Fortigate-Firewall-Complete-Guide


SUPPORT ME – 🚩💲🙏
“Welcome to the FortiGate Firewall Complete Guide! This comprehensive GitHub repository offers detailed lab guides and invaluable information for mastering FortiGate firewalls. Created with countless days and nights of dedication, this guide is entirely free for your benefit. If you find it helpful, please consider showing your support with a coffee ☕️ or your best wishes. Your encouragement fuels the continuation of this resource. Thank you for being part of this journey! 🚀🔥 #FortiGate #Firewall #Networking”
Lab Resources:
- All the labs are simulated on EVE-NG
- Fortigate Firewall Image Used Version: v7.0.9
- Used Cisco Routers and Switches
- Windows Active Directory Used [Windows Server 2019]
- Eve-NG Hosted on VMware Workstation Pro 17.
How can I do Lab?
- You Will Get Fortigate Image: Click here to Download
- All the Images for EVE-NG and GNS3 available here also: Cisco-Images-for-GNS3-and-EVE-NG
- Free VMware Workstation PRO 17 Practice License: VMware-Workstation-Pro-17-Licence-Keys
- Free VMware ESXI License Keys Lab License: VMware-ESXi-License-Keys
Website Version of Full Guide
- Let’s start : click here
Topics to be covered:
| No | Name |
|---|---|
| Module 1 | Introduction to Fortigate Firewall |
| Module 2 | Interface Configurations and Firewall Policies |
| Module 3 | High availability |
| Module 4 | Firewall Authentication |
| Module 5 | Security Profiles |
| Module 6 | Logging and Monitoring |
| Module 7 | Basic IPSEC VPN |
| Module 8 | SSL VPN Upcoming.. |
| Module 9 | ** Upcoming.. |
MODULE 1
Introduction to Fortigate Firewall

Table of Contents:
- Understanding Features of Fortigate
- Fortigaurd Queries & Packages
- UTM firewalls futures
- Platform Design and Architecture
- About CLI
- Getting Mgmt GUI Access
- About Administration Profiles
I. Understanding the Features of FortiGate:
FortiGate is a family of network security appliances developed by Fortinet, designed to provide a wide range of security features to protect networks from various threats. Understanding the features of FortiGate involves grasping its capabilities in different areas of network security. Here’s a detailed breakdown:
- Firewall: FortiGate operates as a firewall, providing traditional packet filtering capabilities to monitor and control the traffic passing through the network based on predefined rules. It can inspect packets at the application layer for more granular control.
- Intrusion Prevention System (IPS): FortiGate includes an IPS module that identifies and blocks malicious activities within the network. It analyzes traffic patterns and signatures to detect and prevent known attacks, such as SQL injection, buffer overflow, and denial-of-service (DoS) attacks.
- Virtual Private Network (VPN): FortiGate supports VPN technologies, allowing secure communication between remote sites or individual users and the corporate network over untrusted networks like the Internet. It offers various VPN types such as SSL VPN, IPsec VPN, and L2TP.
- Antivirus and Antimalware: FortiGate includes antivirus and antimalware functionalities to detect and block malicious software, including viruses, worms, Trojans, and spyware. It can inspect files and URLs in real time to prevent the spread of malware within the network.
- Web Filtering: FortiGate can enforce web filtering policies to control access to websites based on categories, URLs, or specific keywords. It helps organizations enforce acceptable use policies, improve productivity, and mitigate security risks associated with malicious or inappropriate web content.
- Application Control: FortiGate offers application control features to identify and control the usage of various applications within the network. It can classify applications based on their behavior and characteristics, allowing administrators to define policies to permit, deny, or limit access to specific applications.
- Data Loss Prevention (DLP): FortiGate includes DLP capabilities to prevent the unauthorized transmission of sensitive data outside the network. It can inspect outgoing traffic for predefined data patterns such as credit card numbers, social security numbers, or intellectual property, and enforce policies to prevent data leakage.
- Advanced Threat Protection (ATP): FortiGate integrates advanced threat protection mechanisms such as sandboxing and behavior-based analysis to detect and block sophisticated threats like zero-day exploits and targeted attacks. It isolates suspicious files in a sandbox environment to observe their behavior before allowing them into the network.
- Traffic Shaping and Quality of Service (QoS): FortiGate allows administrators to prioritize and control network traffic based on predefined policies. It can allocate bandwidth, enforce traffic shaping rules, and ensure quality of service for critical applications to optimize network performance and user experience.
- Logging and Reporting: FortiGate provides extensive logging and reporting capabilities to track network activity, security events, and policy violations. It generates detailed reports and alerts for administrators to analyze security incidents, troubleshoot issues, and maintain compliance with regulatory requirements.
II. FortiGuard Queries & Packages
FortiGuard is a comprehensive security intelligence service provided by Fortinet that offers real-time updates and protection against emerging threats for Fortinet products, including FortiGate. FortiGuard queries and packages play a crucial role in keeping security solutions up-to-date and effective. Here’s a detailed explanation:
FortiGuard Queries
FortiGuard queries are requests made by Fortinet security products, such as FortiGate firewalls, to the FortiGuard service infrastructure. These queries are initiated to retrieve the latest threat intelligence, security updates, and other relevant information needed to enhance the security posture of the network. Key aspects of FortiGuard queries include:
- Real-time Threat Intelligence: FortiGuard queries fetch real-time threat intelligence data from FortiGuard Labs, Fortinet’s global threat research team. This includes information on new malware signatures, vulnerabilities, zero-day exploits, and other security threats.
- URL Filtering Updates: FortiGuard queries also update URL filtering databases to ensure accurate categorization of websites and protection against web-based threats. This helps in enforcing web filtering policies and blocking access to malicious or inappropriate websites.
- Antivirus and Antimalware Definitions: FortiGuard queries update antivirus and antimalware definitions to detect and block the latest malware strains, including viruses, worms, Trojans, and spyware. This ensures that the security solution can identify and neutralize evolving threats effectively.
- IPS Signatures: FortiGuard queries update intrusion prevention system (IPS) signatures to detect and prevent known network attacks, including vulnerabilities, exploits, and protocol anomalies. Keeping IPS signatures up to date is crucial for protecting against emerging threats and vulnerabilities.
- Application Control Updates: FortiGuard queries fetch updates related to application control, allowing FortiGate firewalls to identify and control the usage of various applications within the network. This includes new application signatures, behavior patterns, and categorization updates.
- DLP Definitions: FortiGuard queries update data loss prevention (DLP) definitions to prevent the unauthorized transmission of sensitive data outside the network. This includes patterns for detecting sensitive information such as credit card numbers, social security numbers, and intellectual property.
FortiGuard Packages
FortiGuard packages are bundles of security updates, intelligence feeds, and definitions provided by Fortinet as part of the FortiGuard subscription service. These packages contain the latest threat intelligence and updates necessary to keep Fortinet security solutions, including FortiGate firewalls, up to date and protected against evolving threats. Key aspects of FortiGuard packages include:
- Comprehensive Security Updates: FortiGuard packages include comprehensive security updates covering multiple aspects of network security, including antivirus, IPS, application control, web filtering, and DLP. These updates are regularly released to ensure timely protection against emerging threats.
- Automatic Delivery: FortiGuard packages are automatically delivered to Fortinet security products, eliminating the need for manual intervention by administrators. This ensures that security solutions are always equipped with the latest threat intelligence and updates without delay.
- Continuous Monitoring and Research: FortiGuard packages are backed by FortiGuard Labs, which continuously monitors global threat landscape, conducts research on emerging threats, and develops security updates and intelligence feeds. This ensures that FortiGuard packages provide effective protection against both known and unknown threats.
- Customization and Configuration: FortiGuard packages can be customized and configured based on the specific security requirements of an organization. Administrators can define update schedules, select specific update components, and prioritize critical updates to align with their security policies and compliance requirements.
- Integration with Security Fabric: FortiGuard packages seamlessly integrate with Fortinet’s Security Fabric, allowing coordinated threat response and sharing of threat intelligence across various Fortinet security products. This enables a unified security posture and enhances the overall effectiveness of the security infrastructure.
III. Understanding UTM (Unified Threat Management) Firewalls and FortiGate
UTM (Unified Threat Management) Firewalls, like FortiGate, are known for their comprehensive approach to network security. Here’s a detailed explanation of why FortiGate is considered a UTM firewall and an overview of UTM firewall features:
Why FortiGate is a UTM Firewall ?.
FortiGate is commonly referred to as a UTM firewall due to its integration of multiple security features into a single platform. Instead of relying on separate devices for various security functions, FortiGate consolidates these functionalities into a unified solution. This integration offers several advantages:
- Centralized Management: With FortiGate, administrators can manage all security policies, configurations, and monitoring from a single interface, simplifying network management and reducing complexity.
- Streamlined Deployment: Deploying a UTM firewall like FortiGate eliminates the need for multiple devices, reducing hardware costs, space requirements, and deployment complexities associated with managing multiple security appliances.
- Improved Performance: By integrating security functions into a single platform, FortiGate can optimize performance and resource utilization, ensuring efficient operation without compromising on security effectiveness.
- Holistic Security Posture: FortiGate provides a comprehensive security posture by combining essential security features such as firewall, VPN, intrusion prevention, antivirus, web filtering, and application control into a single solution. This approach offers a more holistic defense against a wide range of threats.
UTM Firewall Features
UTM firewalls like FortiGate typically offer a wide range of security features to protect networks from various threats. Here’s an overview of key UTM firewall features:
- Firewall: UTM firewalls include traditional packet filtering capabilities to monitor and control network traffic based on predefined rules. They can inspect packets at the application layer for granular control.
- Intrusion Prevention System (IPS): UTM firewalls incorporate an IPS module to detect and block known and unknown network attacks, including exploits, vulnerabilities, and protocol anomalies.
- Virtual Private Network (VPN): UTM firewalls support VPN technologies for secure communication between remote sites or individual users and the corporate network over untrusted networks like the internet.
- Antivirus and Antimalware: UTM firewalls provide antivirus and antimalware functionalities to detect and block malicious software, including viruses, worms, Trojans, and spyware.
- Web Filtering: UTM firewalls enforce web filtering policies to control access to websites based on categories, URLs, or specific keywords, helping organizations enforce acceptable use policies and mitigate security risks.
- Application Control: UTM firewalls offer application control features to identify and control the usage of various applications within the network, allowing administrators to define policies to permit, deny, or limit access to specific applications.
- Data Loss Prevention (DLP): UTM firewalls include DLP capabilities to prevent the unauthorized transmission of sensitive data outside the network by inspecting outgoing traffic for predefined data patterns.
- Advanced Threat Protection (ATP): UTM firewalls integrate advanced threat protection mechanisms such as sandboxing and behavior-based analysis to detect and block sophisticated threats like zero-day exploits and targeted attacks.
- Traffic Shaping and Quality of Service (QoS): UTM firewalls allow administrators to prioritize and control network traffic based on predefined policies, optimizing network performance and user experience.
- Logging and Reporting: UTM firewalls provide extensive logging and reporting capabilities to track network activity, security events, and policy violations, enabling administrators to analyze security incidents and maintain compliance.
IV. FortiGate Firewall Platform Design and Architecture
FortiGate is a next-generation firewall platform designed to deliver comprehensive network security and performance. Its architecture consists of various components working together to provide advanced threat protection, network segmentation, and secure connectivity. Let’s explore each component in detail:

1. Processing Units
a. CPU (Central Processing Unit)
The CPU is the core processing unit responsible for executing firewall operations, packet processing, and running various security services. FortiGate utilizes multi-core CPUs to handle high-throughput traffic and complex security functions efficiently.
b. NP (Network Processor)
FortiGate includes specialized network processors, such as FortiASIC NP6 and NP7, dedicated to offloading and accelerating specific tasks like packet forwarding, encryption/decryption, and content processing. These NP chips enhance firewall performance and scalability.
2. Security Services
a. Firewall
The firewall component enforces security policies by inspecting and filtering network traffic based on predefined rules, ensuring only authorized traffic flows through the network.
b. IPS (Intrusion Prevention System)
The IPS module detects and prevents known and unknown network attacks by analyzing traffic patterns, signatures, and behavior anomalies, protecting against exploits, malware, and vulnerabilities.
c. VPN (Virtual Private Network)
FortiGate supports various VPN technologies, including IPsec, SSL, and L2TP, to establish secure communication channels between remote sites, users, and partners over untrusted networks like the internet.
d. Antivirus and Antimalware
FortiGate includes antivirus and antimalware services to detect and block malicious software, such as viruses, worms, Trojans, and spyware, preventing them from infecting the network.
e. Web Filtering
The web filtering feature controls access to websites based on categories, URLs, or keywords, allowing organizations to enforce acceptable use policies, block malicious sites, and improve productivity.
f. Application Control
FortiGate offers application control capabilities to identify and control the usage of various applications within the network, allowing administrators to define policies to permit, deny, or limit access to specific applications.
g. DLP (Data Loss Prevention)
DLP functionality prevents the unauthorized transmission of sensitive data outside the network by inspecting outgoing traffic for predefined data patterns such as credit card numbers, social security numbers, or intellectual property.
h. ATP (Advanced Threat Protection)
FortiGate integrates advanced threat protection mechanisms, including sandboxing and behavior-based analysis, to detect and block sophisticated threats like zero-day exploits and targeted attacks.
3. Networking Components
a. Interfaces
FortiGate includes physical and virtual network interfaces to connect to various network segments, enabling traffic ingress/egress and network segmentation for security and performance optimization.
b. Routing
FortiGate supports dynamic and static routing protocols to route traffic between different network segments efficiently and securely, ensuring optimal network performance and connectivity.
c. VLANs (Virtual Local Area Networks)
VLANs allow FortiGate to segment the network into multiple virtual LANs, isolating traffic and improving security, scalability, and performance across large and complex networks.
4. Management and Reporting
a. Management Interface
FortiGate provides a web-based management interface, command-line interface (CLI), and centralized management platforms (FortiManager) for configuring, monitoring, and managing firewall policies, security services, and network settings.
b. Logging and Reporting
FortiGate logs network activity, security events, and policy violations, generating detailed reports and alerts for administrators to analyze security incidents, troubleshoot issues, and maintain compliance with regulatory requirements.
FortiGate’s platform design and architecture leverage these components to deliver robust network security, performance, and scalability for modern enterprise environments.
Three Families of Fortinet SPUs(Security Processing Units):
- NETWORK PROCESSOR 7 (NP7)
- CONTENT PROCESSOR 9 (CP9)
- SECURITY PROCESSING UNIT (SP5)

Link: https://www.fortinet.com/products/fortigate/fortiasic
V. FortiGate Firewall CLI
The FortiGate firewall Command Line Interface (CLI) provides administrators with a powerful and flexible tool for configuring, monitoring, and troubleshooting the firewall. Here’s an explanation of the FortiGate firewall CLI:
Overview of FortiGate CLI
The CLI is accessed using SSH or through the console port directly connected to the firewall device. It provides a text-based interface where administrators can execute commands to perform various tasks related to firewall configuration and management.
Key Features and Functions
1. Configuration Management
- Configuration Hierarchy: FortiGate CLI follows a hierarchical structure where configuration settings are organized into nested levels, such as system, interface, firewall policy, etc.
- Configuration Commands: Administrators can use CLI commands to view, modify, and commit configuration changes. Commands include
show,get,set,edit,delete,execute, andend.
2. Monitoring and Troubleshooting
- Status Monitoring: CLI commands provide real-time monitoring of system status, interface statistics, CPU and memory usage, VPN connections, and more.
- Diagnostic Tools: FortiGate CLI includes diagnostic tools such as
ping,traceroute,diag sniff, anddiag debugcommands to troubleshoot network connectivity issues and analyze traffic flow.
3. Security Policy Management
- Firewall Policies: Administrators can define and manage firewall policies using CLI commands to control traffic flow between different network segments based on source/destination IP, port, protocol, and security profiles.
- Security Profiles: CLI allows configuring security profiles such as antivirus, IPS, web filtering, and application control to enforce security policies and protect against threats.
4. VPN Configuration
- VPN Tunnels: CLI commands enable administrators to configure IPsec, SSL, and other types of VPN tunnels to establish secure communication channels between remote sites, users, and partners.
- VPN Monitoring: Administrators can monitor VPN connections, view tunnel status, and troubleshoot VPN-related issues using CLI commands.
5. System Administration
- System Configuration: CLI provides commands to configure system settings, including hostname, time zone, DNS, NTP, SNMP, logging, and administrative access controls.
- User Management: Administrators can manage user accounts, authentication methods, and access permissions using CLI commands.
Advantages of FortiGate CLI
- Granular Control: CLI offers granular control over firewall configuration settings, allowing administrators to customize settings according to specific requirements.
- Scripting and Automation: CLI commands can be scripted and automated using shell scripts or automation tools, facilitating batch configuration changes and streamlining repetitive tasks.
- Direct Access: CLI provides direct access to firewall configuration without the need for a graphical user interface (GUI), making it suitable for advanced users and troubleshooting scenarios.
VI. Getting Management GUI Access of FortiGate Firewall
Accessing the management GUI (Graphical User Interface) of a FortiGate firewall allows administrators to configure and manage the firewall using a web-based interface. Here’s how to obtain management GUI access:
- Connect to the FortiGate Firewall
First, establish a connection to the FortiGate firewall. This can be done through the console port directly connected to the firewall device or via SSH (Secure Shell) if remote access is enabled.
# Example SSH command to connect to the FortiGate firewall
ssh admin@<firewall_ip_address>
2. Enable Management Access
Ensure that management access is enabled on the FortiGate firewall. By default, HTTPS (HTTP over SSL) access is enabled on port 443 for management GUI access.
# Example command to enable HTTPS access
config system settings
    set admin-https-ssl-port 443
    set gui-mgmt https
    end
3. Configure Administrative Access
Configure administrative access credentials to log in to the management GUI. Ensure that the admin user has the necessary privileges to access and manage the firewall.
# Example command to configure administrative access
config system admin
    edit admin
        set password <admin_password>
    next
end
4. Access the Management GUI
Once management access is enabled and administrative credentials are configured, access the management GUI using a web browser. Enter the IP address of the FortiGate firewall in the browser’s address bar and log in with the administrative credentials.
https://<firewall_ip_address>
Additional Considerations
- Firewall Rules: Ensure that firewall rules permit traffic to the management interface (usually port 443 for HTTPS) from the IP addresses or networks that require access to the management GUI.
- Security: Use strong, unique passwords for administrative access and regularly update them to enhance security.
- Logging and Monitoring: Monitor access to the management GUI and enable logging to track administrative activities for auditing and security purposes.
Demo:

Default Username: admin
Password:
Configure the new strong Password
Sample Topology:

Initial CLI Conifguration for GUI access:

Taking GUI Admin Access: http://105.0.0.254


Changing Firewall Hostname: FGT


Welcome to Fortigate Firewall Dashboard

VII. Administration Profiles in FortiGate Firewall
Administration profiles in FortiGate firewall provide a flexible way to manage administrative access and privileges within the firewall. They allow administrators to define specific permissions and restrictions for different users or groups, ensuring secure and efficient management of the firewall. Here’s an in-depth look at administration profiles:
Overview
Administration profiles serve as templates that define the access rights and capabilities of administrators or administrative groups. Each profile specifies the level of access to various firewall functionalities, including configuration, monitoring, and management tasks.
Key Components
1. Access Controls
- Permissions: Administration profiles define permissions for different firewall functionalities, such as configuration changes, system settings, security policies, and VPN configurations.
- Granularity: Profiles can be configured with granular access controls, allowing administrators to assign specific permissions based on their roles and responsibilities.
2. User Authentication
- Authentication Methods: Administration profiles specify the authentication methods used to verify the identity of administrators, including local authentication, RADIUS, LDAP, or TACACS+.
- Authentication Servers: Profiles can be configured to authenticate users against multiple authentication servers for redundancy and flexibility.
3. Administrative Privileges
- Role-based Access: Administration profiles support role-based access control (RBAC), allowing administrators to assign different roles with varying levels of privileges.
- Super Administrators: Super administrators have unrestricted access to all firewall functionalities and settings, while other administrators may have limited privileges based on their assigned profiles.
4. Session Management
- Session Limits: Administration profiles can define session limits to control the number of concurrent administrative sessions allowed per user or group.
- Timeouts: Profiles specify session timeouts to automatically log out inactive administrators, enhancing security and resource management.
Configuration and Management
1. Profile Creation
- Creation: Administration profiles are created and configured through the FortiGate firewall’s web-based management GUI or Command Line Interface (CLI).
- Naming Conventions: Profiles are assigned unique names for easy identification and management.
2. Profile Assignment
- Assignment to Administrators: Once created, administration profiles are assigned to individual administrators or administrative groups based on their roles and responsibilities.
- Multiple Profiles: Administrators can be assigned multiple profiles to accommodate complex access requirements.
Demo:
Click on Administrator: System —> Administrator

By default Super_Admin

Set the username/password also select as a Local user:

Create the new Administrator Profile for the new user

Select the Permission Which you want to give and click Ok.
Note:
The idle timeout period is the amount of time that an administrator will stay logged in to the GUI without any activity. This is to prevent someone from accessing the FortiGate if the management PC is left unattended. By default, it is set to five minutes.

Select newly created Profile and Click OK.


Newly created Admin :

Administrator Profile Hierachy:

Summary:
The module provided a basic introduction to FortiGate firewall, covering various aspects of the product:
- Understanding Features of FortiGate: Explains the features and capabilities of FortiGate firewall, highlighting its advanced threat protection, network segmentation, and secure connectivity.
- FortiGuard Queries & Packages: Discusses FortiGuard services, including threat intelligence and security updates provided by Fortinet, enhancing the effectiveness of the firewall in detecting and preventing threats.
- UTM Firewalls Features: Describes UTM (Unified Threat Management) features of FortiGate, which include firewall, intrusion prevention, antivirus, web filtering, and application control, offering comprehensive protection against various cyber threats.
- Platform Design and Architecture: Explores the design and architecture of FortiGate firewall, including its processing units, security services, networking components, and management features.
- About CLI: Provides an overview of the FortiGate Command Line Interface (CLI), which allows administrators to configure, monitor, and troubleshoot the firewall using text-based commands.
- Getting Mgmt GUI Access: Details the steps to access the management GUI (Graphical User Interface) of FortiGate firewall, allowing administrators to configure and manage the firewall through a web-based interface.
- About Administration Profiles: Discusses administration profiles in FortiGate, which define access rights and privileges for administrators or administrative groups, ensuring secure and efficient management of the firewall.
MODULE 2
Interface Configurations and Firewall Policies

Table of contents:
- Basic Interface Configuration
- configure static and dynamic routing
- Configuring DHCP
- Basic Firewall Policies
- Network Address Translation - Fortigate
- Virtual Wire configuration
I. Basic Interface Configuration
Configuring interfaces on a FortiGate firewall is essential for establishing network connectivity and defining traffic flow. Here’s a detailed guide on how to perform basic interface configuration using commands:
1. Connect to the FortiGate Firewall
Before configuring interfaces, establish a connection to the FortiGate firewall using SSH or through the console port directly connected to the firewall device.
Example SSH command to connect to the FortiGate firewall
ssh admin@<firewall_ip_address>
2. Enter Configuration Mode
Enter configuration mode to make changes to the firewall’s configuration. You will need to enter the global configuration context to configure interfaces.
# Enter global configuration mode
config system global
3. Configure Physical Interfaces
FortiGate firewalls have physical interfaces (e.g., Ethernet ports) that connect to the network. Configure the desired physical interfaces with appropriate IP addresses and other settings.
# Example command to configure physical interface
edit system interface
    edit <interface_name>
        set ip <ip_address> <subnet_mask>
    next
end
4. Configure VLAN Interfaces (Optional)
If VLANs (Virtual Local Area Networks) are used to segment the network, configure VLAN interfaces and assign them to the desired physical interfaces.
# Example command to configure VLAN interface
edit system interface
    edit <vlan_interface_name>
        set vlanid <vlan_id>
        set ip <ip_address> <subnet_mask>
    next
end
5. Configure Virtual Interfaces (Optional)
Virtual interfaces such as loopback interfaces can be configured for various purposes, such as management or routing.
# Example command to configure loopback interface
edit system interface
    edit <loopback_interface_name>
        set ip <ip_address> <subnet_mask>
    next
end
6. Configure Default Gateway
Specify the default gateway for the firewall to enable outbound traffic routing to external networks.
# Example command to configure default gateway
config router static
    edit 1
        set gateway <gateway_ip_address>
end
7. Save Configuration Changes
Save the configuration changes to persist them across reboots.
# Save configuration
end
8. Considerations
- Interface Naming: Use meaningful names for interfaces to easily identify their purpose and location.
- Security Policies: After configuring interfaces, create firewall policies to control traffic flow between interfaces and enforce security rules.
- Monitoring: Regularly monitor interface status and traffic to detect any issues or anomalies.
Demo:
Sample Lab topology:

The Management Interface Configurations we have done through CLI:

Configure the as per the below image:
Steps:
- Add Alias LAN or any meaningful name to identify the LAN
- Set the role as LAN as per our Topology.
- Select Manual and assign IP for interface(port2)
- Allow the only required Protocols
- Make sure the Interface status is Enabled.
- Save the configurations by clicking OK.

NOTE: Also we can configure the interfaces via CLI
# LAN port2 interface

config system interface
edit port2
set mode static
set ip 10.1.1.100/24
set allowaccess ping
set alias "LAN"
set role lan
end

# WAN port3 interface

config system interface
edit port3
set mode static
set ip 192.168.1.100/24
set allowaccess ping
set alias "WAN"
set role wan
end

# DMZ port4 interface

config system interface
edit port4
set mode static
set ip 172.16.1.100/24
set allowaccess ping
set alias "DMZ"
set role dmz
end

# To see the configuration on CLI

show system interface
Configure the remaining WAN & DMZ interfaces same as the previous one.

II. Configuring Static and Dynamic Routing on FortiGate Firewall
Routing is a critical function in network devices like FortiGate firewalls, enabling the forwarding of traffic between different networks. Here’s a detailed guide on how to configure static and dynamic routing using commands:
1. Connect to the FortiGate Firewall
Before configuring routing, establish a connection to the FortiGate firewall using SSH or through the console port directly connected to the firewall device.
# Example SSH command to connect to the FortiGate firewall
ssh admin@<firewall_ip_address>
2. Enter Configuration Mode
Enter configuration mode to make changes to the firewall’s configuration. You will need to enter the global configuration context to configure routing.
# Enter global configuration mode
config system global
3. Configure Static Routes
Static routes are manually configured routes that define the next-hop IP address for destinations not directly connected to the firewall.
# Example command to configure a static route
config router static
    edit 1
        set dst <destination_network> <subnet_mask>
        set gateway <next_hop_ip_address>
end
4. Configure Dynamic Routing Protocols
FortiGate firewalls support dynamic routing protocols such as OSPF (Open Shortest Path First) and BGP (Border Gateway Protocol) for dynamic route exchange and network convergence.
4.1. OSPF Configuration
# Example command to configure OSPF
config router ospf
    set router-id <router_id>
    config area
        edit <area_id>
            set network <area_network> <area_subnet_mask>
    end
    config redistribute connected
        set status enable
    end
end
4.2. BGP Configuration
# Example command to configure BGP
config router bgp
    set as <autonomous_system_number>
    config neighbor
        edit <neighbor_ip_address>
            set remote-as <neighbor_as_number>
            set capability-default-originate enabl
    end
end
5. Verify Routing Configuration
After configuring static and dynamic routing, verify the routing table and routing protocol status to ensure correct configuration.
# Example command to view routing table
get router info routing-table

# Example command to view OSPF neighbor status
get router info ospf neighbor

# Example command to view BGP neighbor status
get router info bgp neighbor
6. Save Configuration Changes
Save the configuration changes to persist them across reboots.
# Save configuration
end
7. Considerations
- Route Summarization: Use route summarization to reduce the size of the routing table and optimize routing efficiency.
- Redundancy: Implement redundancy and failover mechanisms such as ECMP (Equal-Cost Multi-Path) and HA (High Availability) to ensure network availability and reliability.
- Security Policies: After configuring routing, create appropriate firewall policies to control traffic flow between networks and enforce security rules.
Demo:
All the Routing Parts will be available Network Tab Section:

We can configure the Static Route towards Our Wifi Router/GW to get the internet access.
Steps:
- Go to Network —> Static Routes
- Click on Create New

Assign the Wifi Router IP address, Make it Destination 0.0.0.0/0.0.0.0 Any Any
- By default, it takes the WAN interface.
- click on OK to save the configurations.

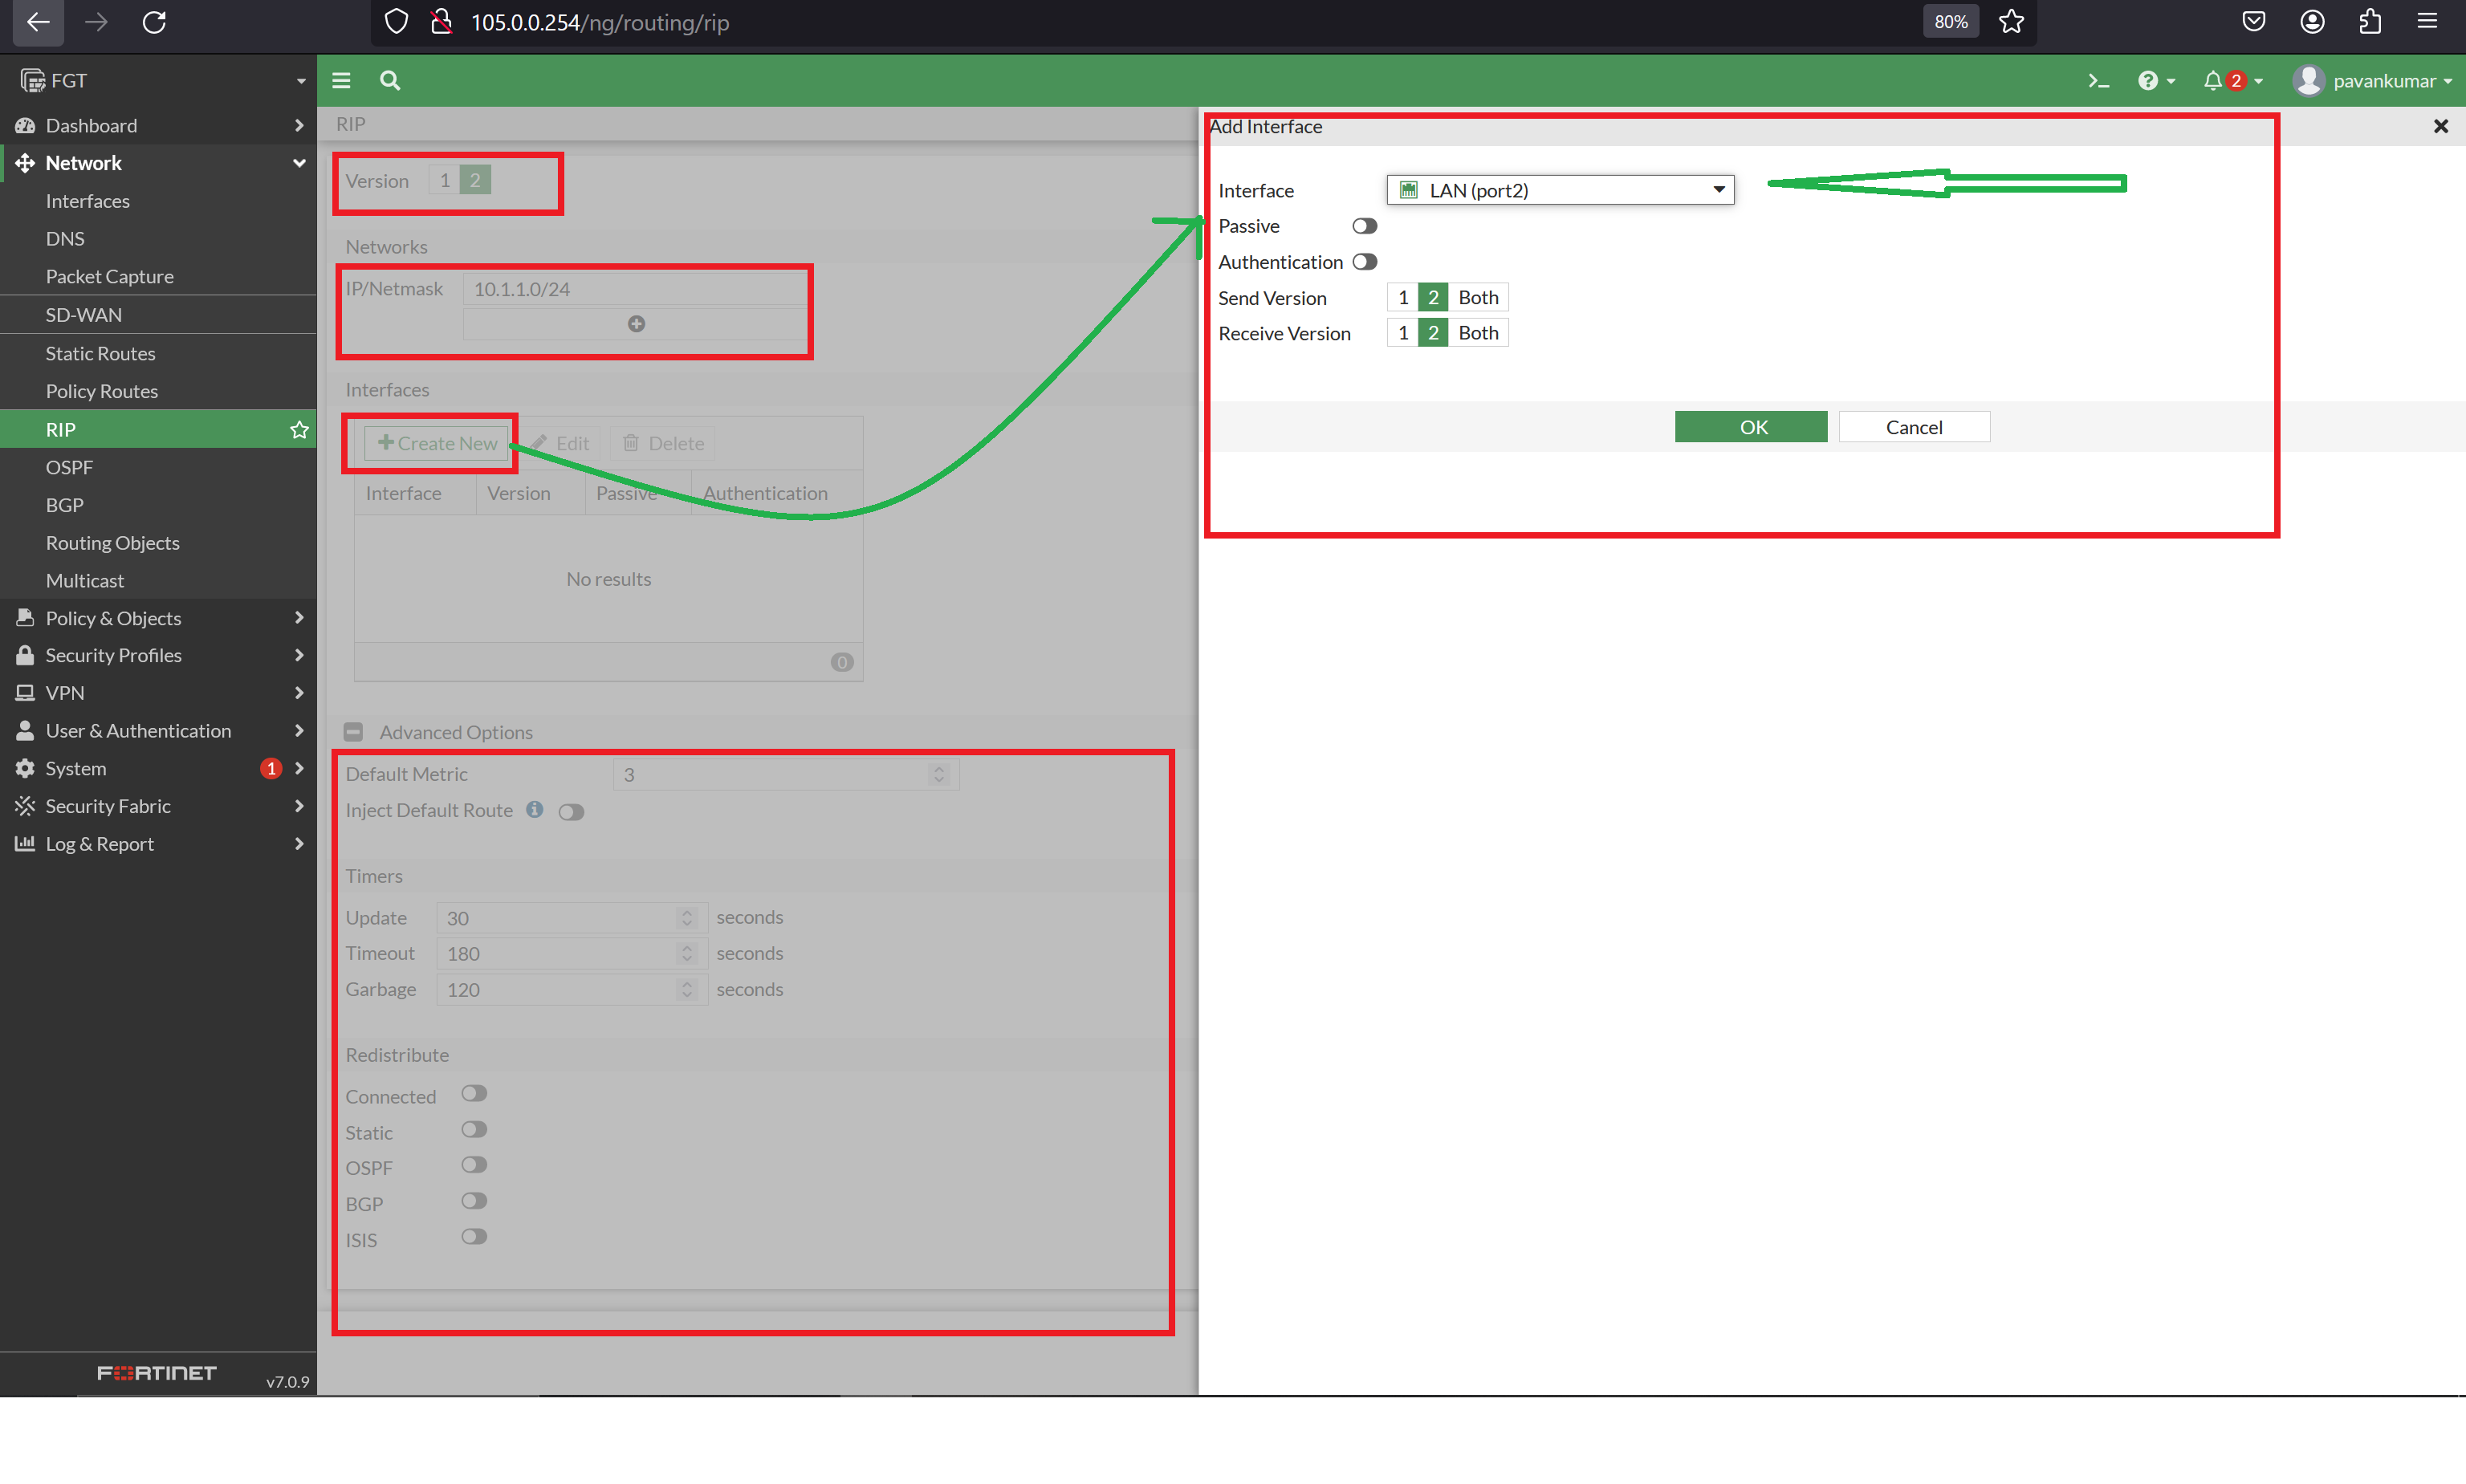
To configure dynamic routing protocols like RIPv2, OSPF, BGP
Steps to configure RIPv2:
- select the required version
- and enter the network/subnet that you want
- if any passive interface or authentication is configured make sure that match the md5 key.
- make sure that the Hello and Hold timers are matching.
- If any redistribute want to do turn on the toggle-specific protocol.
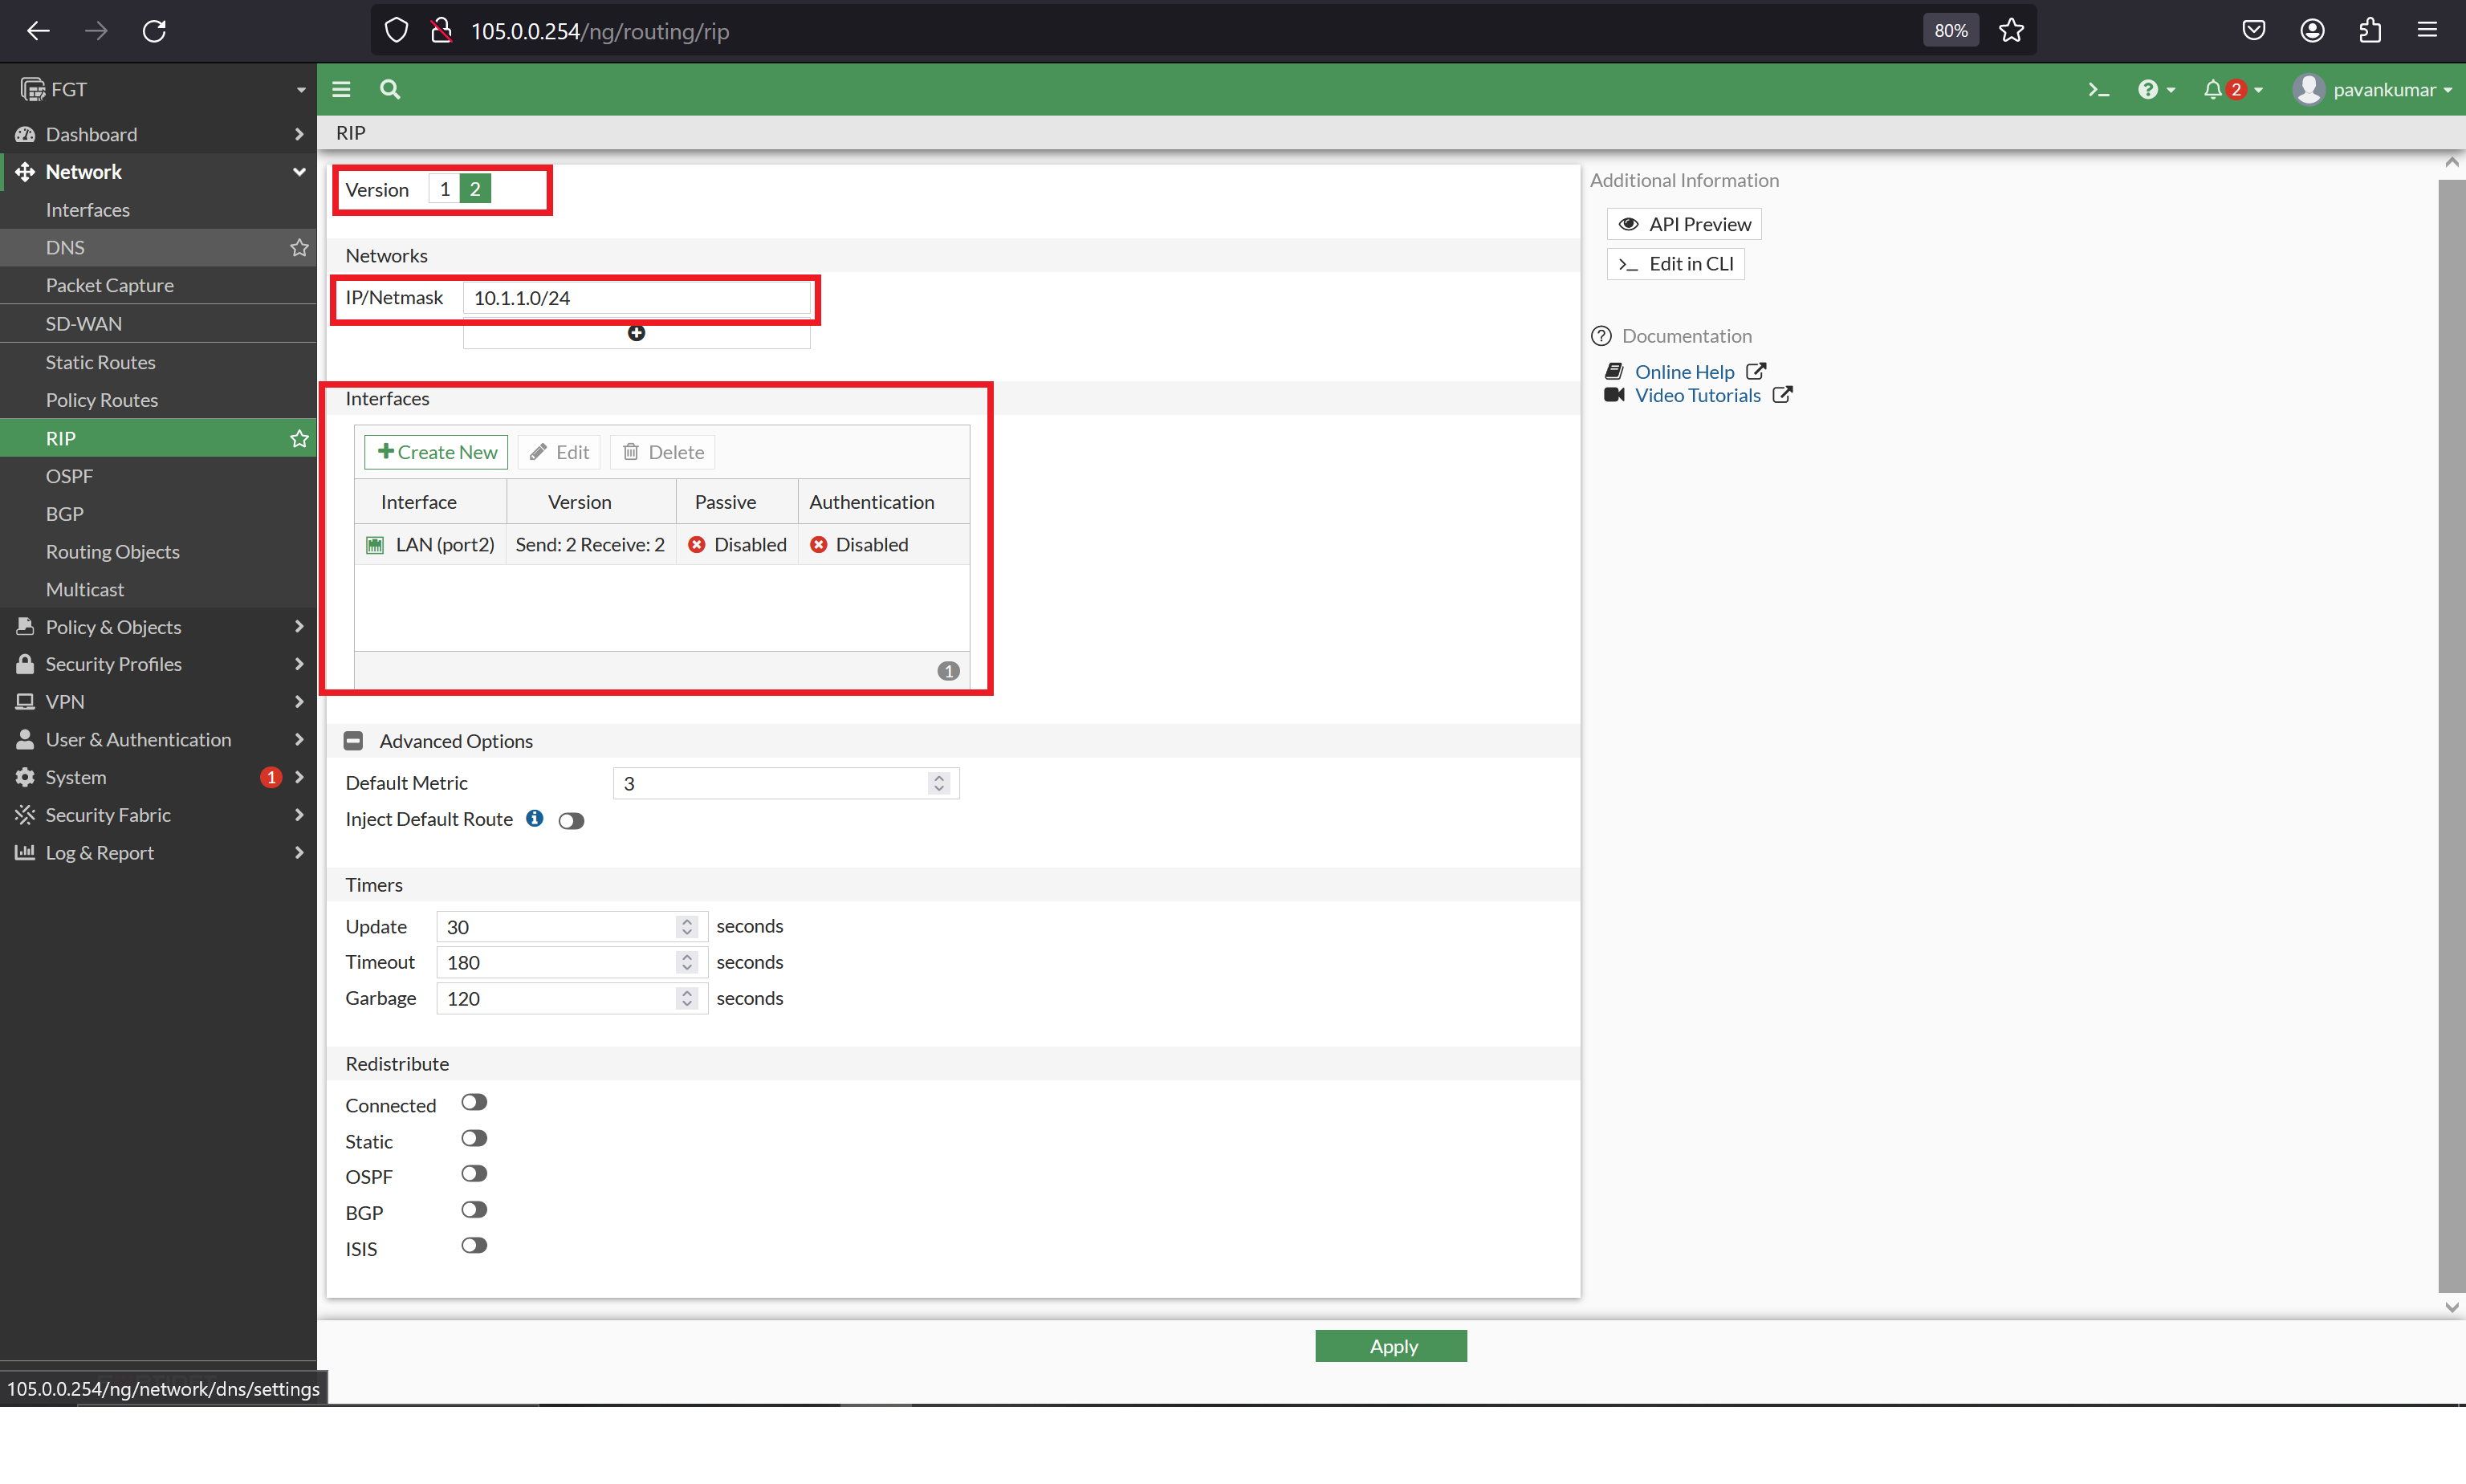
Follow the Image with your real network and conditions.
III. Configuring DHCP Server Pool for LAN Interface on FortiGate Firewall
Configuring a DHCP server pool on the LAN interface of a FortiGate firewall allows local users to obtain IP addresses automatically, simplifying network management. Here’s a detailed guide on how to configure the DHCP server pool for local users:
1. Connect to the FortiGate Firewall
Before configuring DHCP, establish a connection to the FortiGate firewall using SSH or through the console port directly connected to the firewall device.
# Example SSH command to connect to the FortiGate firewall
ssh admin@<firewall_ip_address>
2. Enter Configuration Mode
Enter configuration mode to make changes to the firewall’s configuration. You will need to enter the system interface context to configure the LAN interface.
# Enter system interface configuration mode
config system interface
3. Configure LAN Interface
If not already configured, configure the LAN interface with an IP address and subnet mask.
# Example command to configure LAN interface
edit <lan_interface_name>
    set ip <ip_address> <subnet_mask>
    set allowaccess ping https ssh
    set dhcp-server enable
    set dhcp-server-option lease-time <lease_time_in_seconds>
    set dhcp-server-option default-gateway <gateway_ip_address>
    set dhcp-server-ip-range <start_ip_address> <end_ip_address>
end
<lan_interface_name>: Name of the LAN interface (e.g., “lan”).<ip_address>: IP address of the LAN interface.<subnet_mask>: Subnet mask of the LAN interface.<lease_time_in_seconds>: Lease time for IP addresses (in seconds).<gateway_ip_address>: Default gateway IP address for DHCP clients.<start_ip_address>: Start IP address of the DHCP IP pool.<end_ip_address>: End IP address of the DHCP IP pool.
4. Configure DNS Server (Optional)
Optionally, configure DNS server settings for DHCP clients.
# Example command to configure DNS server for DHCP clients
set dhcp-server-option dns-server <dns_server_ip_address>
5. Save Configuration Changes
Save the configuration changes to persist them across reboots.
# Save configuration
end
6. Considerations
- DHCP Lease Time: Adjust the DHCP lease time based on network requirements and usage patterns.
- IP Address Range: Ensure that the DHCP IP address range does not overlap with statically assigned IP addresses or other DHCP pools.
- DNS Configuration: Provide accurate DNS server information to DHCP clients for name resolution.
- Security: Limit access to DHCP configuration and ensure proper firewall policies are in place to protect the DHCP service from unauthorized access.
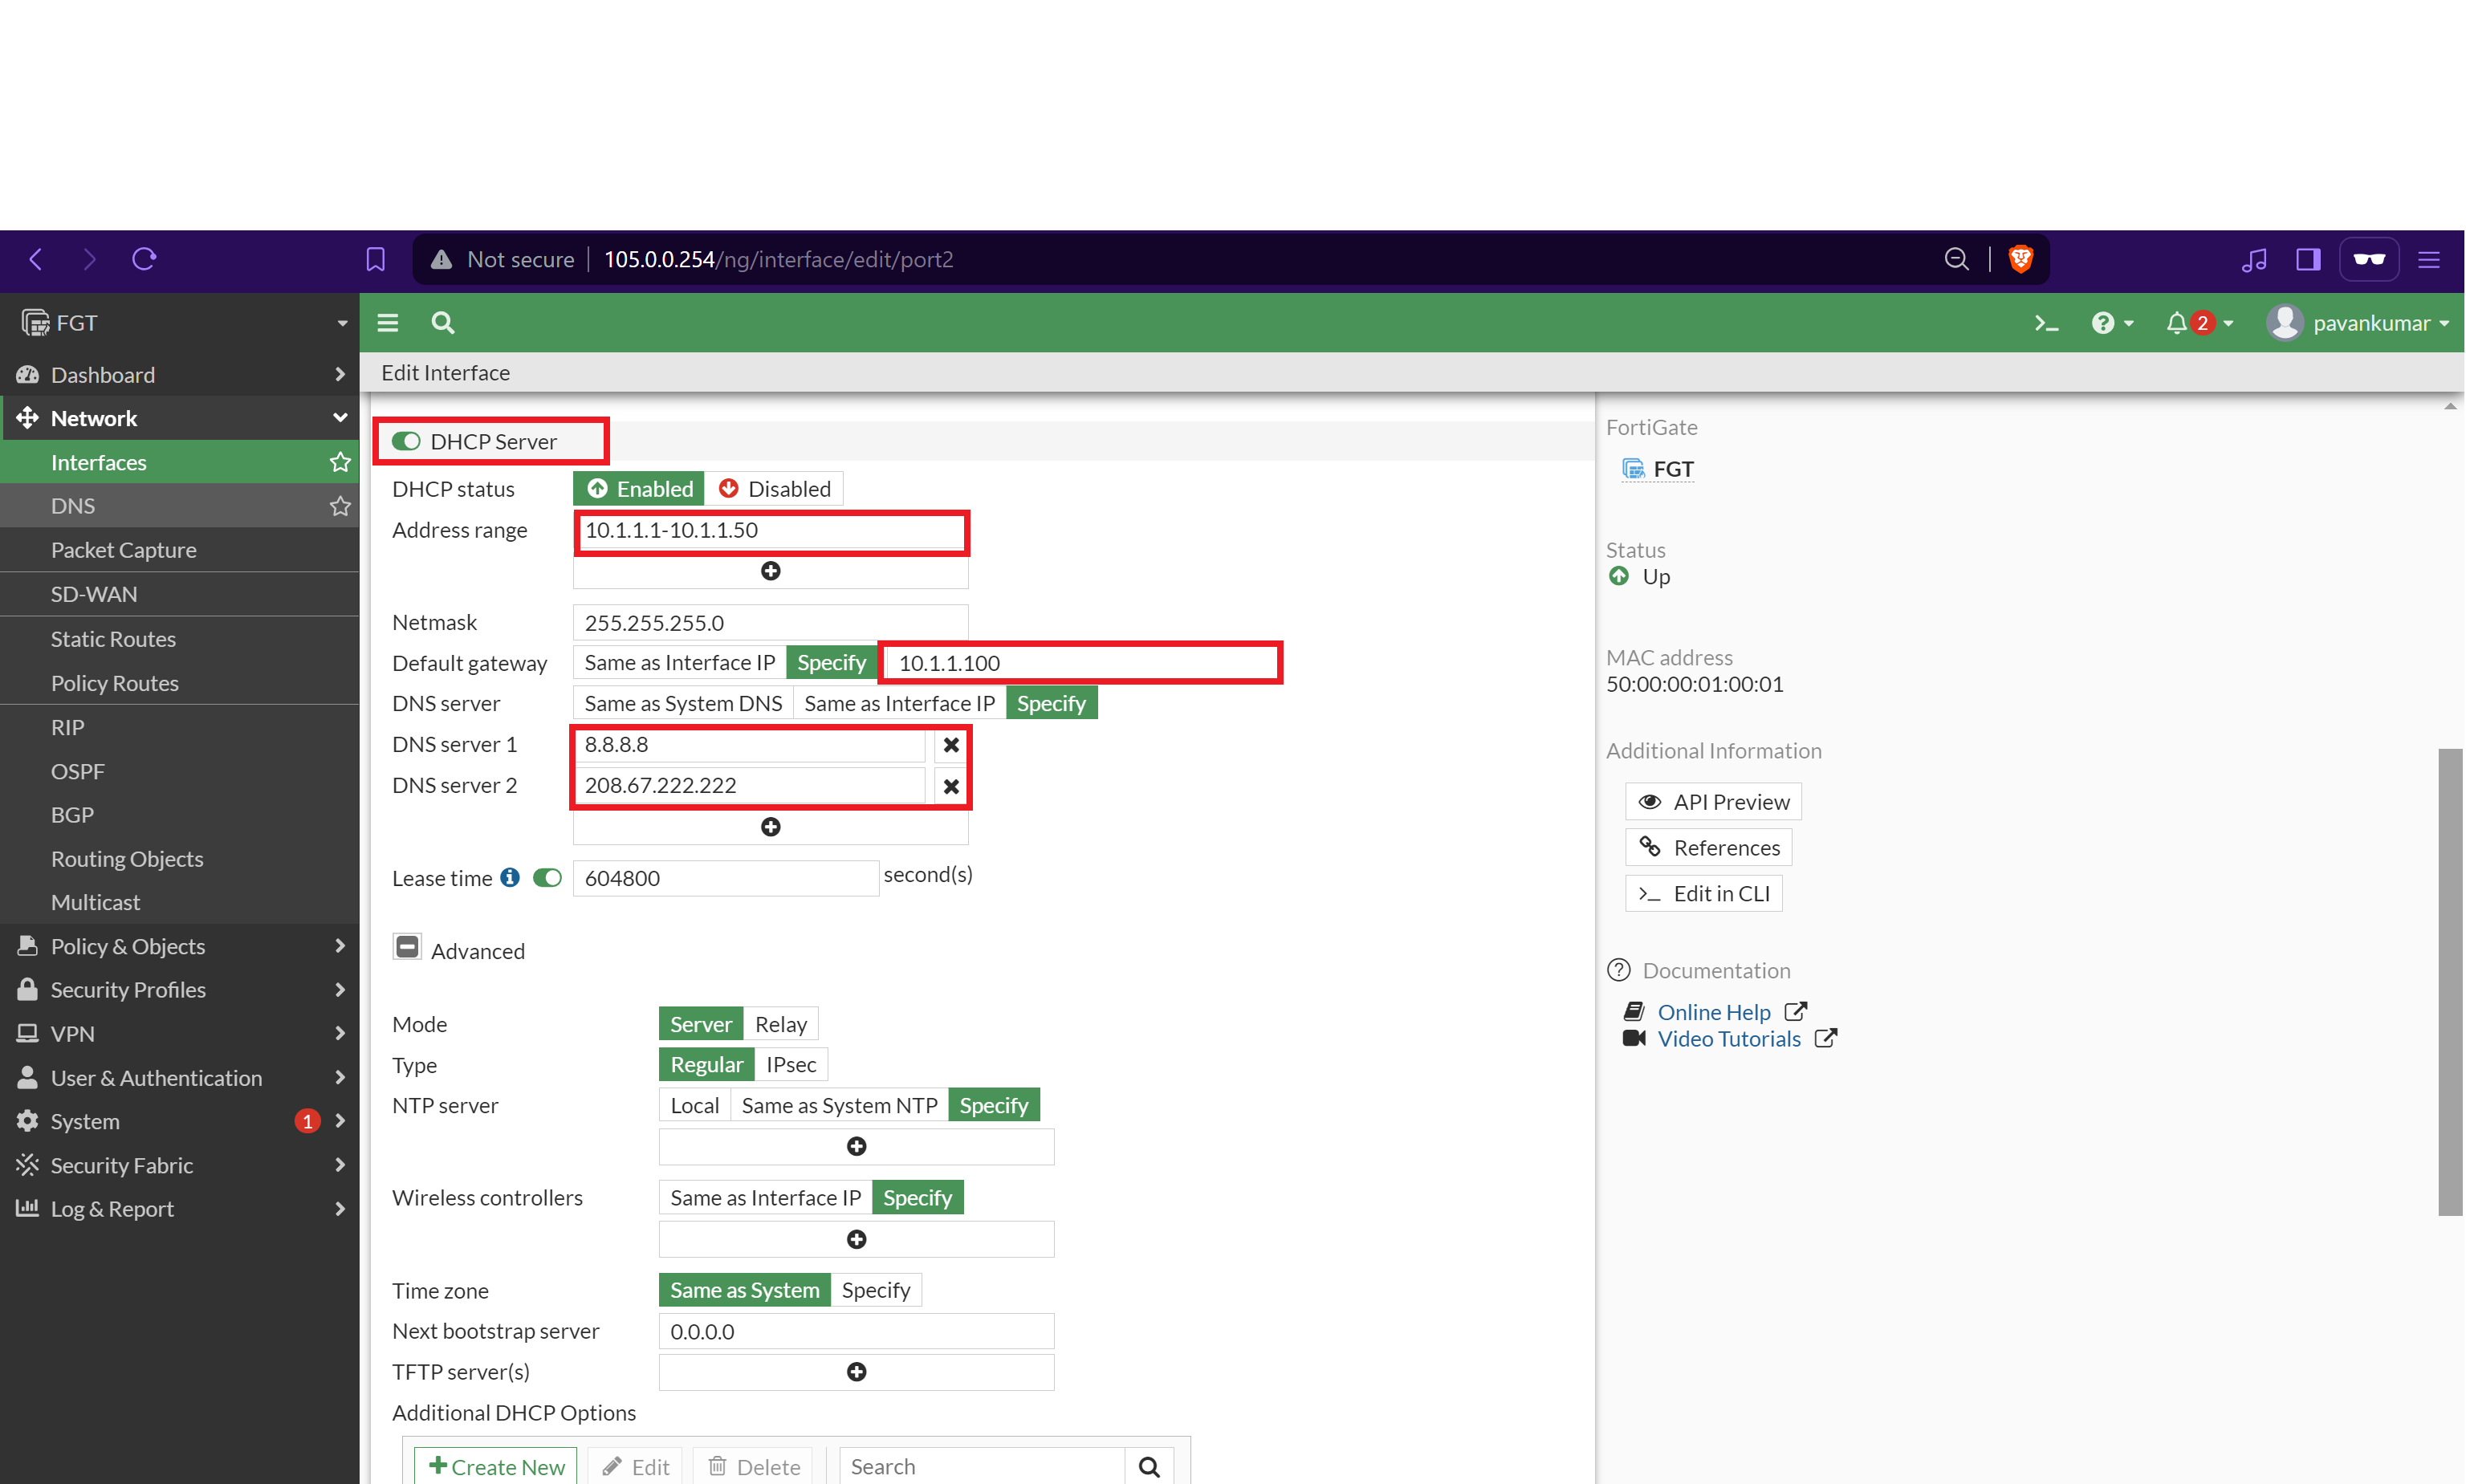
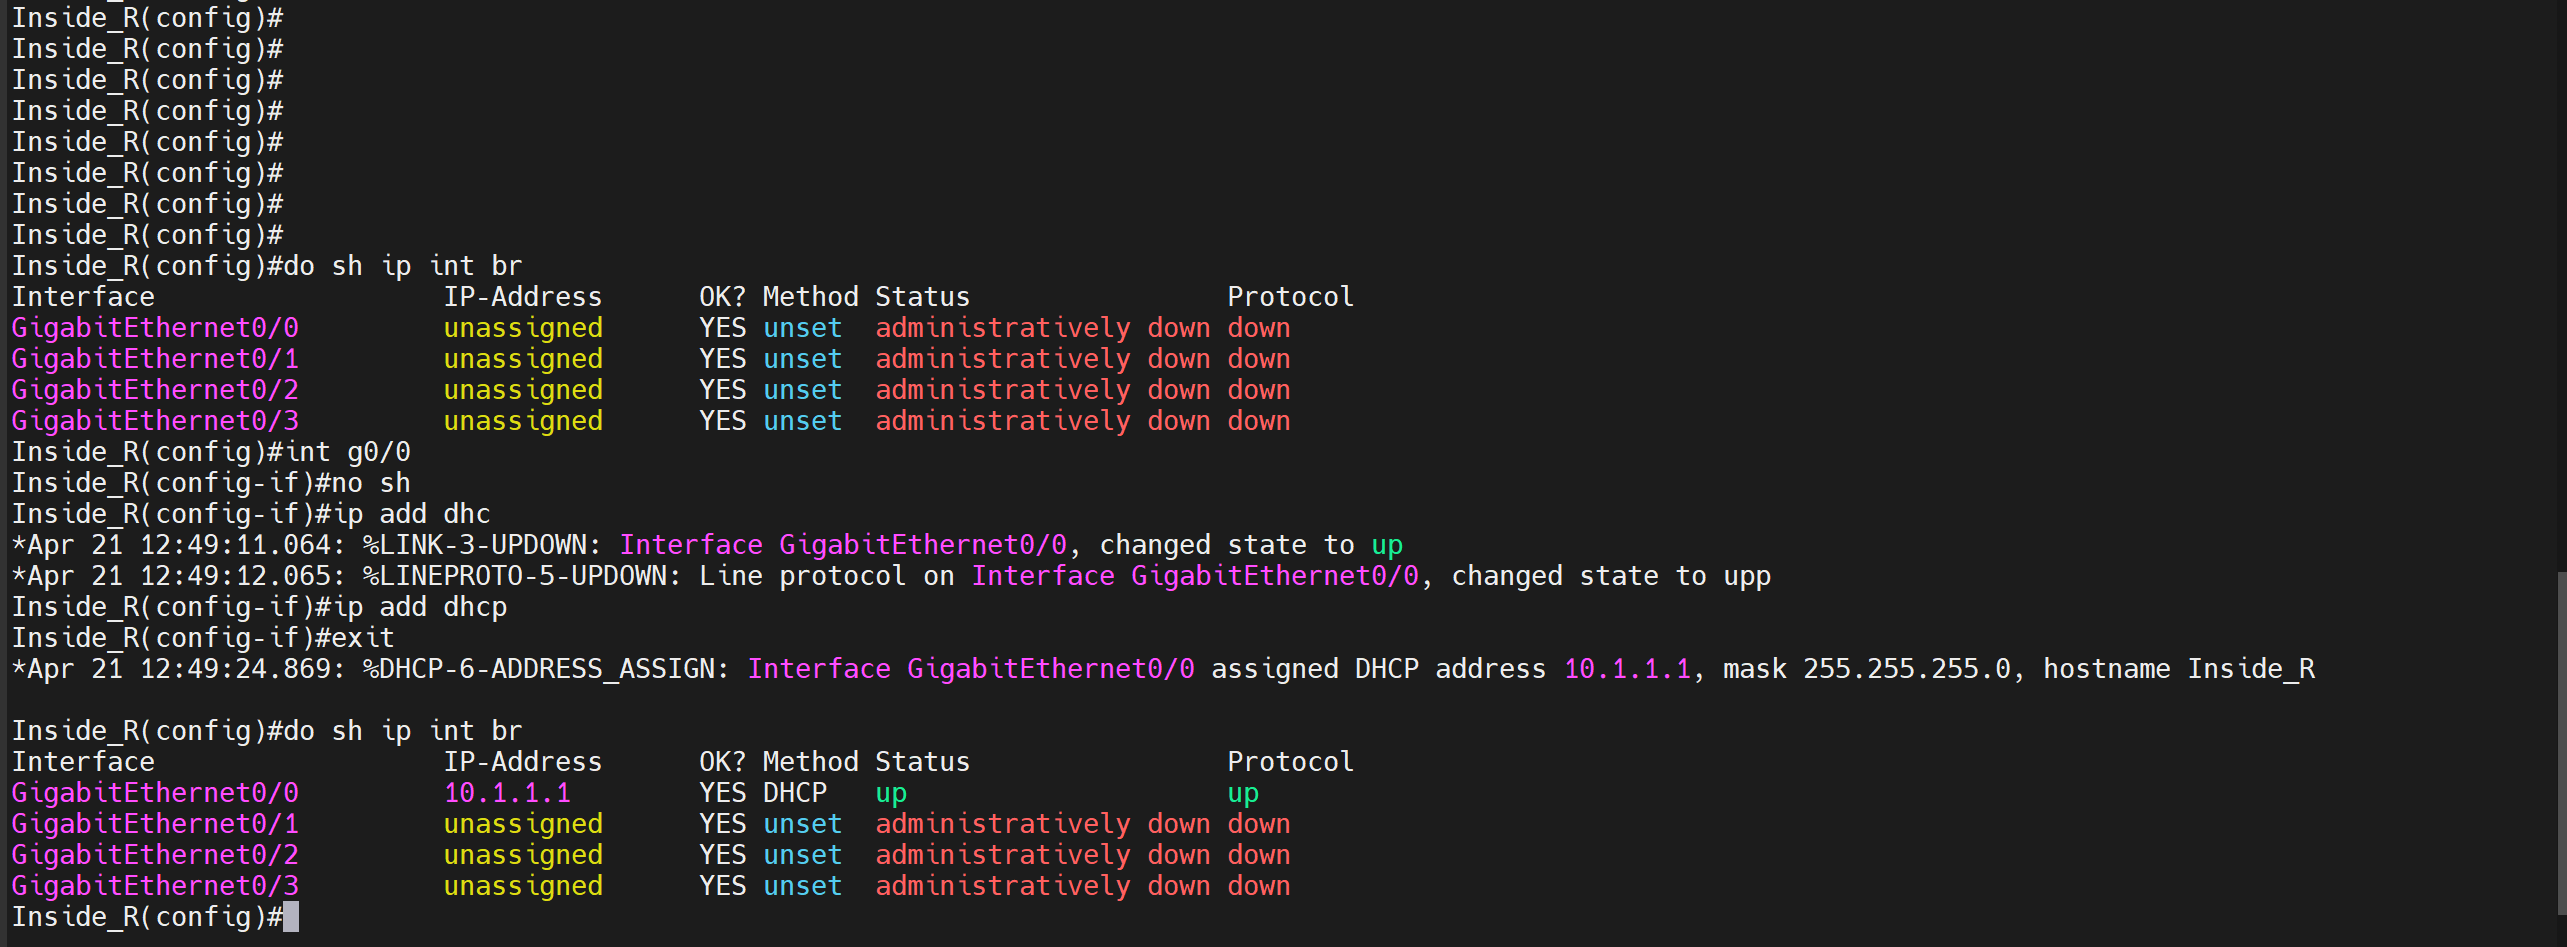
Demo:
To configure the DHCP server go to Network —> Interface —> port2(LAN)
- enable the DHCP server toggle
- set the IP range by excluding the static IP- to avoid the conflict of IP’s
- set the netmask and default gateway as interface IP
- set the DNS server addresses- any
- set the lease time as your requirement
- set apply to save the config.
IV. FortiGate Firewall: Basic Firewall Policies Configuration and Theory
Firewall policies on the FortiGate firewall define how traffic is allowed or denied between different network segments. Understanding basic firewall policy configurations and the theory behind rule-by-fault behavior is essential for effective network security. Here’s a detailed explanation:
1. Firewall Policies Overview
Firewall policies are rules that dictate the flow of traffic through the firewall. Each policy consists of conditions, actions, and security profiles. Policies are evaluated in sequence, and the first matching policy is applied to the traffic.
2. Basic Firewall Policy Configuration
2.1. Policy Conditions
- Source and Destination: Specify the source and destination IP addresses or address groups for the traffic.
- Service: Define the protocol and port number or service group used by the traffic.
- Schedule: Optionally, restrict when the policy is active based on a defined schedule.
- Action: Specify whether the traffic is allowed, denied, or logged.
2.2. Policy Actions
- Accept: Allow the traffic to pass through the firewall.
- Deny: Block the traffic and generate a log entry.
- Monitor: Log the traffic but allow it to pass through the firewall.
2.3. Security Profiles
- Antivirus: Scan files for viruses and malware.
- Intrusion Prevention System (IPS): Detect and prevent network-based attacks.
- Web Filtering: Block access to malicious or inappropriate websites.
- Application Control: Control access to specific applications and protocols.
3. Theory: Rule by Default Behavior
FortiGate firewall follows the rule by default behavior, where traffic that does not match any firewall policy is implicitly denied by default. This behavior ensures that only explicitly permitted traffic is allowed to traverse the firewall, enhancing network security.
4. Implicit Deny All Policy
By default, FortiGate firewall includes an implicit “Deny All” policy at the end of the policy list. This policy denies all traffic that does not match any preceding policy. Administrators can modify this behavior by adding specific allow policies above the “Deny All” policy.
5. Best Practices
- Rule Ordering: Arrange firewall policies from most specific to least specific to ensure that traffic matches the intended policy.
- Logging: Enable logging for deny actions to monitor and analyze network traffic effectively.
- Regular Review: Periodically review and update firewall policies to adapt to changes in network requirements and security threats.
6. Example Configuration
config firewall policy
    edit 1
        set srcintf "internal"
        set dstintf "external"
        set srcaddr "all"
        set dstaddr "all"
        set action accept
        set schedule "always"
        set service "ALL"
        set logtraffic all
end
Demo:
To configure policy go to Policy & Objects —> Firewall Policy
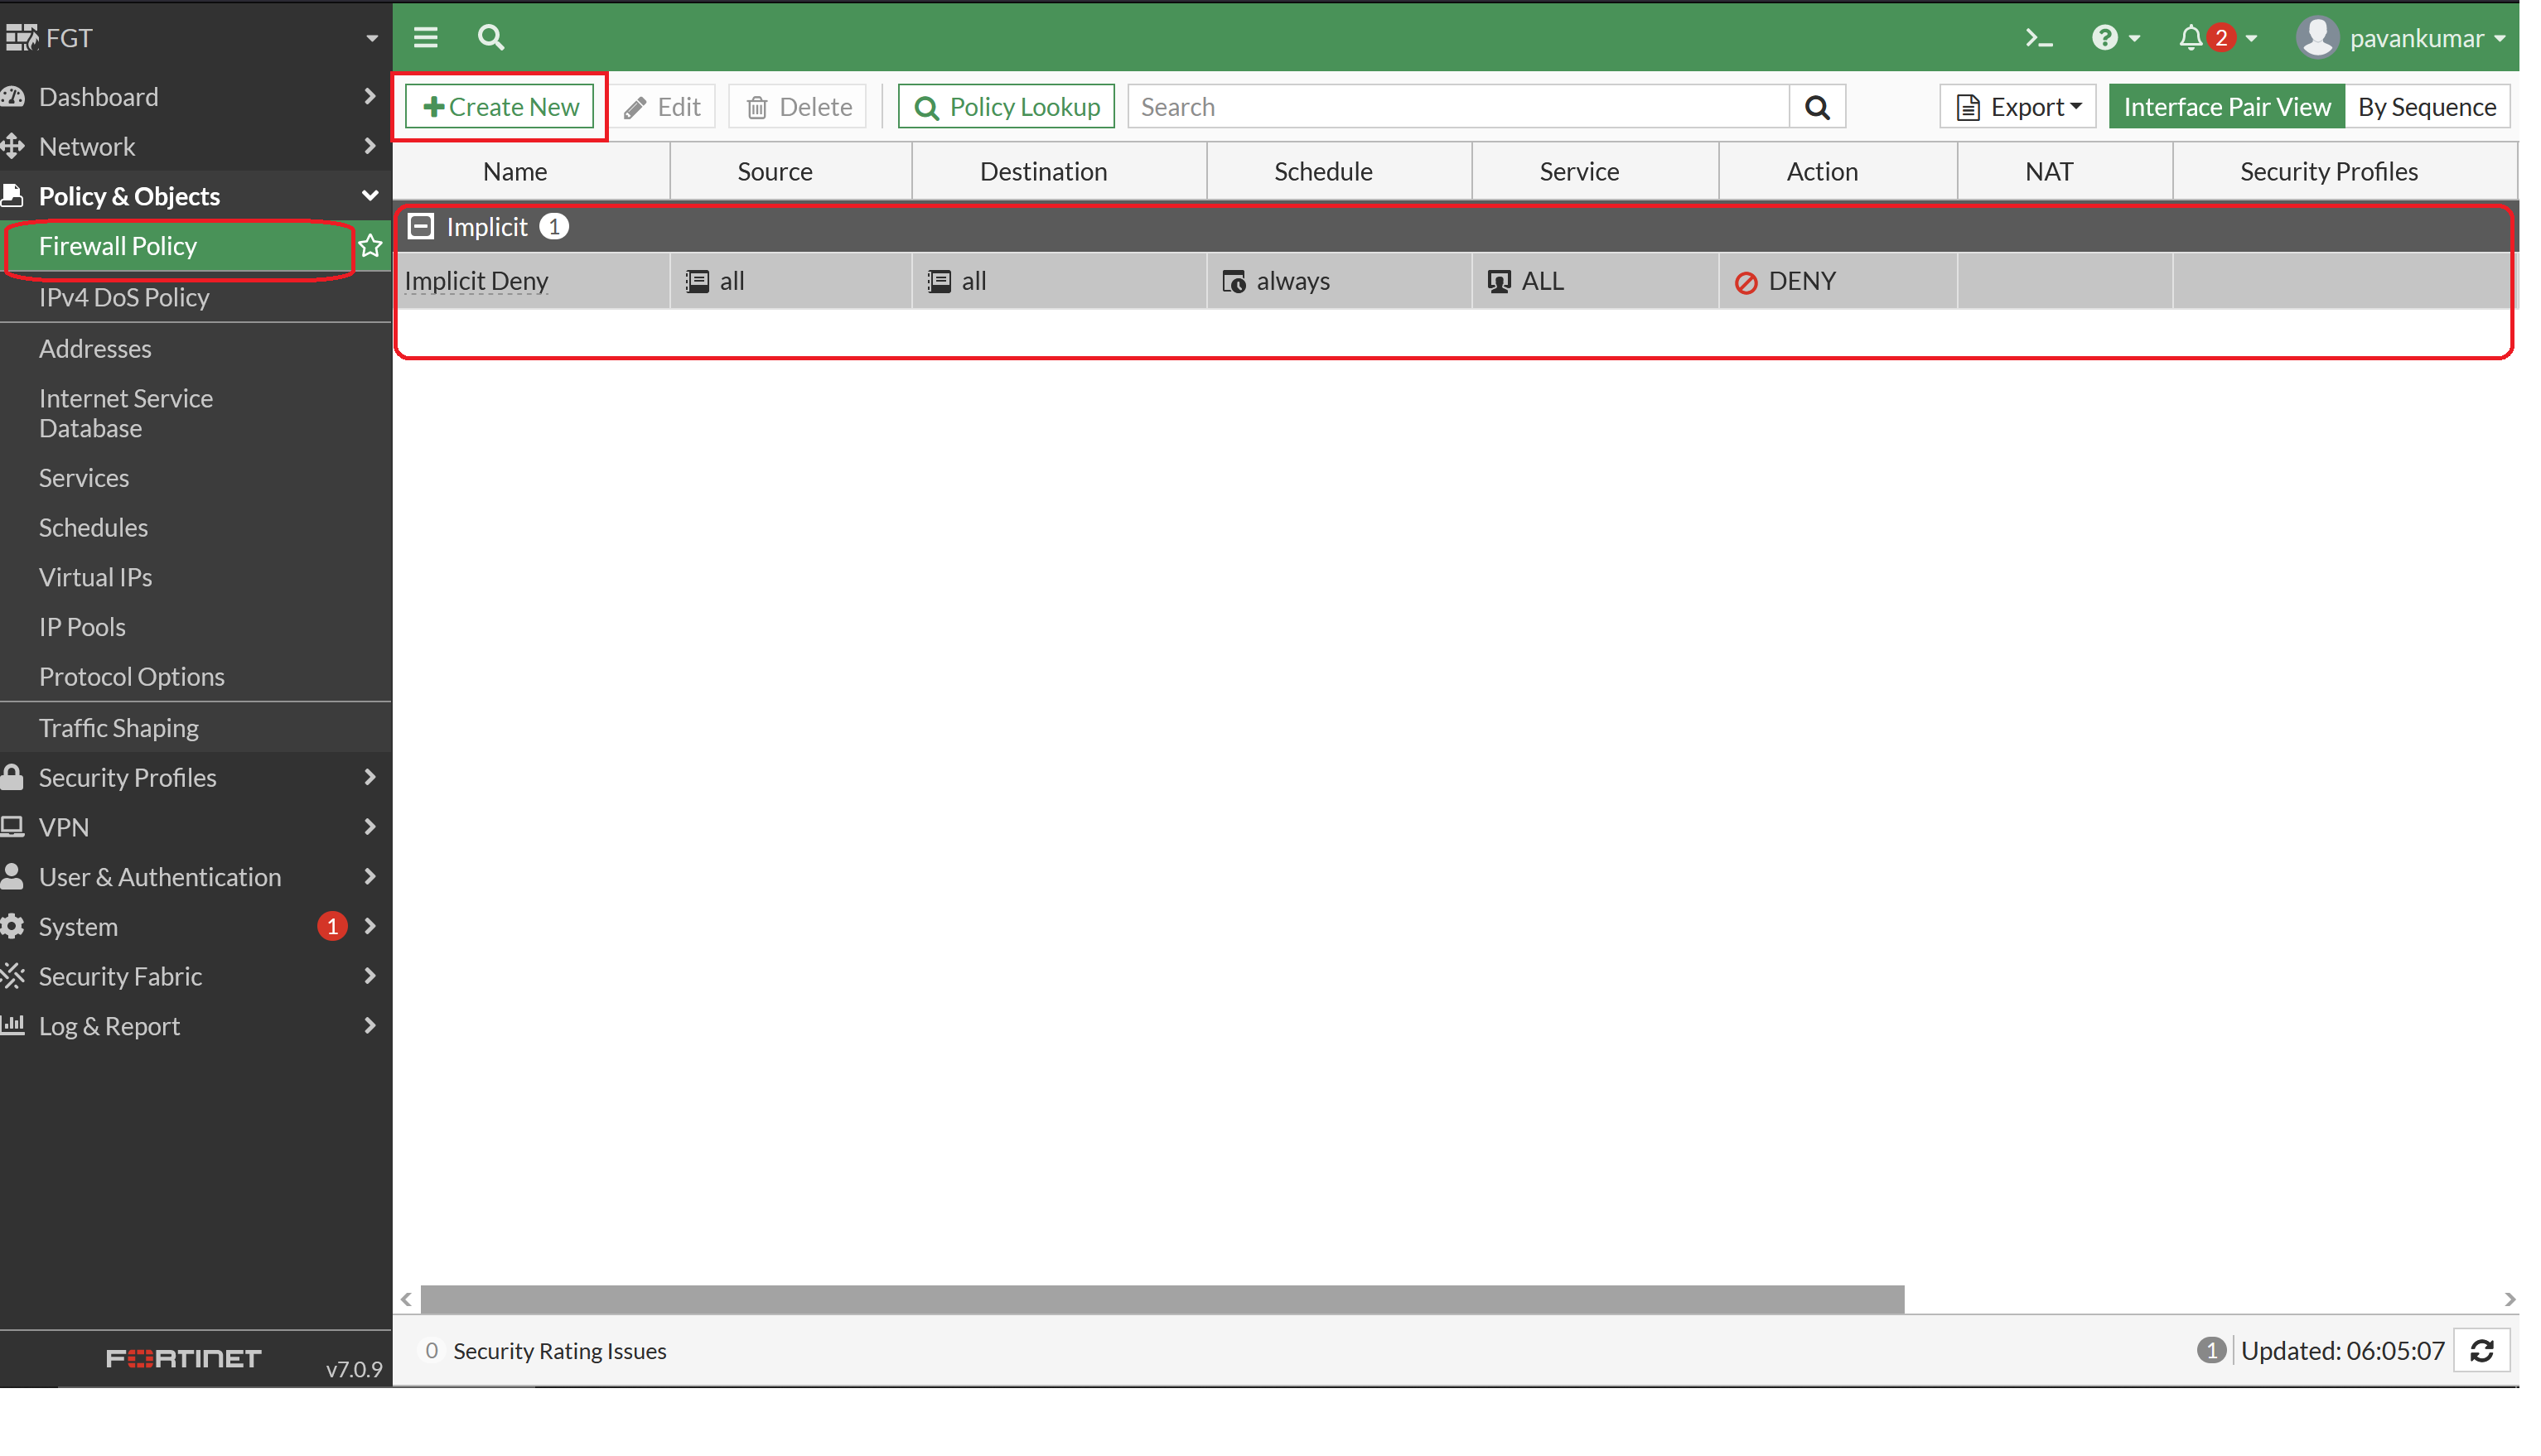
- There will be one by default policy present - Implicit deny
- by clicking create new we can create a new policy on top of Implicit deny.
- It will override the Implicit deny policy.
- For example any traffic does not match with configured policy, it will discards the packet as per the implicit deny policy.
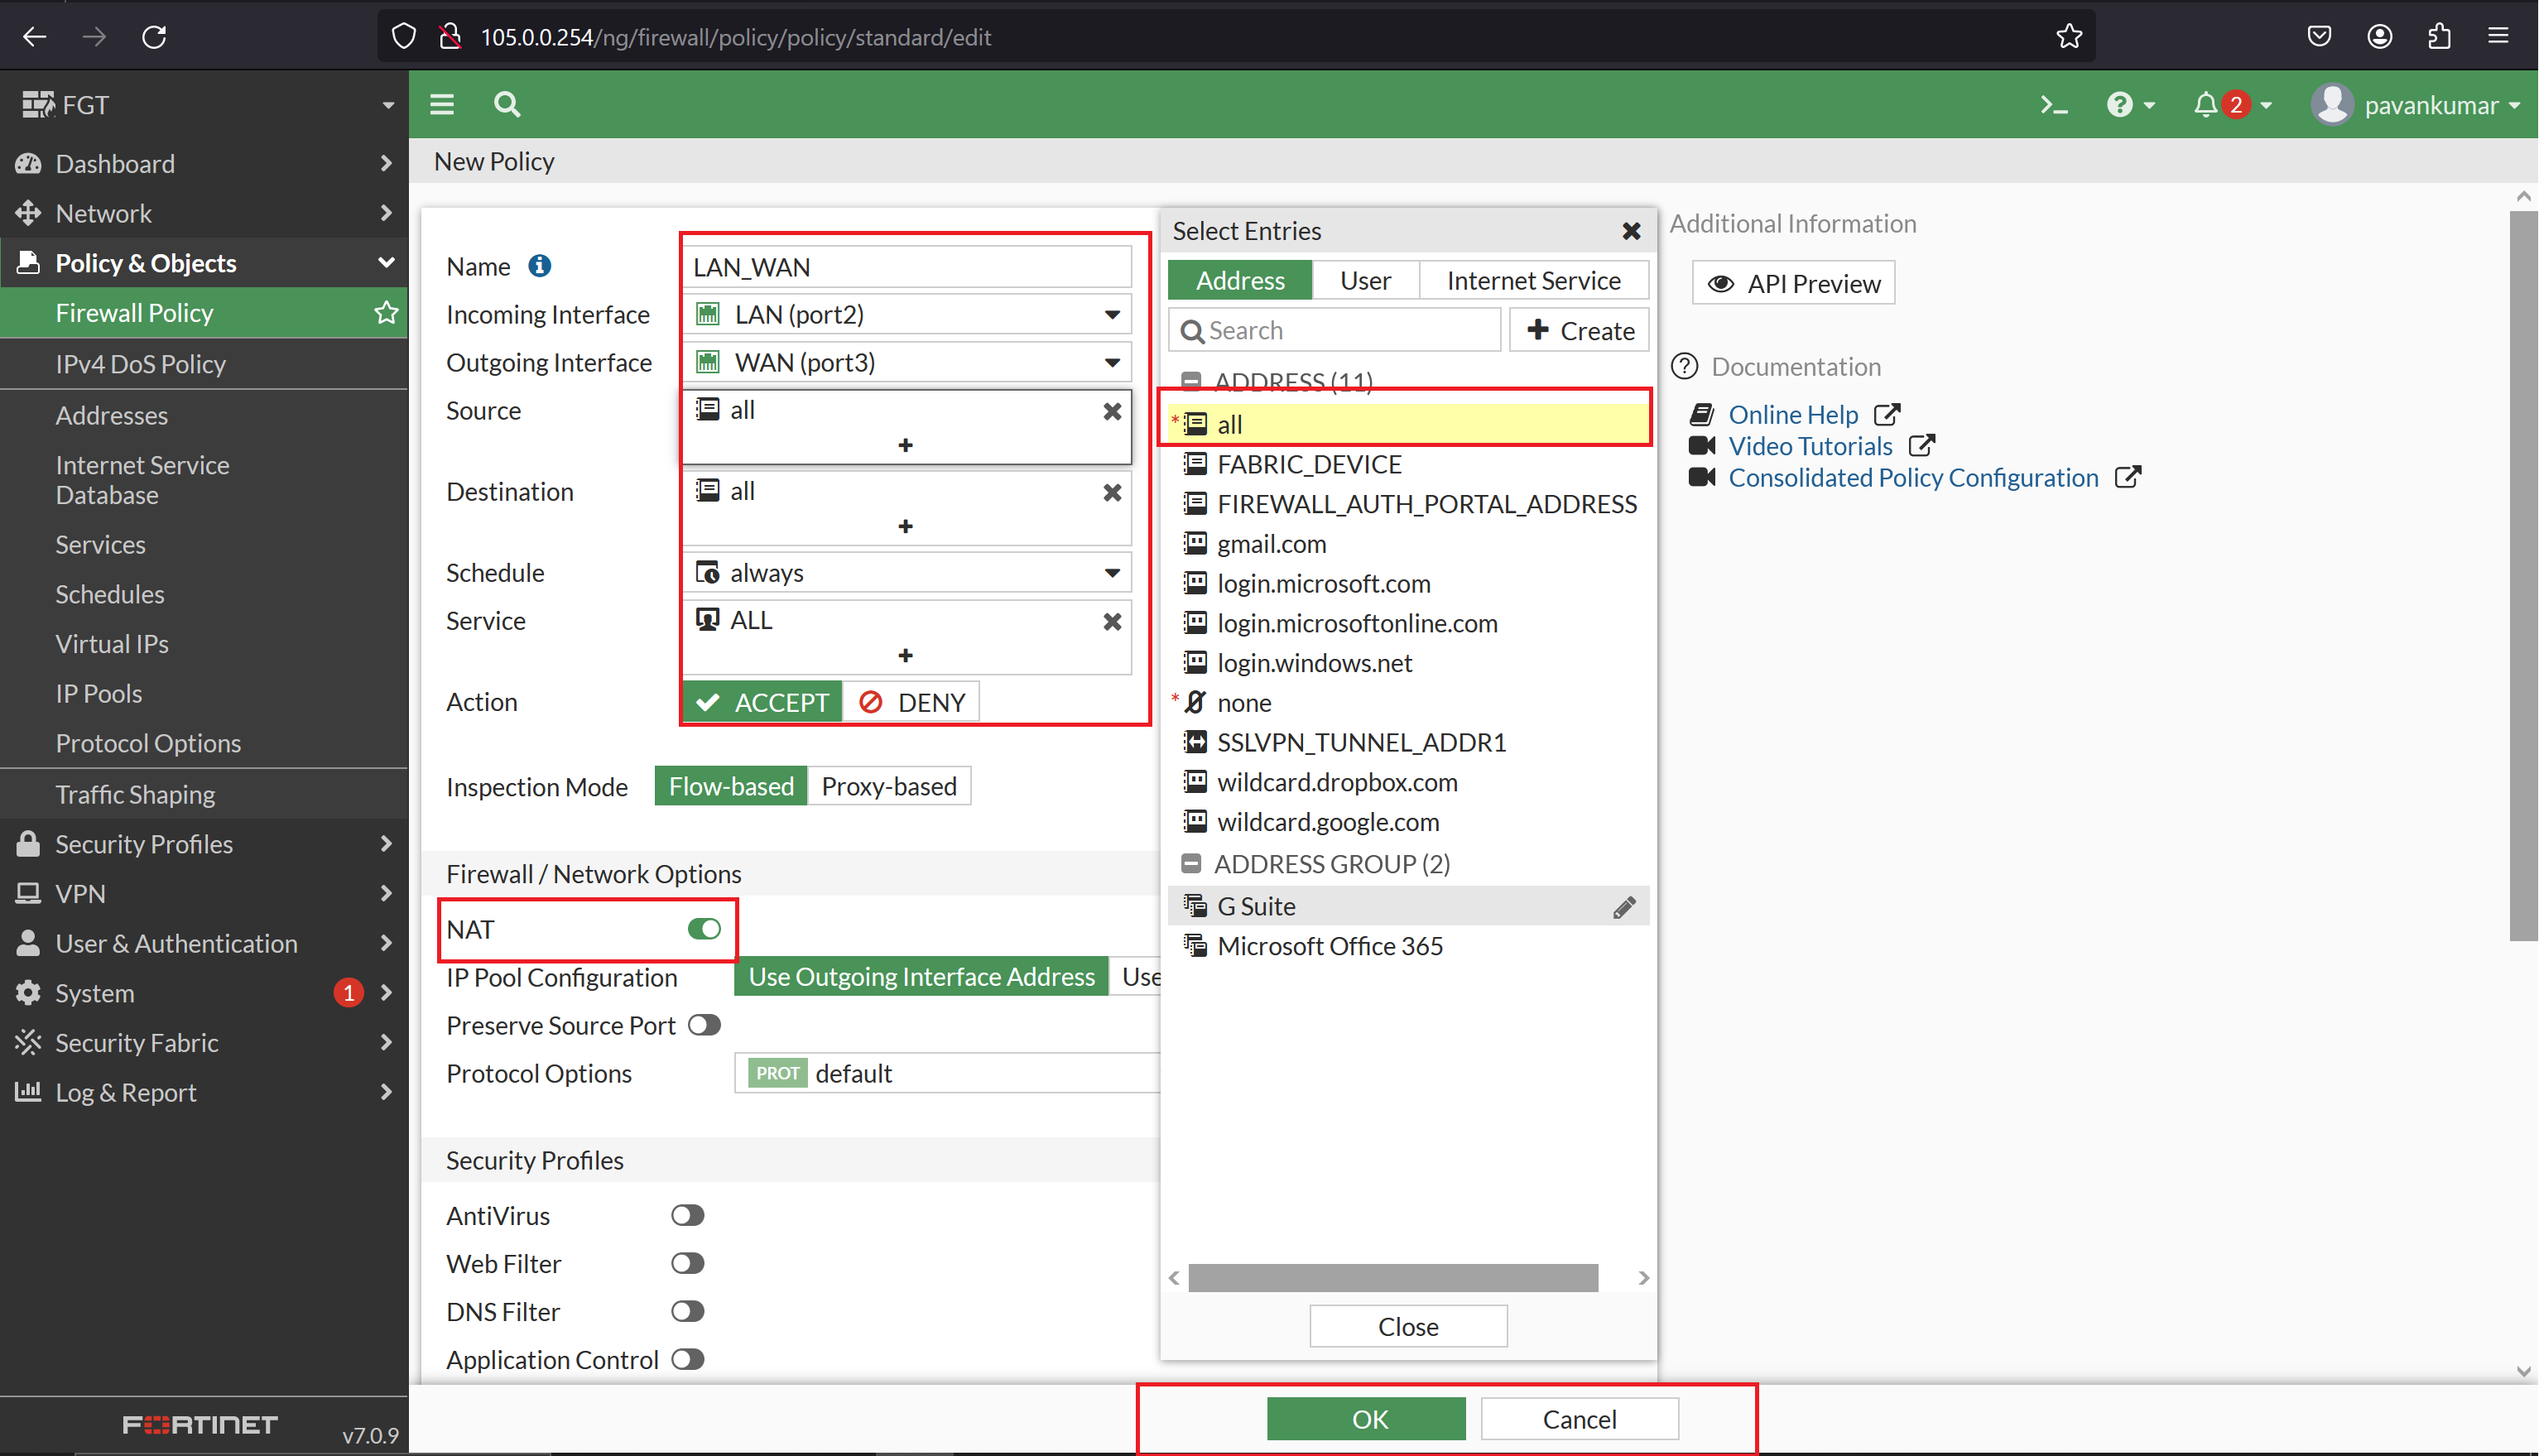
To enable the traffic for LAN —> WAN
- give the meaningful name for ‘Name’ to identify the purpose of the policy.
- make sure you have selected LAN and WAN interfaces as incoming and outgoing interfaces respectively.
- Source, Destination, and Services set to “all” Initially set it as all, for learning - once you are clear with concepts apply the specific one.
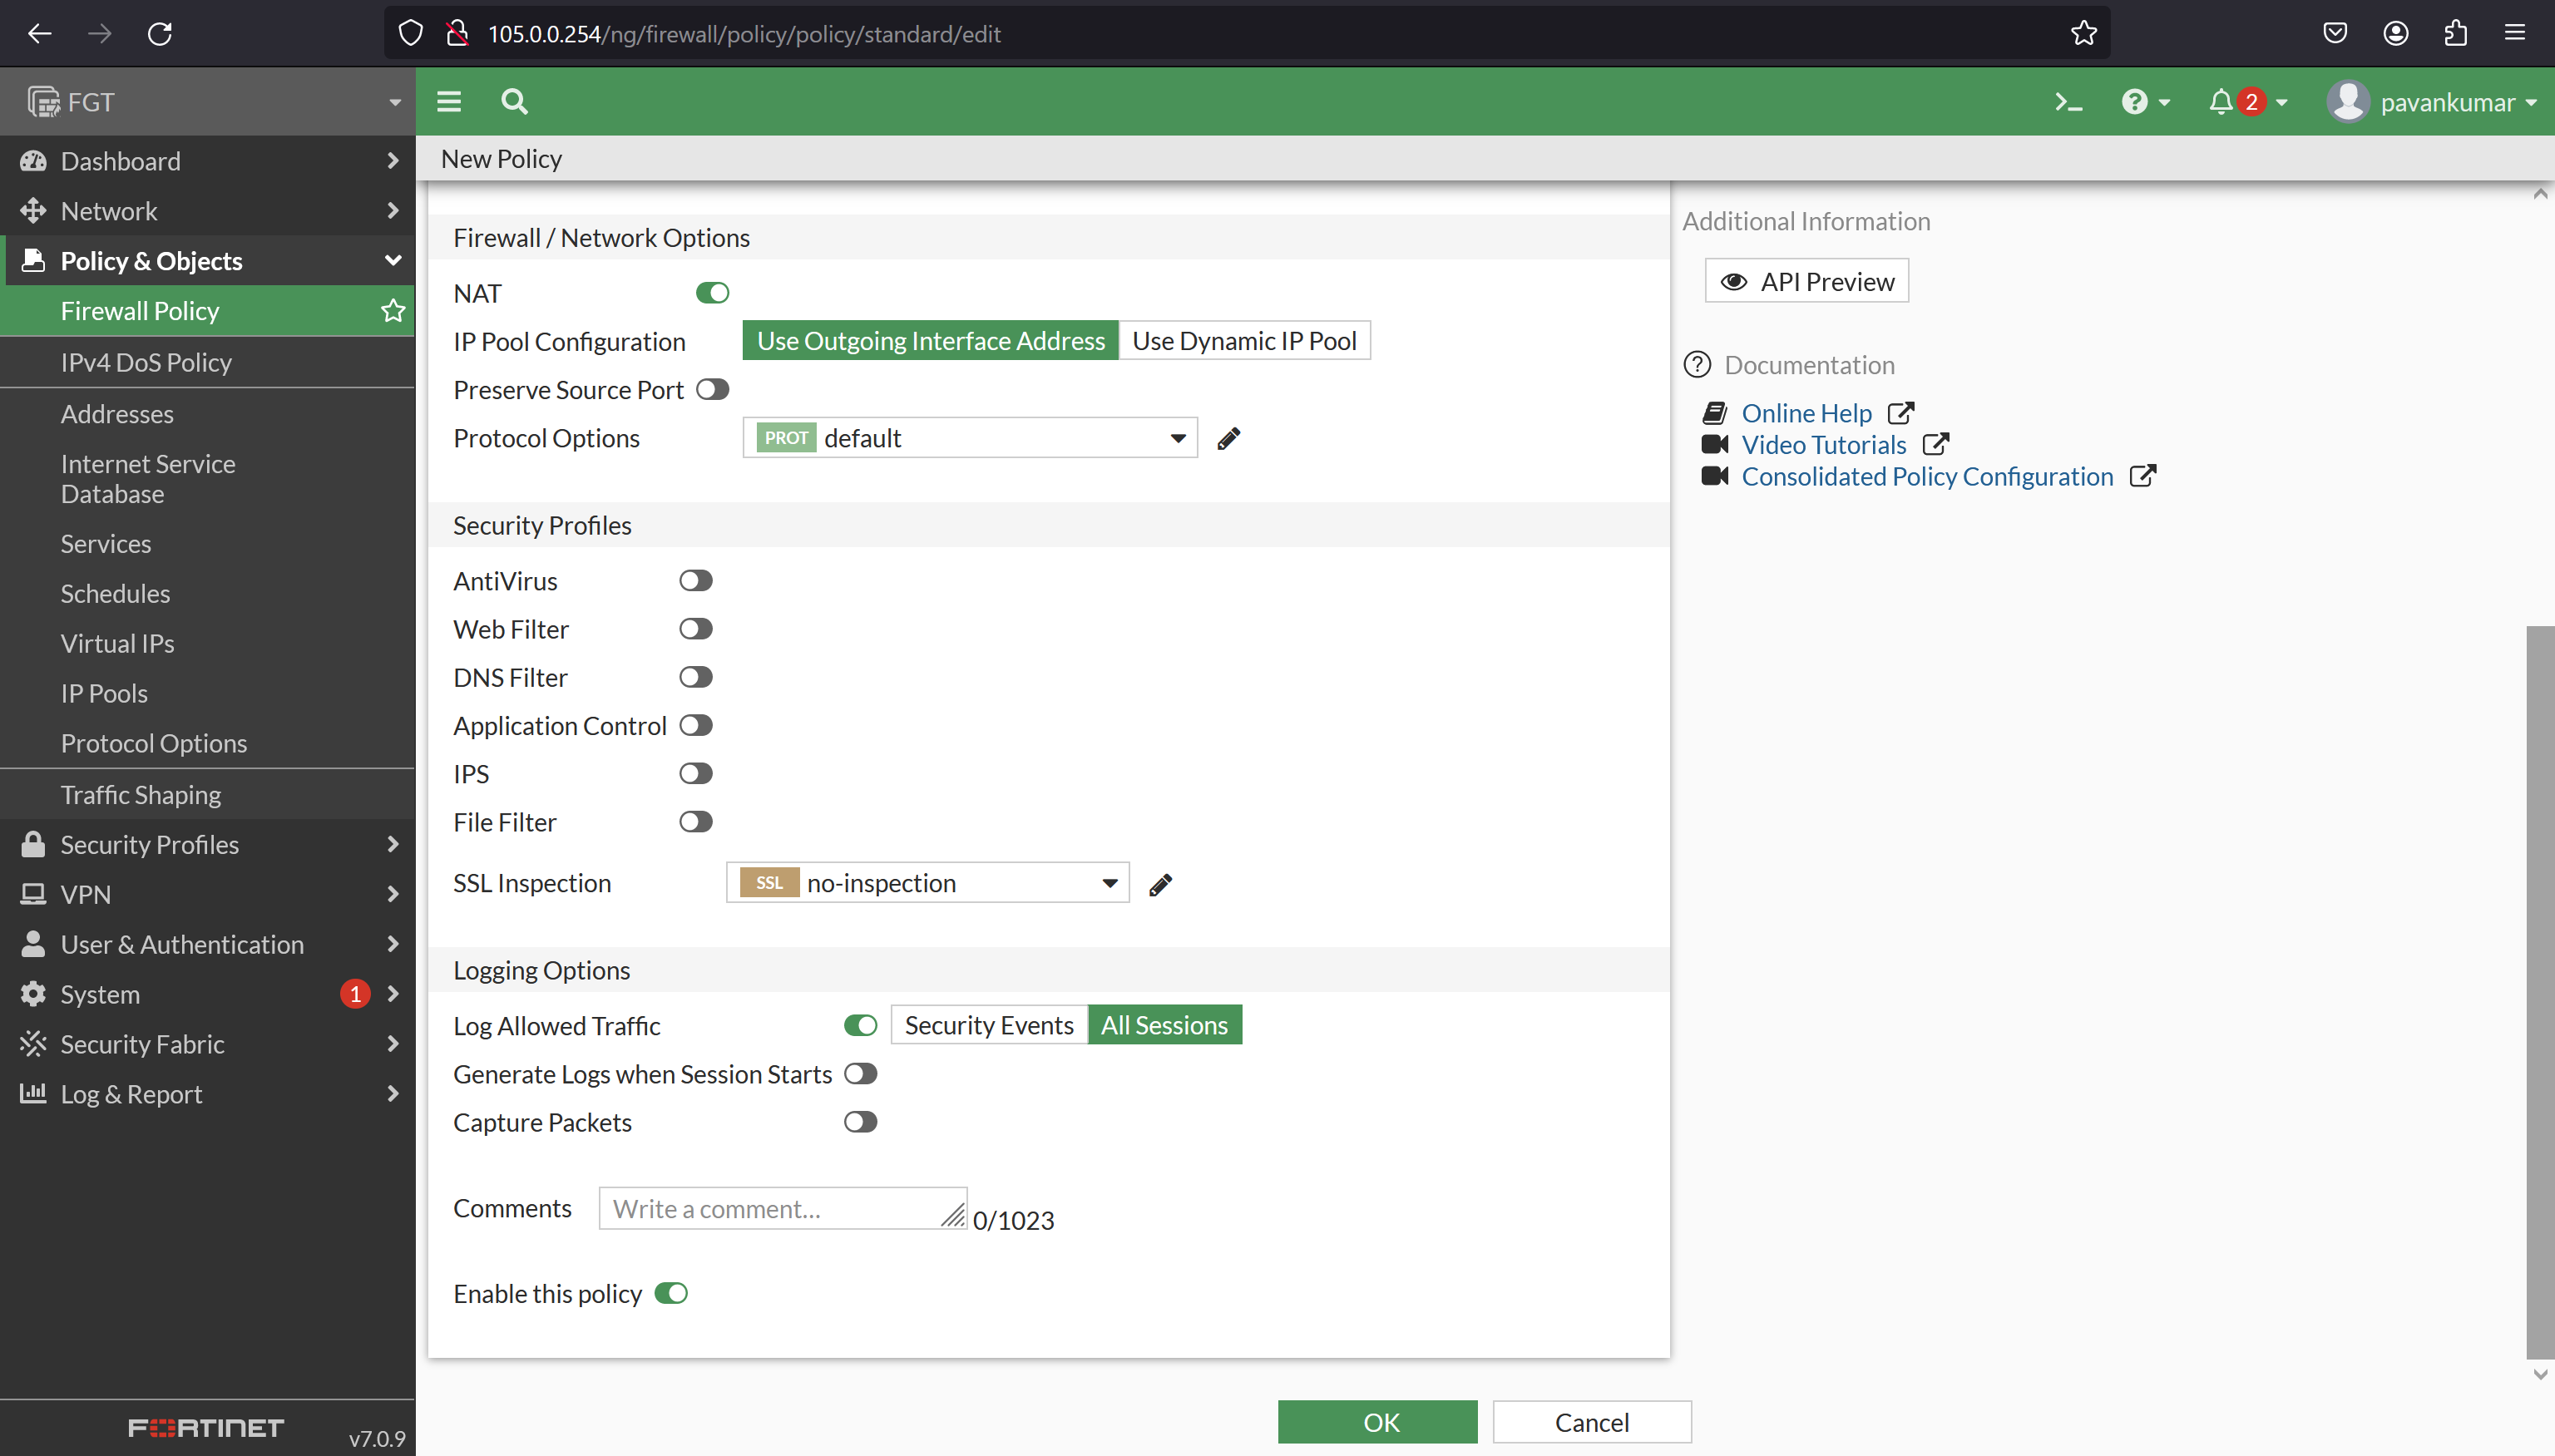
- allow the NAT.
- if you want to see the logs, enable the Log Allowd Traffic. - “All Sessions”
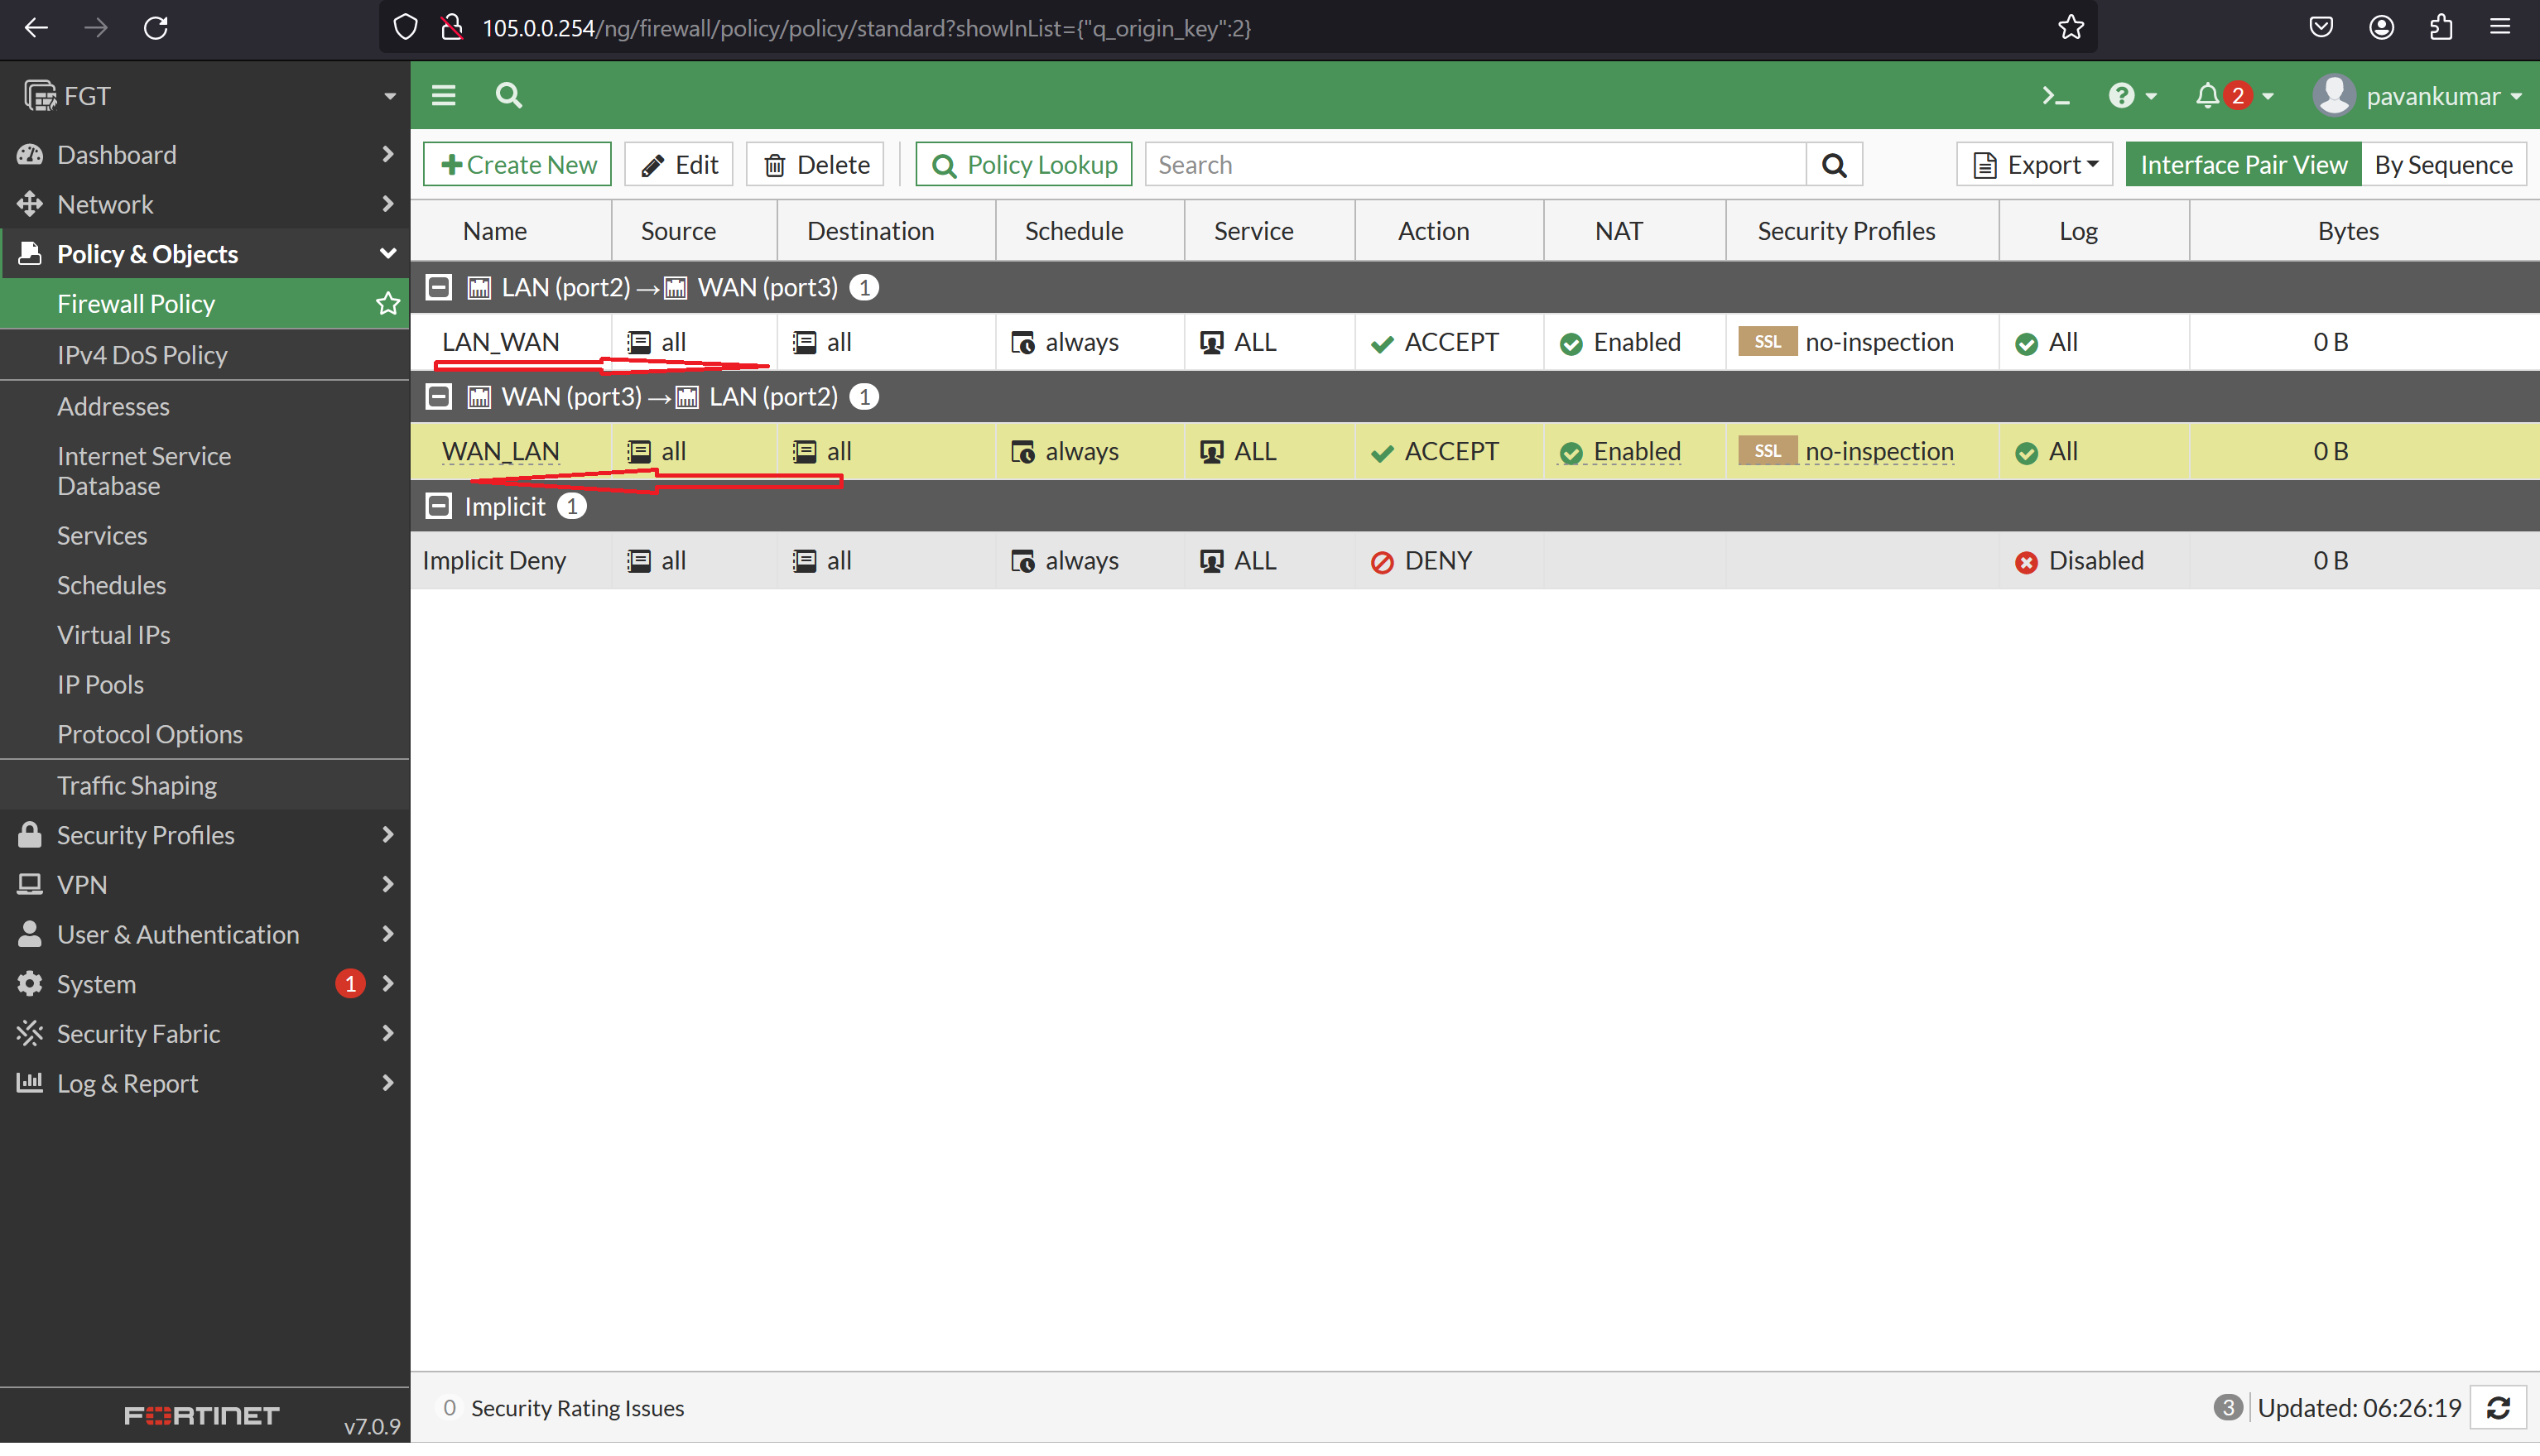
- also, traffic should be allowed on both sides, so we have to configure the reverse Policy inorder to get the communication. WAN —> LAN (only limited access)
V. Network Address Translation - Fortigate
1. Theory of NAT (Network Address Translation)
NAT is a technique used to modify network address information in packet headers while in transit through a router or firewall. It serves several purposes, including conserving IP addresses, enabling connectivity between different network types, and enhancing network security by hiding internal IP addresses.
- Types of NAT:
- Source NAT (SNAT): Modifies the source IP address of outgoing packets, typically used for outbound internet access.
- Destination NAT (DNAT): Modifies the destination IP address of incoming packets, commonly used for inbound services such as web servers or email servers.
2. Configuration of NAT on FortiGate Firewall
2.1. Static NAT Configuration (1-to-1 NAT)
Static NAT maps a public IP address to a private IP address on a one-to-one basis, allowing external hosts to initiate connections to internal hosts.
config firewall ippool
    edit "public_pool"
        set type static
        set address <public_ip_range>
    next
end

config firewall vip
    edit "static_nat"
        set extintf "wan1"
        set extip <public_ip>
        set mappedip <private_ip>
    next
end
2.2. Port Forwarding Configuration
Port forwarding redirects traffic from a specific port on the firewall’s public IP address to an internal IP address and port.
config firewall vip
    edit "port_forwarding"
        set extintf "wan1"
        set extip <public_ip>
        set mappedip <private_ip>
        set protocol <protocol>
        set extport <public_port>
        set mappedport <private_port>
    next
end
3. Static IP Assignment
Assigning a static IP address to a device ensures consistency and predictability in network configurations, particularly for devices requiring consistent access or services.
config system interface
    edit <interface_name>
        set ip <ip_address> <subnet_mask>
        set allowaccess <access_options>
    next
end
4. Interface IP Configuration
Configuring IP addresses on interfaces enables communication between different network segments and defines the gateway for traffic leaving the subnet.
config system interface
    edit <interface_name>
        set ip <ip_address> <subnet_mask>
        set allowaccess <access_options>
    next
end
Demo:
By visiting Policy & Objects —> LAN-WAN policy
- NAT should be enabled.
- Instead of Interface IP —> Use Dynamic IP Pool —> by clicking
- we can able to select the types of NAT we want to perform.
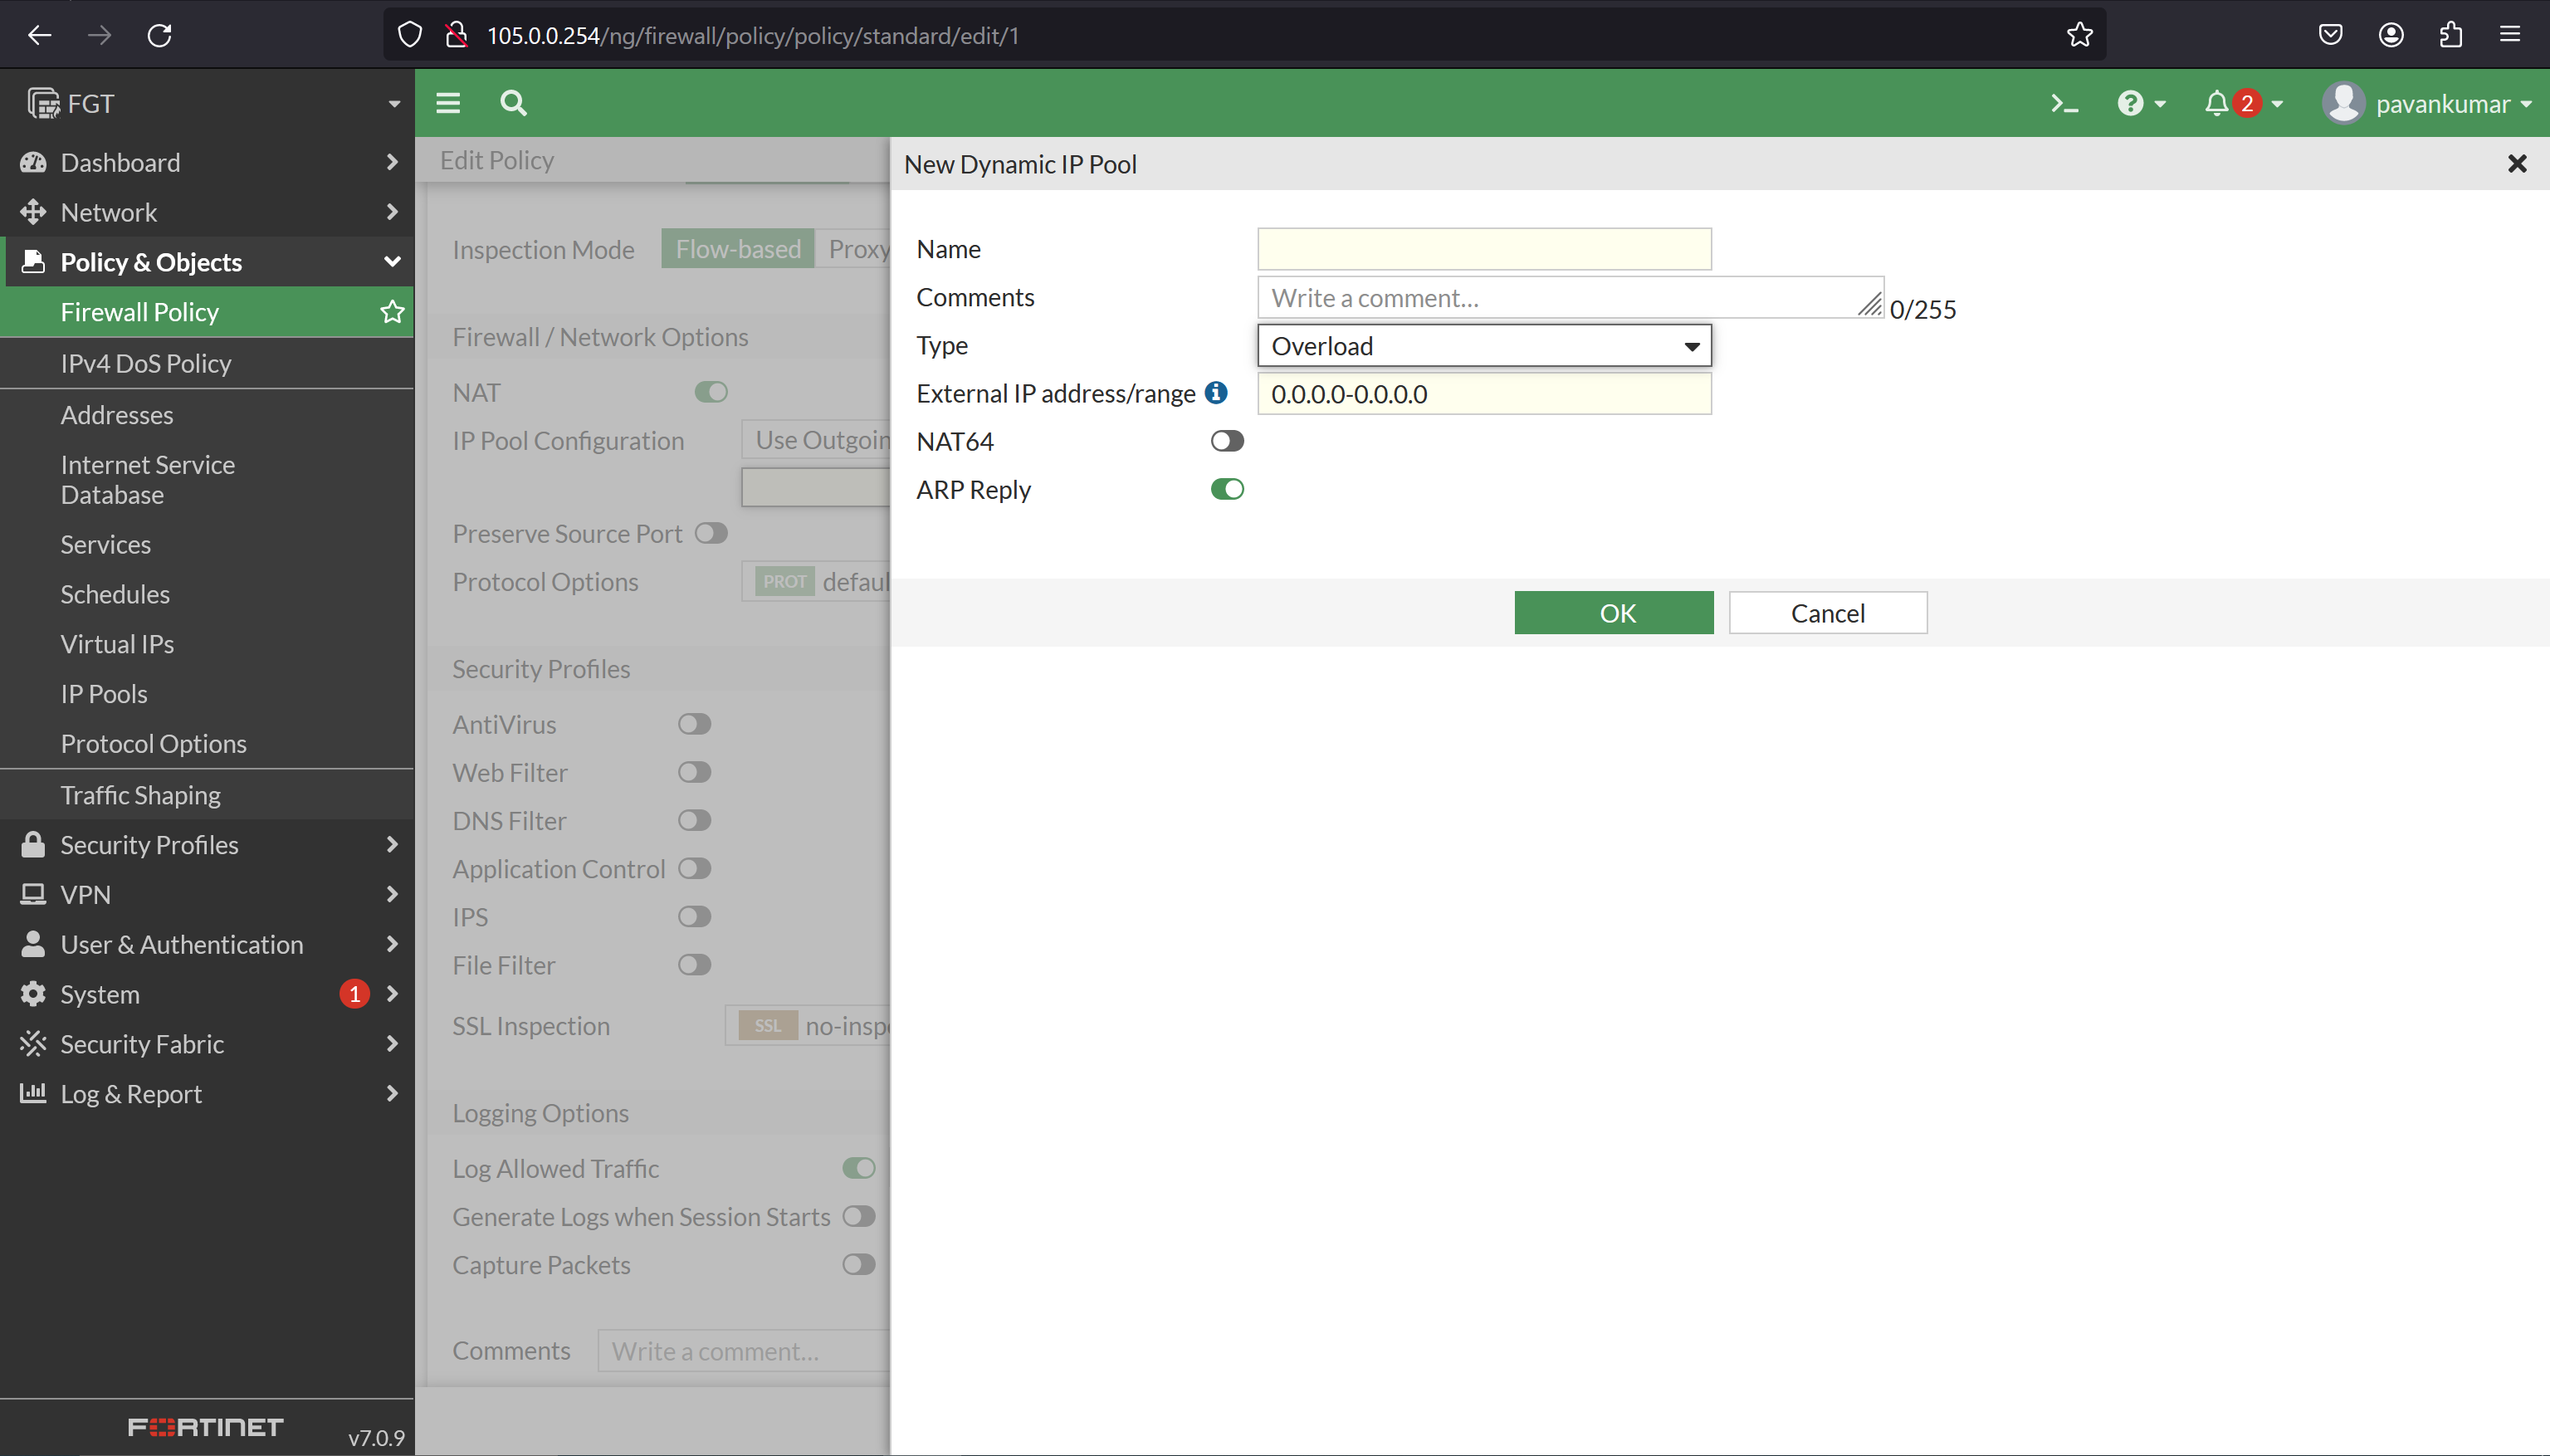
- Overload, One-to-One, Fixed Port Range - choose as per your requirement and apply it.
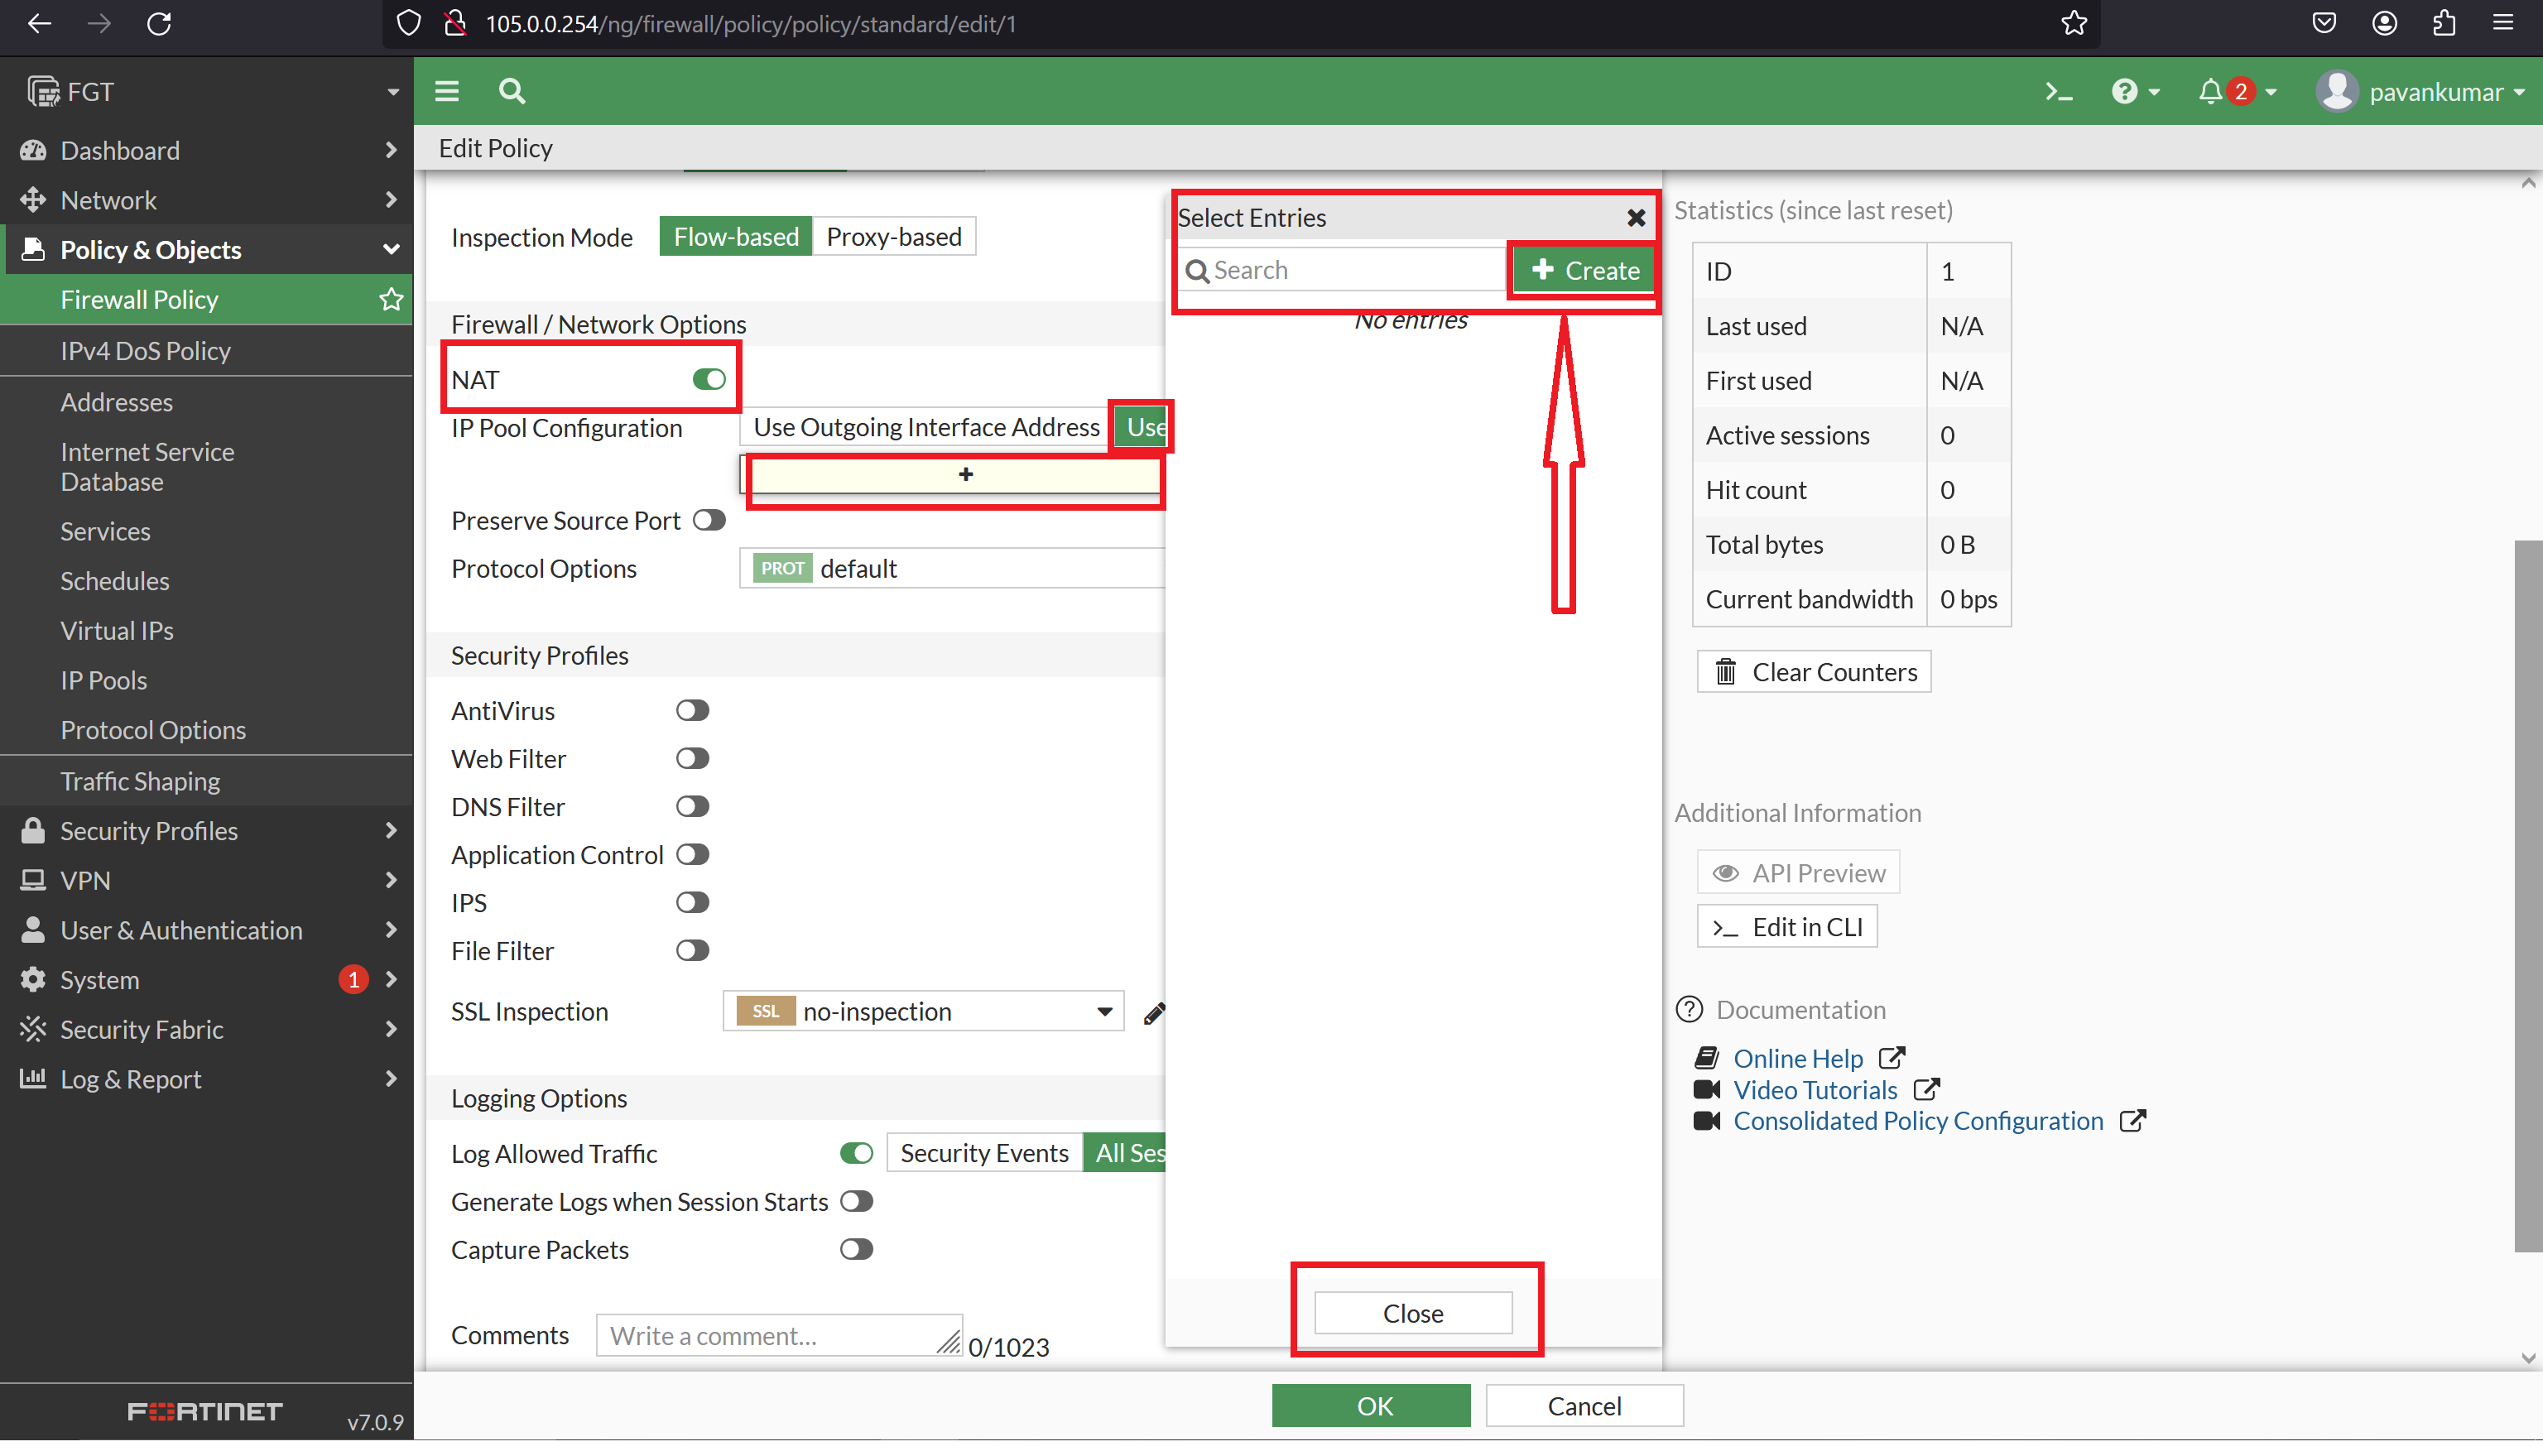
Enter the IP address You want NAT.
If you want to Map the original protocol number with custom - you can do it by configuring the Protocol Option. Port Mapping.
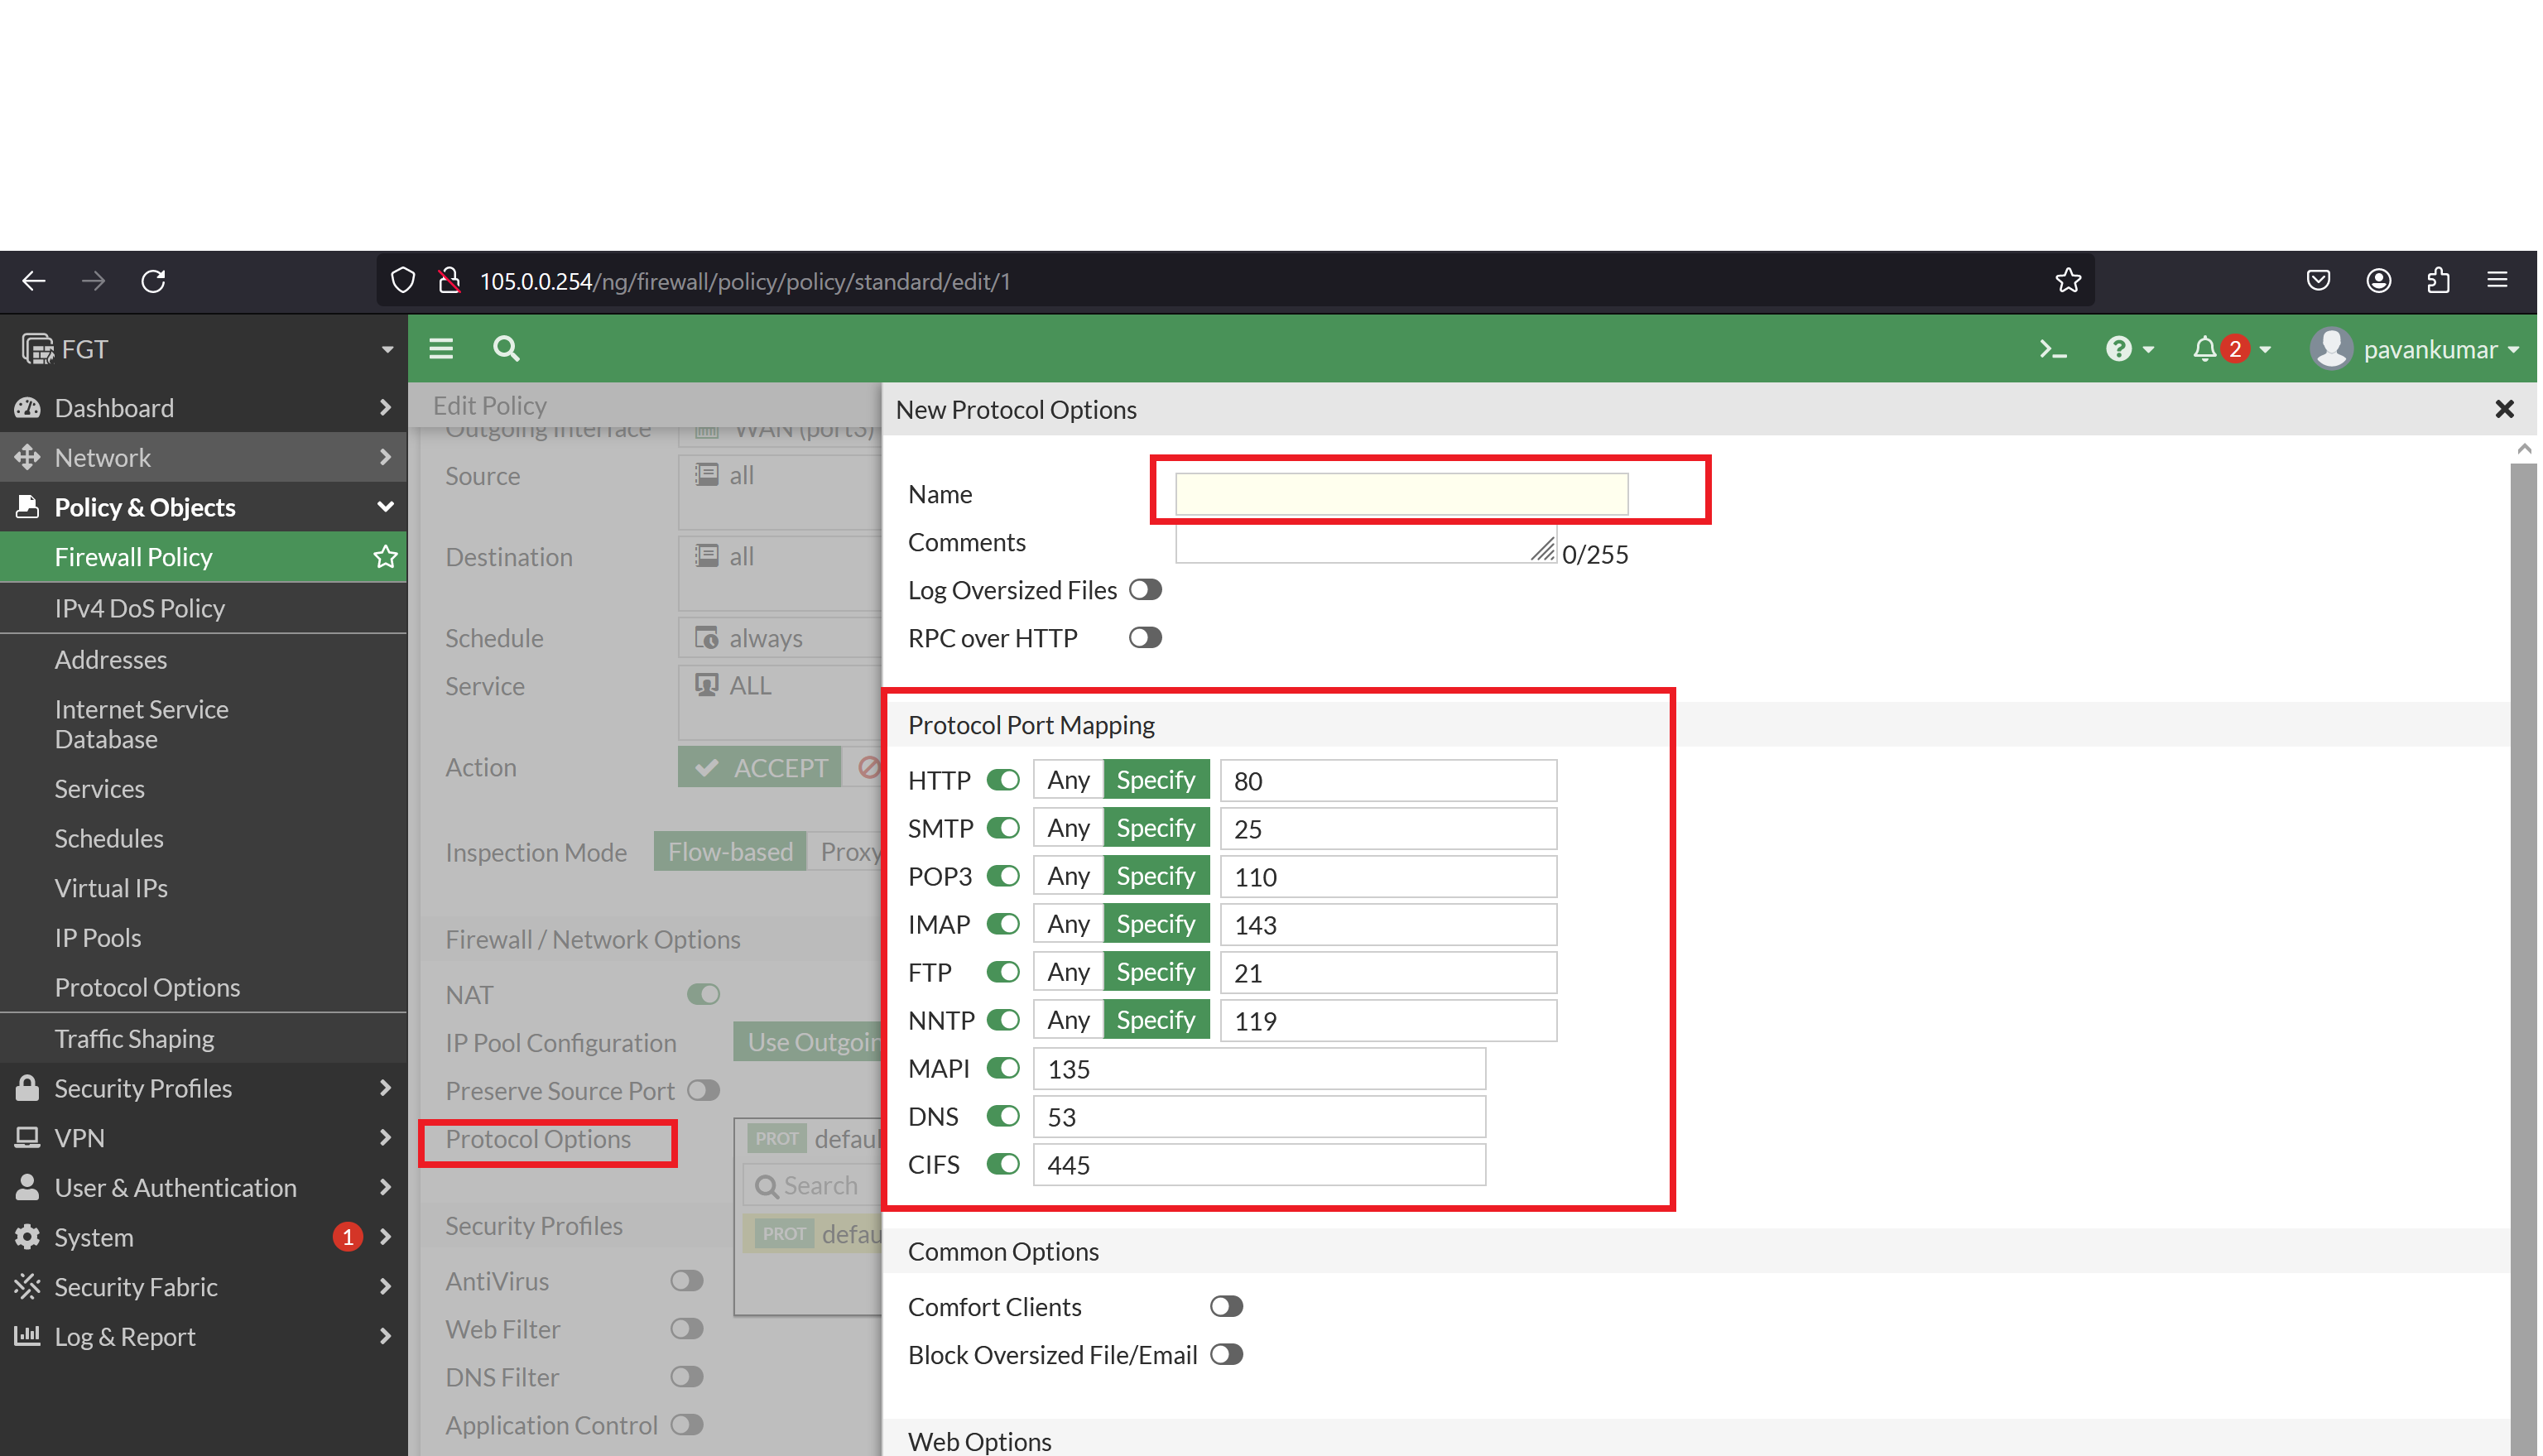
VI. Virtual Wire configuration
Certainly! FortiGate Virtual Wire (VW) is a feature that allows you to transparently insert security services, such as firewall policies and intrusion prevention systems (IPS), into the network without changing the IP addressing or topology. It operates at Layer 2 of the OSI model, meaning it doesn’t require IP addresses to be changed, making it ideal for scenarios where IP addressing cannot be modified easily.
Advantages of Virtual Wire Feature:
Here’s a breakdown of the key theoretical aspects of FortiGate Virtual Wire:
1. Layer 2 Operation:
- Virtual Wire operates at Layer 2 (Data Link Layer) of the OSI model, which means it deals with MAC addresses rather than IP addresses. This allows the FortiGate firewall to seamlessly intercept and inspect traffic passing through it without requiring any IP address changes.
- Since Virtual Wire operates at Layer 2, it can’t perform routing or NAT (Network Address Translation). Instead, it forwards packets based on MAC addresses.
2. Transparent Traffic Inspection:
- Virtual Wire enables the insertion of security services, such as firewall policies, intrusion prevention systems (IPS), and antivirus scanning, into the network path without disrupting normal network operations.
- Traffic passing through the Virtual Wire is transparently inspected by the FortiGate firewall, which can enforce security policies and detect and mitigate threats in real-time.
3. In-line Deployment:
- In Virtual Wire deployment, the FortiGate firewall sits in-line between two network segments, intercepting traffic as it passes through.
- It typically involves configuring two physical interfaces on the FortiGate firewall—one for inbound traffic (ingress interface) and the other for outbound traffic (egress interface).
4. Traffic Forwarding and Filtering:
- Once traffic enters the Virtual Wire, it is forwarded to the appropriate egress interface based on the configured security policies.
- The firewall inspects the traffic according to predefined security rules, including firewall policies, IPS signatures, antivirus scans, and other security profiles.
- If the traffic matches any security policy, the firewall takes the specified action (e.g., allow, deny, log).
5. VLAN Support:
- Virtual Wire supports VLANs, allowing you to segment traffic within the Virtual Wire deployment.
- You can assign VLAN IDs to the Virtual Wire configuration to handle tagged VLAN traffic between network segments.
6. Simplified Deployment and Management:
- Virtual Wire simplifies the deployment of security services by eliminating the need for complex network reconfigurations.
- It also simplifies management by providing a transparent way to insert security services into the network path, reducing operational overhead and minimizing disruption to network operations.
Here’s a detailed explanation of the concept along with configuration steps:
1. Security Policy Configuration:
Create security policies to define how traffic is handled by the Virtual Wire pair. This includes specifying the source and destination zones, as well as the security profiles to be applied (e.g., IPS, antivirus).
config firewall policy
    edit 1
        set srcintf "port2"
        set dstintf "port3"
        set action accept
        ...
    next
end
srcintf: Specifies the source interface.dstintf: Specifies the destination interface.action: Defines the action to be taken on the traffic (e.g., accept, deny).
2. Monitoring and Logging:
Configure logging and monitoring to track traffic passing through the Virtual Wire for security analysis and troubleshooting purposes.
config log
    set status enable
    ...
end
3. Testing and Verification:
Test the Virtual Wire configuration to ensure that traffic is being inspected and forwarded correctly without any disruptions to network connectivity.
This configuration enables the FortiGate unit to operate in Virtual Wire mode, transparently inspecting and filtering traffic between two network segments without requiring any changes to IP addressing or network topology.
Demo:
Sample Topology:
To configure Virtual Wire, go to Interface –> Create New:
Now new Virtual Pair Interface is Configured:
As per the Fortigate we have to configure the Firewall Virtual Wire Pair Policy, go to Policy & Objects –> Firewall Virtual Wire Pair Policy –> create bidirectional policy:
Now is the Time to Initiate the traffic towards the internet, all the traffic will be available in the firewall, Logs –> Forwarded Traffic:
Check the logs to verify the Source and destination information, Traffic from PC to Internet.:
NOTE
- To get Internet access to the PC, we have configured Static NAT on the Router[Edge_R].
- Without NAT we are not able to access the internet, the ISP drops the packet.
- Because Private IPs are not routable in ISPs.
Summary:
In Module 2, we covered essential topics related to configuring interfaces and firewall policies on FortiGate firewall. Here’s a summary of the topics covered:
- Basic Interface Configuration: Explained how to configure interfaces on FortiGate firewall, including setting IP addresses, subnet masks, and access permissions.
- Configure Static and Dynamic Routing: Detailed the configuration of static and dynamic routing protocols such as OSPF and BGP on FortiGate firewall to enable efficient traffic forwarding.
- Configuring DHCP: Provided guidance on configuring DHCP server pools on the LAN interface of FortiGate firewall to automate IP address assignment for local users.
- Basic Firewall Policies: Covered the configuration of firewall policies on FortiGate firewall, including setting conditions, actions, and security profiles to control traffic flow between different network segments.
- Network Address Translation (NAT): Explained the theory and configuration of NAT on FortiGate firewall, including static NAT (1-to-1 NAT) and port forwarding to facilitate communication between internal and external networks.
By understanding and implementing the concepts covered in Module 2, administrators can effectively configure interfaces, routing, DHCP, firewall policies, and NAT on FortiGate firewall to ensure efficient network connectivity and robust security measures.
MODULE 3
High availability
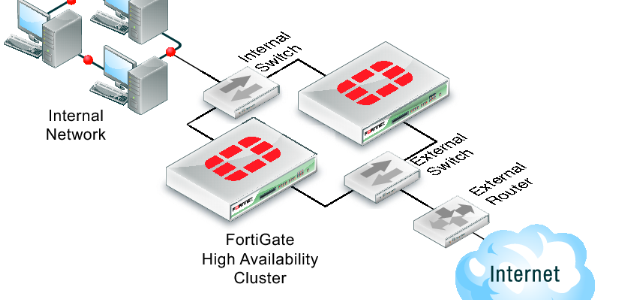
Table of contents:
- Active - Standby(Theory)
- Active - Standby(Lab)
- Active - Active(Theory)
- Active - Active(Lab)
I. Active-Standby(Theory)
Hardware Requirements:
- Identical FortiGate Models: Both FortiGate units in the HA cluster must be identical models to ensure compatibility and proper synchronization.
- Sufficient Resources: Ensure that both FortiGate units have adequate CPU, memory, and storage resources to handle the expected network traffic and configurations.
- Network Interfaces: Each FortiGate unit should have the same number and type of network interfaces (e.g., Ethernet, fiber) configured identically.
- HA Ports: Both FortiGate units must have dedicated HA ports available for HA heartbeat communication and synchronization. These ports should be connected via a dedicated HA link cable or network segment.
- Power and Cooling: Ensure that the power supply and cooling systems are sufficient to support both FortiGate units and maintain optimal operating conditions.
Software Requirements:
- Compatible Firmware Versions: Both FortiGate units must run the same firmware version to ensure compatibility and proper functionality.
- HA Licensing: Ensure that both FortiGate units are licensed for HA features and functionalities. Some HA features may require specific licensing.
- Configuration Synchronization: Configure both FortiGate units with identical network configurations, security policies, routing settings, and HA settings.
- Virtual Domains (VDOMs): If using VDOMs, ensure that VDOM settings are synchronized between both units and that VDOM HA settings are properly configured.
- Monitoring and Management: Set up monitoring and management tools to monitor the health and status of the HA cluster, including CPU usage, memory utilization, and interface status.
Network Requirements:
- Dedicated HA Link: Establish a dedicated network link (HA link) between the HA ports of both FortiGate units for heartbeat communication and synchronization.
- Redundant Network Connectivity: Ensure redundant network connectivity for both FortiGate units to prevent single points of failure and ensure continuous operation.
- Network Topology: Configure network routing and VLAN settings to accommodate HA failover events and ensure seamless traffic redirection in case of unit failure.
By meeting these hardware, software, and network requirements, administrators can set up a robust high availability (HA) configuration in the FortiGate firewall to ensure continuous network operation and minimize downtime.
Active-Standby Theory of FortiGate Firewall with FGCP
Active-standby mode in the FortiGate firewall, facilitated by FGCP (FortiGate Cluster Protocol), is a high availability (HA) configuration where two firewall units operate in tandem. One unit serves as the primary (active) unit, actively processing traffic, while the other unit acts as the secondary (standby) unit, ready to take over in case of failure.
1. FGCP (FortiGate Cluster Protocol)
- Purpose: FGCP is a proprietary protocol developed by Fortinet for communication and synchronization between firewall units in an HA cluster.
- Heartbeat and Configuration Sync: FGCP uses heartbeat signals over the HA link to monitor the status of each unit and synchronize configuration and session information.
- Failover Control: FGCP manages failover events, ensuring a seamless transition between active and standby units without disruption to network traffic.
- Session Pickup: FGCP enables the standby unit to pick up and continue processing existing sessions from the failed active unit during failover.
2. HA Link
- Dedicated Connection: The HA link provides a dedicated communication channel between the primary and secondary firewall units for FGCP communication.
- Heartbeat Signals: Heartbeat signals are exchanged over the HA link to monitor the health and availability of each firewall unit in the cluster.
- Synchronization: Configuration and session synchronization occur over the HA link to ensure that both units have identical configurations and state information.
3. Firewall State
- Active Unit: The active unit processes network traffic and maintains firewall state information, including active sessions, NAT translations, and security policies.
- Standby Unit: The standby unit remains synchronized with the active unit, mirroring its configuration and firewall state, but does not process traffic.
4. Gratuitous ARP (GARP), MAC and IP Swap, Priority
These concepts remain unchanged in the context of FGCP. Gratuitous ARP messages, MAC and IP swap, and priority configurations play crucial roles in ensuring smooth failover and uninterrupted network connectivity during active-standby mode operation with FGCP.
II. Active-Standby(Lab)
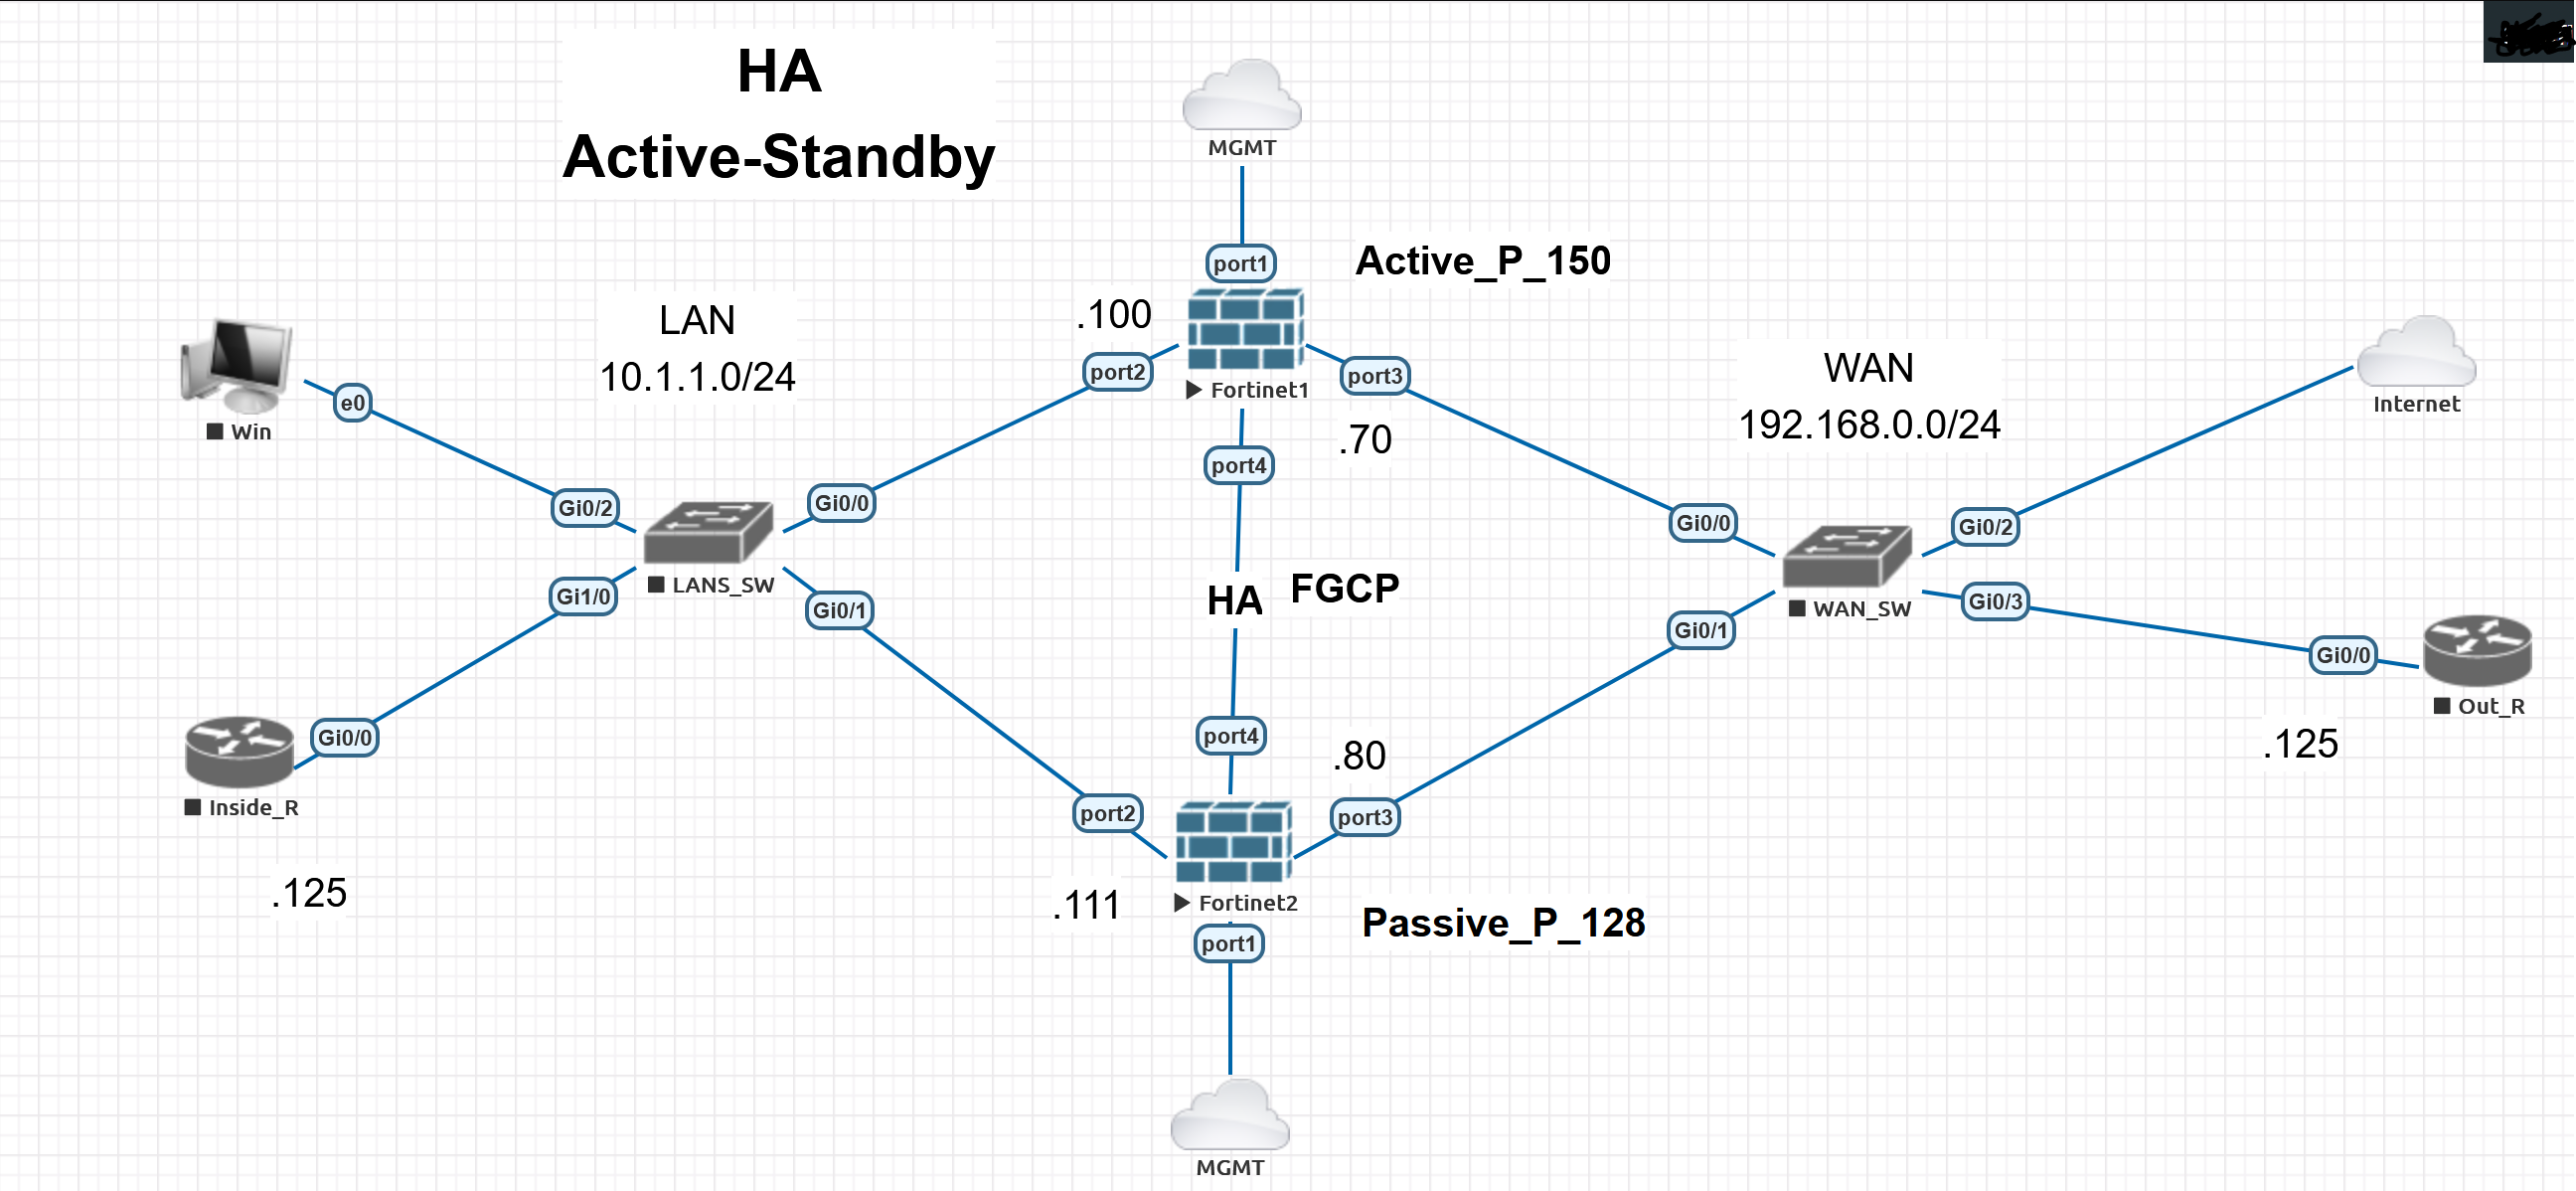
Sample Topology:
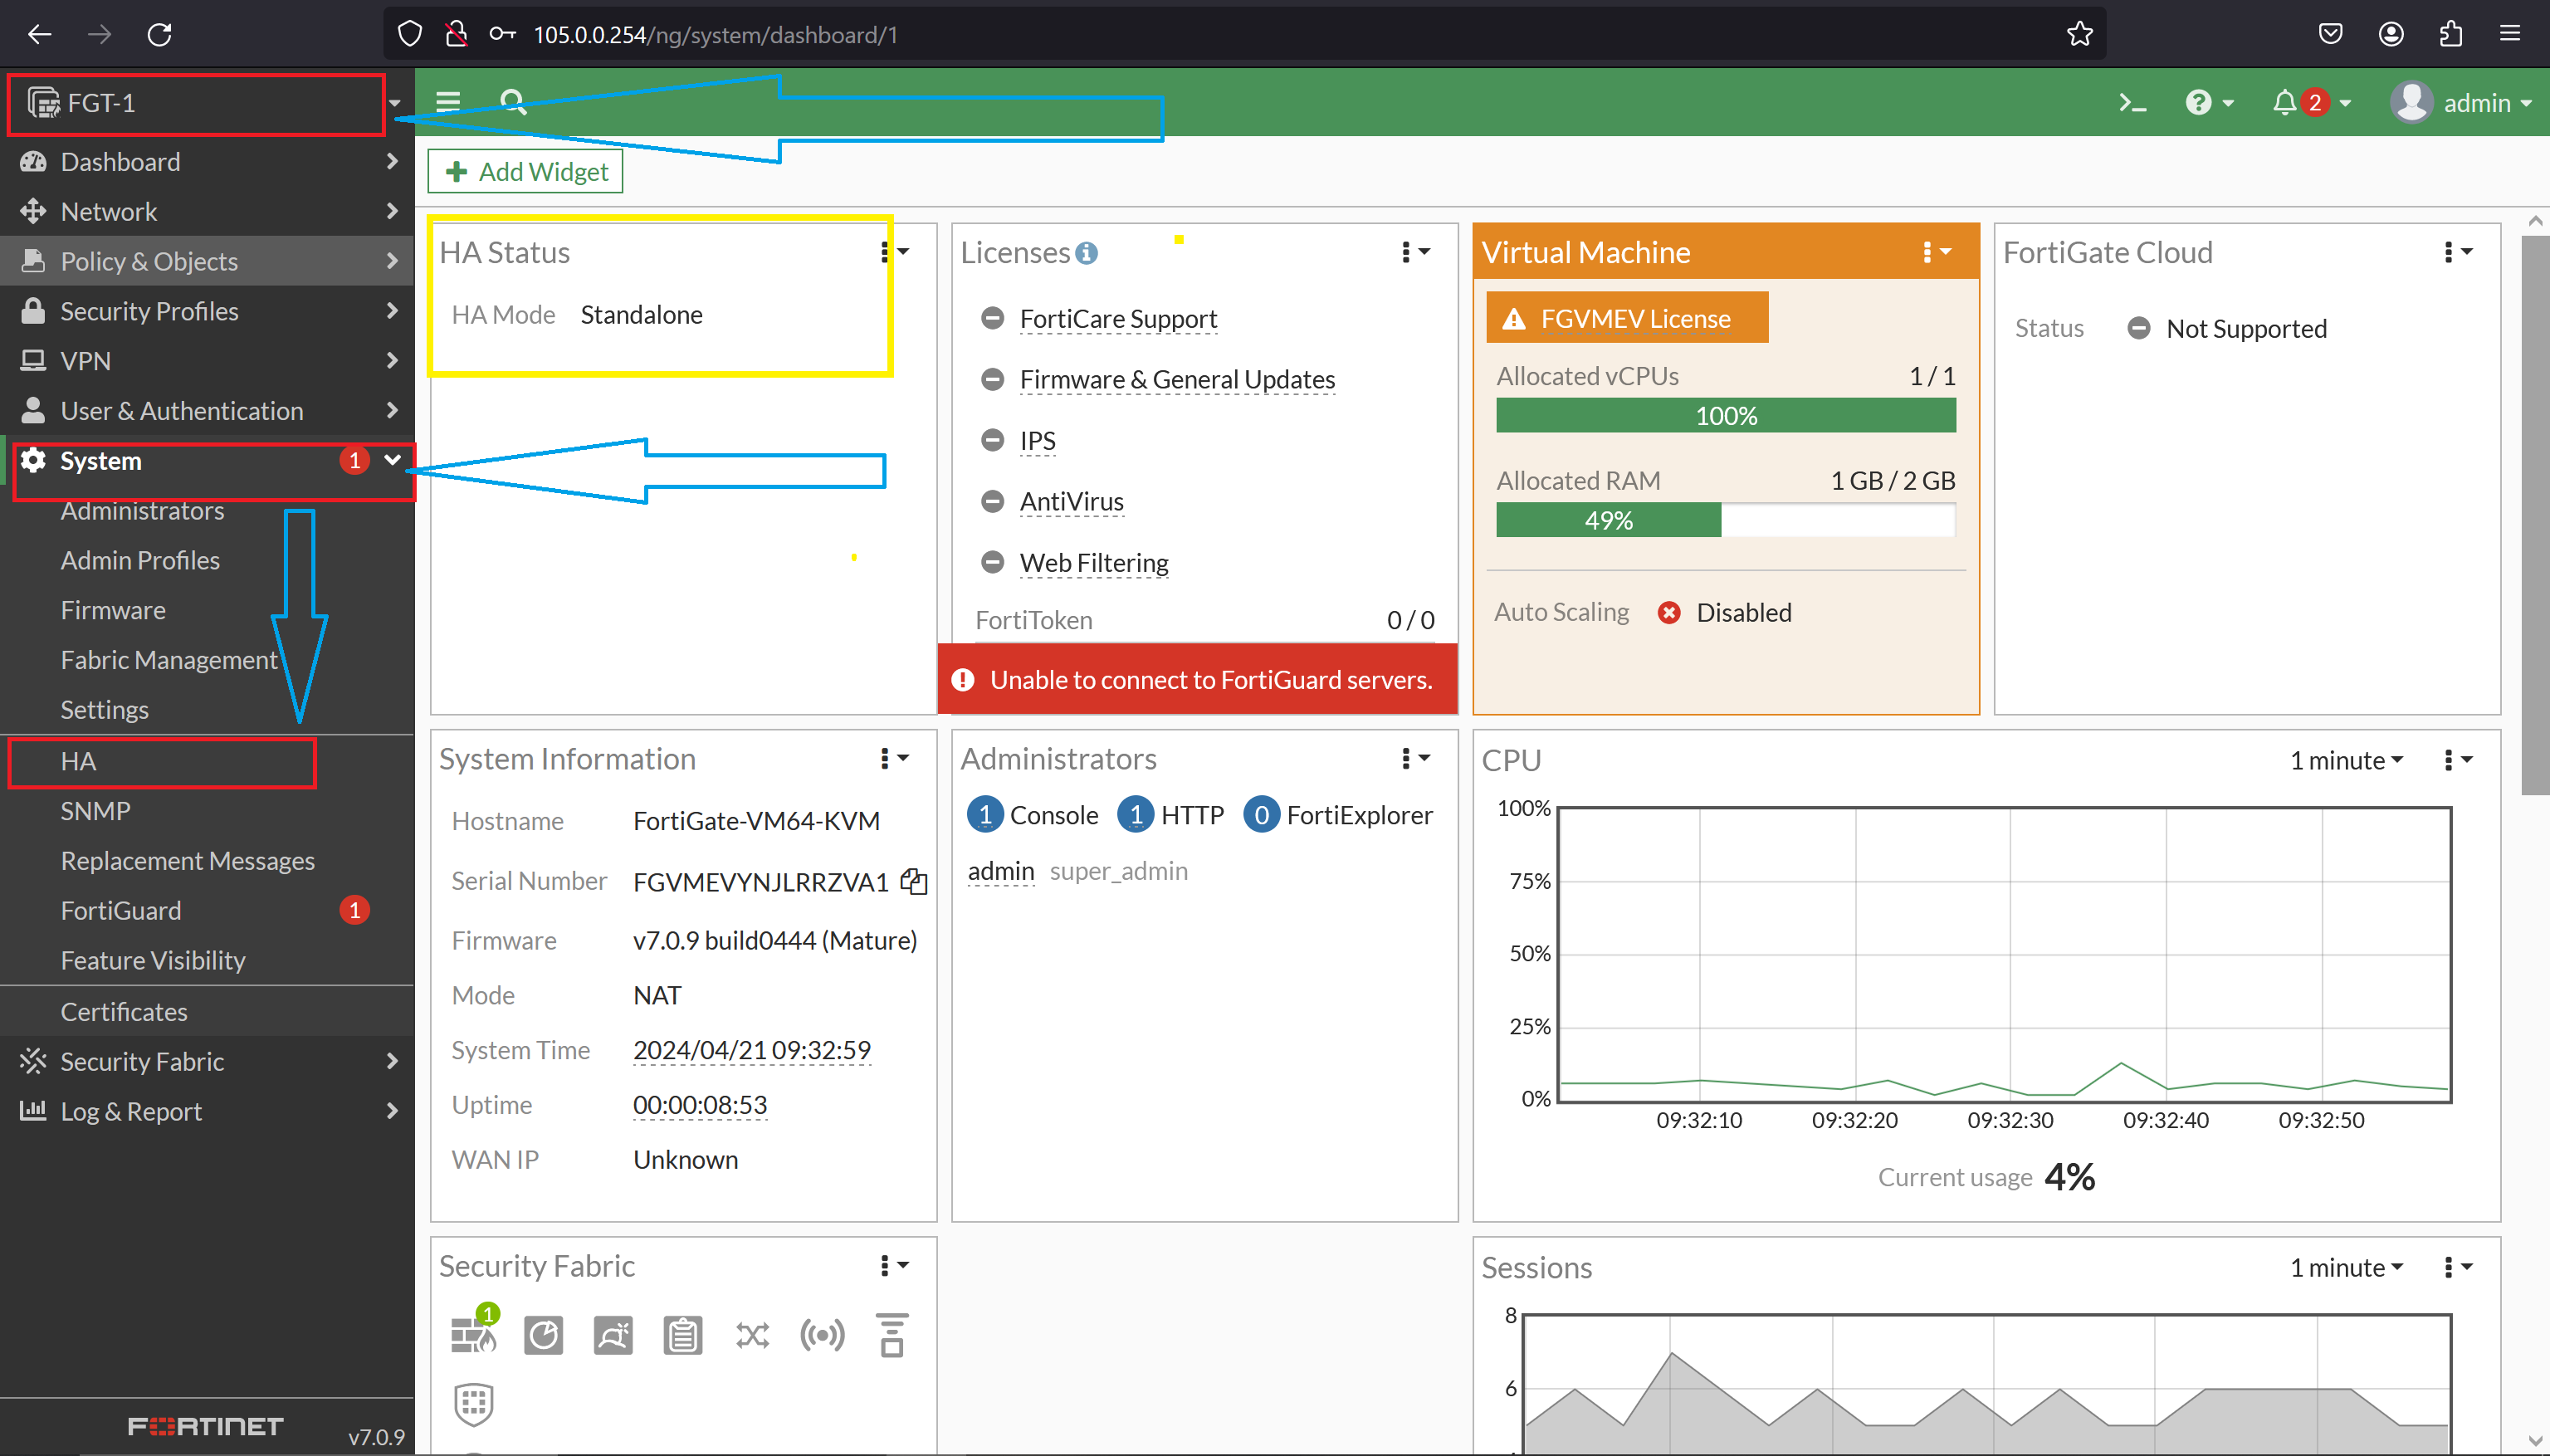
FGT-1 Dashboard:
As shown below diagram FGT-1 HA status is “Standalone”
- Go to System —> HA
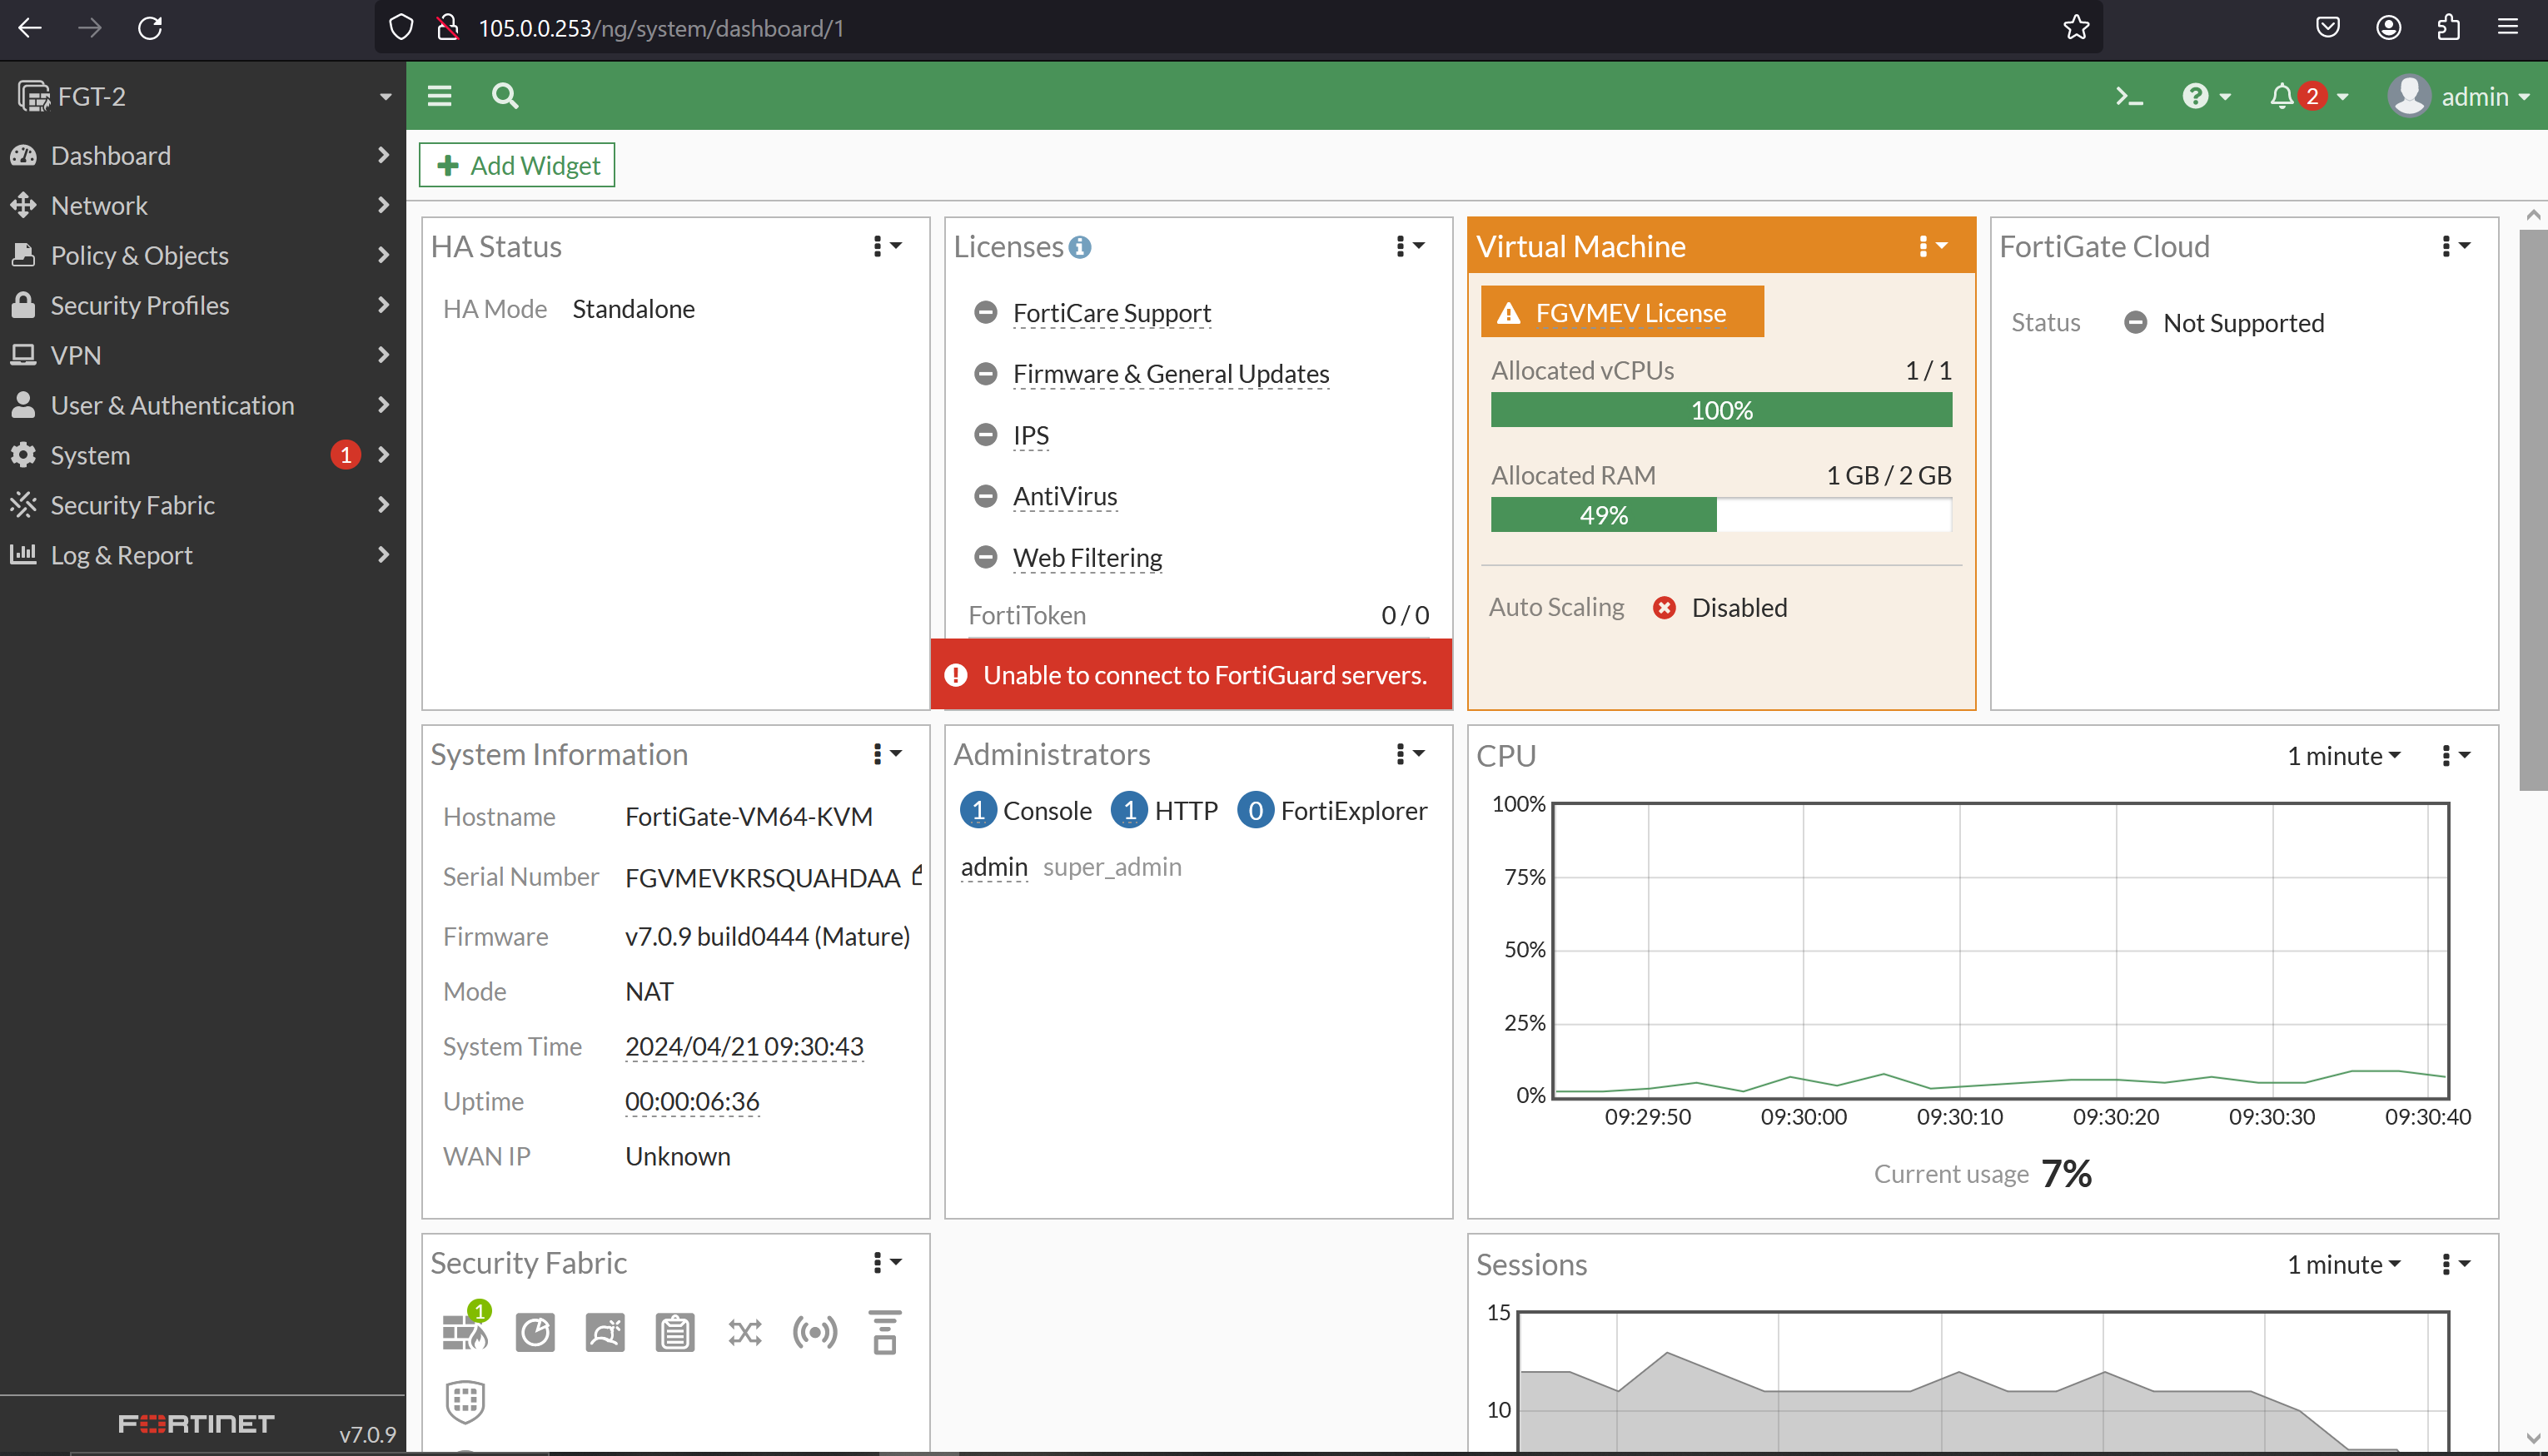
FGT-2 Dashboard:
Higher priority devices become the Active/Primary. FGT-1
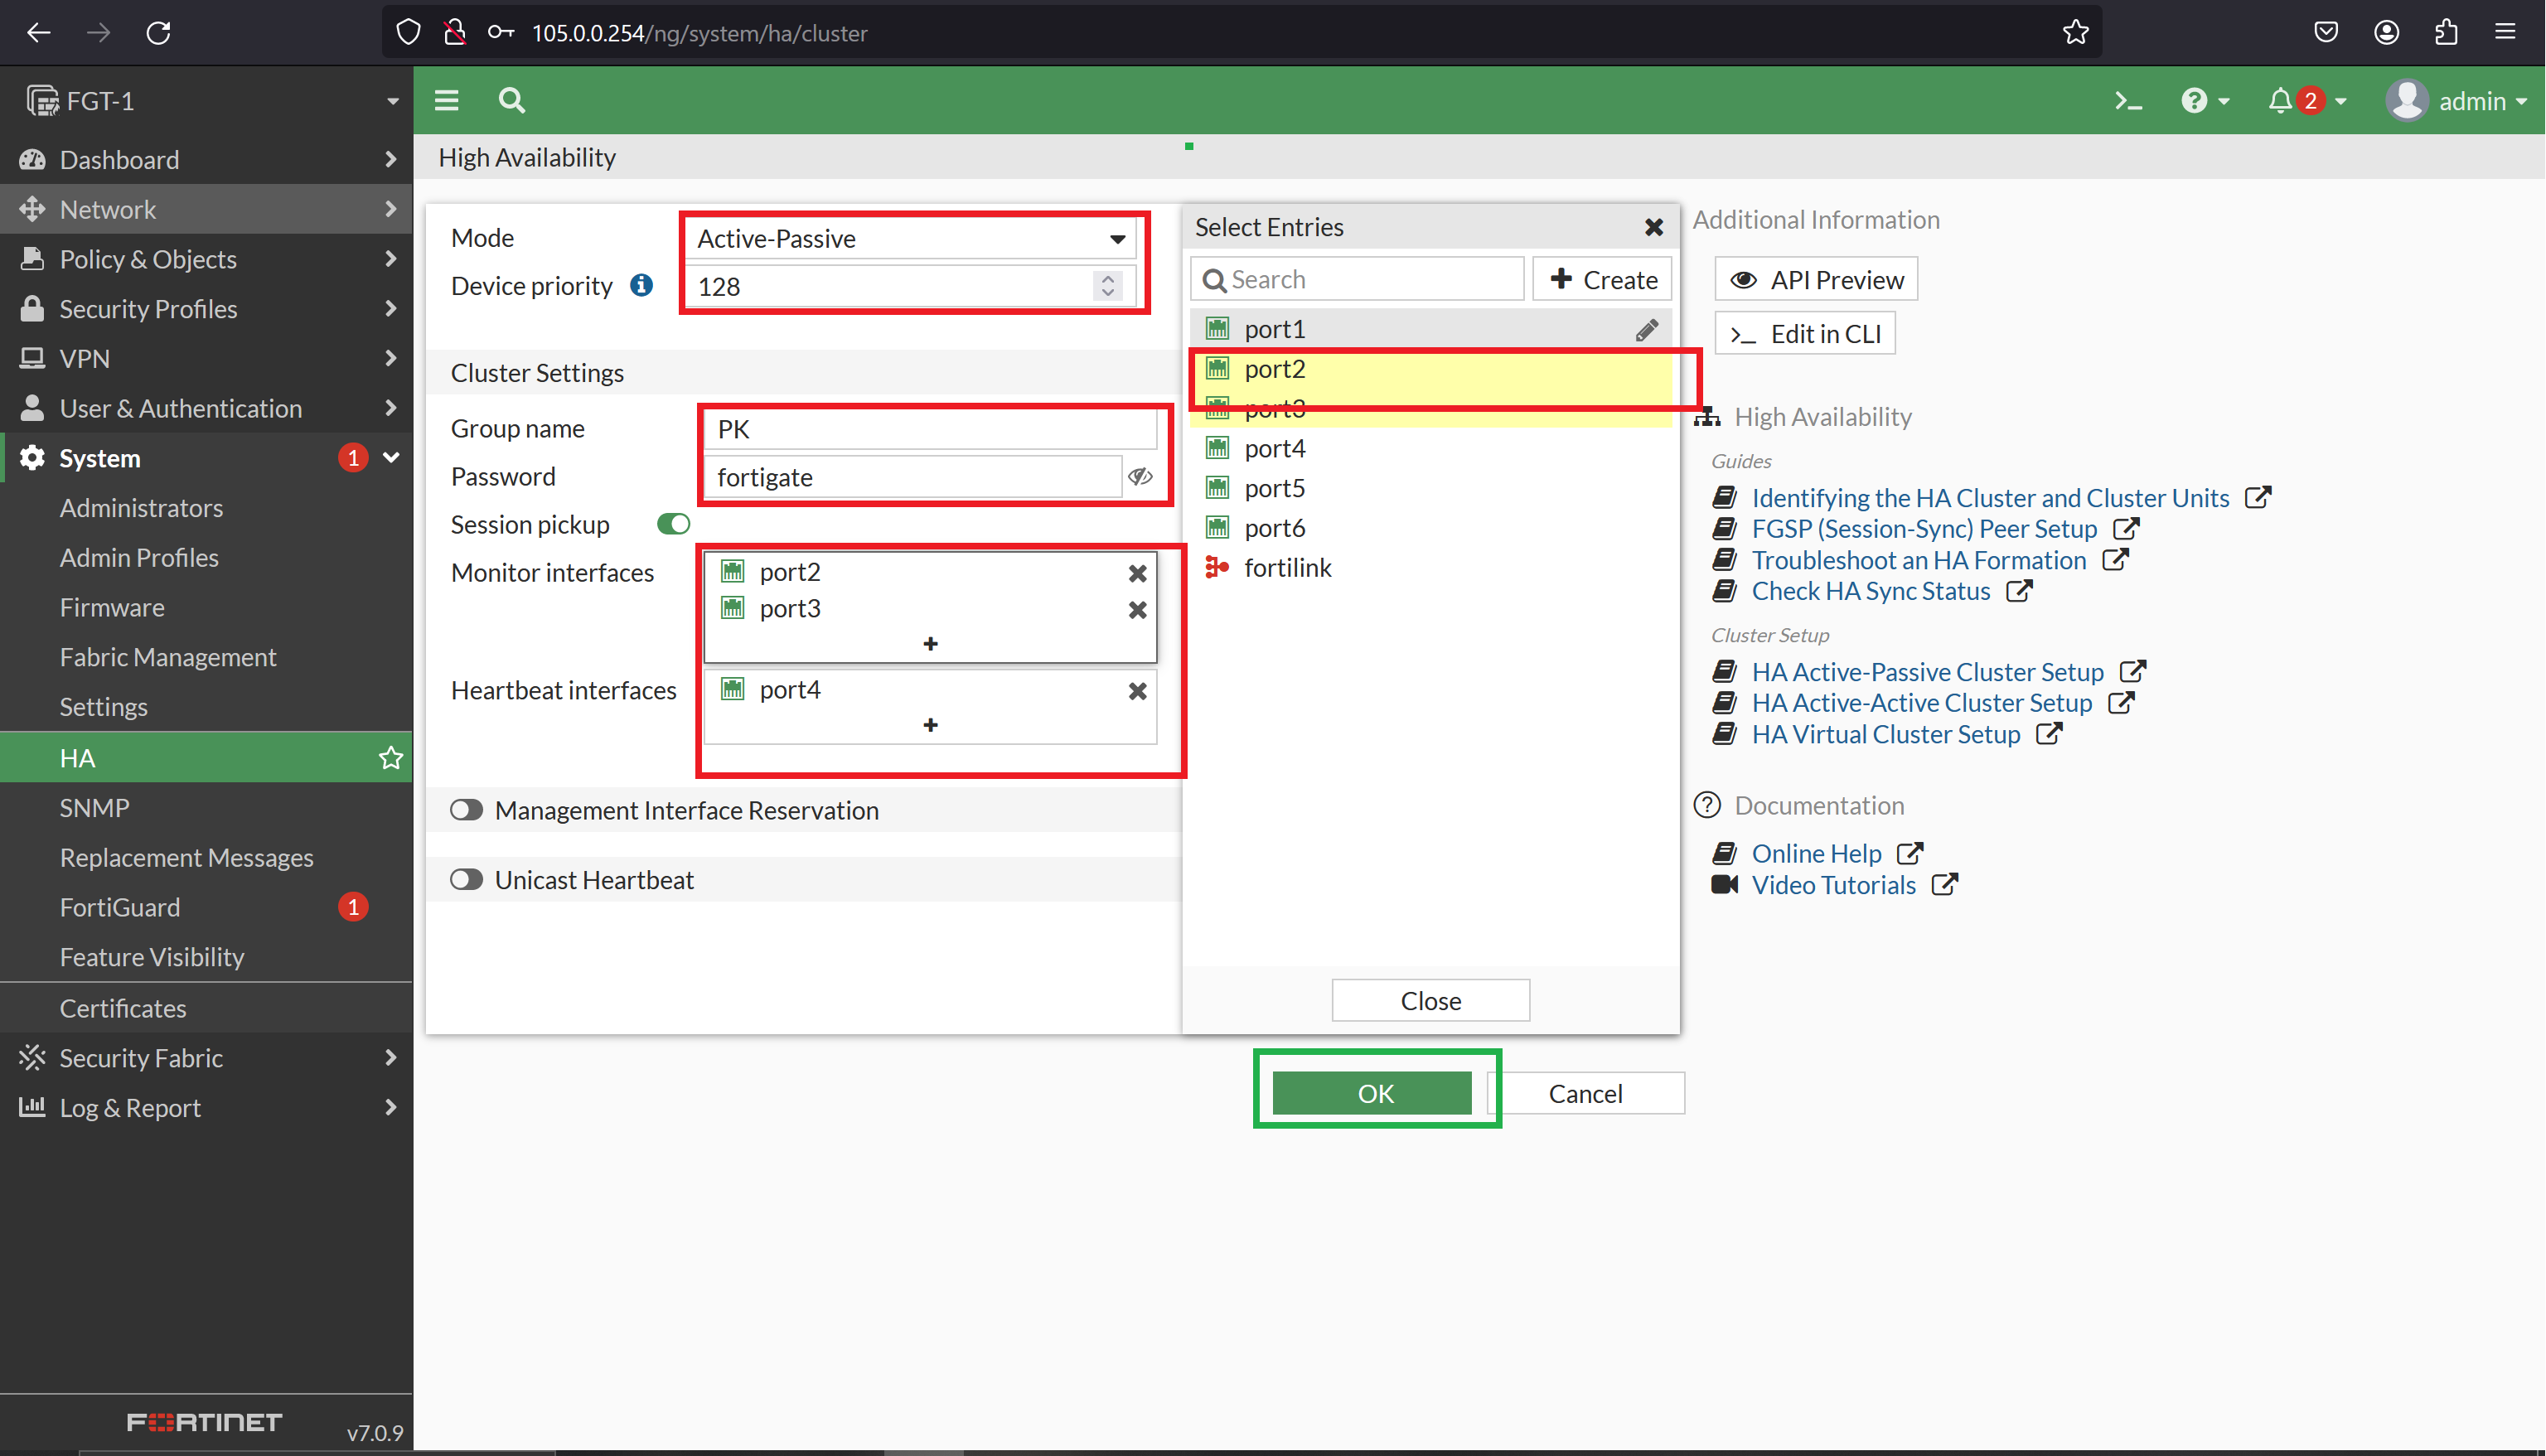
As per our requirement, FGT-1 will be Active, and FGT-2 will be Passive.
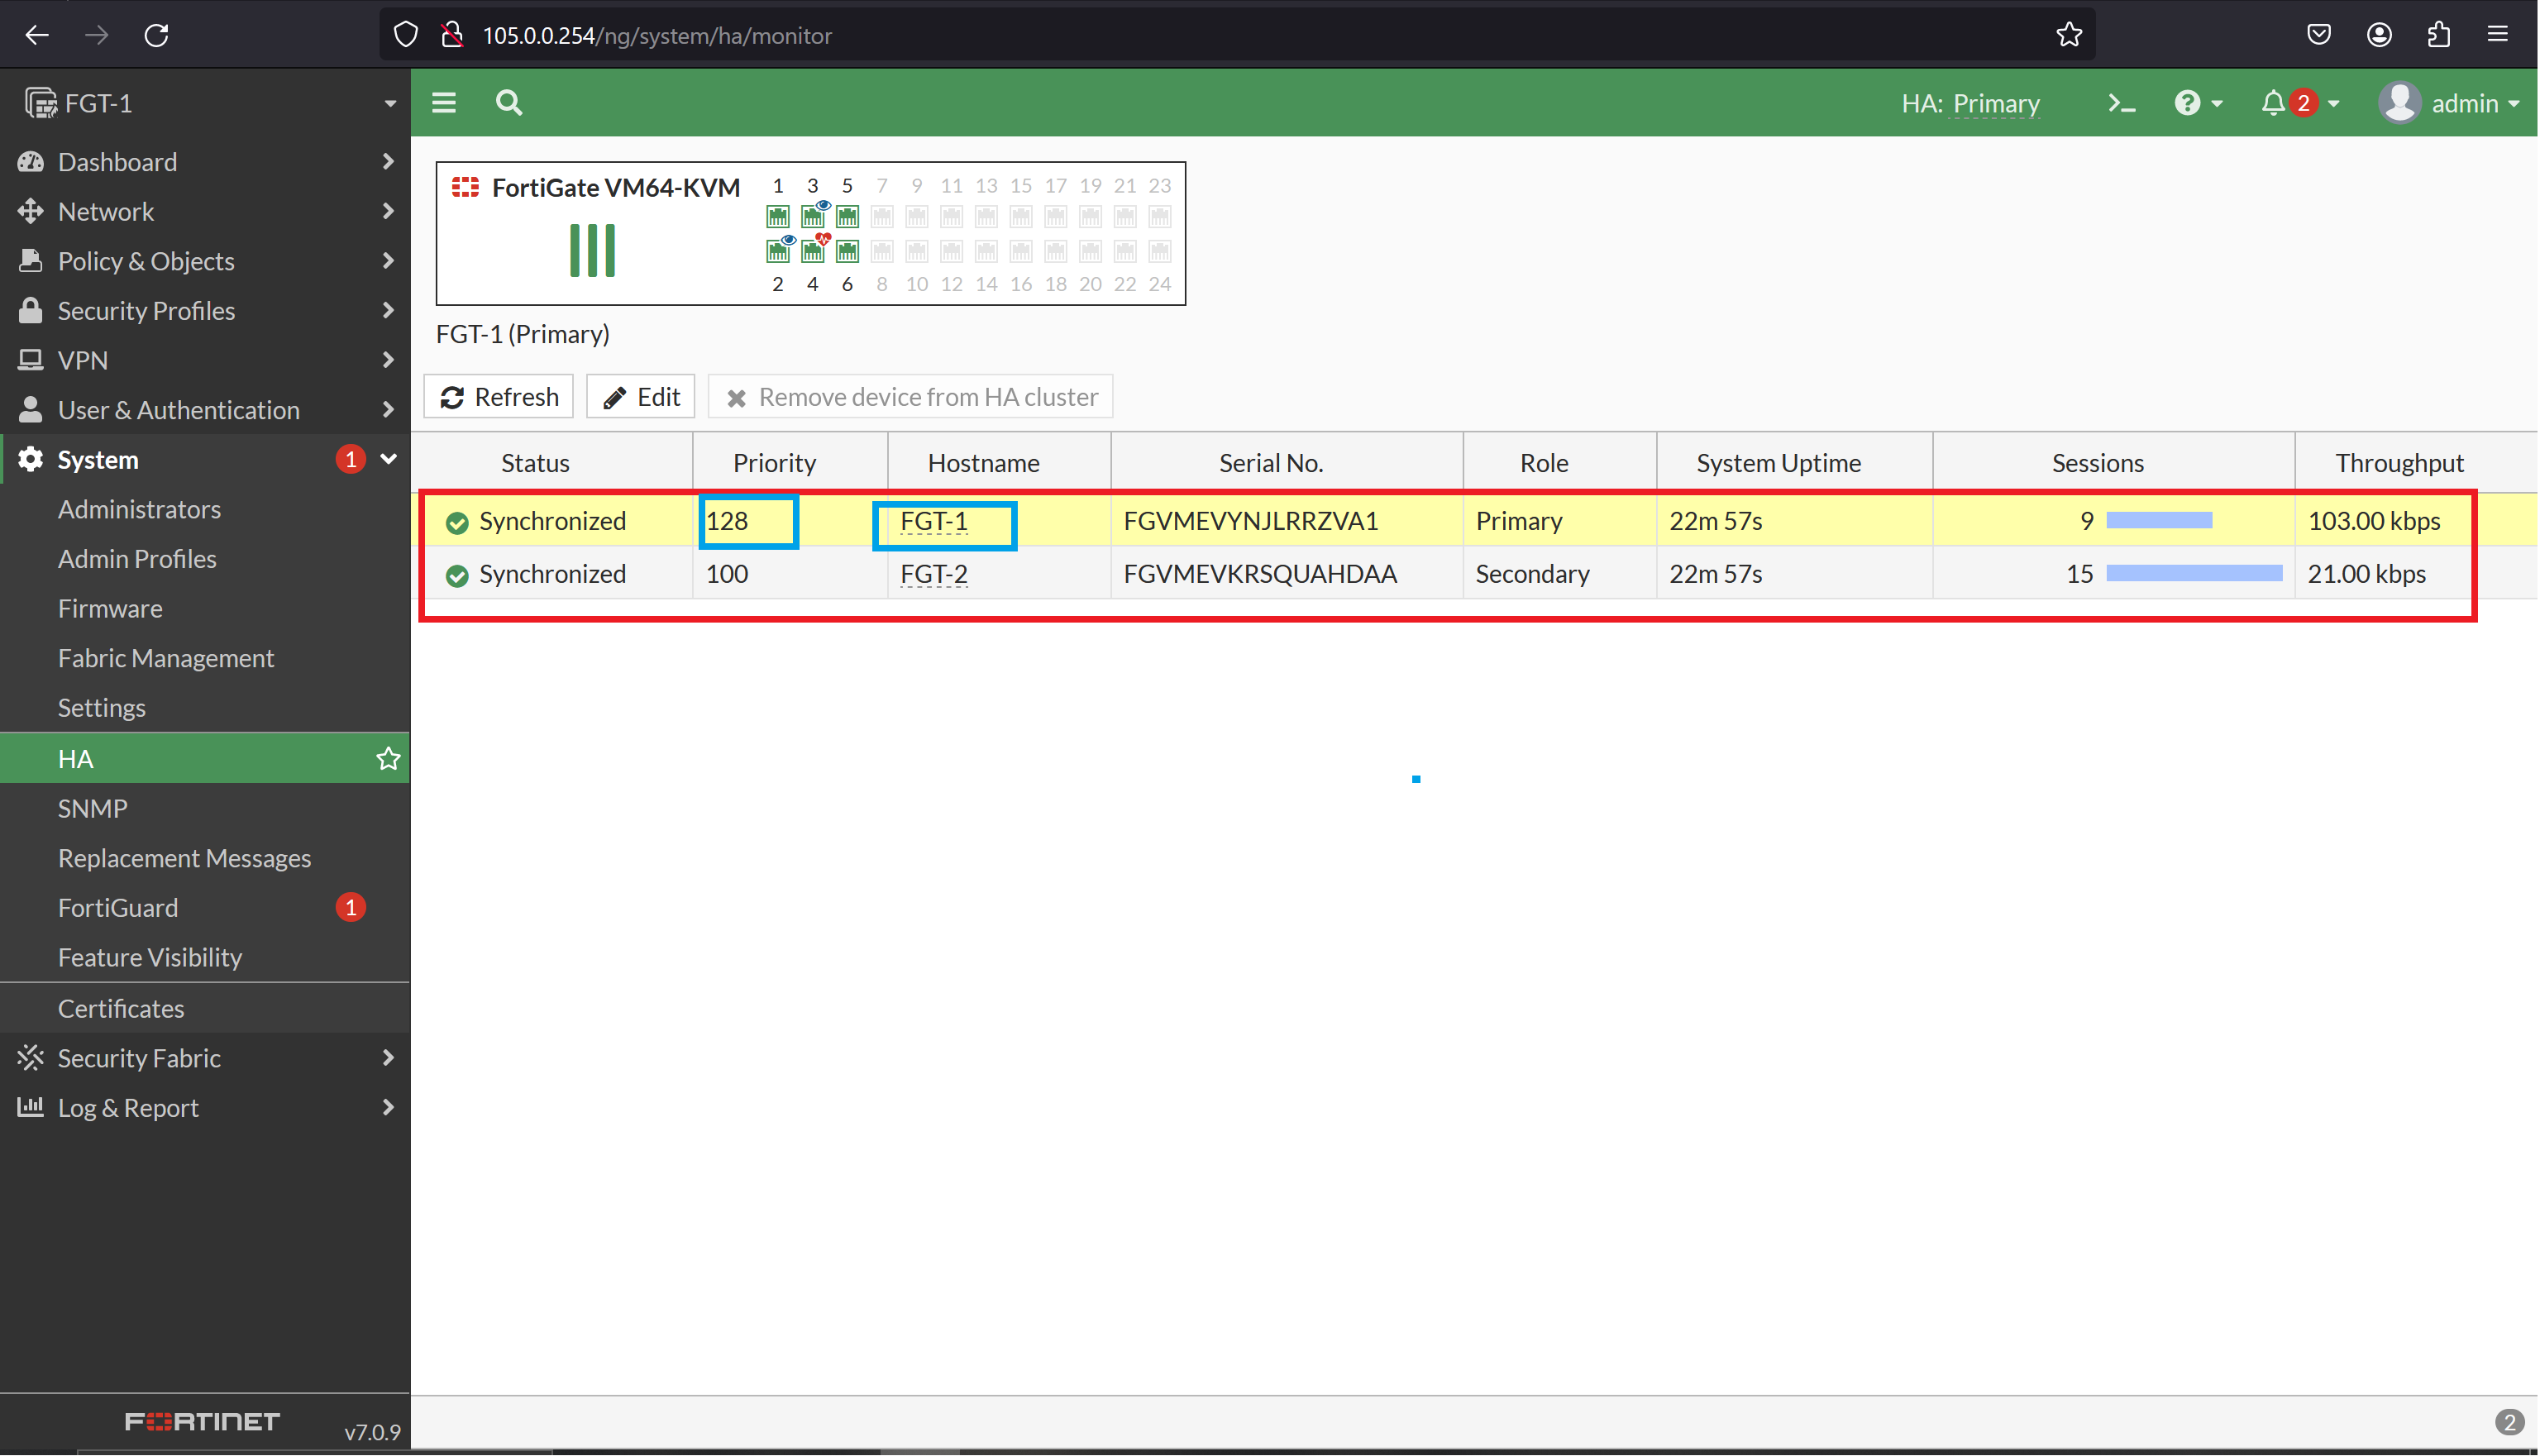
- FGT-1 priority is 128 and FGT-2 priority is 100.
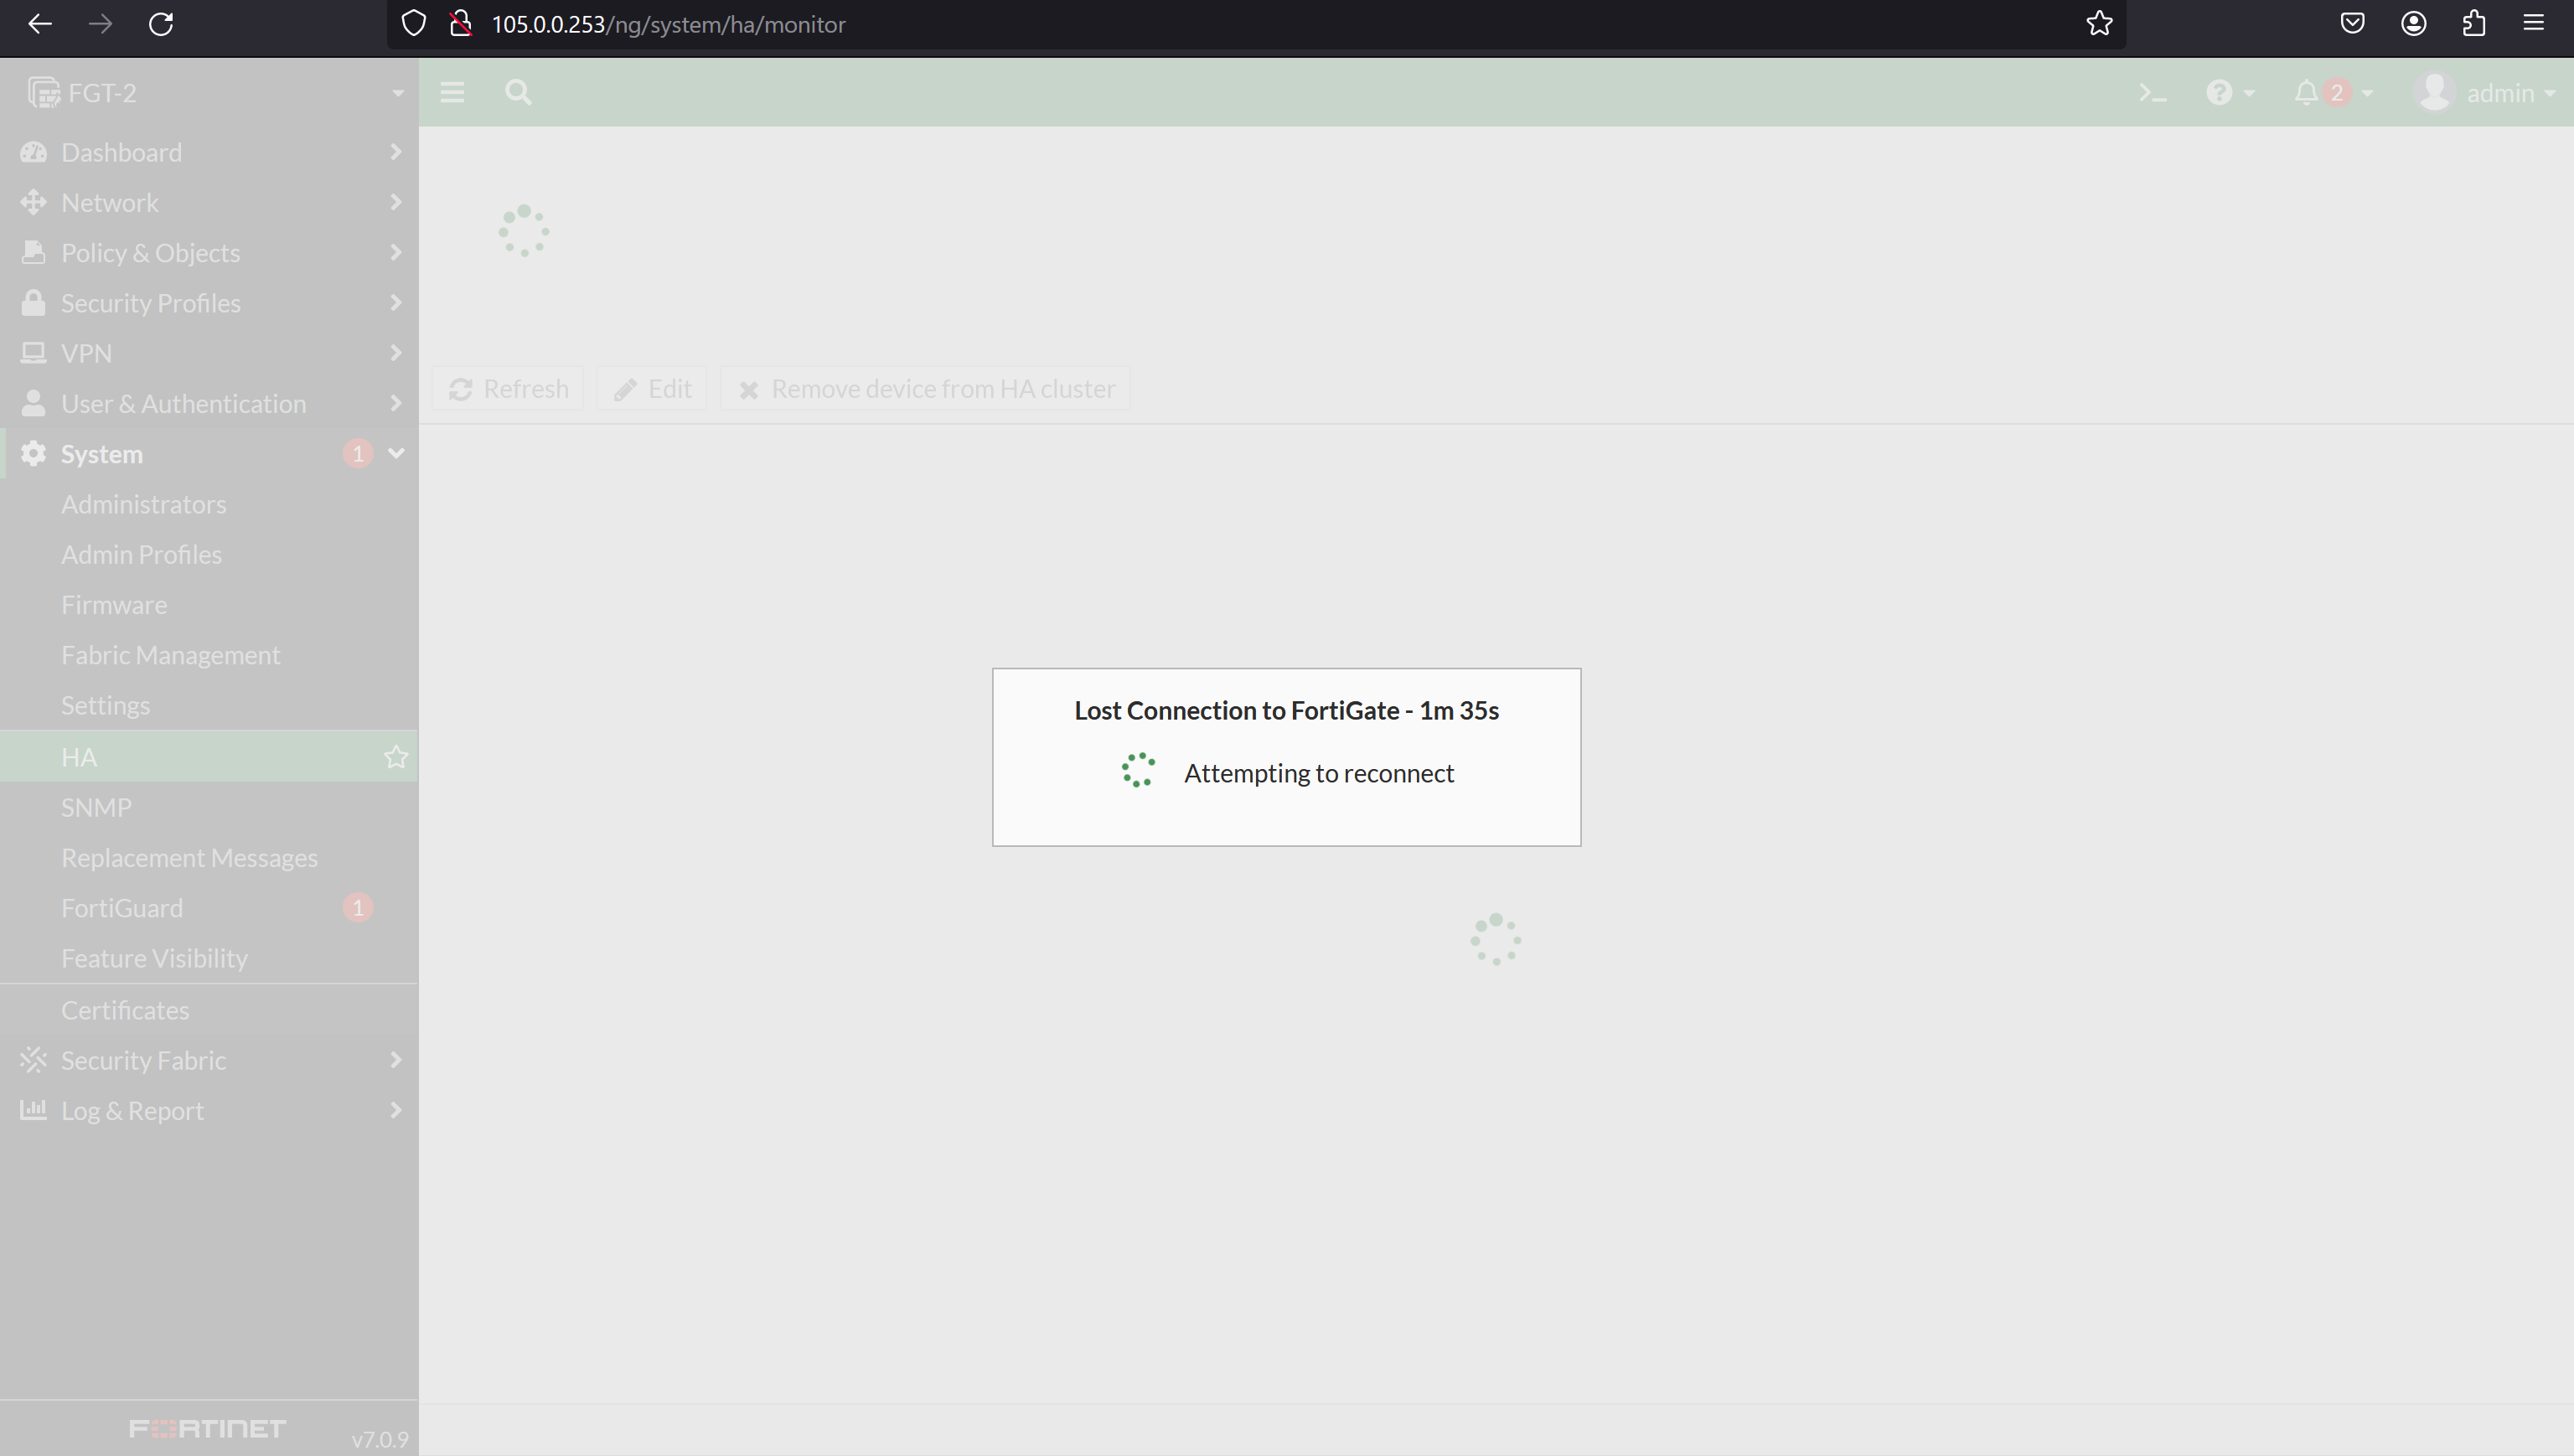
- In the Fortigate firewall once synchronization completes we don’t get access to the Passive device.
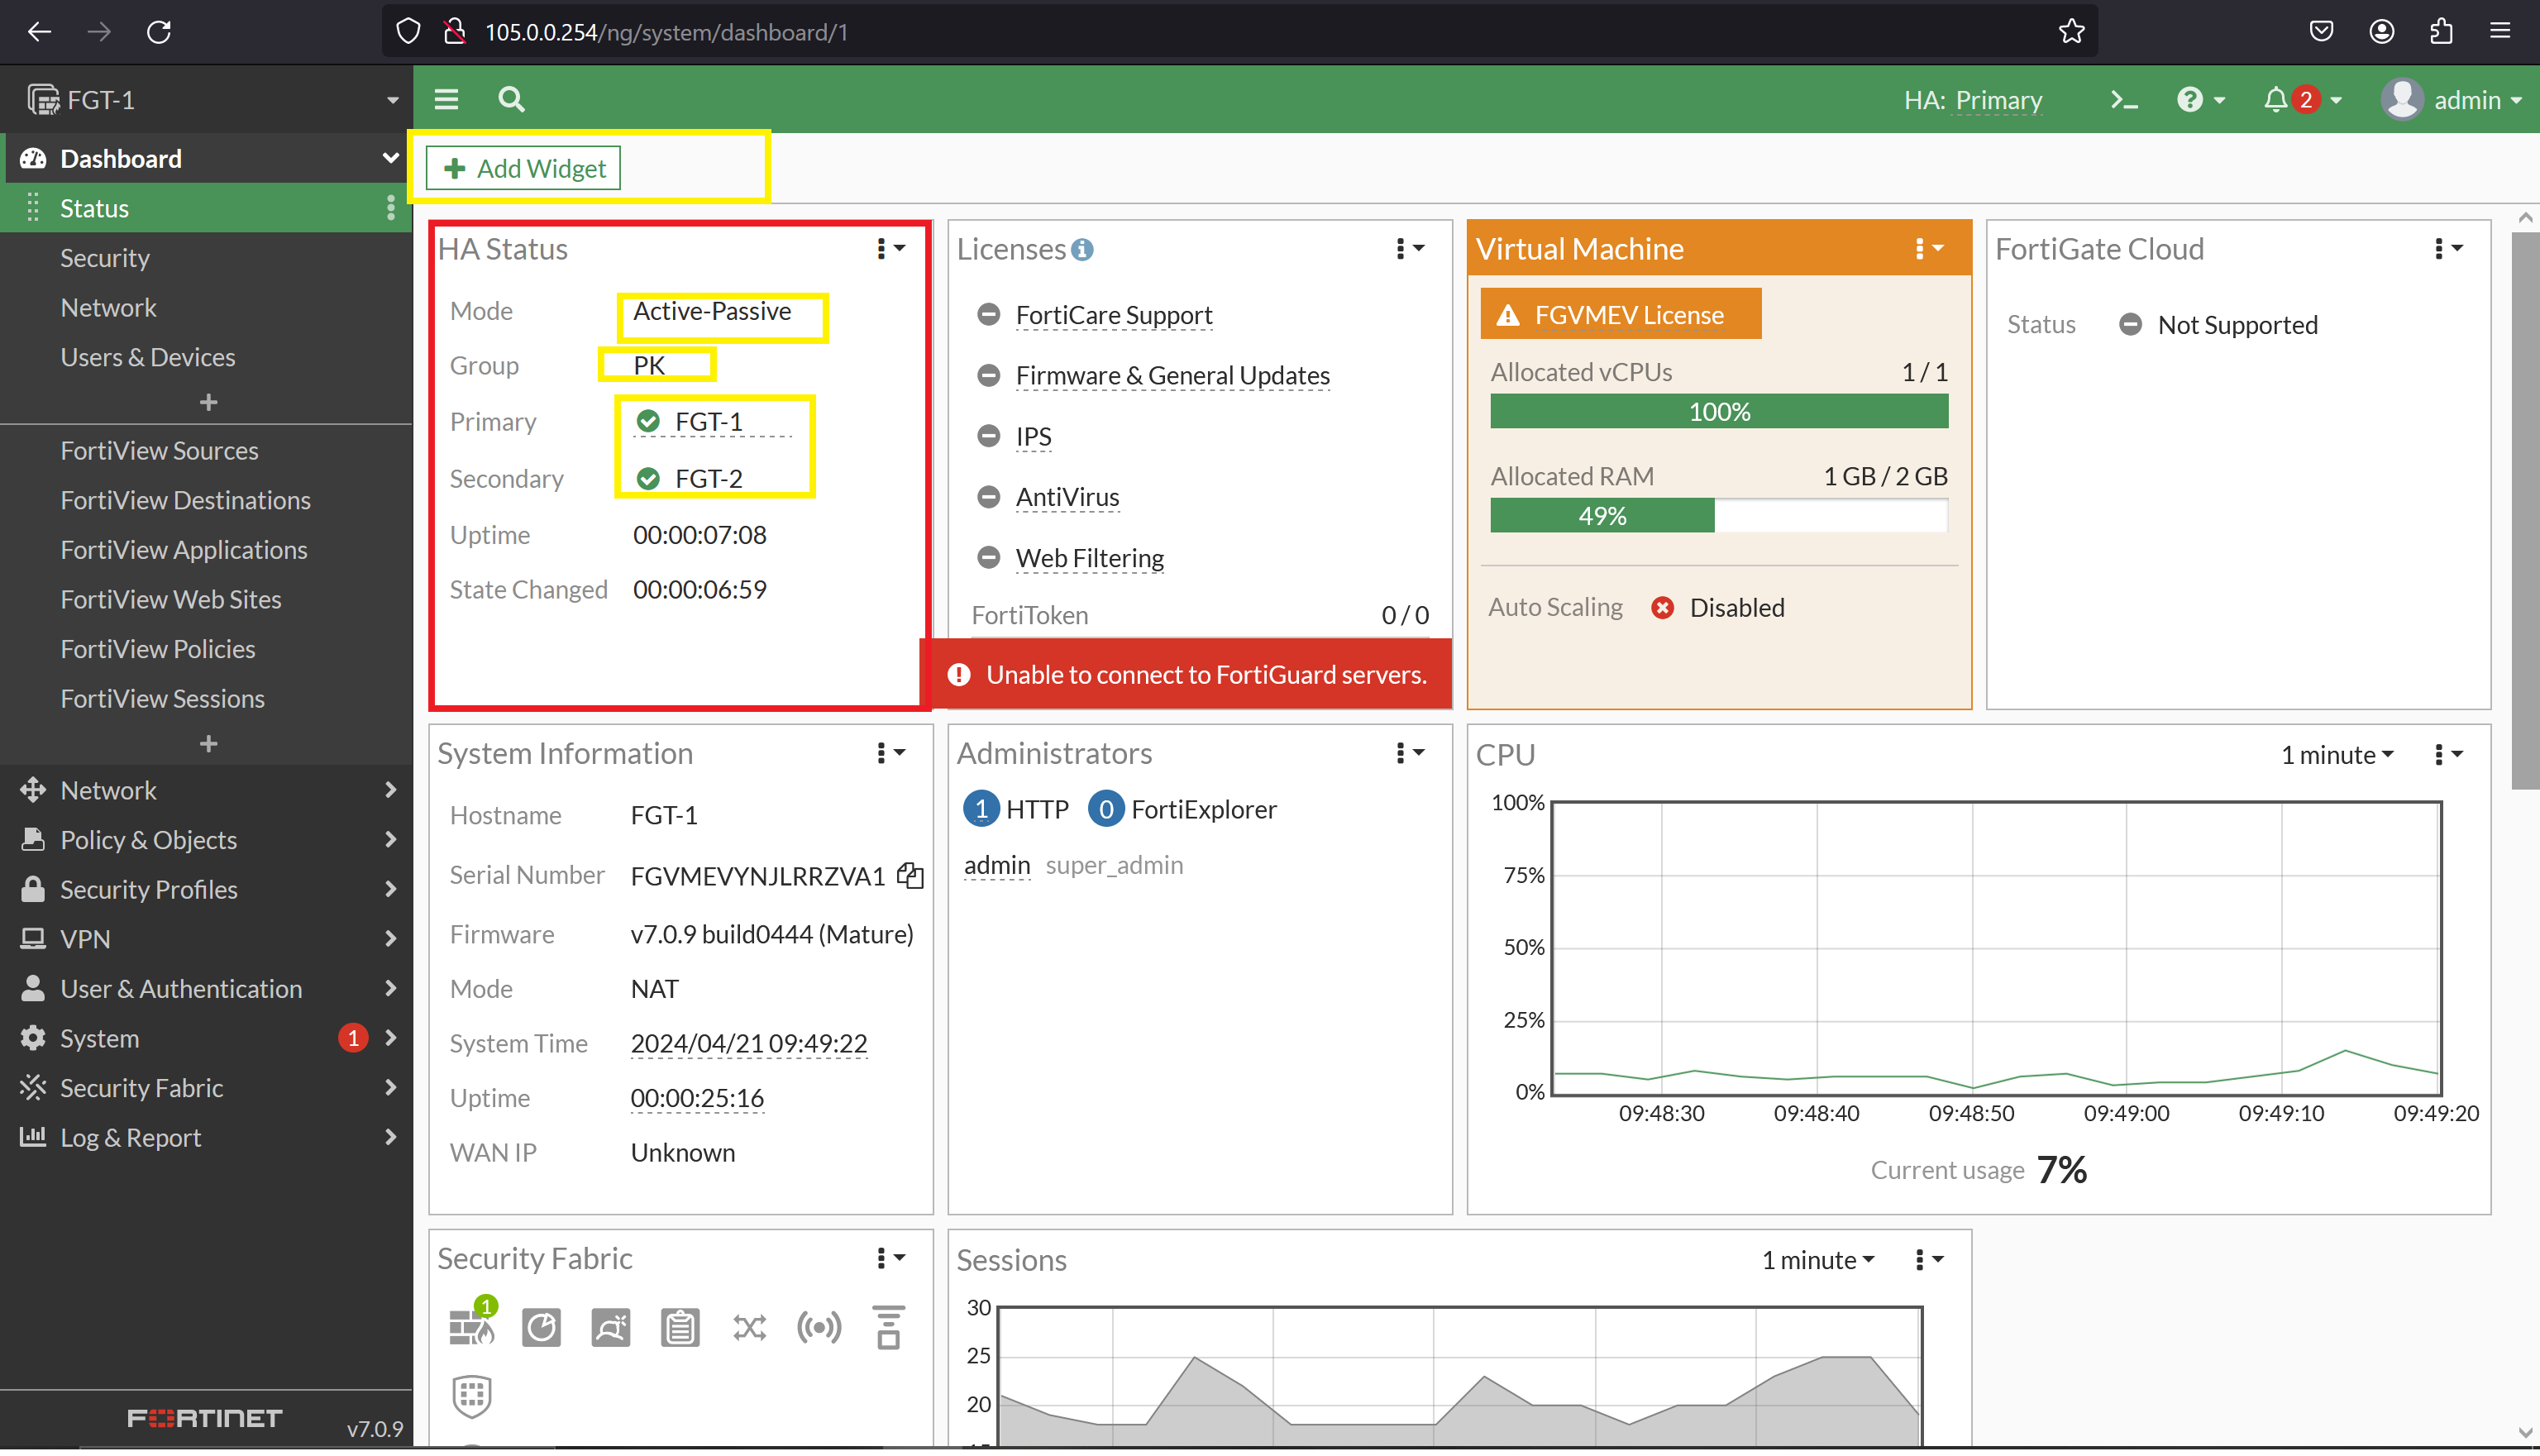
- Only we can see the status in the Active device
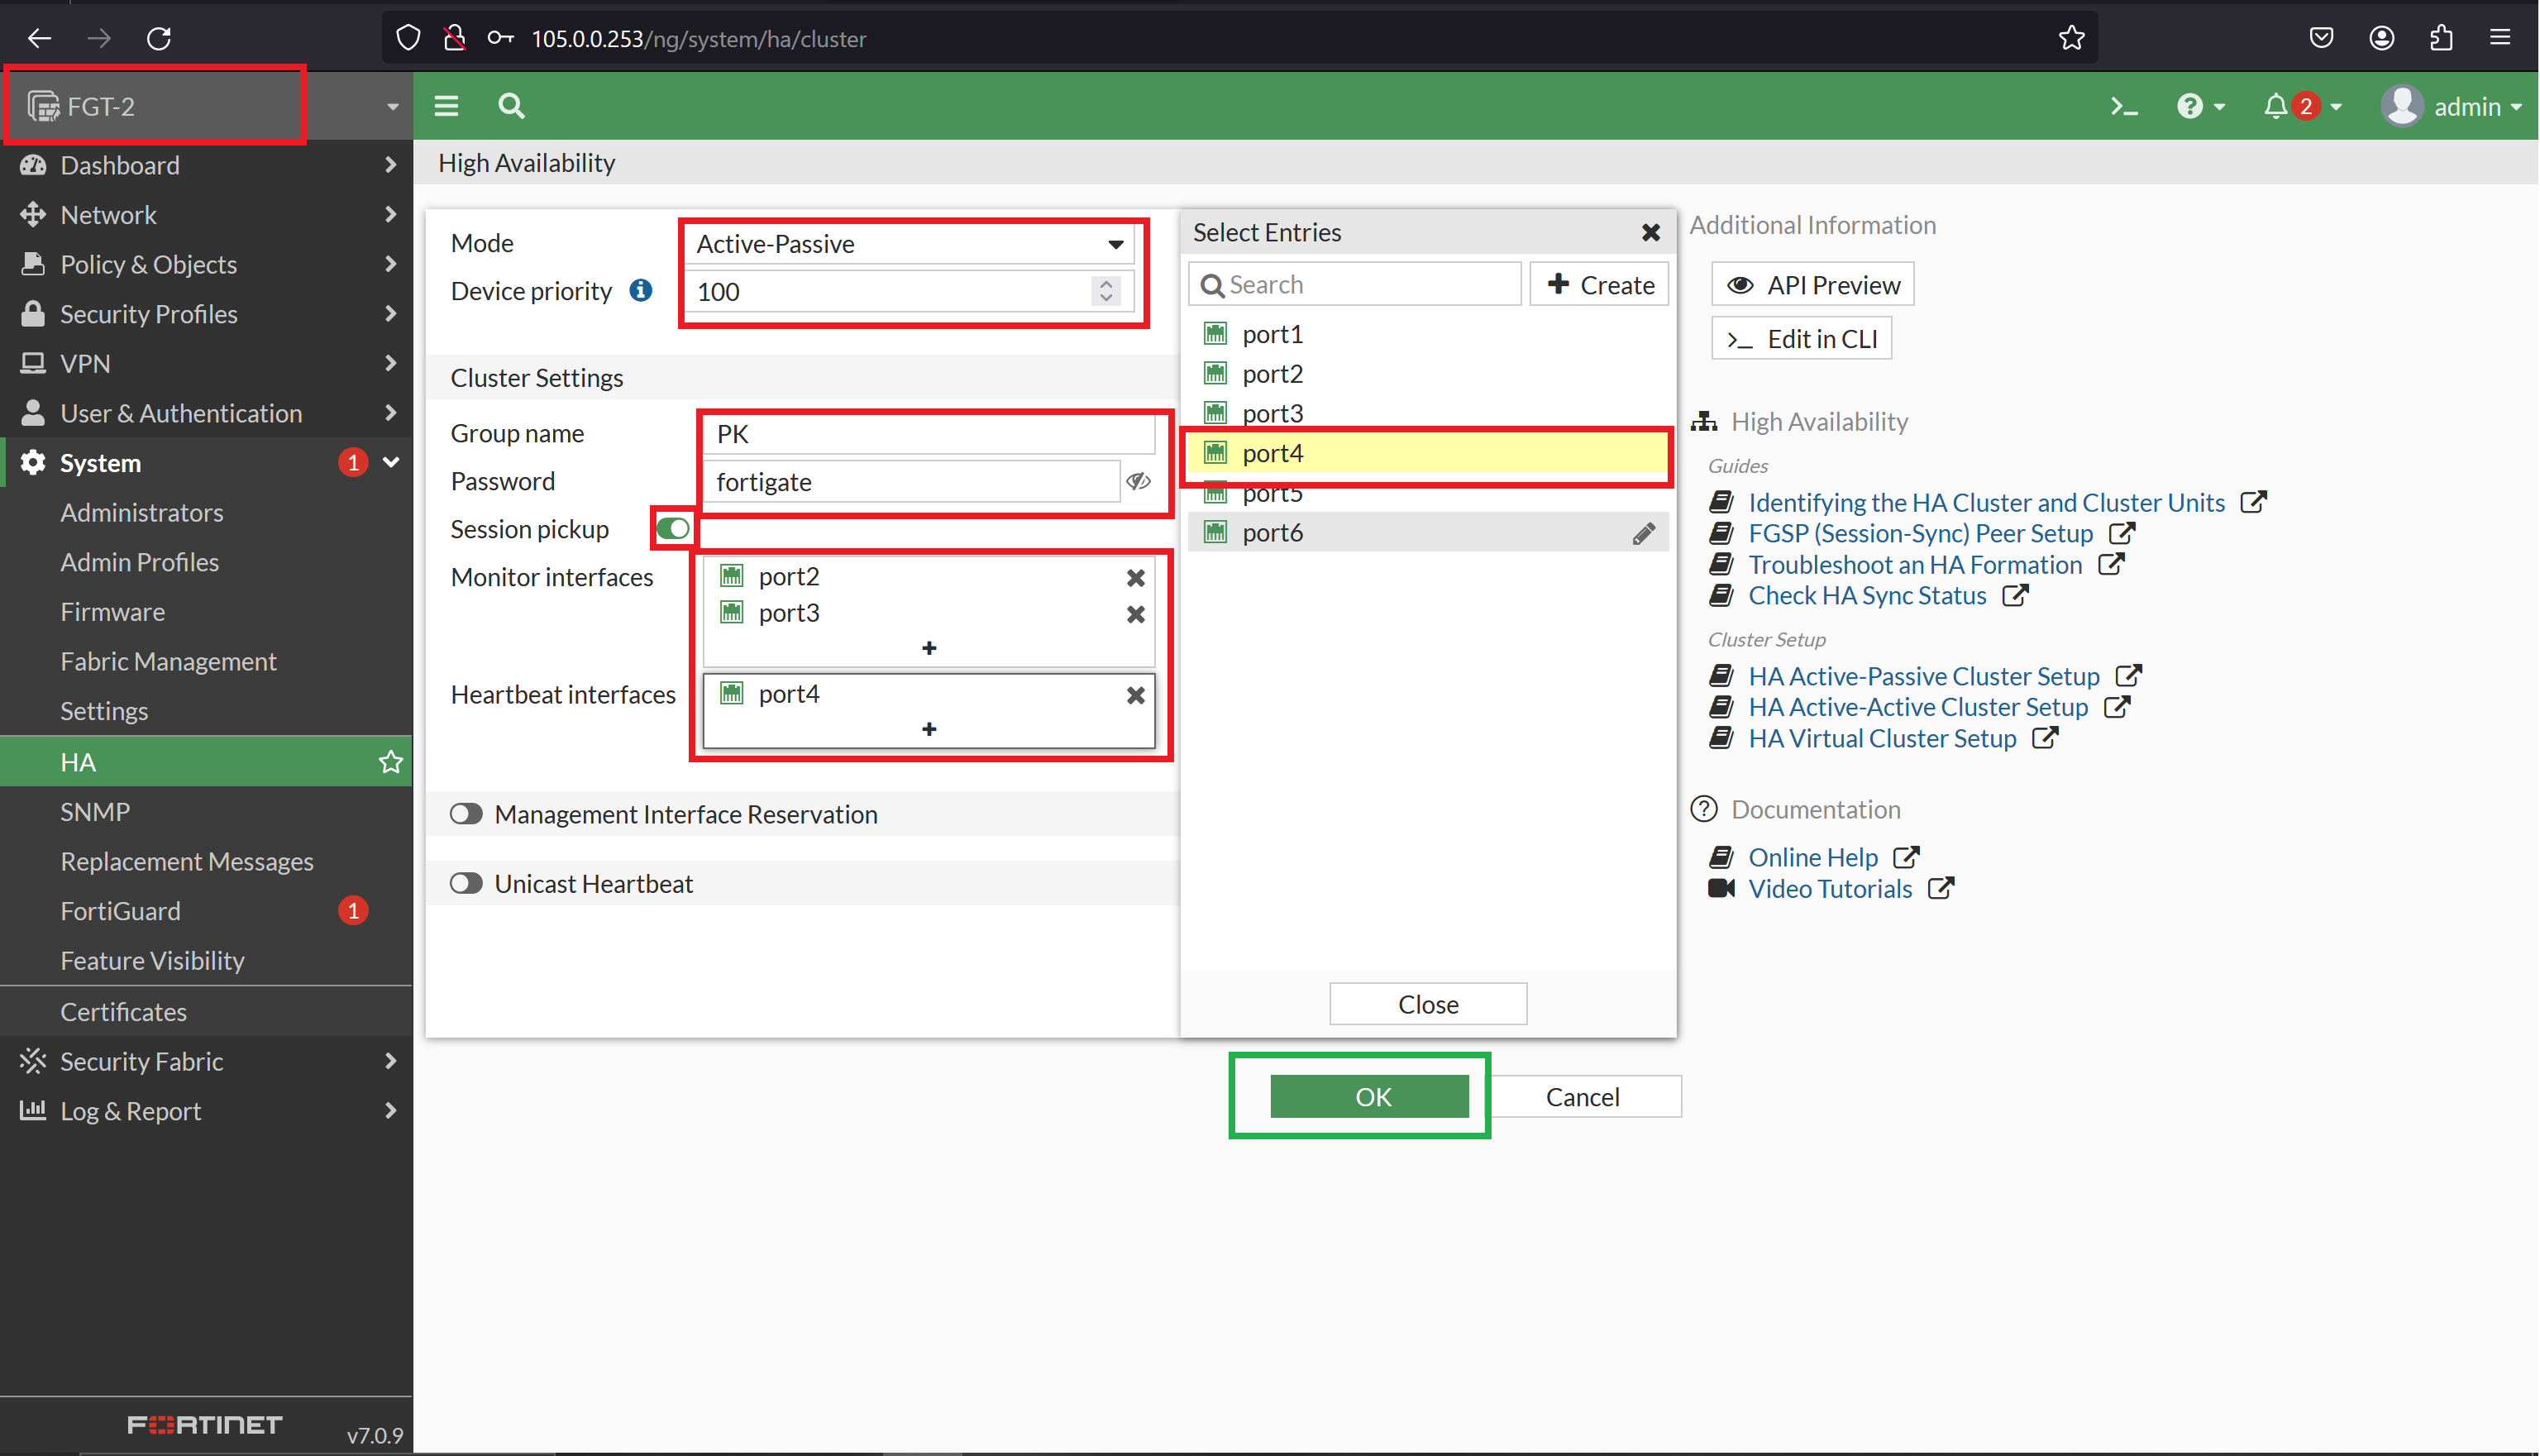
FGT-1 Dashboard of Both Firewall Synchronization.
FGT-2 Lost Connection Screen.
FGT-1 Dashboard Widget.
After the failure of FGT-1, FGT-2 will take over the role of Primary.
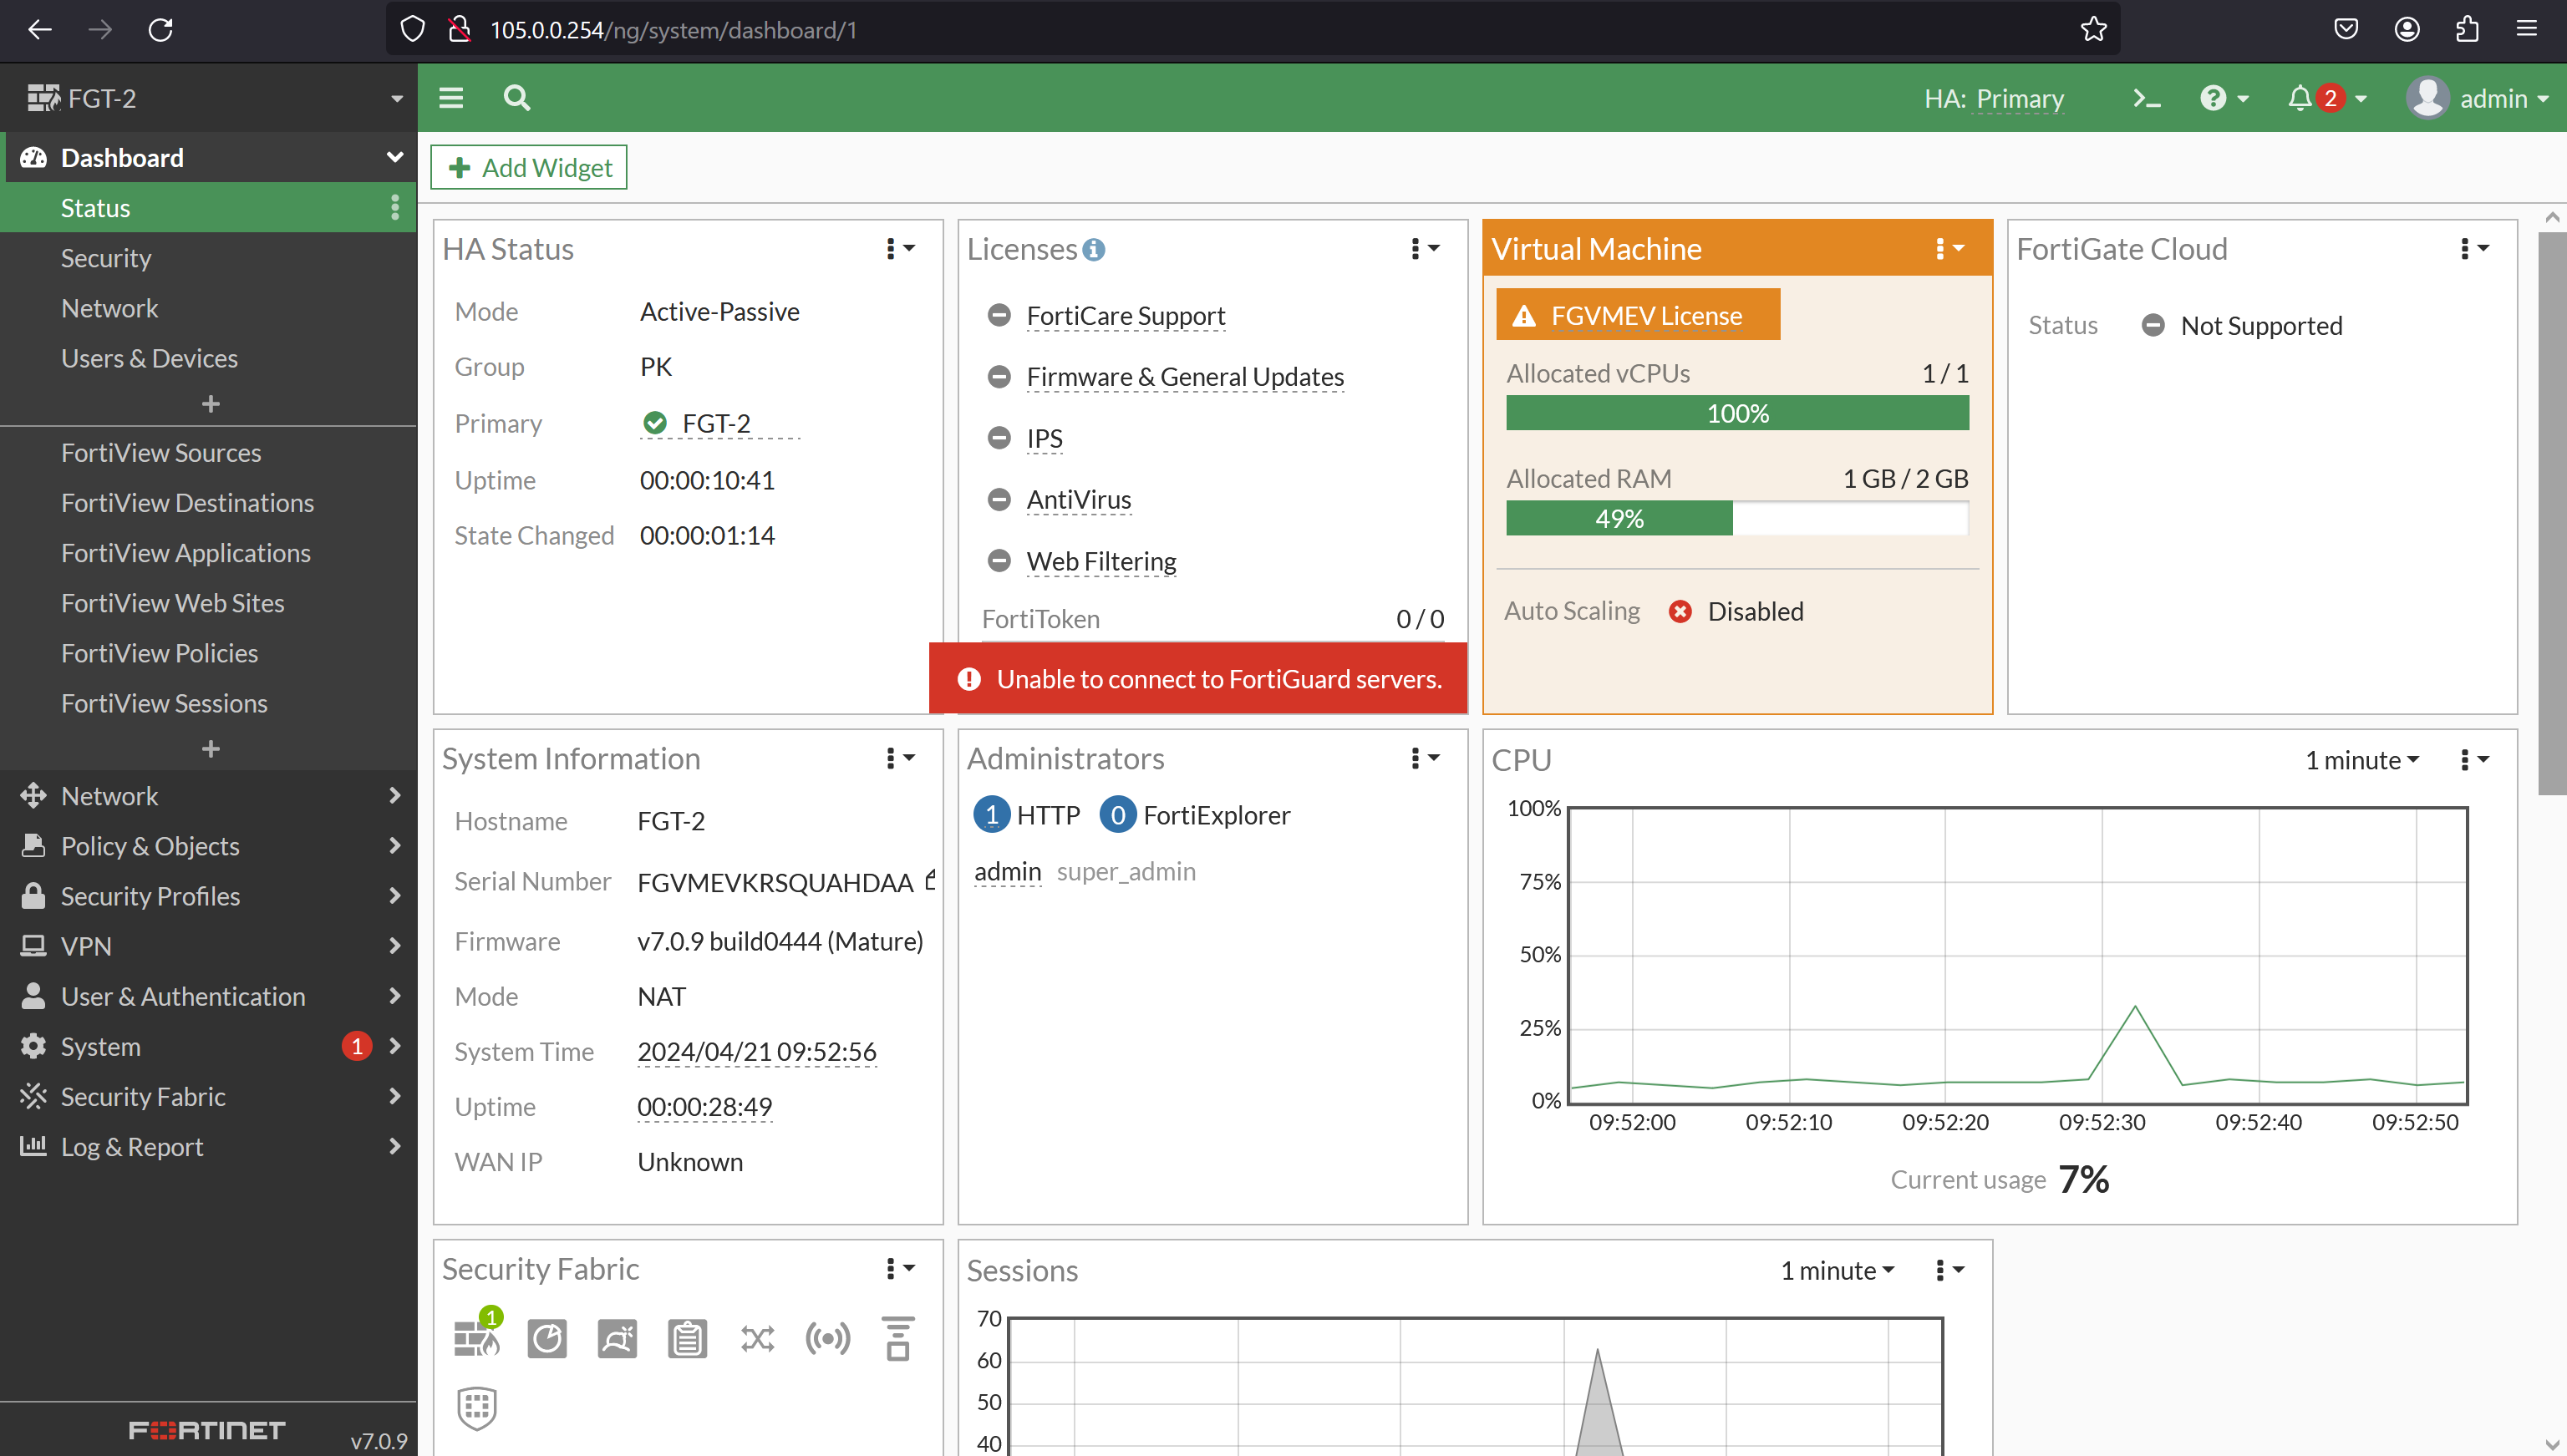
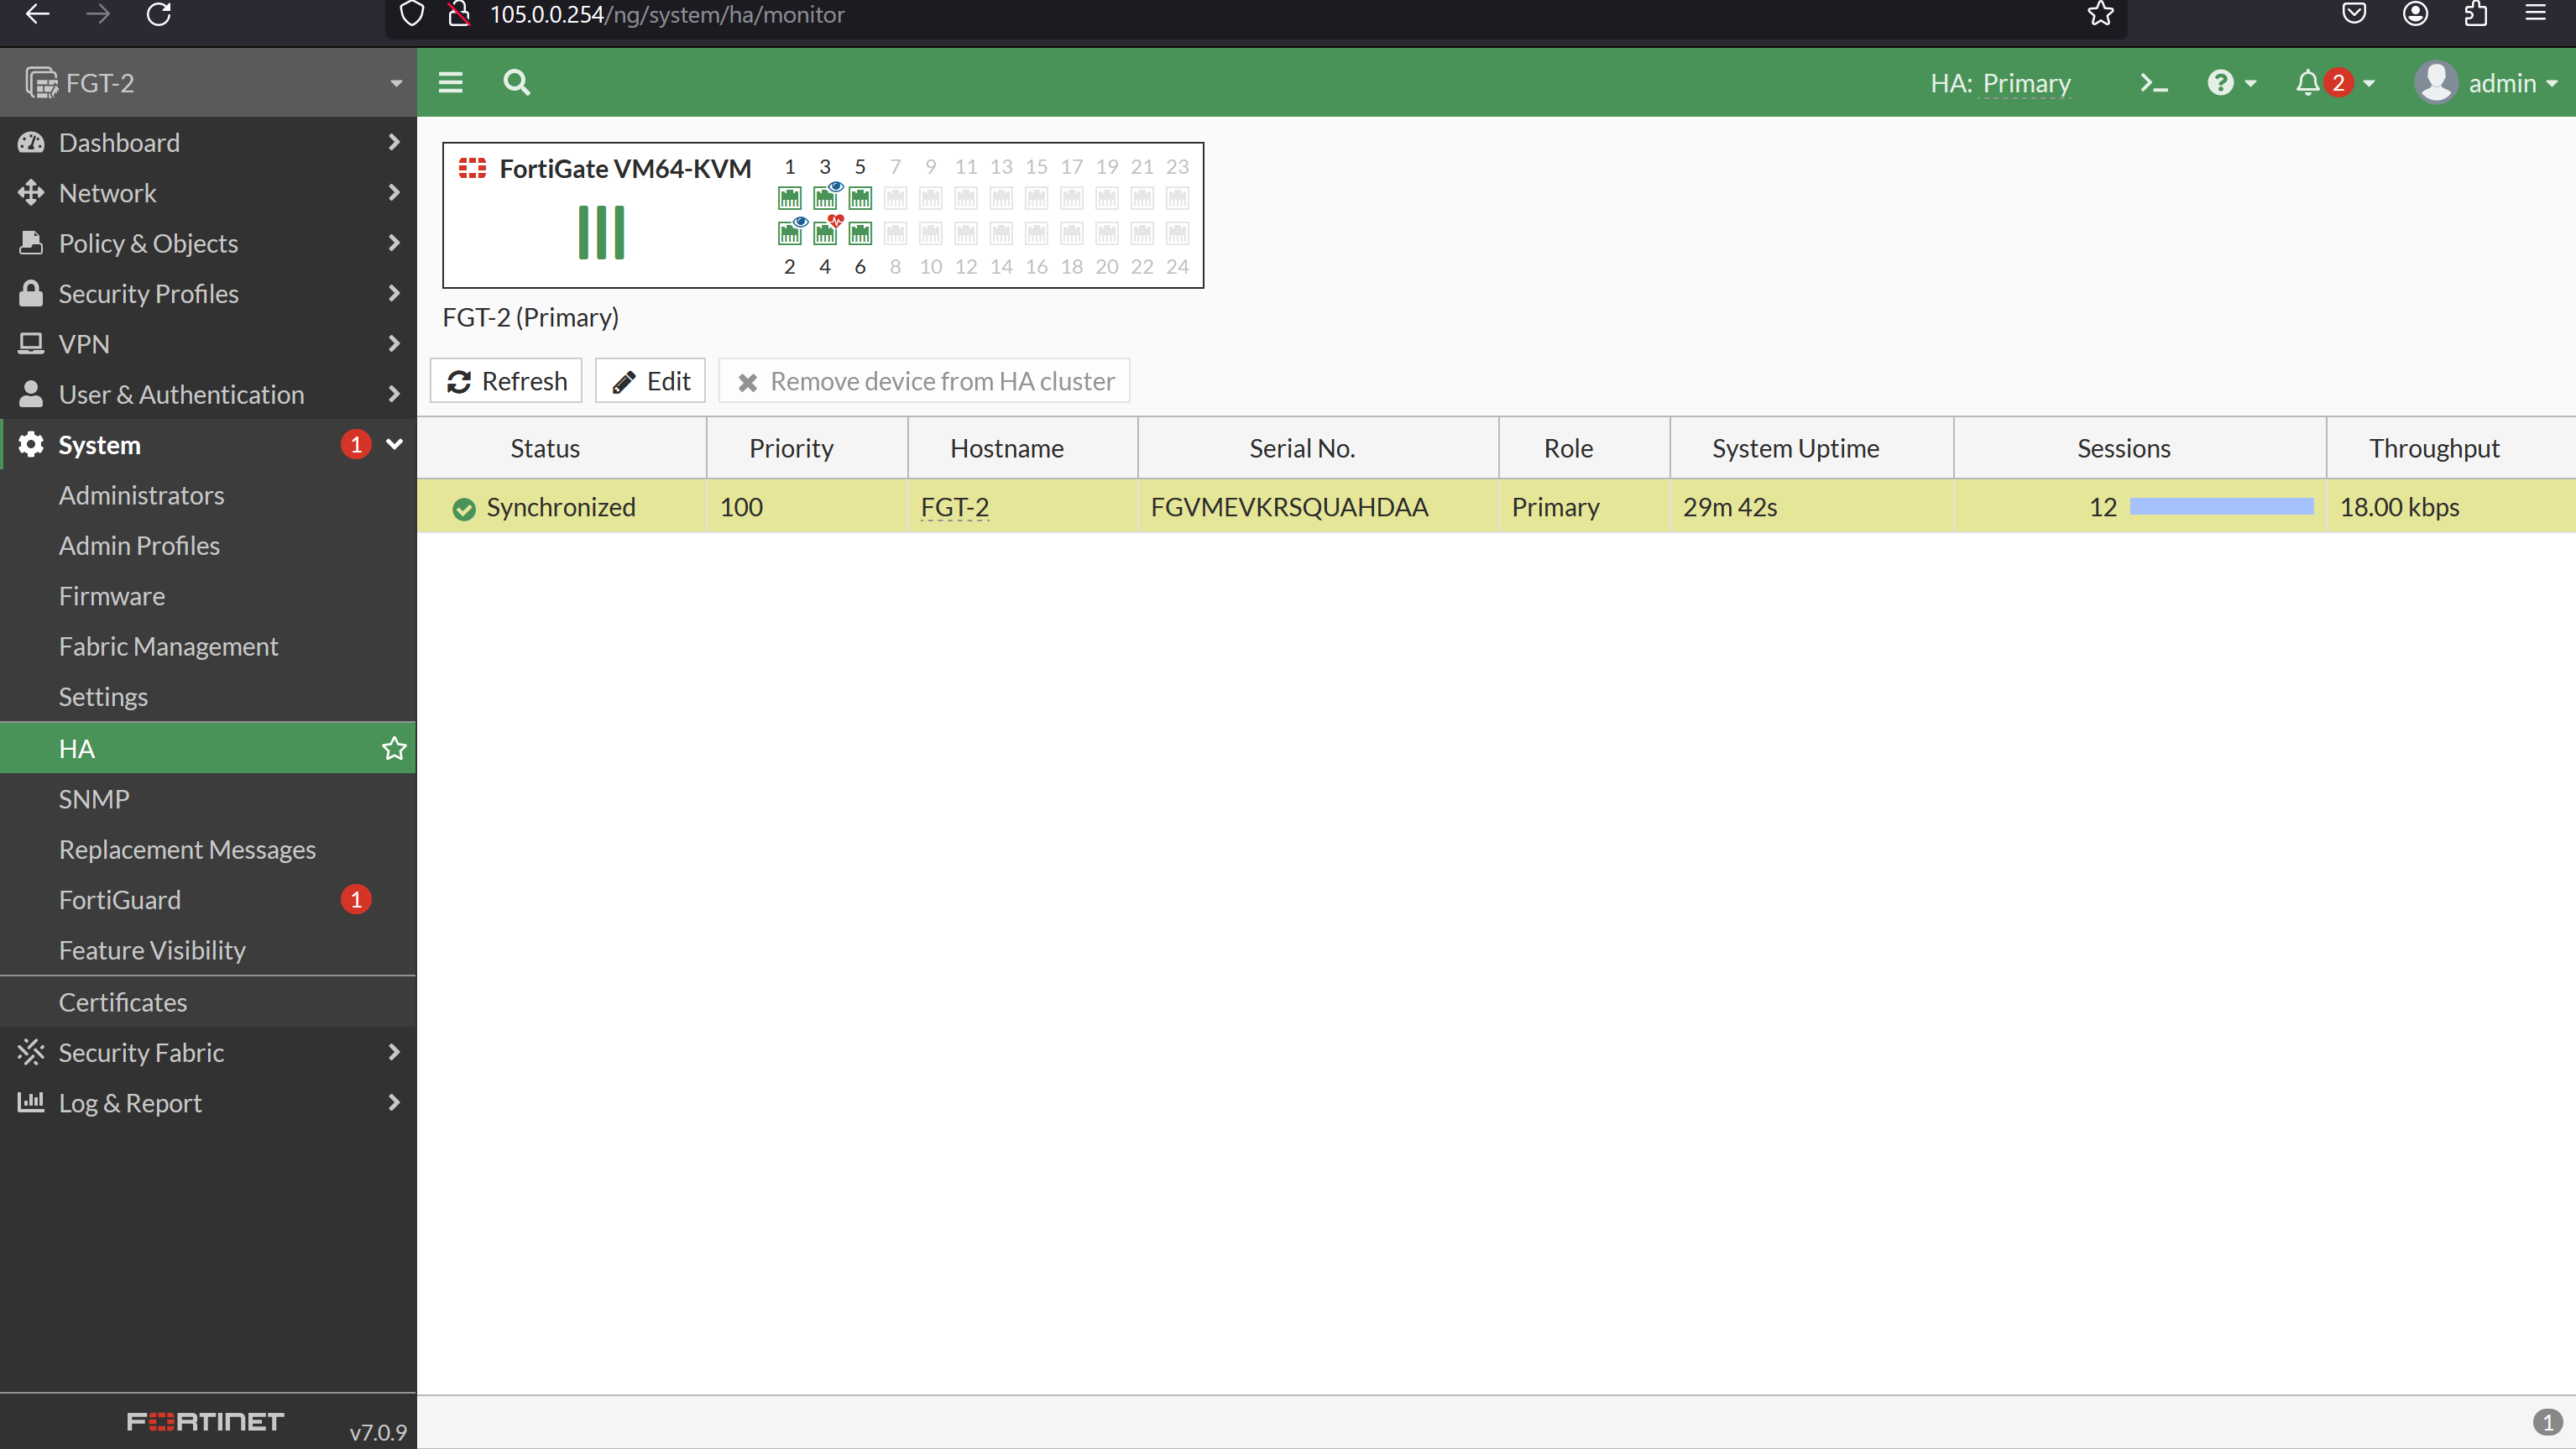
III. Active-Active Failover in FortiGate Firewall
Active-active failover in FortiGate firewall is a high availability (HA) configuration where both firewall units actively process network traffic simultaneously, distributing the load across the cluster. This configuration enhances performance and ensures redundancy by allowing seamless failover between units in case of hardware or software failures.
HA and load balancing
FGCP active-active HA uses a technique similar to unicast load balancing where the primary unit is associated with the cluster HA virtual MAC addresses and cluster IP addresses. The primary unit is the only cluster unit that receives packets sent to the cluster. The primary unit uses a load-balancing schedule to distribute sessions to all cluster units (including the primary unit). Subordinate unit interfaces retain their actual MAC addresses, and the primary unit communicates with the subordinate units using these MAC addresses. Packets exiting the subordinate units proceed directly to their destination and do not pass through the primary unit.
By default, active-active HA load balancing distributes proxy-based security profile processing to all cluster units. Proxy-based security profile processing is CPU and memory-intensive, so FGCP load balancing may result in higher throughput because resource-intensive processing is distributed among all cluster units.
The following proxy-based security profile processing is load-balanced:
- Virus scanning
- Web filtering
- Email Filtering
- Data Loss Prevention (DLP) of HTTP, FTP, IMAP, IMAPS, POP3, POP3S, SMTP, SMTPS, IM, and NNTP sessions accepted by firewall policies
Other features enabled in firewall policies such as endpoint security, traffic shaping, and authentication have no effect on active-active load balancing.
During active-active HA load balancing, the primary unit uses the configured load balancing schedule to determine which cluster unit will process a session. The primary unit stores the load-balancing information for each load-balanced session in the cluster load-balancing session table. Using the information in this table, the primary unit can then forward all of the remaining packets in each session to the appropriate cluster unit. The load balancing session table is synchronized among all cluster units.
ICMP, multicast, and broadcast sessions are never load-balanced and are always processed by the primary unit. The following sessions are only processed by the primary unit:
- IPS
- Application control
- Flow-based virus scanning
- Flow-based web filtering
- Flow-based DLP
- Flow-based email filtering
- VoIP
- IM
- P2P
- IPsec VPN
- SSL VPN
- HTTP multiplexing
- SSL offloading
- WAN optimization
- Explicit web proxy
- WCCP
In addition to load balancing, active-active HA provides the same session, device, and link failover protection as active-passive HA. If the primary unit fails, a subordinate unit becomes the primary unit and resumes operating the cluster. Active-active HA maintains as many load balanced sessions as possible after a failover by continuing to process the load balanced sessions that were being processed by the cluster units that are still operating.
Active-active failover
If a subordinate unit fails, the primary unit redistributes the sessions that the subordinate was processing among the remaining active cluster members. If the primary unit fails, the subordinate units negotiate to select a new primary unit. The new primary unit continues to distribute packets among the remaining active cluster units.
Failover works similarly if the cluster consists of only two units. If the primary unit fails, the subordinate unit negotiates and becomes the new primary unit. If the subordinate unit fails, the primary unit processes all traffic. In both cases, the single remaining unit continues to function as a primary unit, maintaining the HA virtual MAC address for all of its interfaces.
2. Configuration
2.1. HA Configuration
- Enable HA: Configure active-active HA mode on both firewall units.
- Synchronize Configuration: Ensure that both units have identical configurations, including network interfaces, routing, and security policies.
- Configure Load Balancing: Define load-balancing algorithms and link load-balancing settings to distribute traffic evenly across the cluster.
2.2. Firewall Policies
- Symmetric Policies: Create symmetric firewall policies that apply to both active units, ensuring consistent enforcement of security rules.
- Policy Prioritization: Prioritize firewall policies to ensure that critical traffic is processed efficiently and does not experience delays.
2.3. Monitoring and Alerting
- Health Monitoring: Continuously monitor the health and status of both firewall units, including CPU usage, memory utilization, and interface status.
- Alerting: Configure alert notifications to promptly notify administrators of any issues or failures within the HA cluster, allowing for quick resolution.
IV. Active - Active(Lab)
Sample Topology:
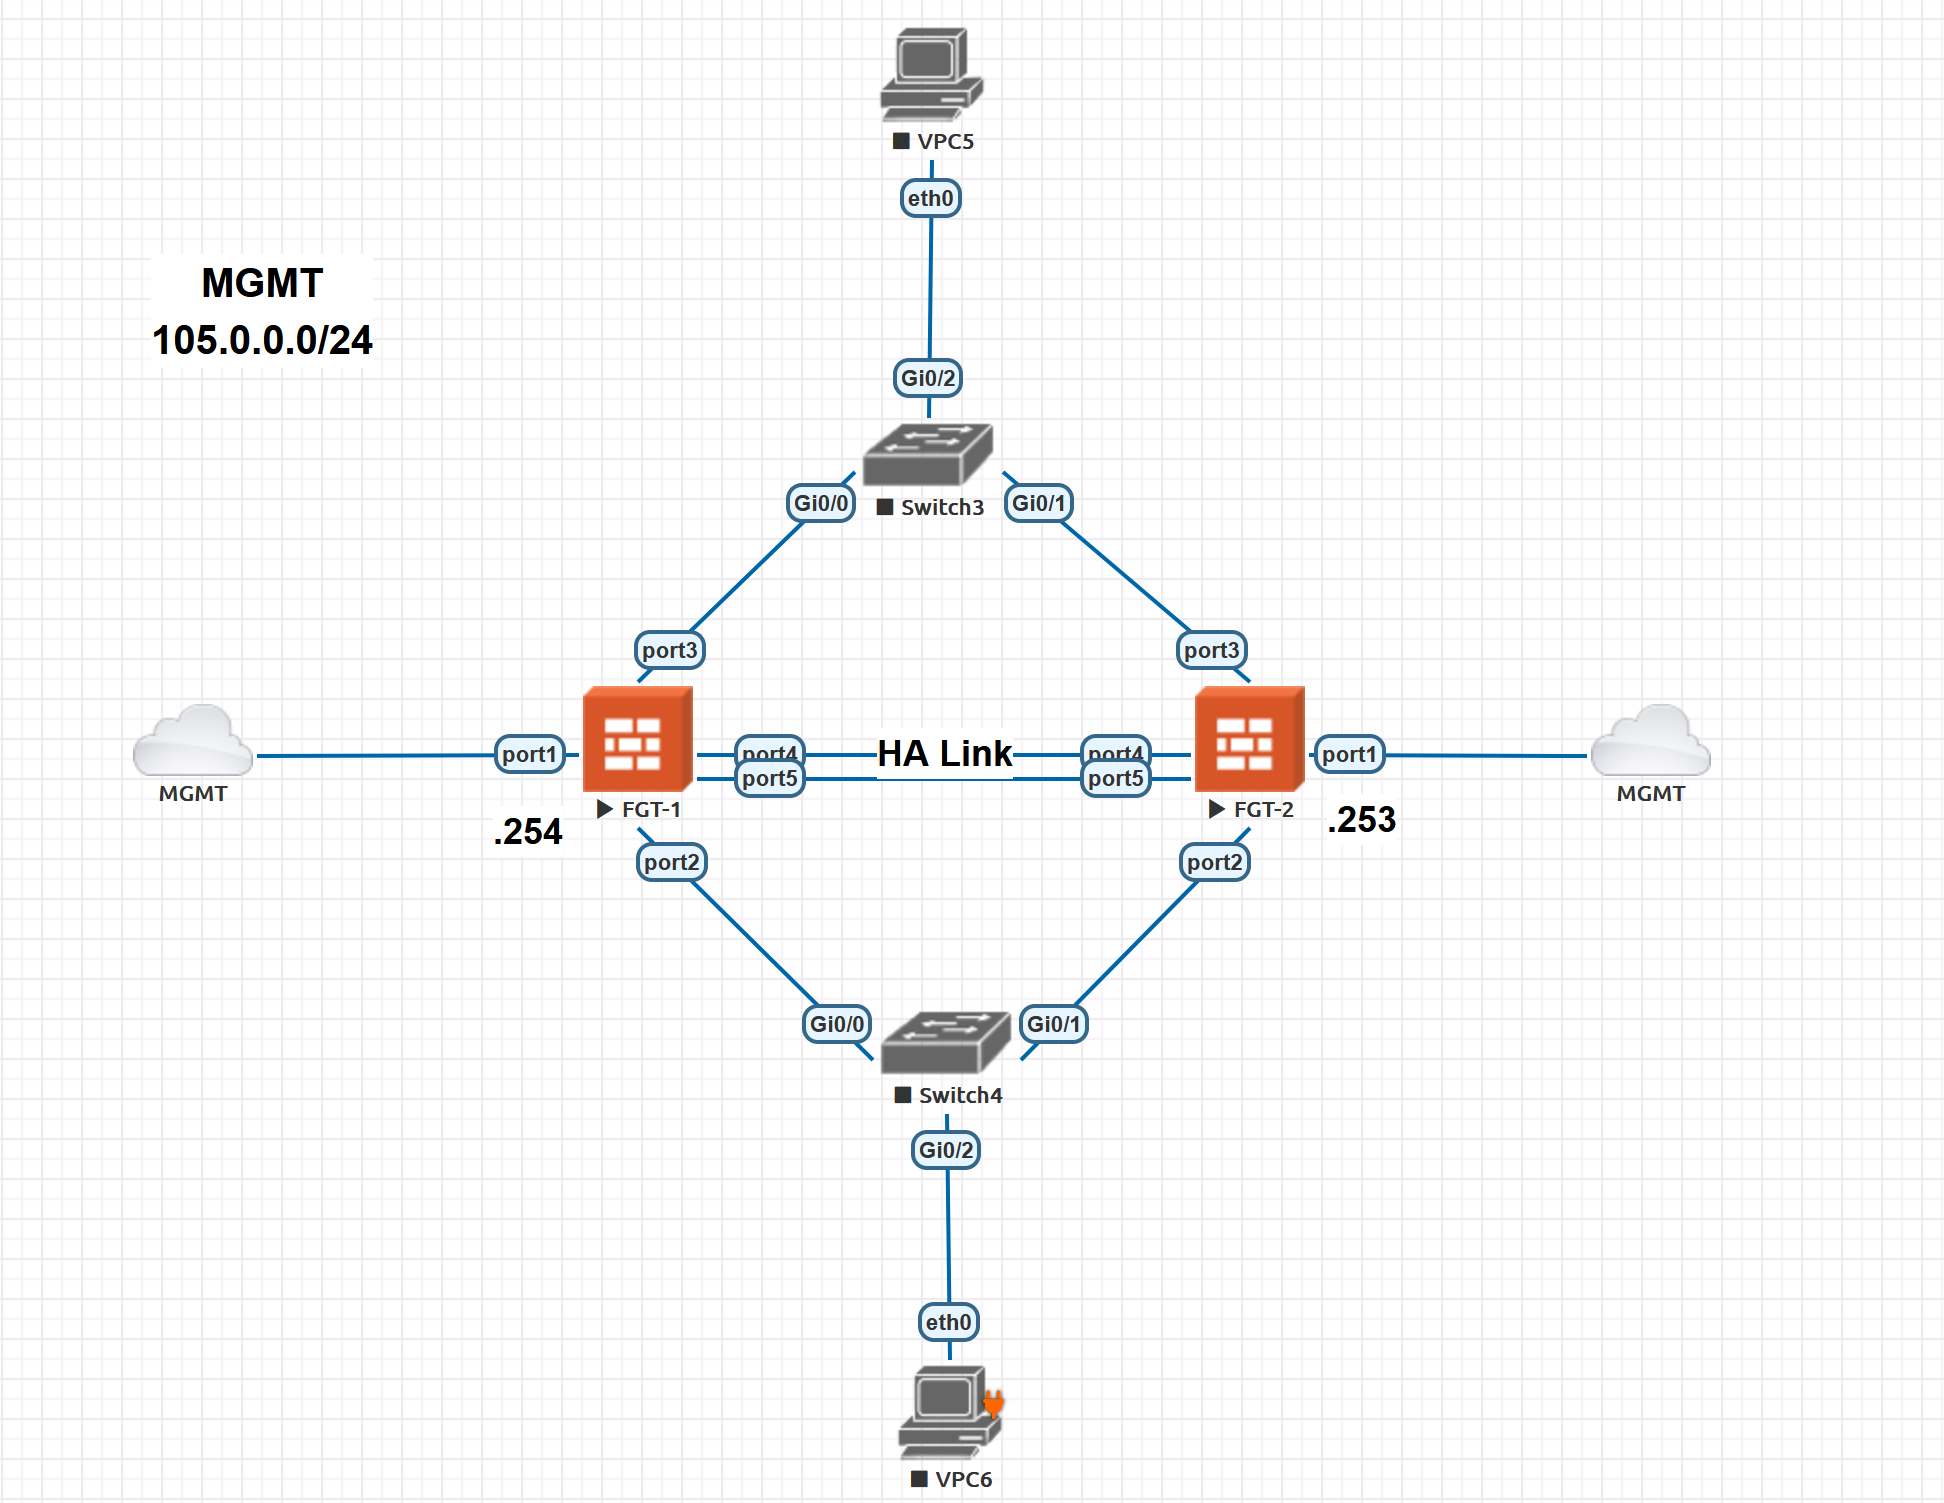
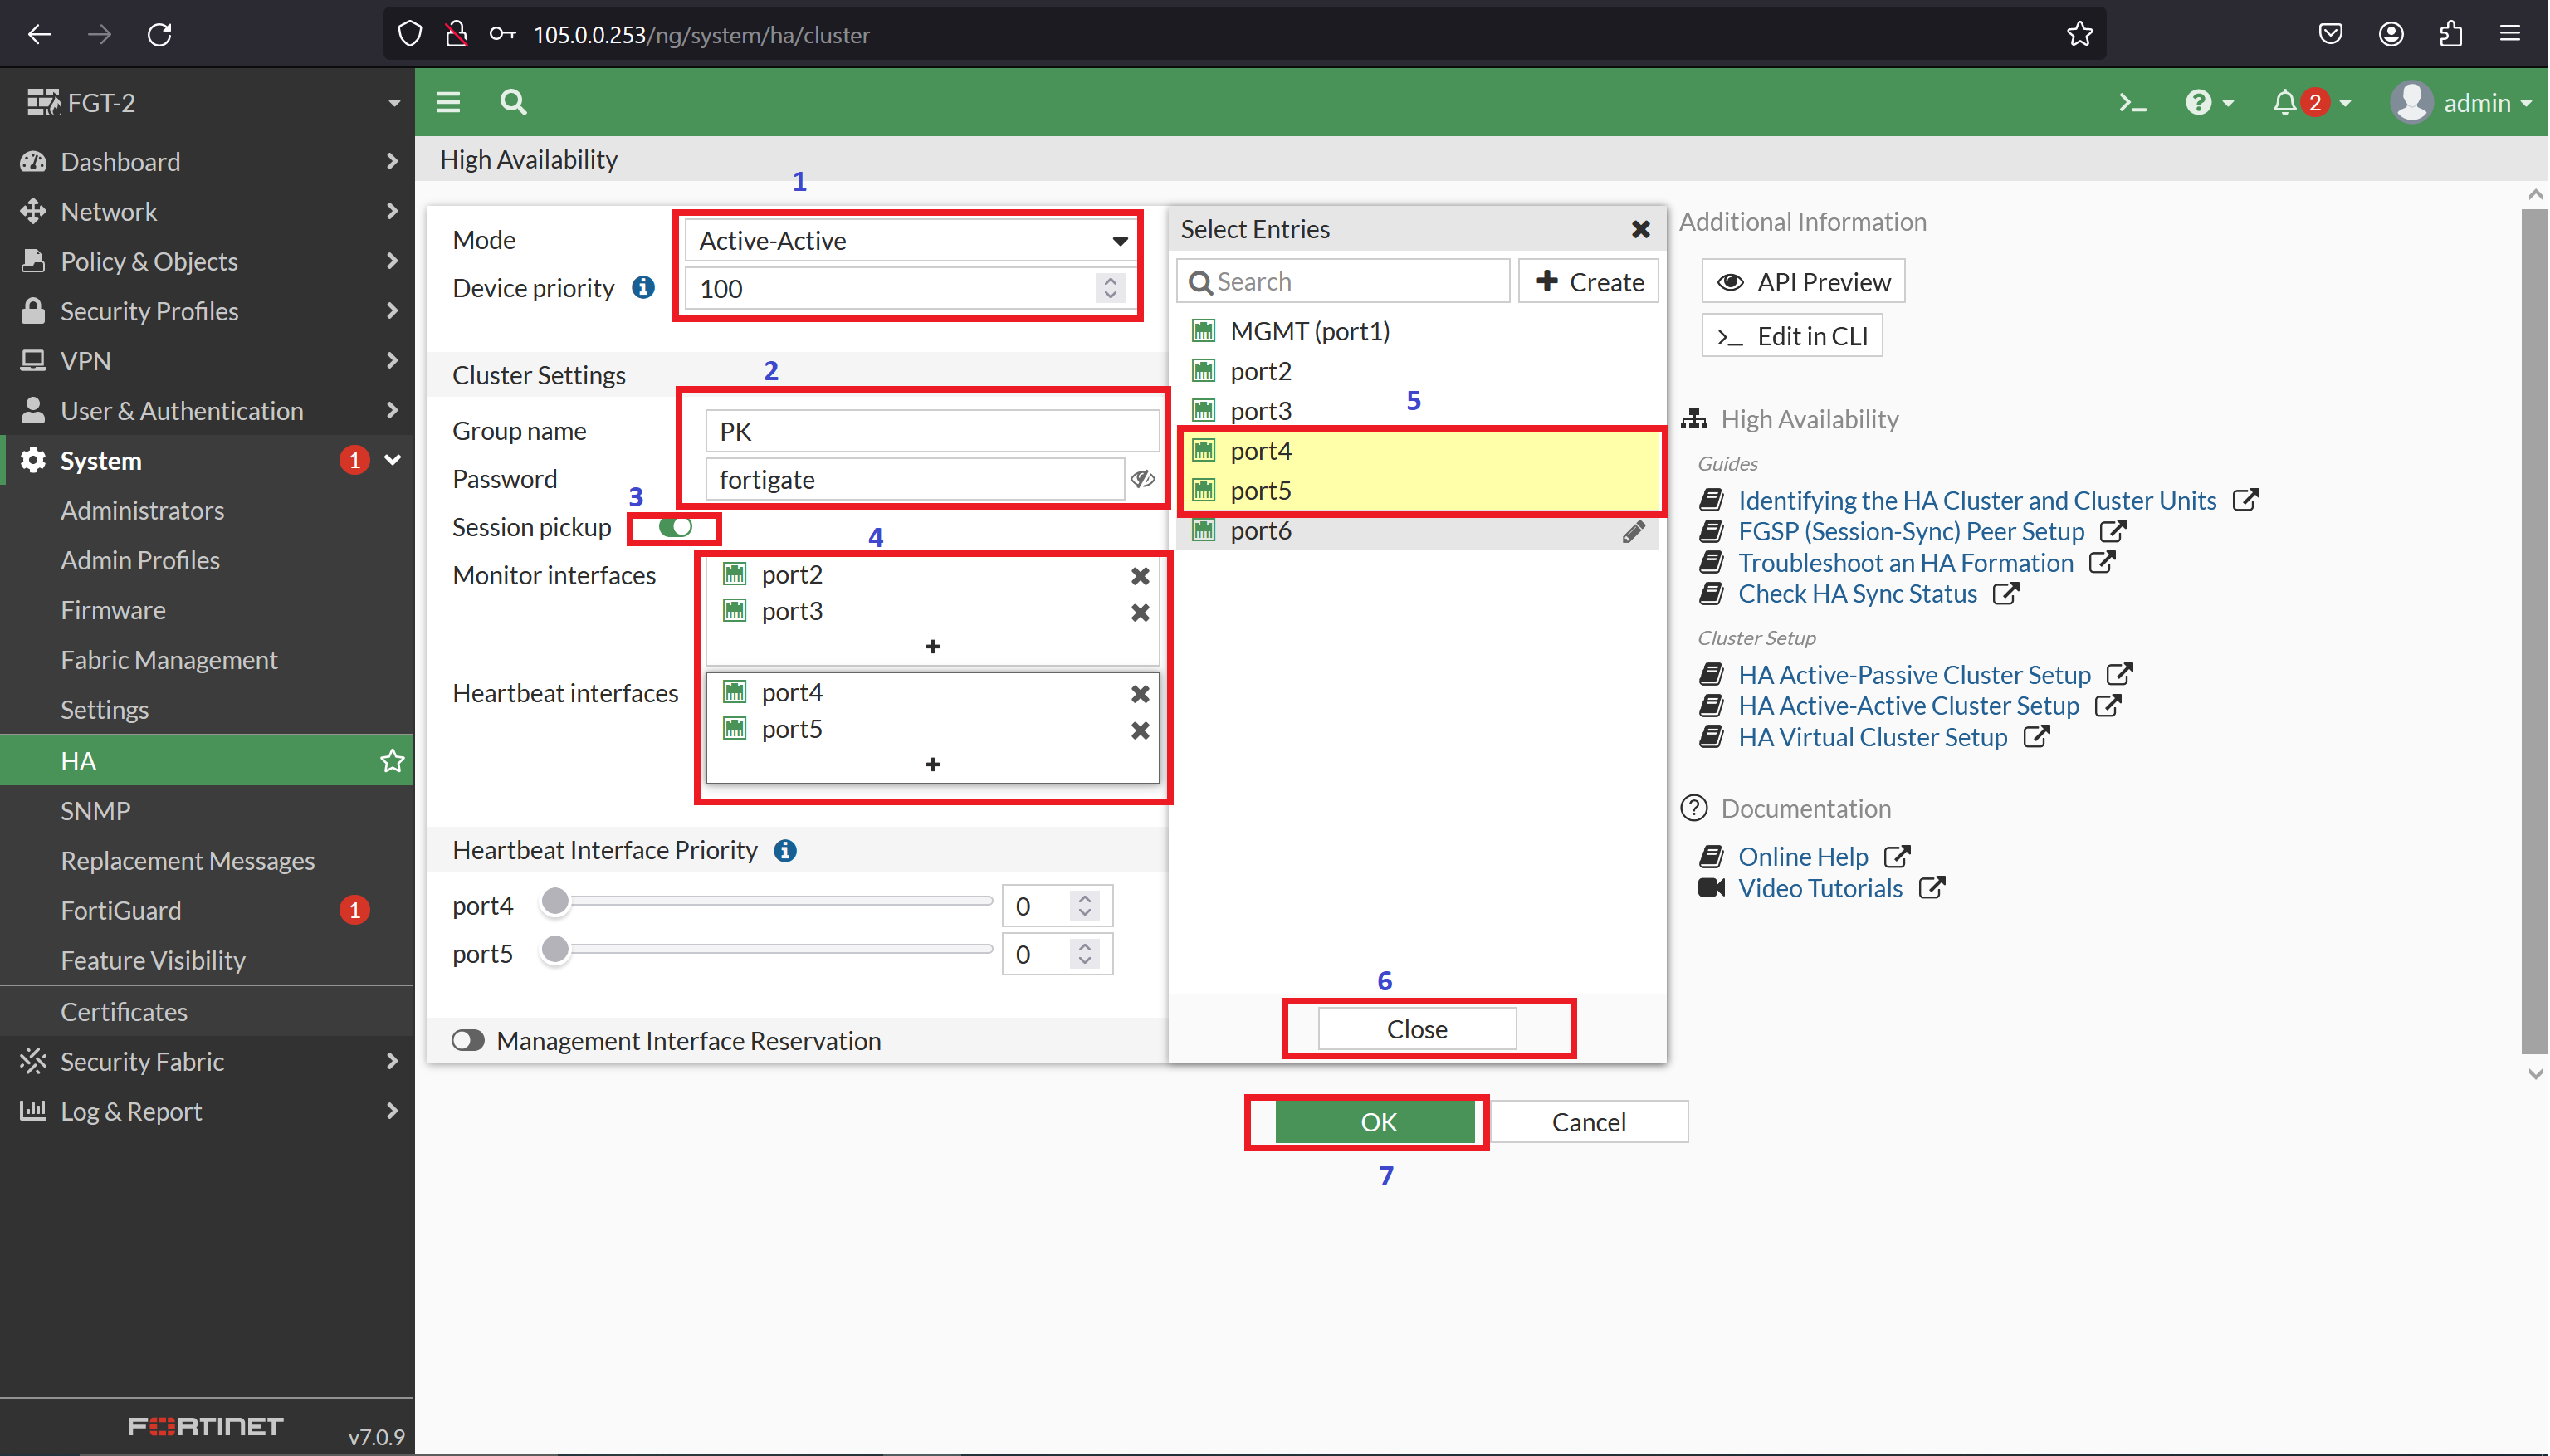
FGT-1 device Active-Active HA configuration, Follow the steps.
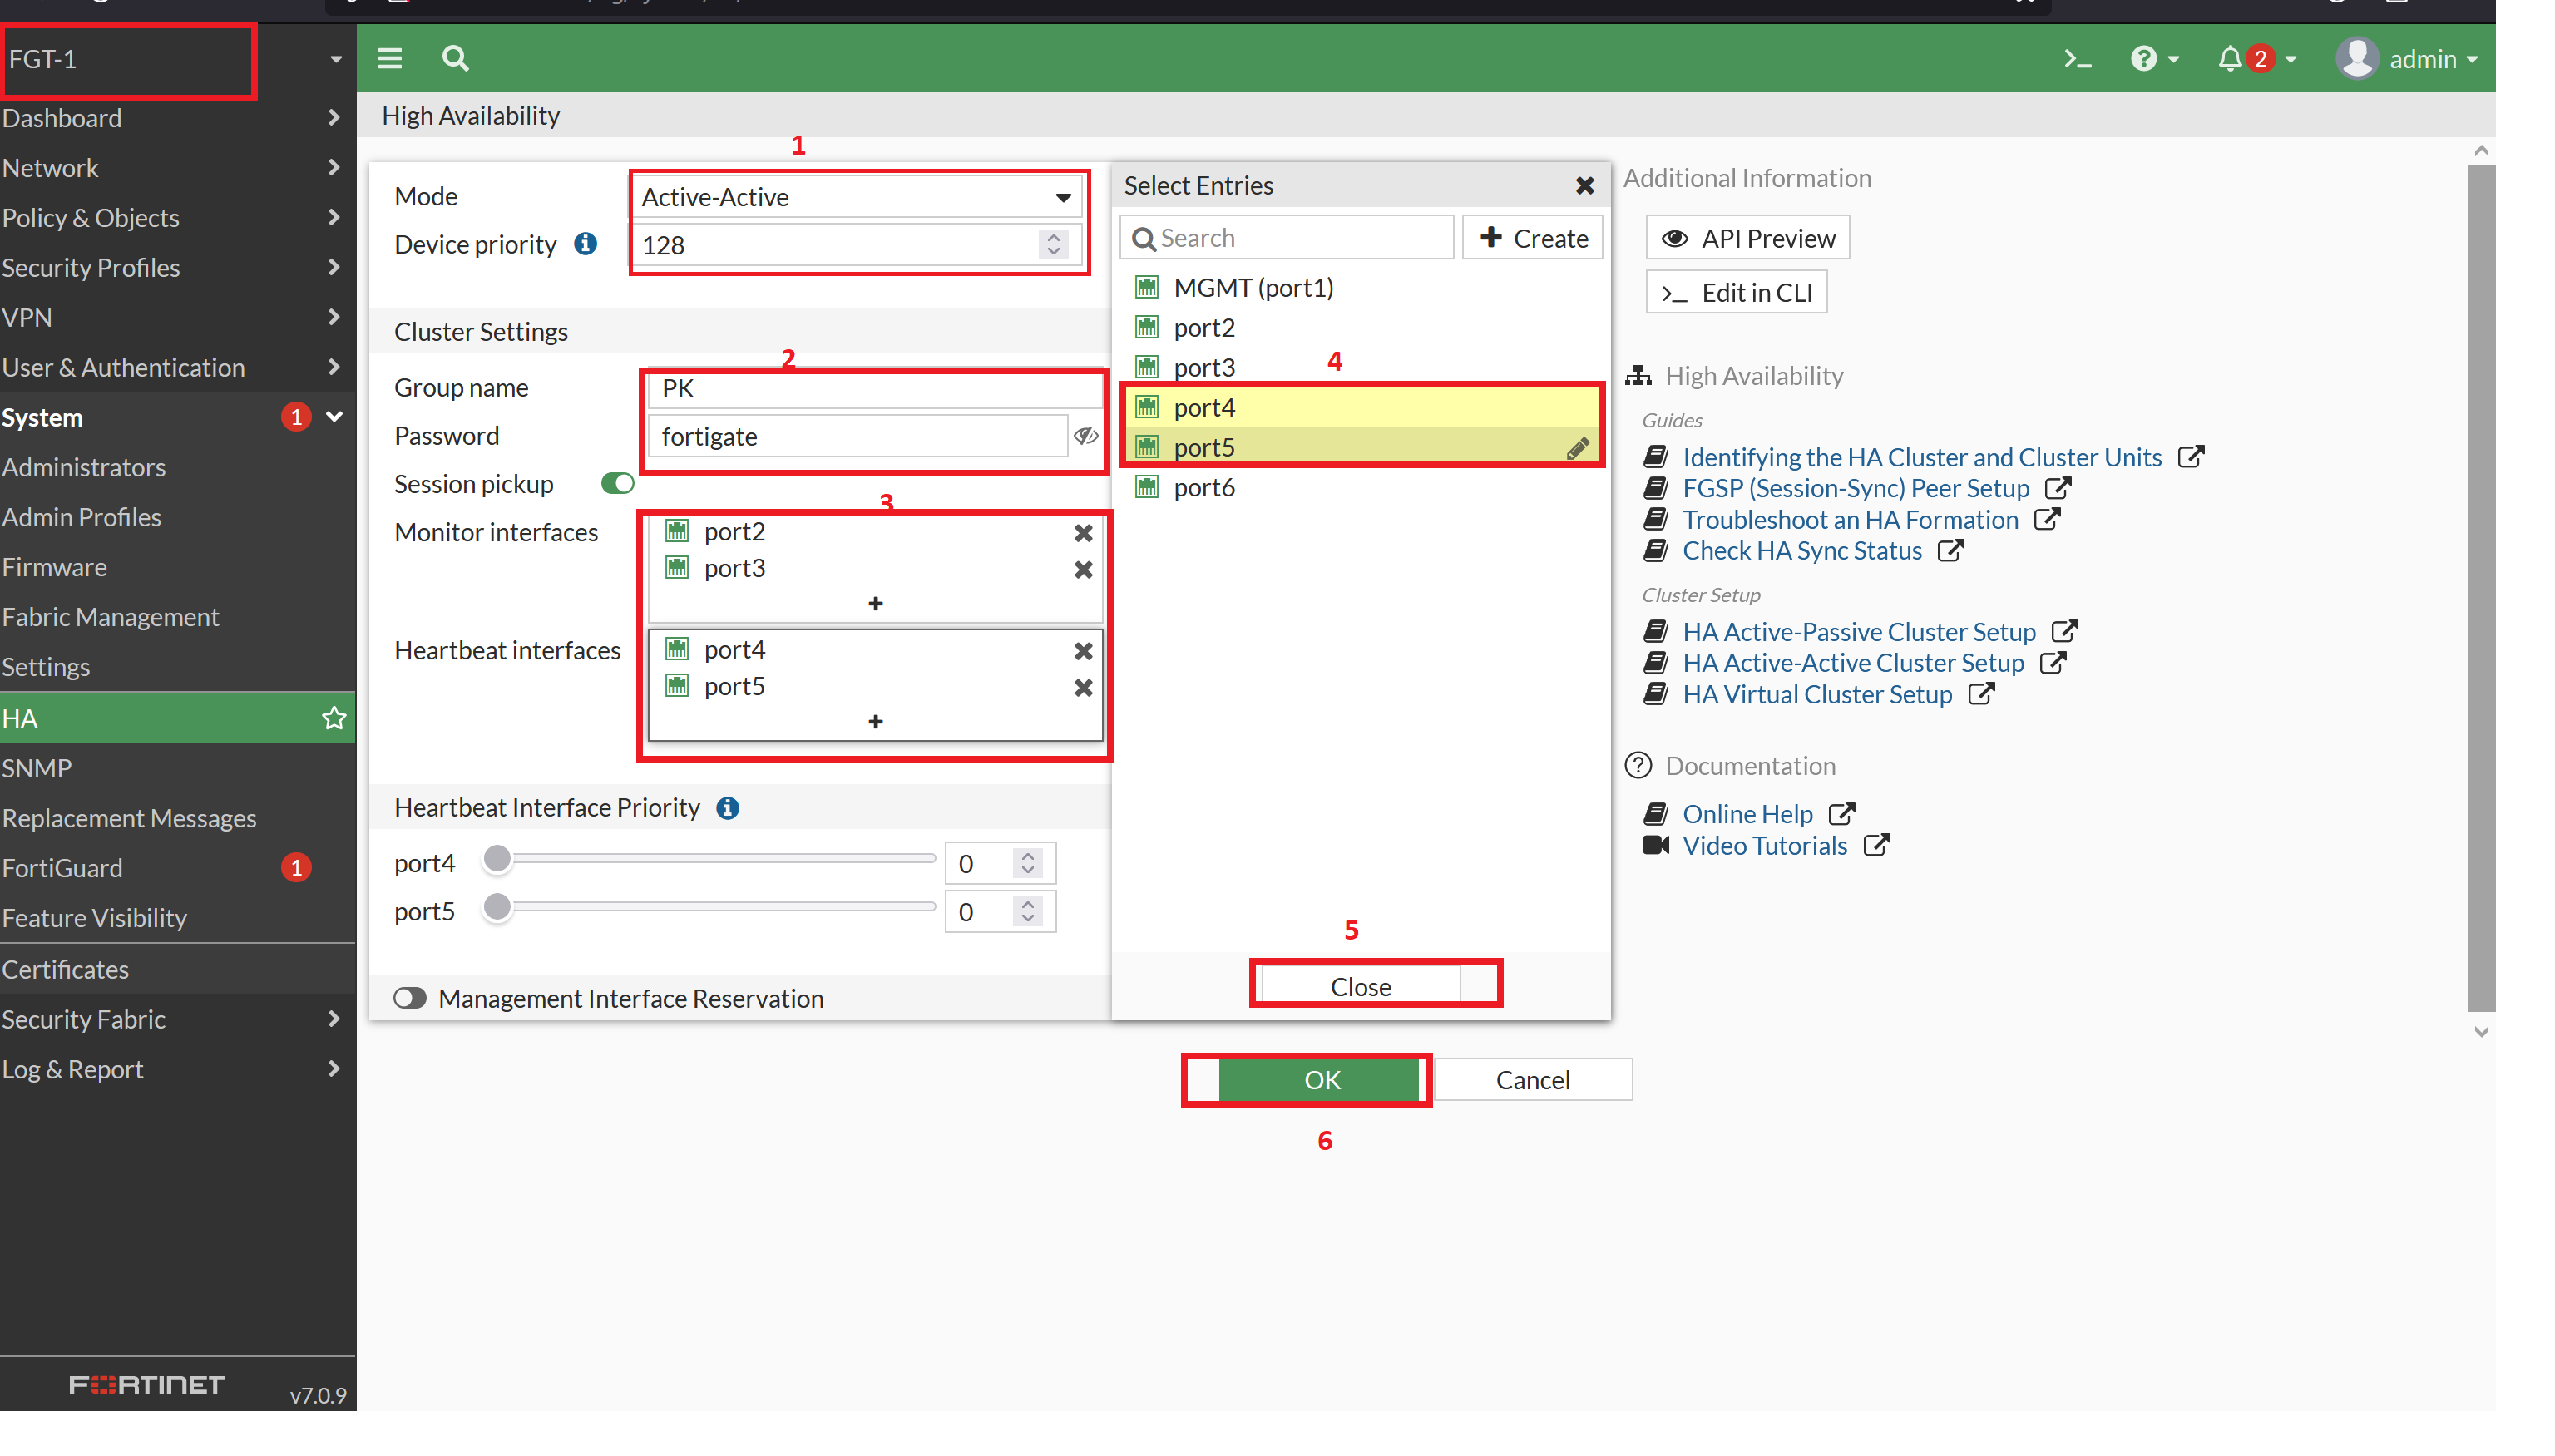
FGT-2 device HA configuration, Make sure that both are in the same group and Password inorder to synchronize.FGT-2 GUI access will not be available.
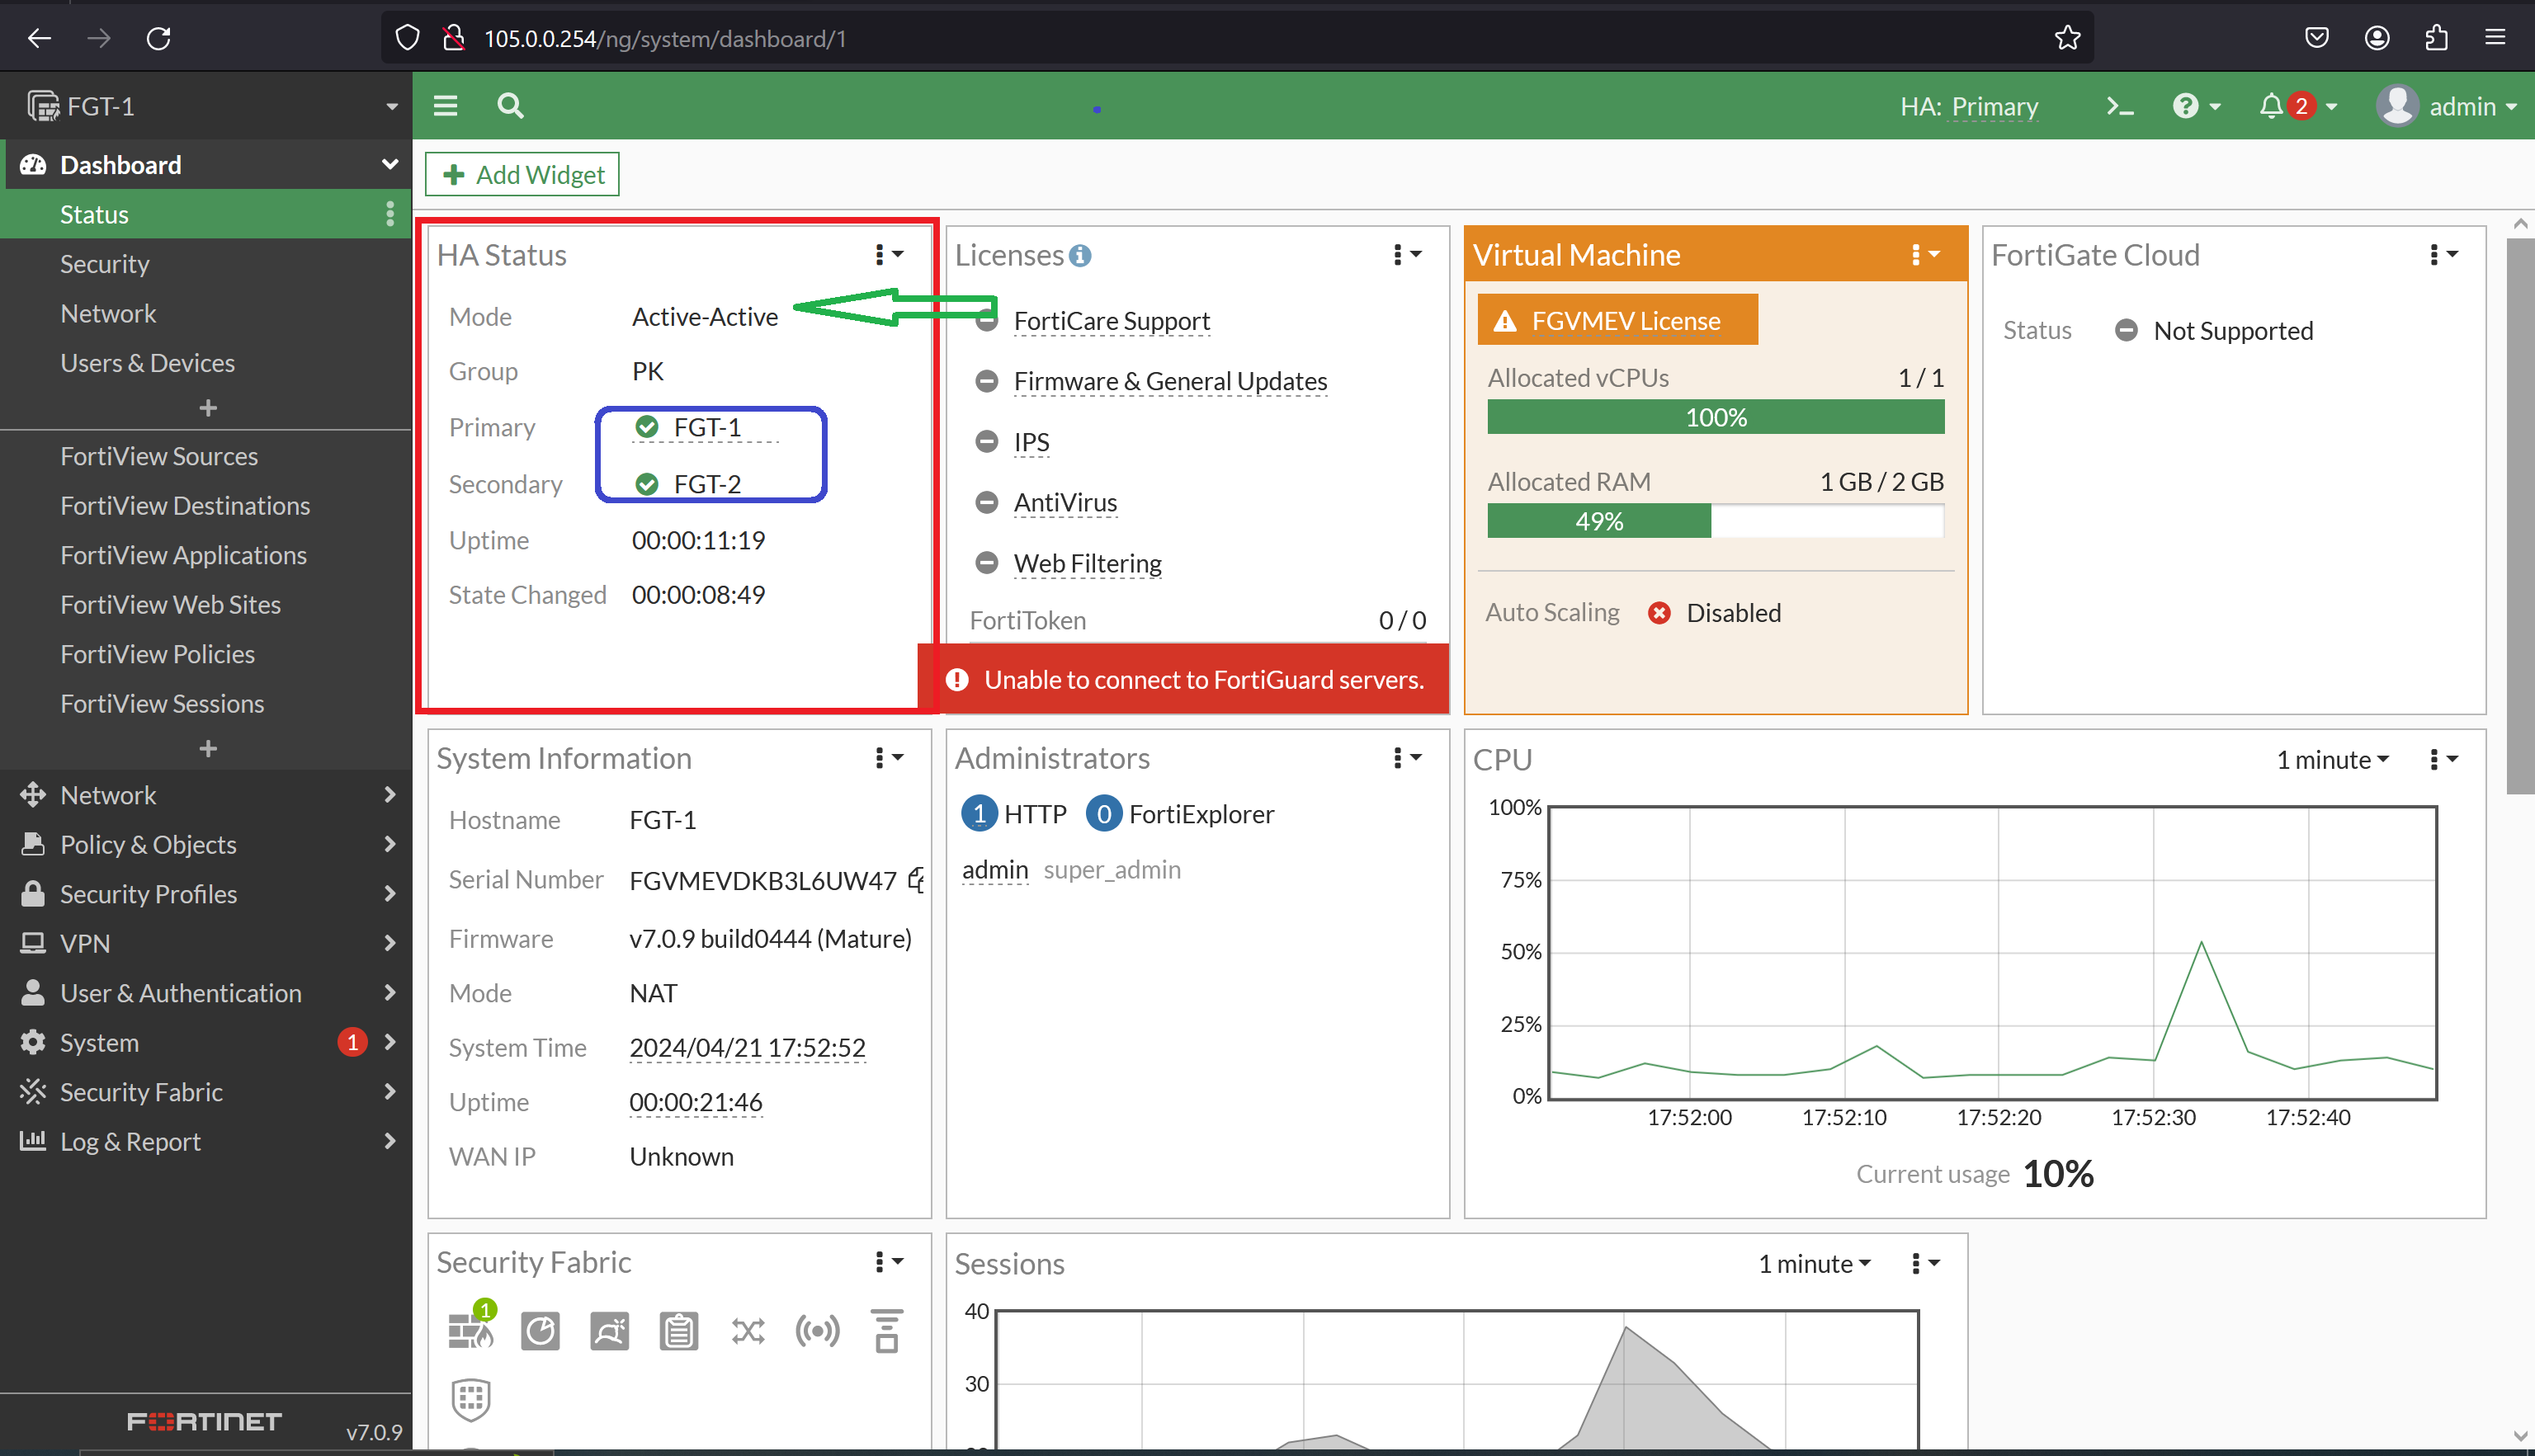
Both FGT-1 and FGT-2 are synchronized, FGT-1 will be master/primary, and FGT-2 will be secondary.
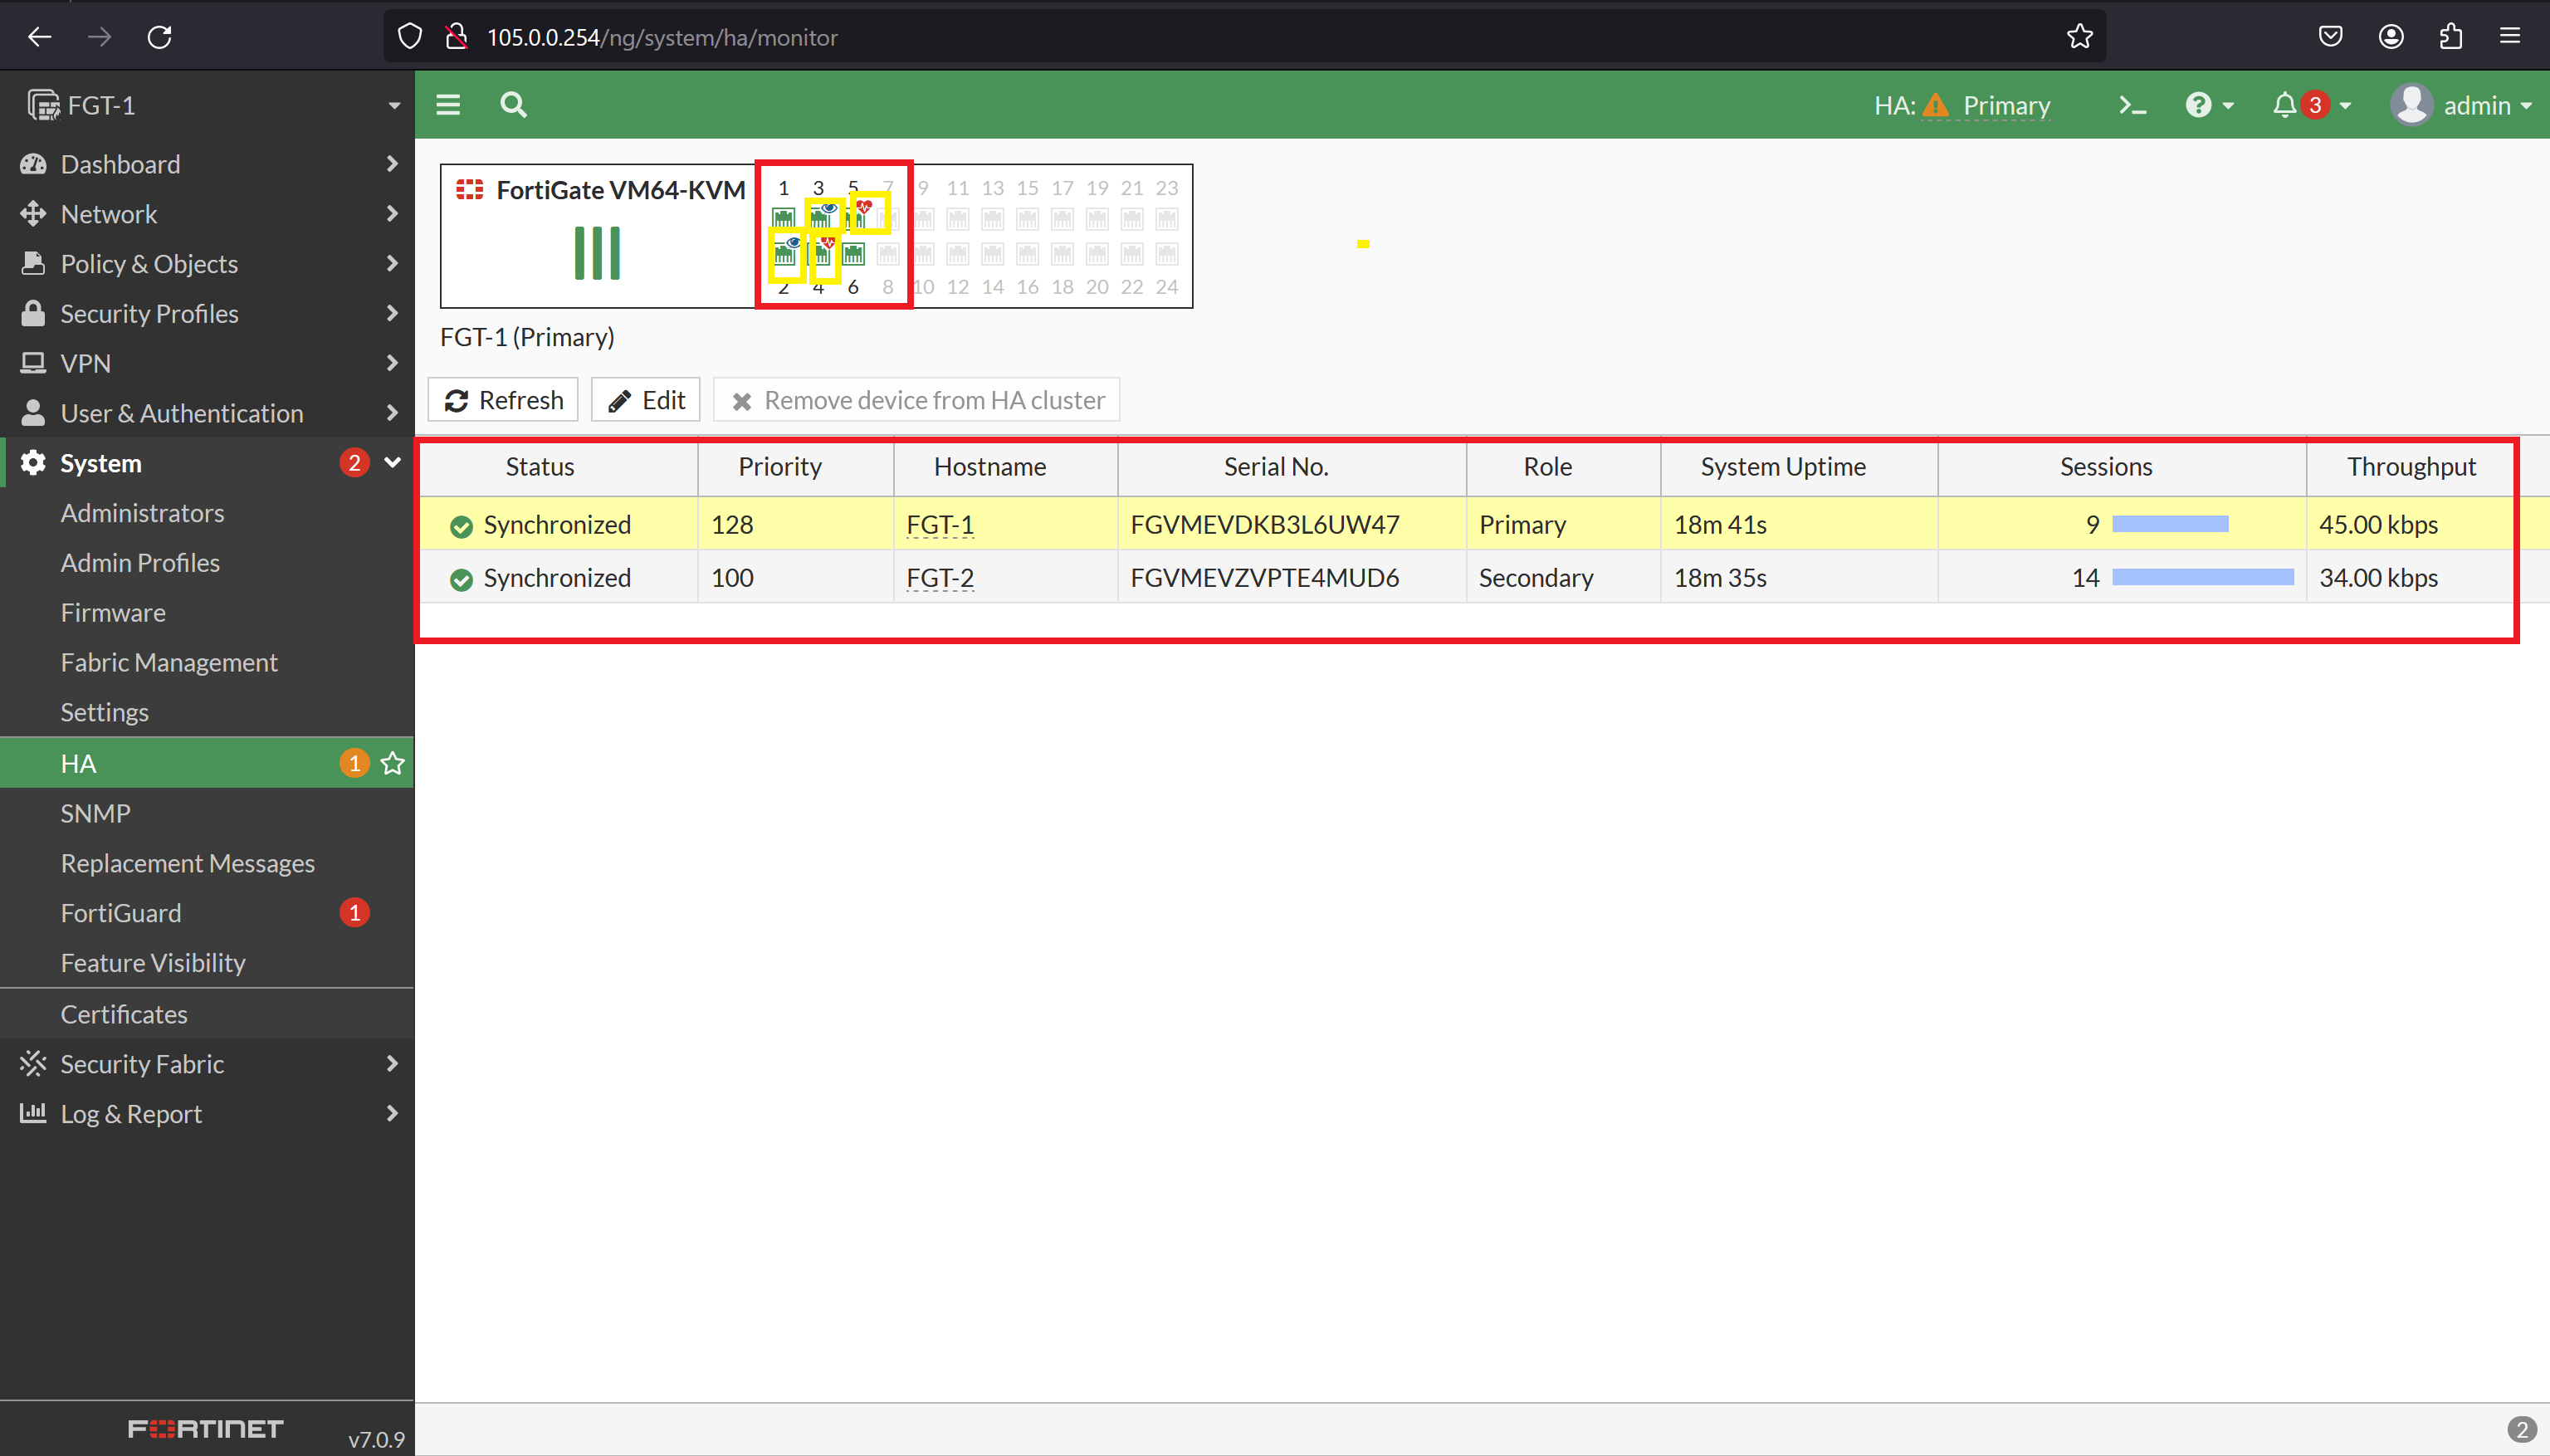
As per the priority, we have decided that FGT-1 128 is Primary and FGT-2 100 will be elected as Secondary.
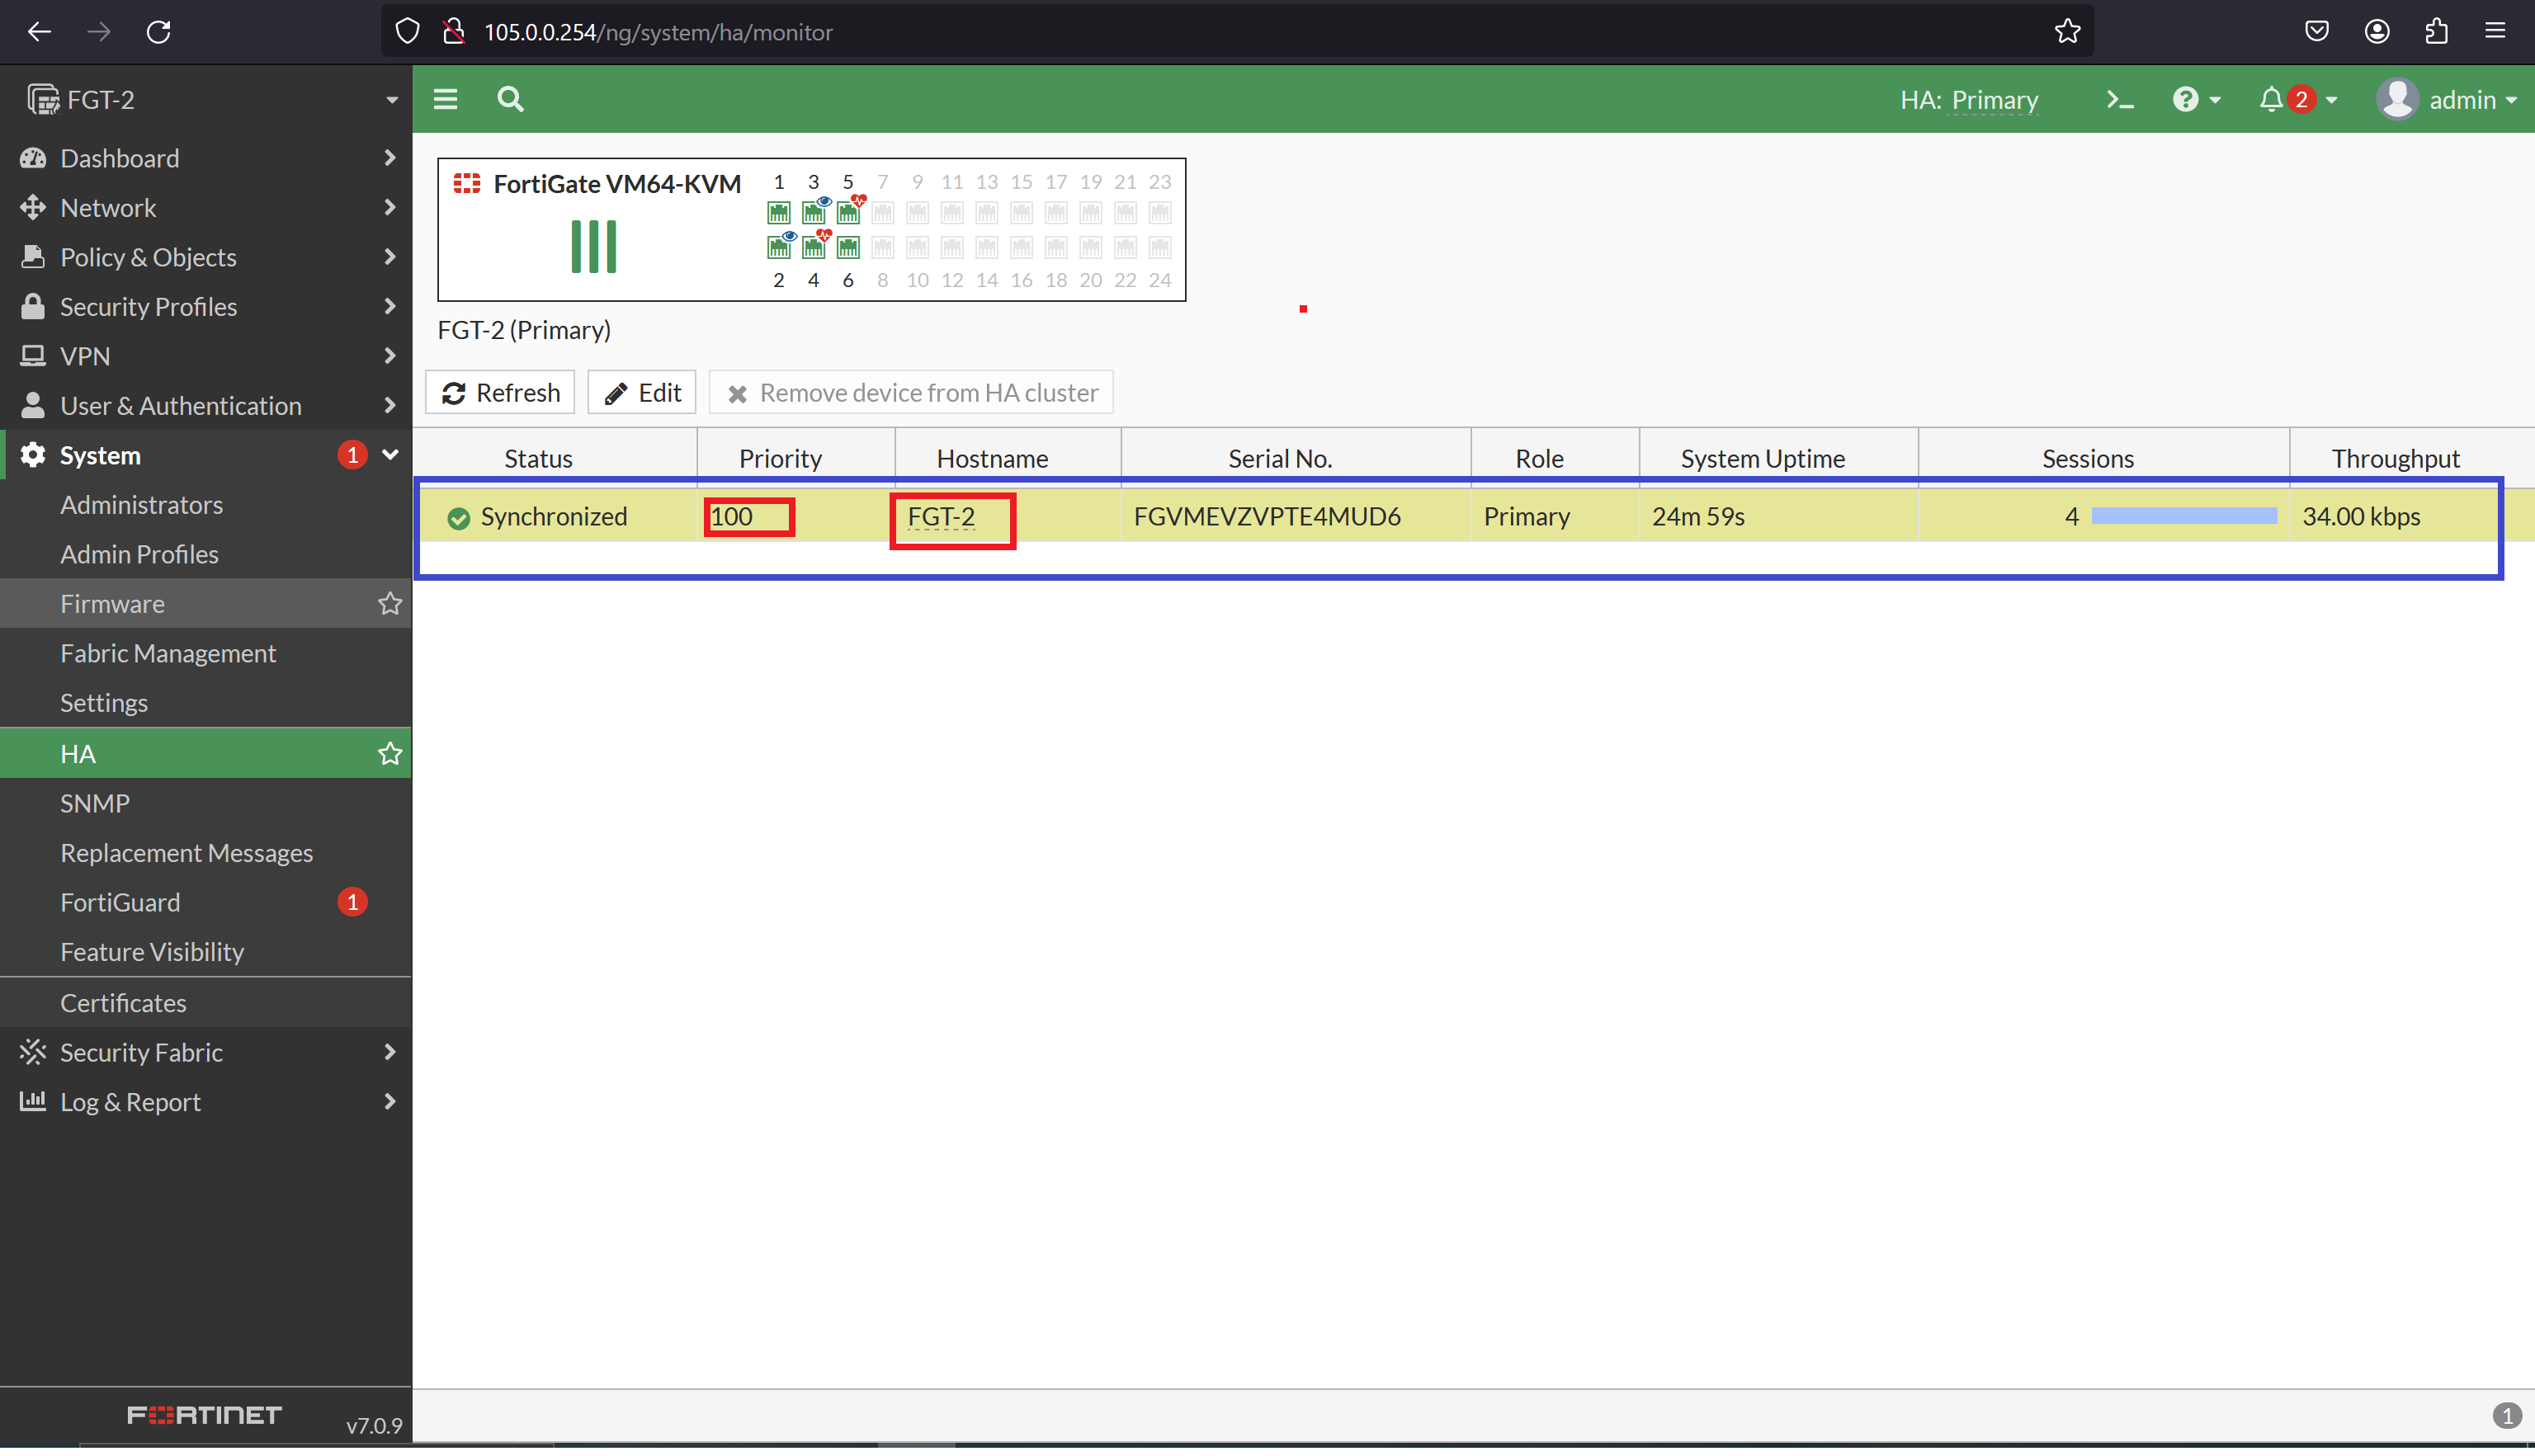
FGT-1 failure occurs, and FGT-2 takes the role of Primary.
Summary:
Module 3 of the FortiGate firewall course covers high availability (HA) configurations, including both active-standby and active-active setups. Here’s a brief summary of the topics covered:
- Active-Standby (Theory): Explains the theory behind active-standby HA configurations, where one firewall unit serves as the primary (active) unit while the other acts as the secondary (standby) unit. In case of failure, the standby unit takes over seamlessly to ensure continuous operation.
- Active-Standby (Lab): Provides hands-on lab exercises for configuring active-standby HA on FortiGate firewall units. Students learn how to set up HA links, synchronize configurations, and test failover scenarios.
- Active-Active (Theory): Discusses the theory behind active-active HA configurations, where both firewall units actively process network traffic simultaneously. Load balancing, firewall state synchronization, and session pickup are explained in detail.
- Active-Active (Lab): Offers practical lab exercises for configuring active-active HA on FortiGate firewall units. Students learn how to configure load balancing algorithms, ensure firewall state synchronization, and test failover scenarios in an active-active setup.
MODULE 4
Firewall Authentication
Table of contents:
- Creating User and Policies
- Create Authentication Policies[Captive Portal]
- Monitor firewall Users
I. Creating Users and Policies
Creating users and policies on the FortiGate firewall allows administrators to control access to network resources and define security rules for traffic flow. Here’s a detailed guide on how to create users and policies:
1. Creating Users
1.1. Local Users
- Purpose: Local users are specific to the FortiGate firewall and are authenticated locally.
- Steps:
- Access the FortiGate firewall web interface or CLI.
- Navigate to System > Administrators > Administrators.
- Click Create New to add a new user.
- Enter the user details, including username, password, and privileges.
- Save the changes.
1.2. External Authentication
- Purpose: FortiGate firewall supports external authentication methods such as LDAP, RADIUS, or TACACS+ for user authentication.
- Steps:
- Configure external authentication servers under User & Device > Authentication > LDAP/Radius/TACACS+.
- Navigate to System > Administrators > Administrators.
- Click Create New to add a new user.
- Select the external authentication server from the dropdown list.
- Enter the username and assign privileges.
- Save the changes.
2. Creating Policies
2.1. Firewall Policies
- Purpose: Firewall policies control traffic flow between different network segments based on defined criteria.
- Steps:
- Access the FortiGate firewall web interface or CLI.
- Navigate to Policy & Objects > IPv4 Policy.
- Click Create New to add a new policy.
- Configure the policy details, including source and destination addresses, services, and action (allow/deny).
- Optionally, configure security profiles such as antivirus, IPS, or web filtering.
- Save the changes.
2.2. VPN Policies
- Purpose: VPN policies define how VPN traffic is handled by the FortiGate firewall, including IPsec or SSL VPN tunnels.
- Steps:
- Access the FortiGate firewall web interface or CLI.
- Navigate to VPN > IPsec > Tunnels or VPN > SSL-VPN > Portals/Settings.
- Click Create New to add a new VPN tunnel or portal.
- Configure the tunnel/portal settings, including encryption algorithms, authentication methods, and access controls.
- Save the changes.
Demo:
Sample Topology:
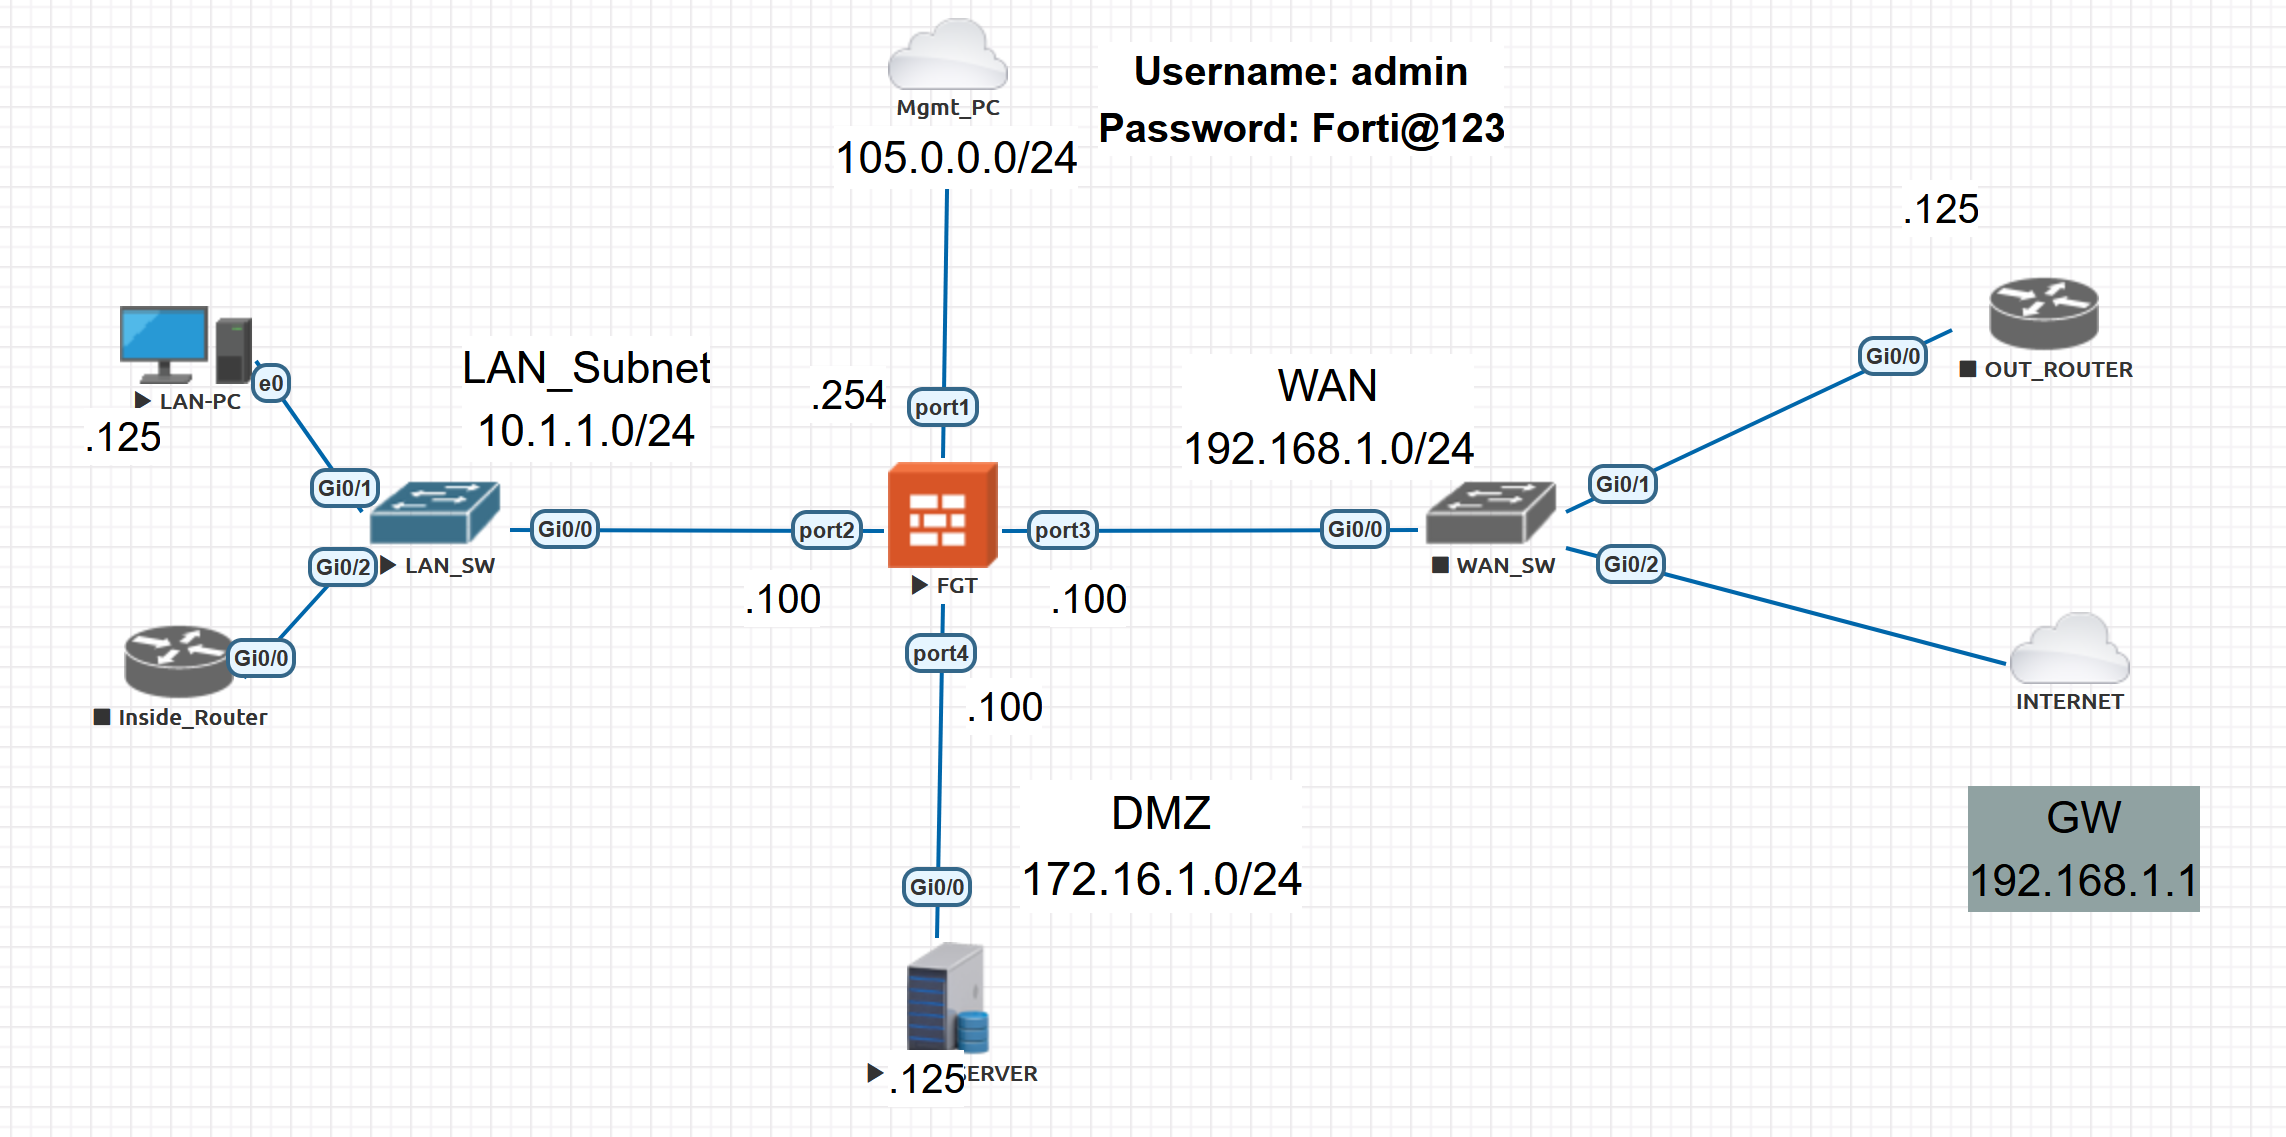
Now we are configuring Captive Portal or User Authentication.
Steps:
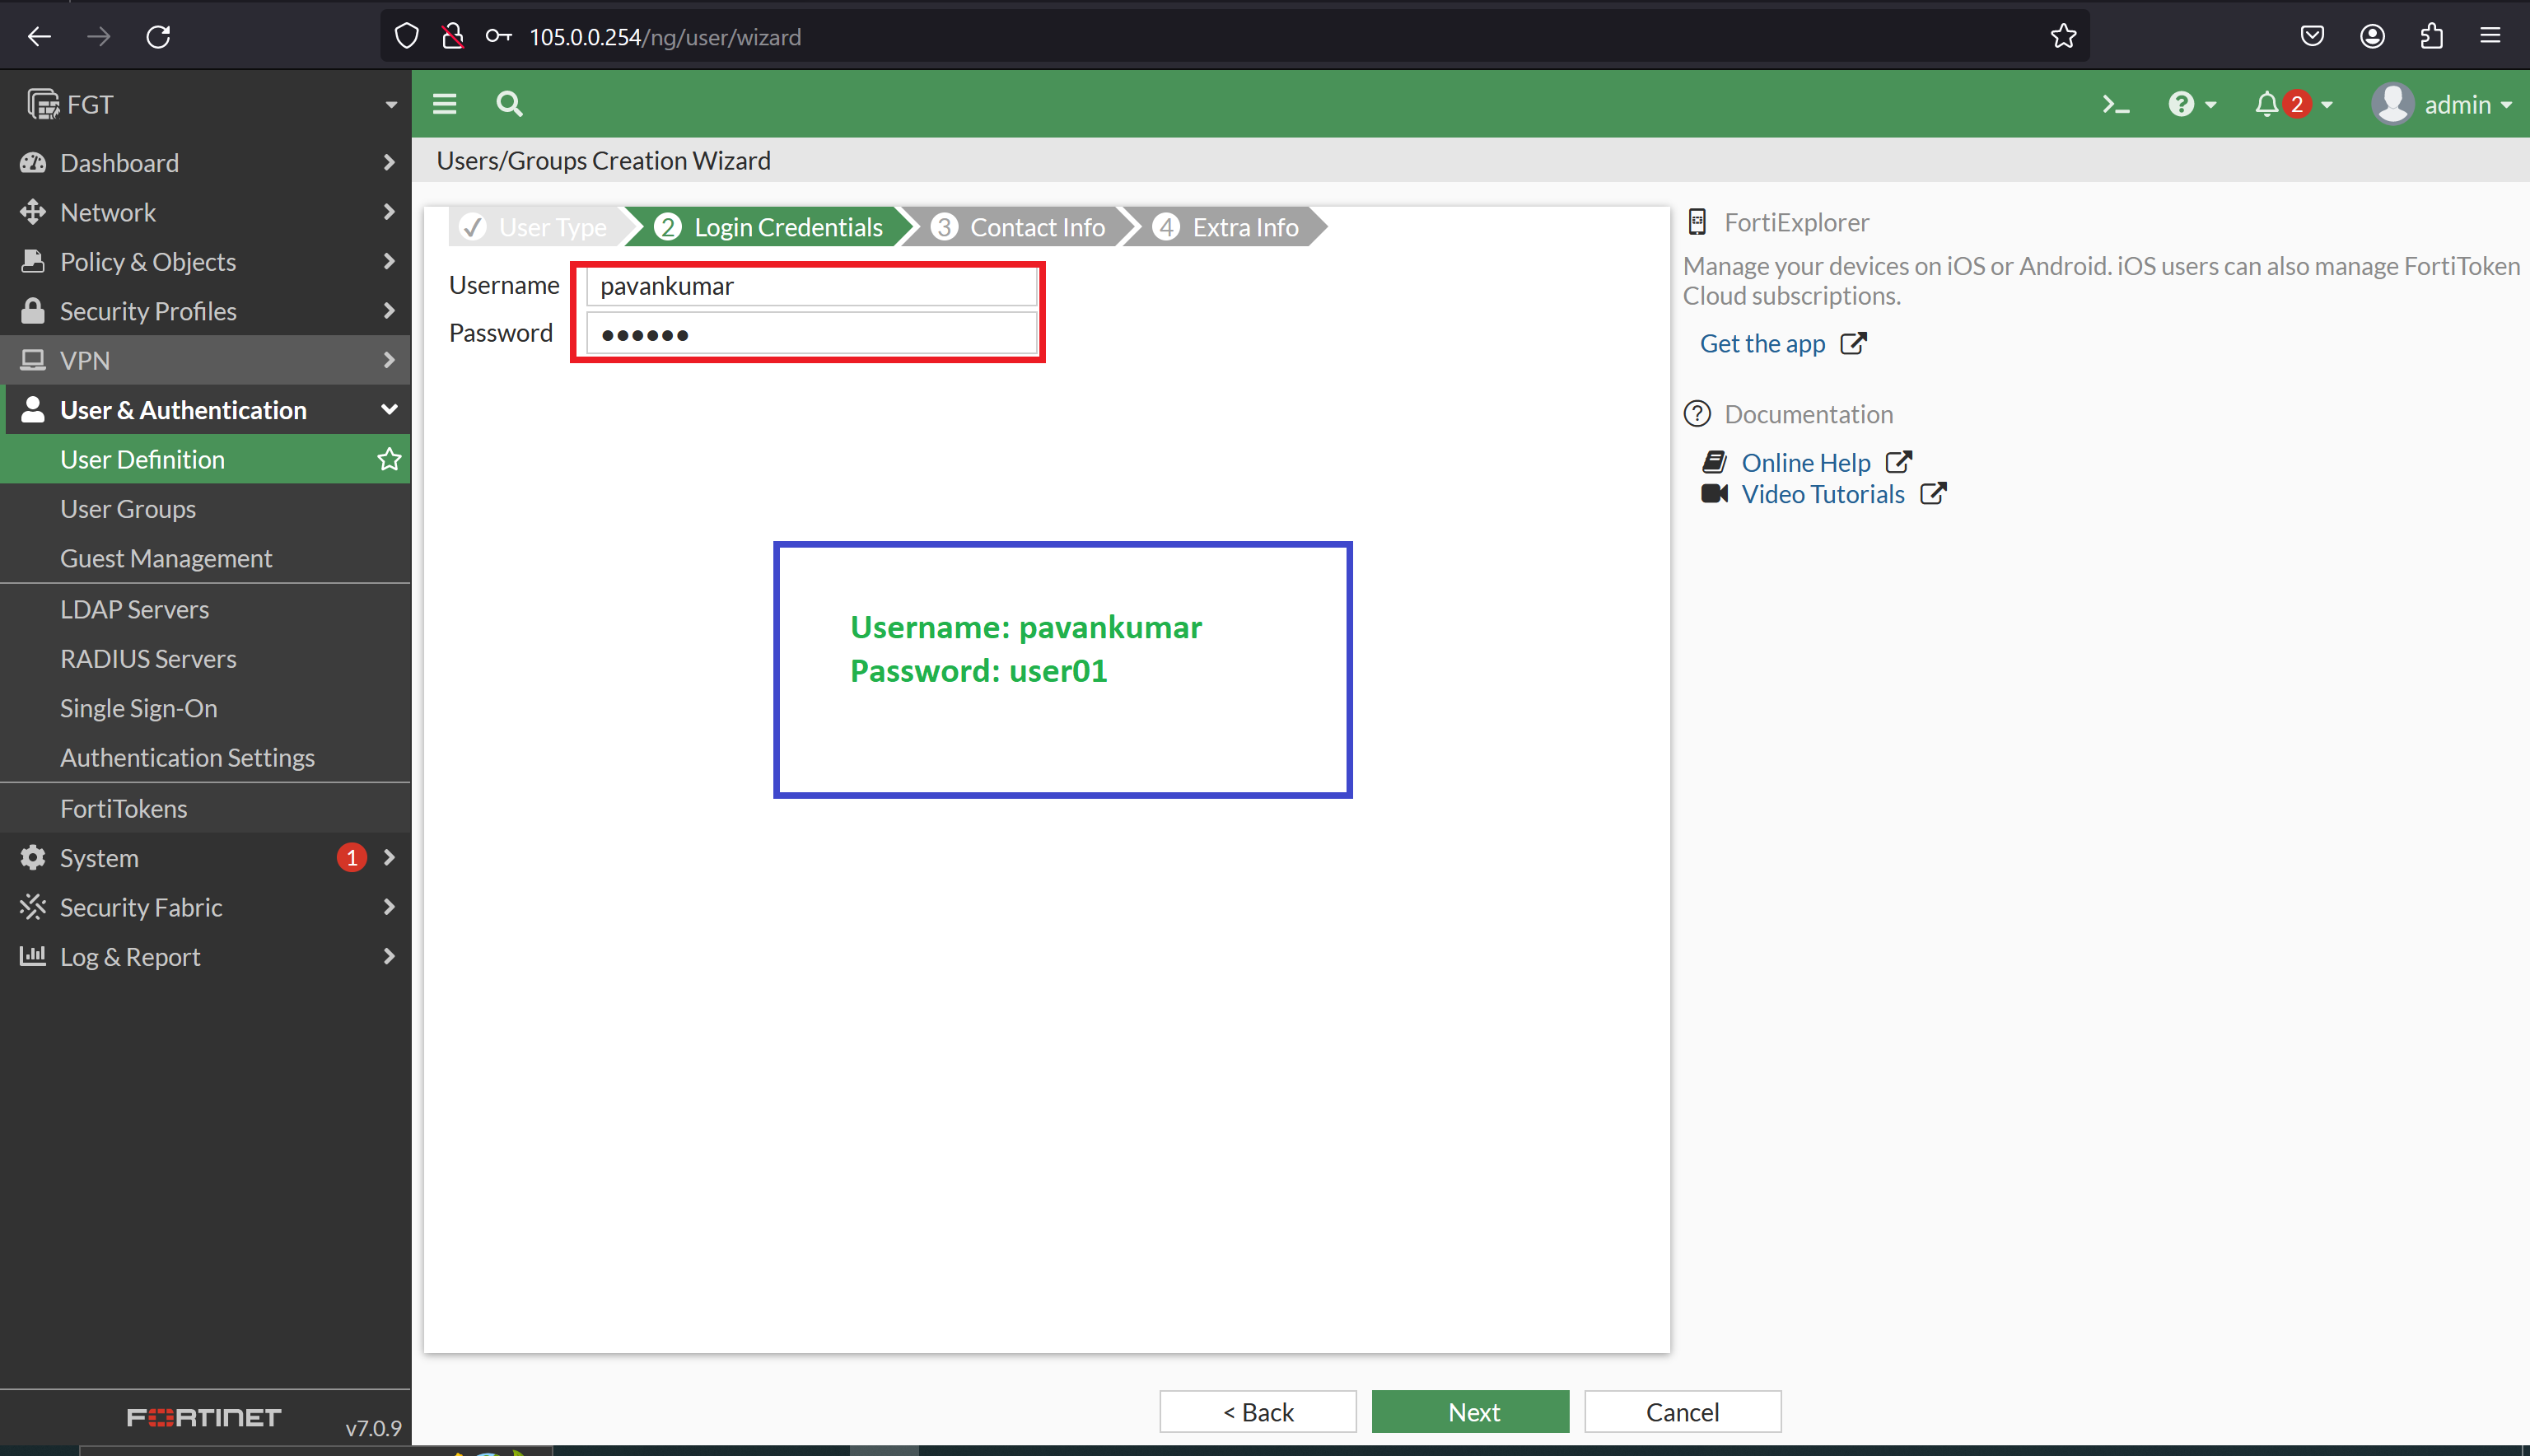
- we need to create the Local user to be authenticated before accessing the web server.
- Create the user and assign that user to a particular group, or make it default as a Guest-group.
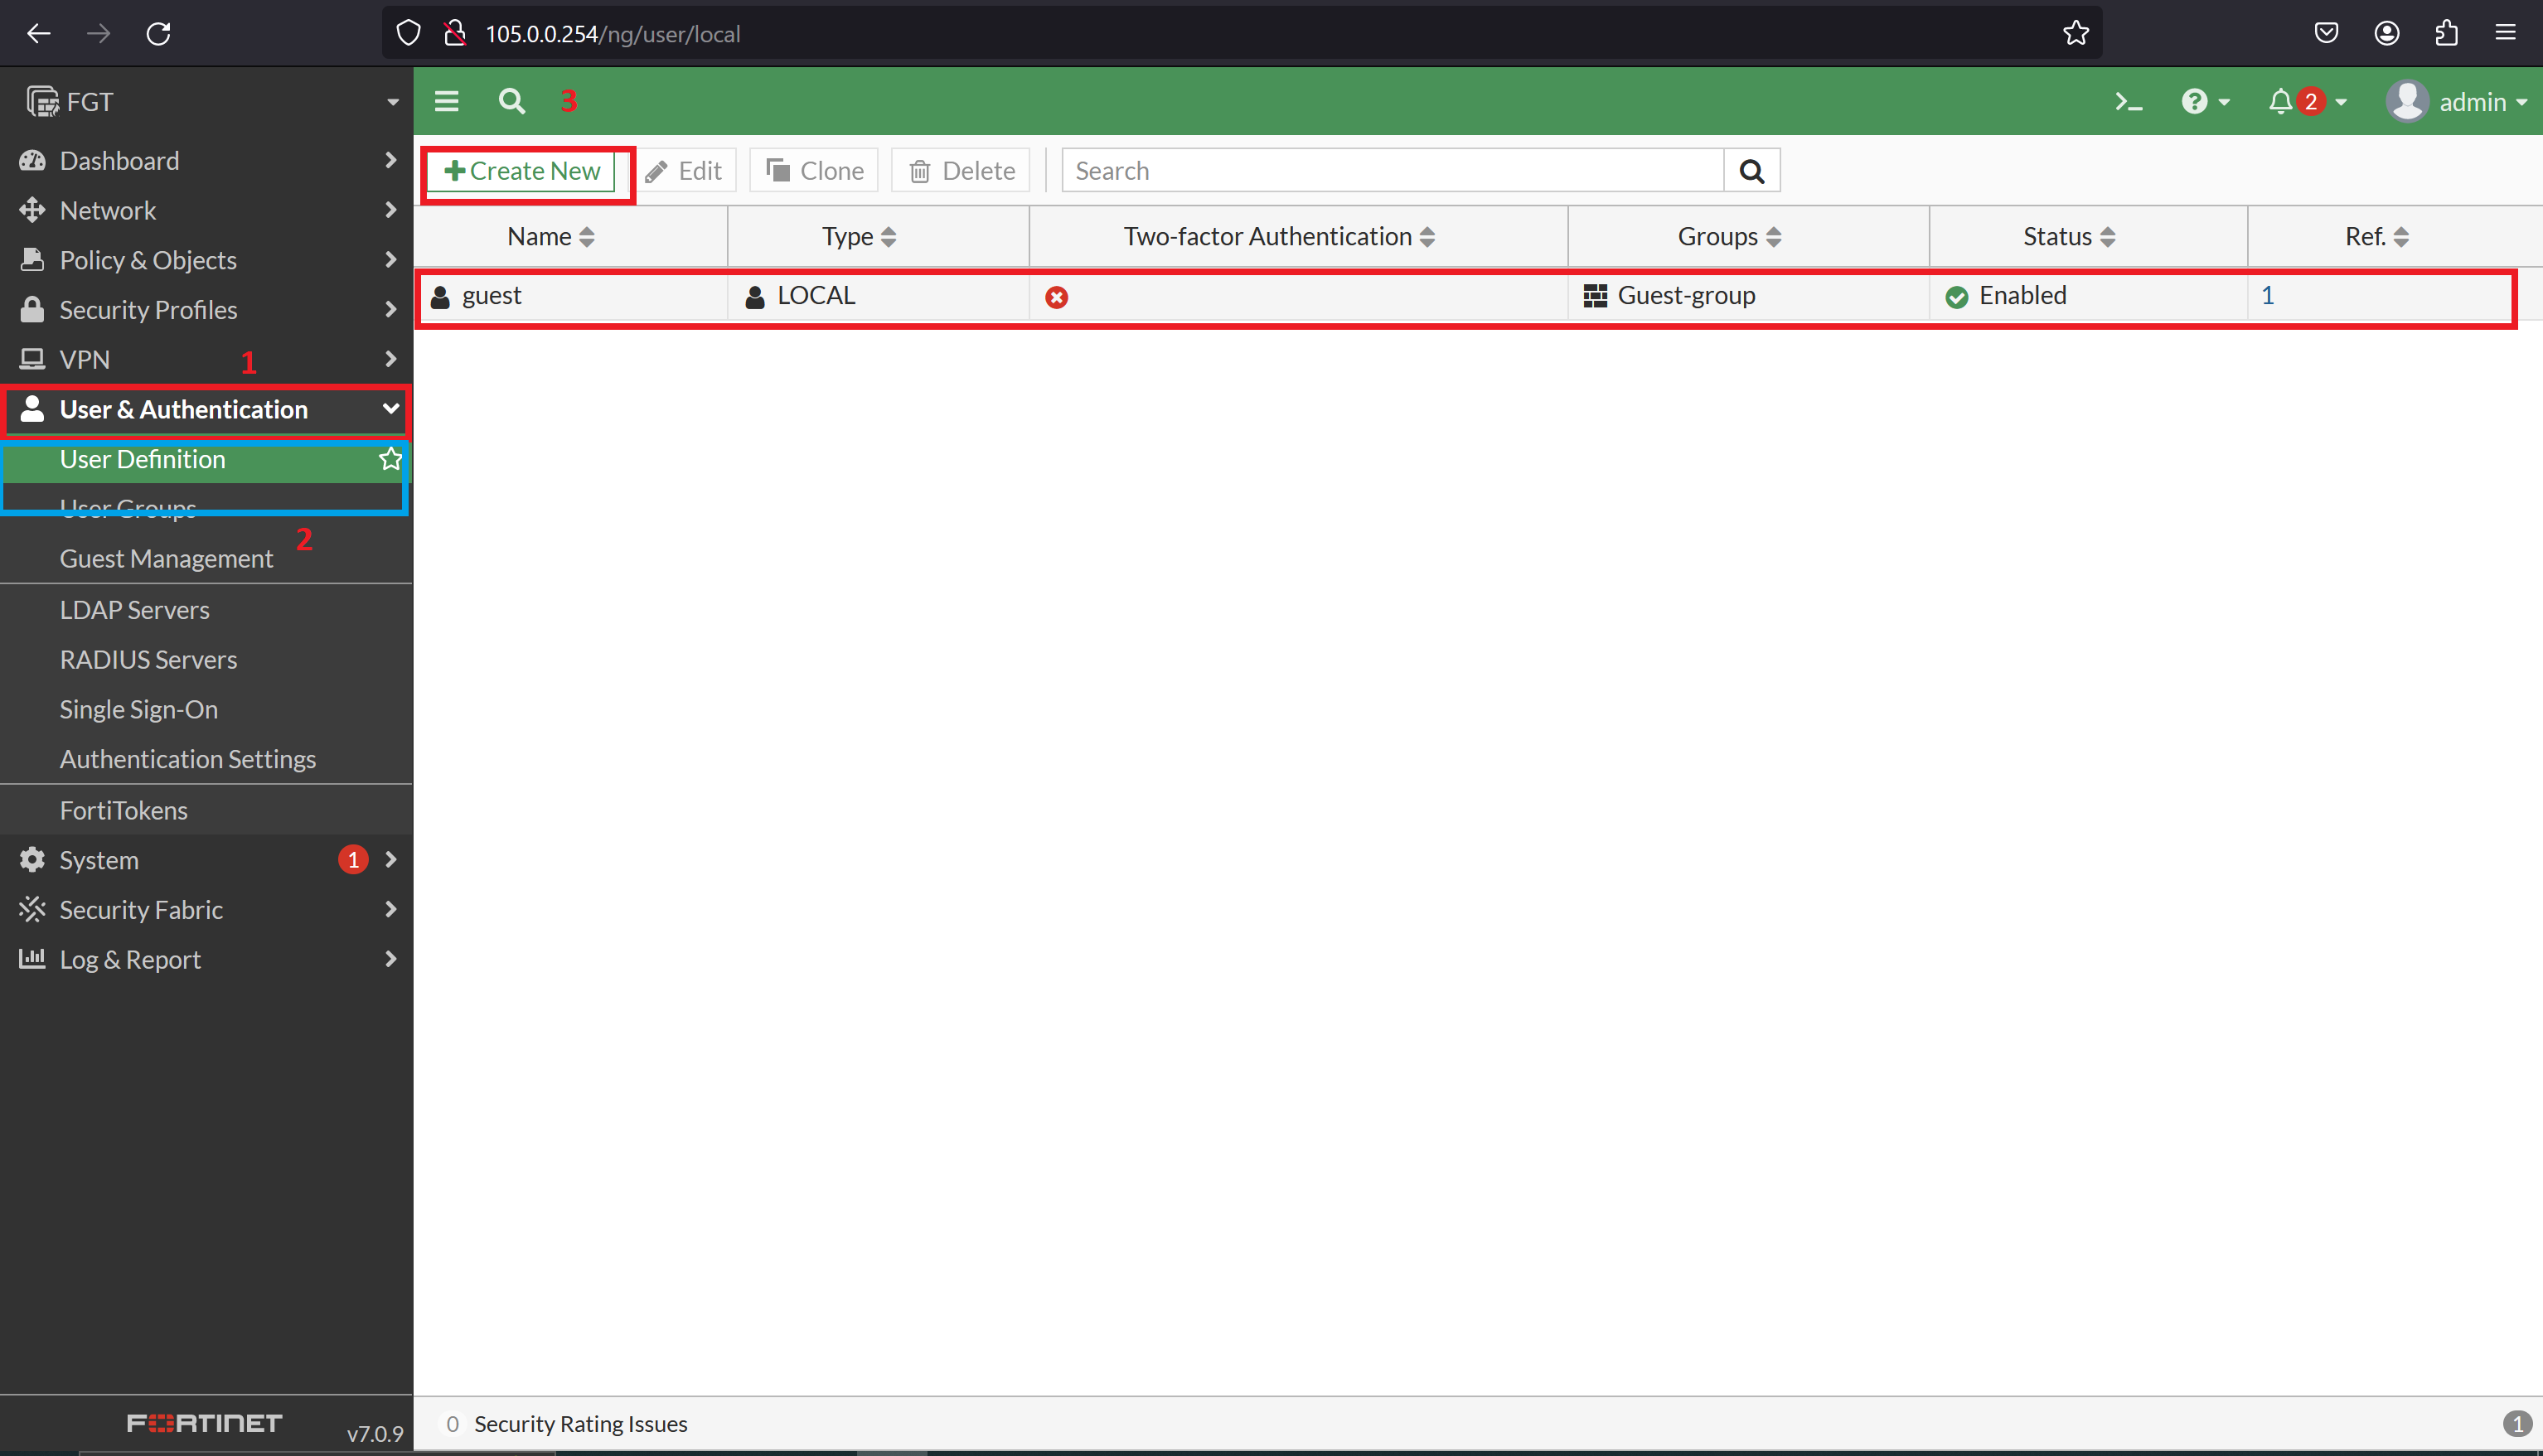
Select User Type —> Local user
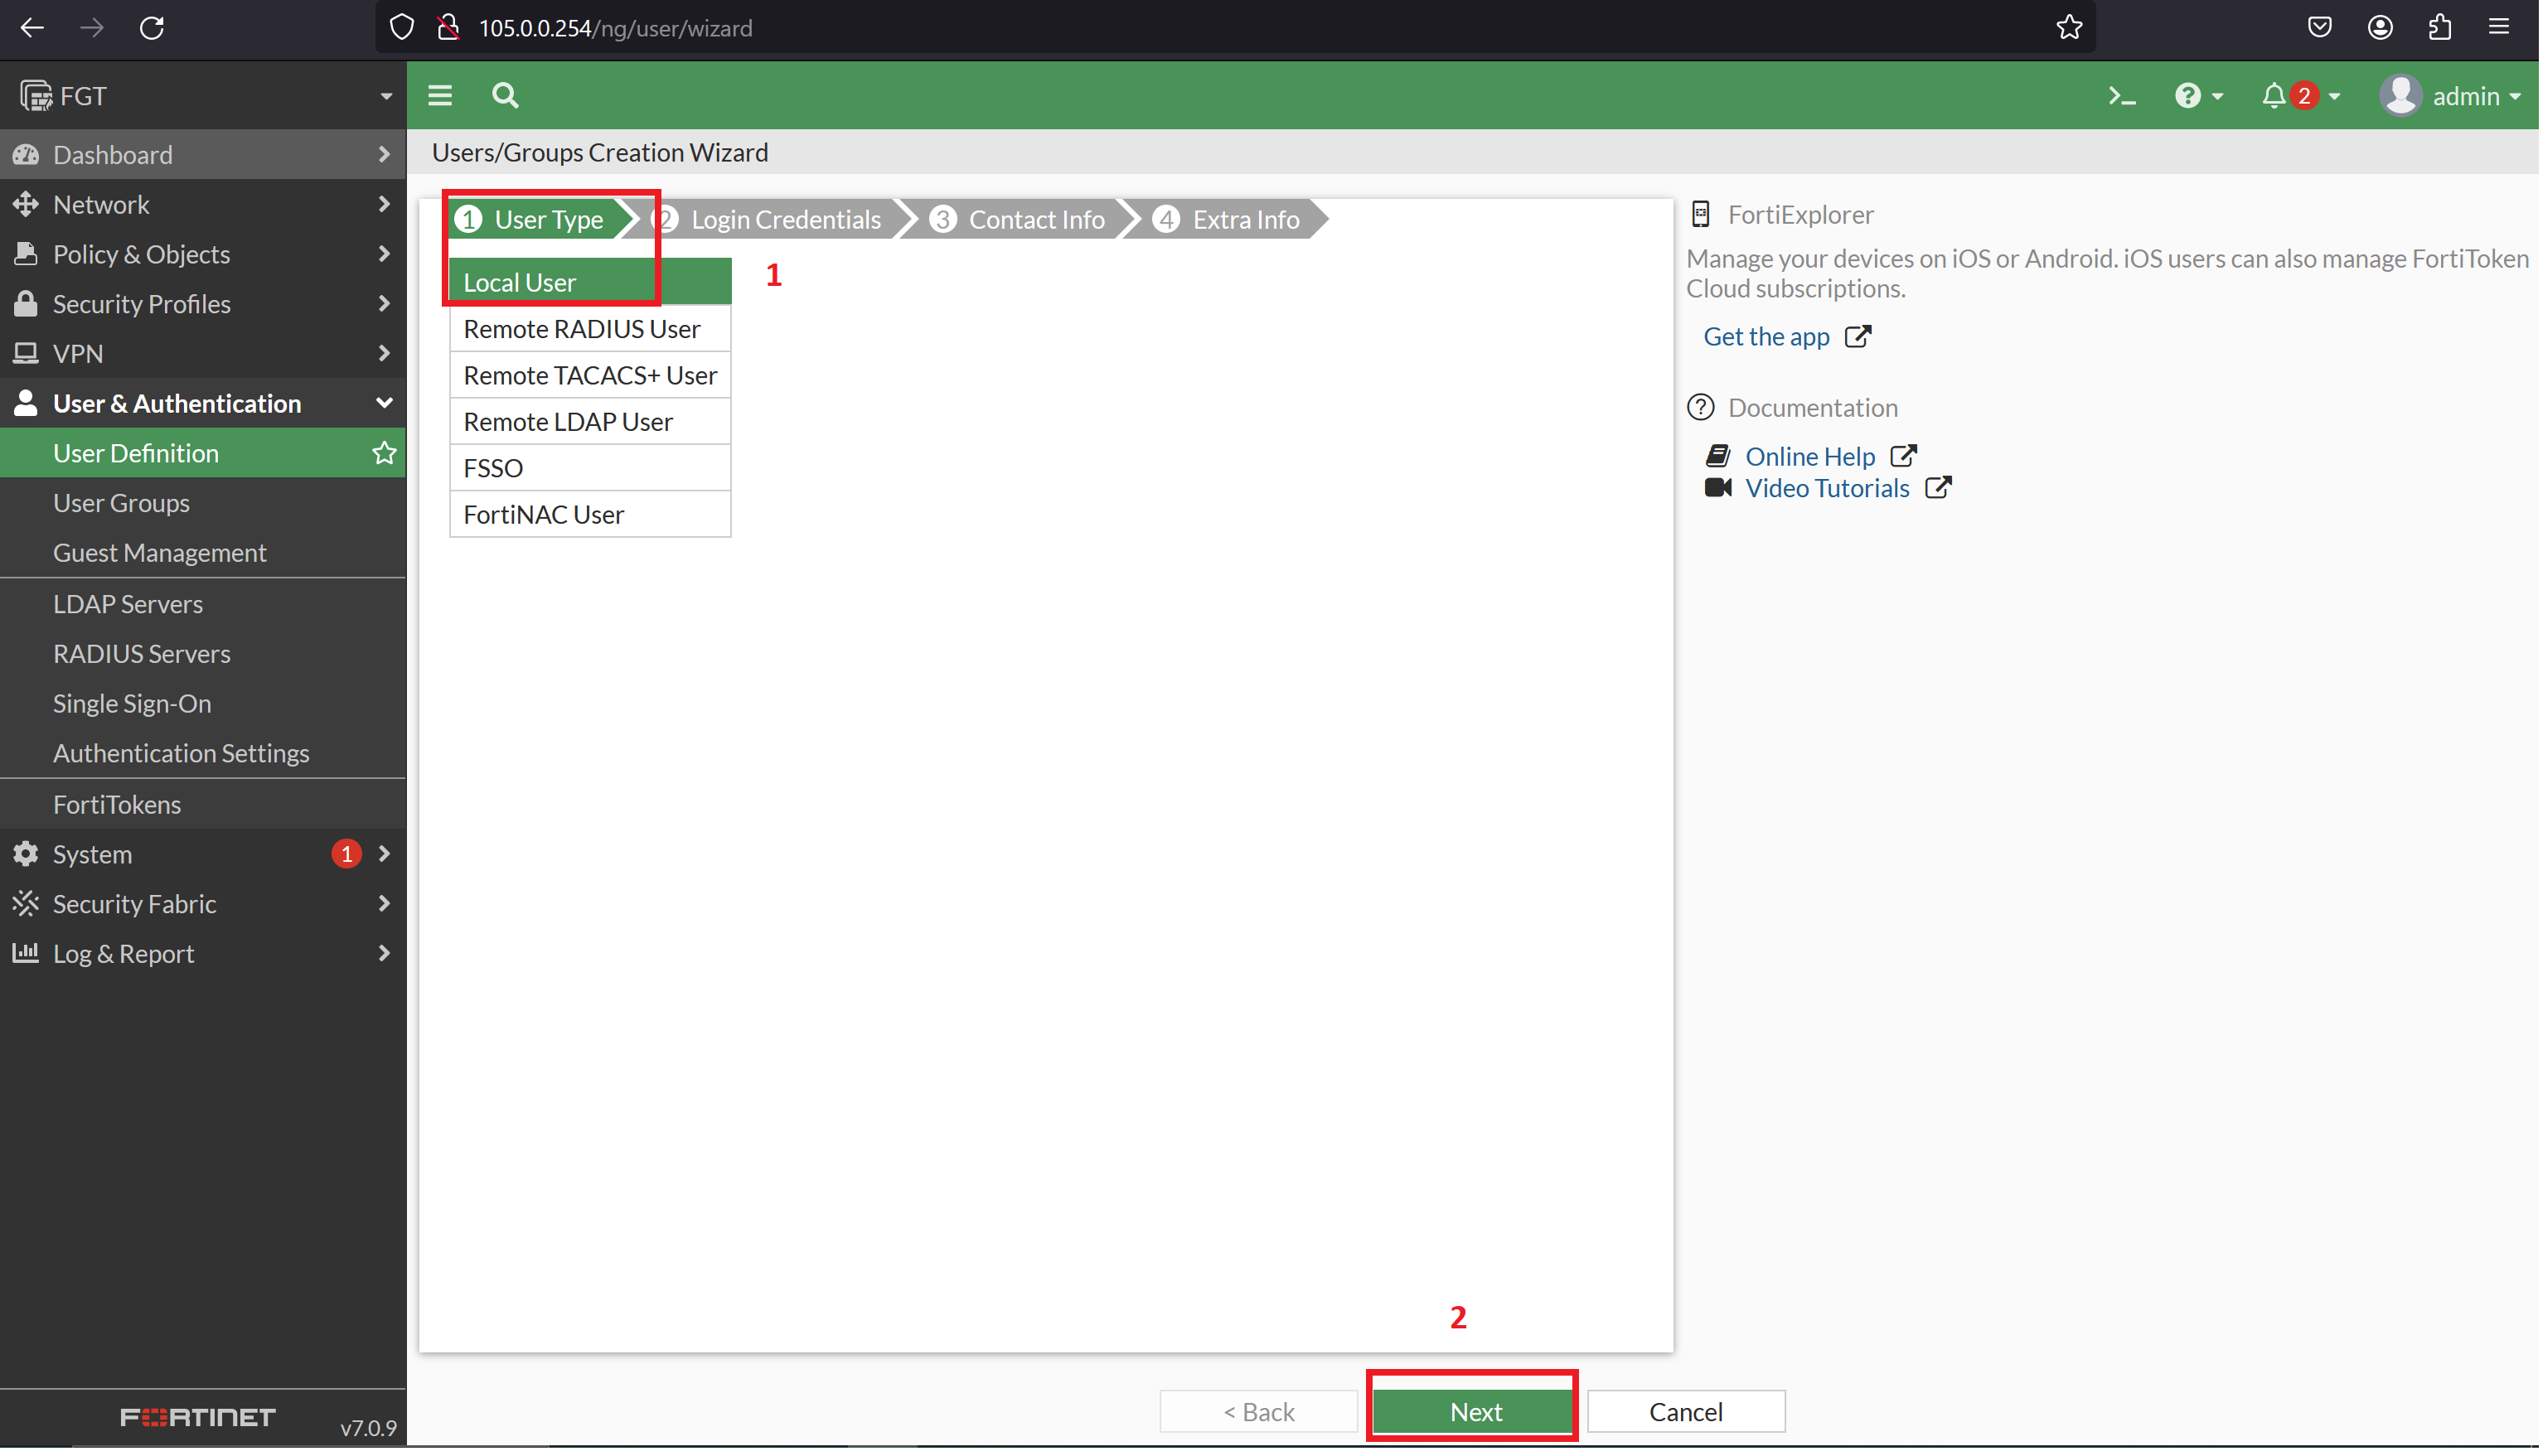
Create the login credentials and disable the two-factor authentication for now.:
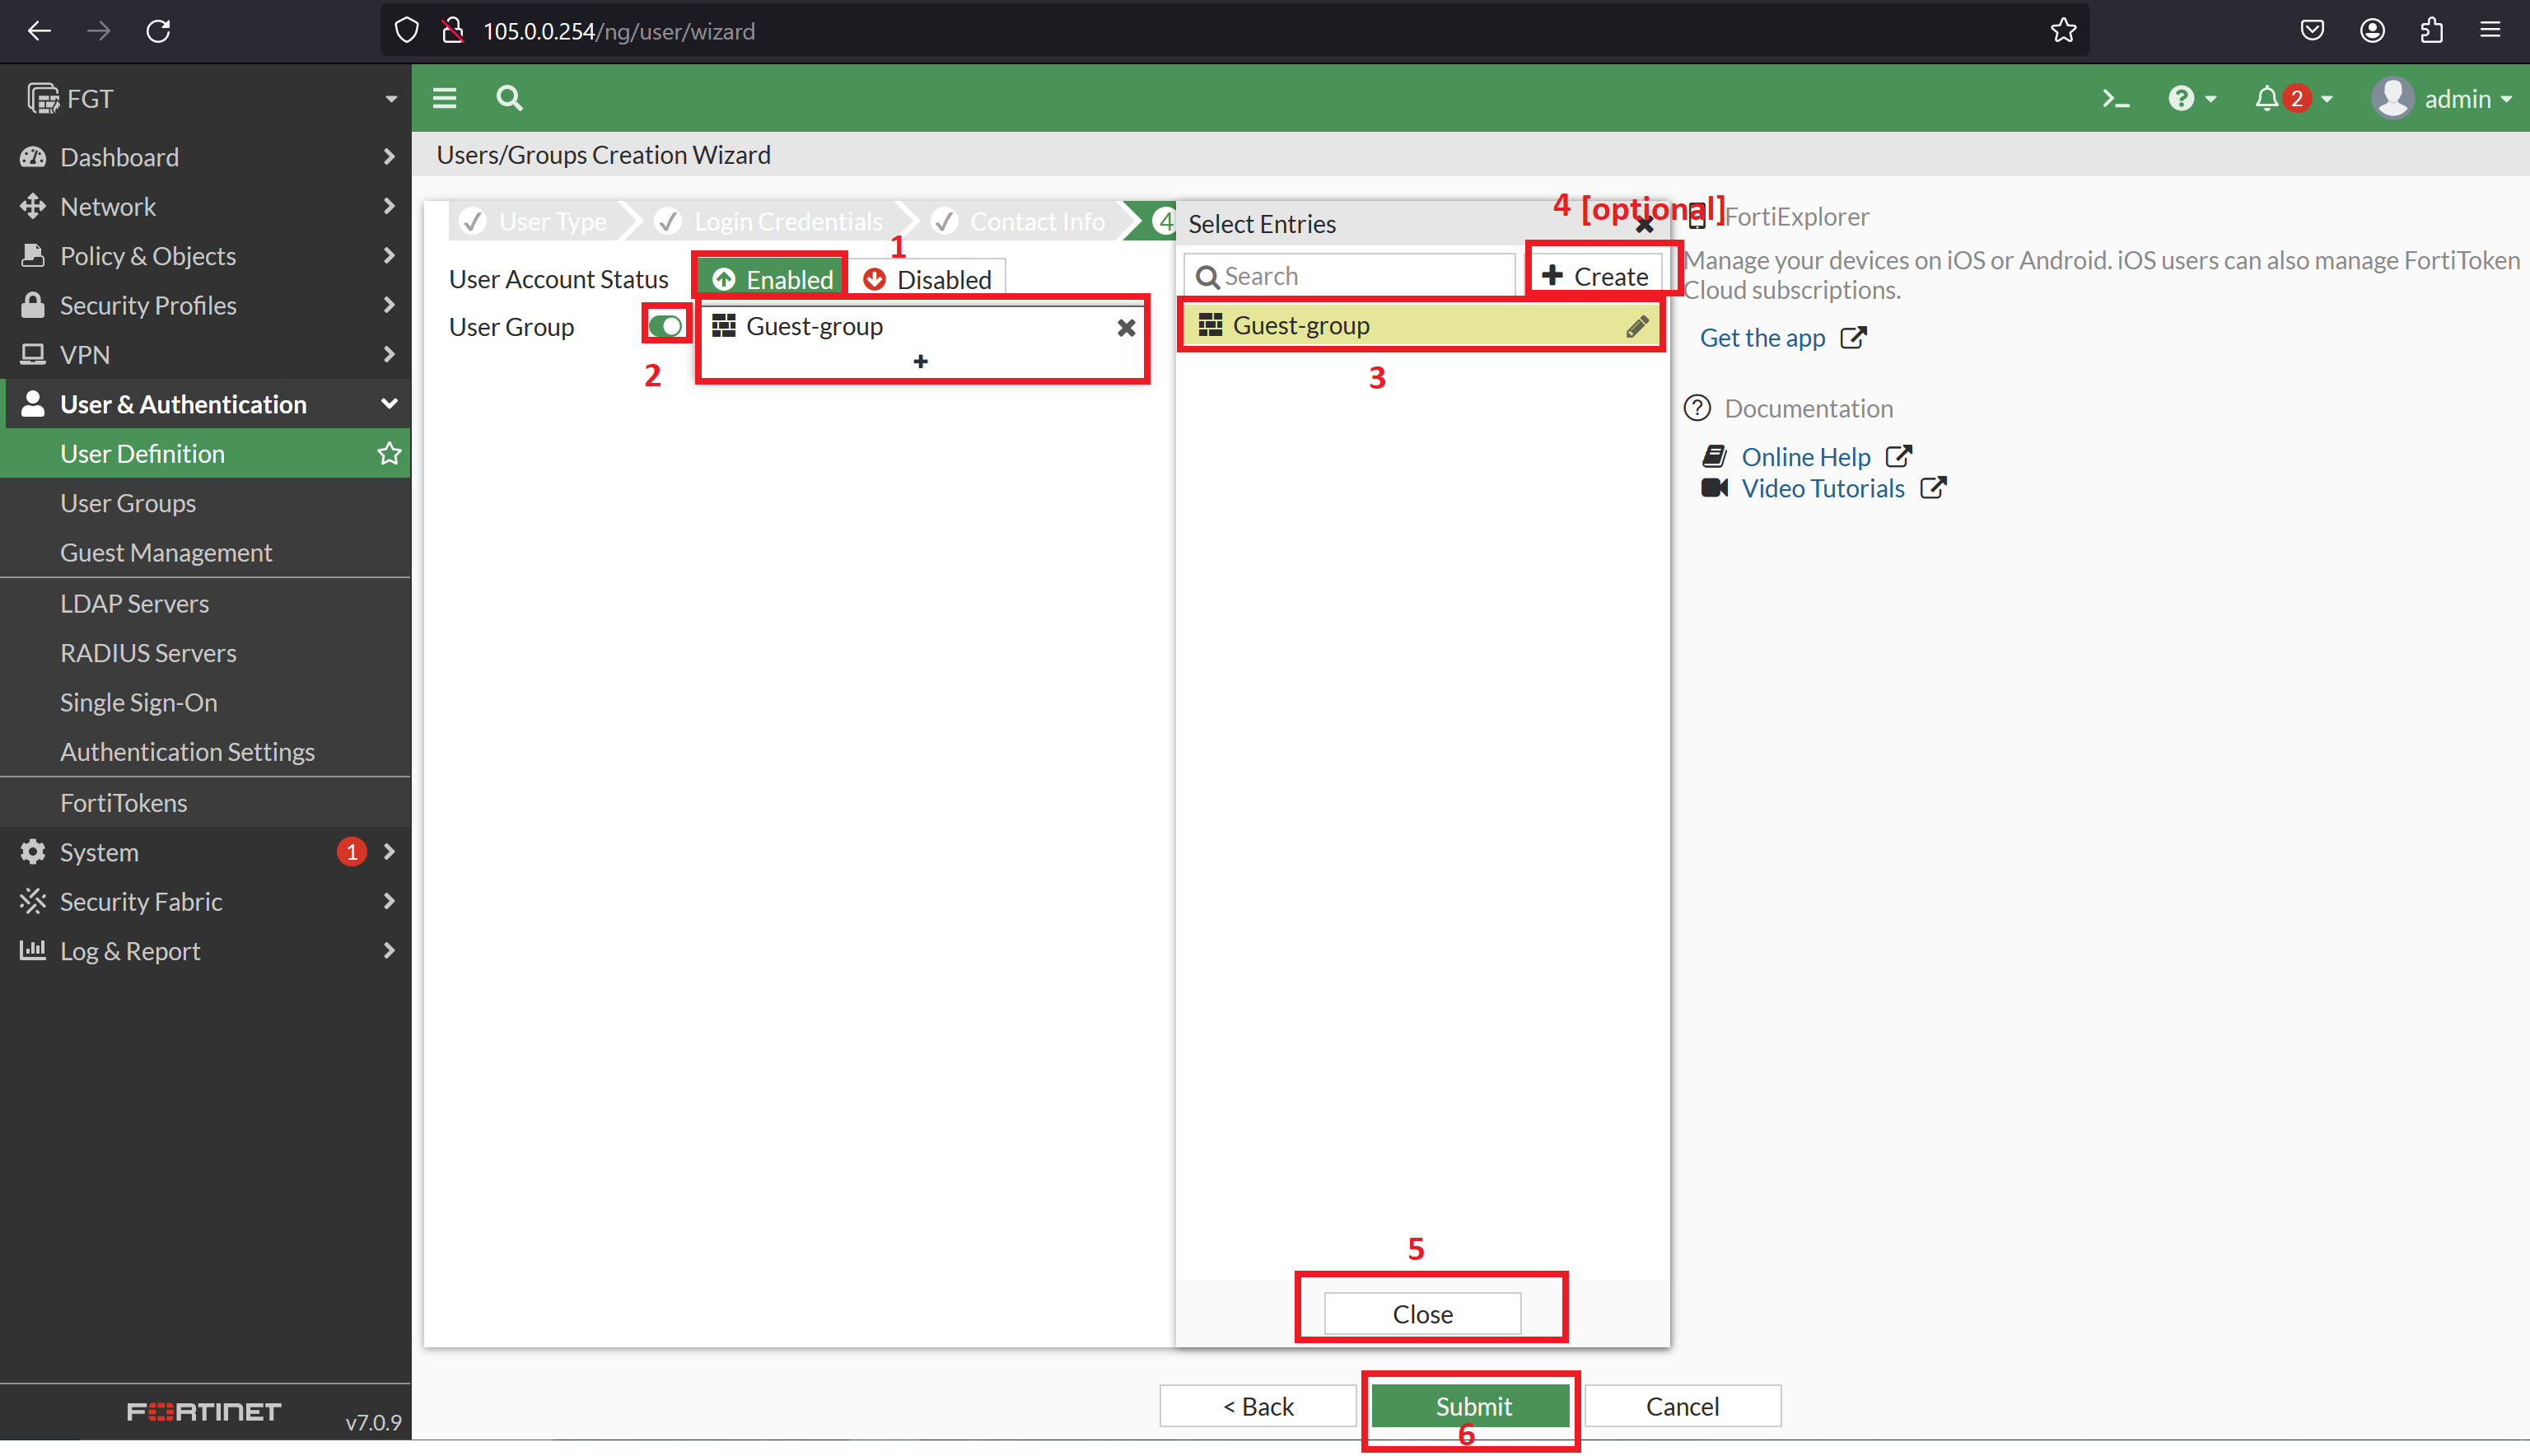
Enable the User account status and assign a default group or create a new one.
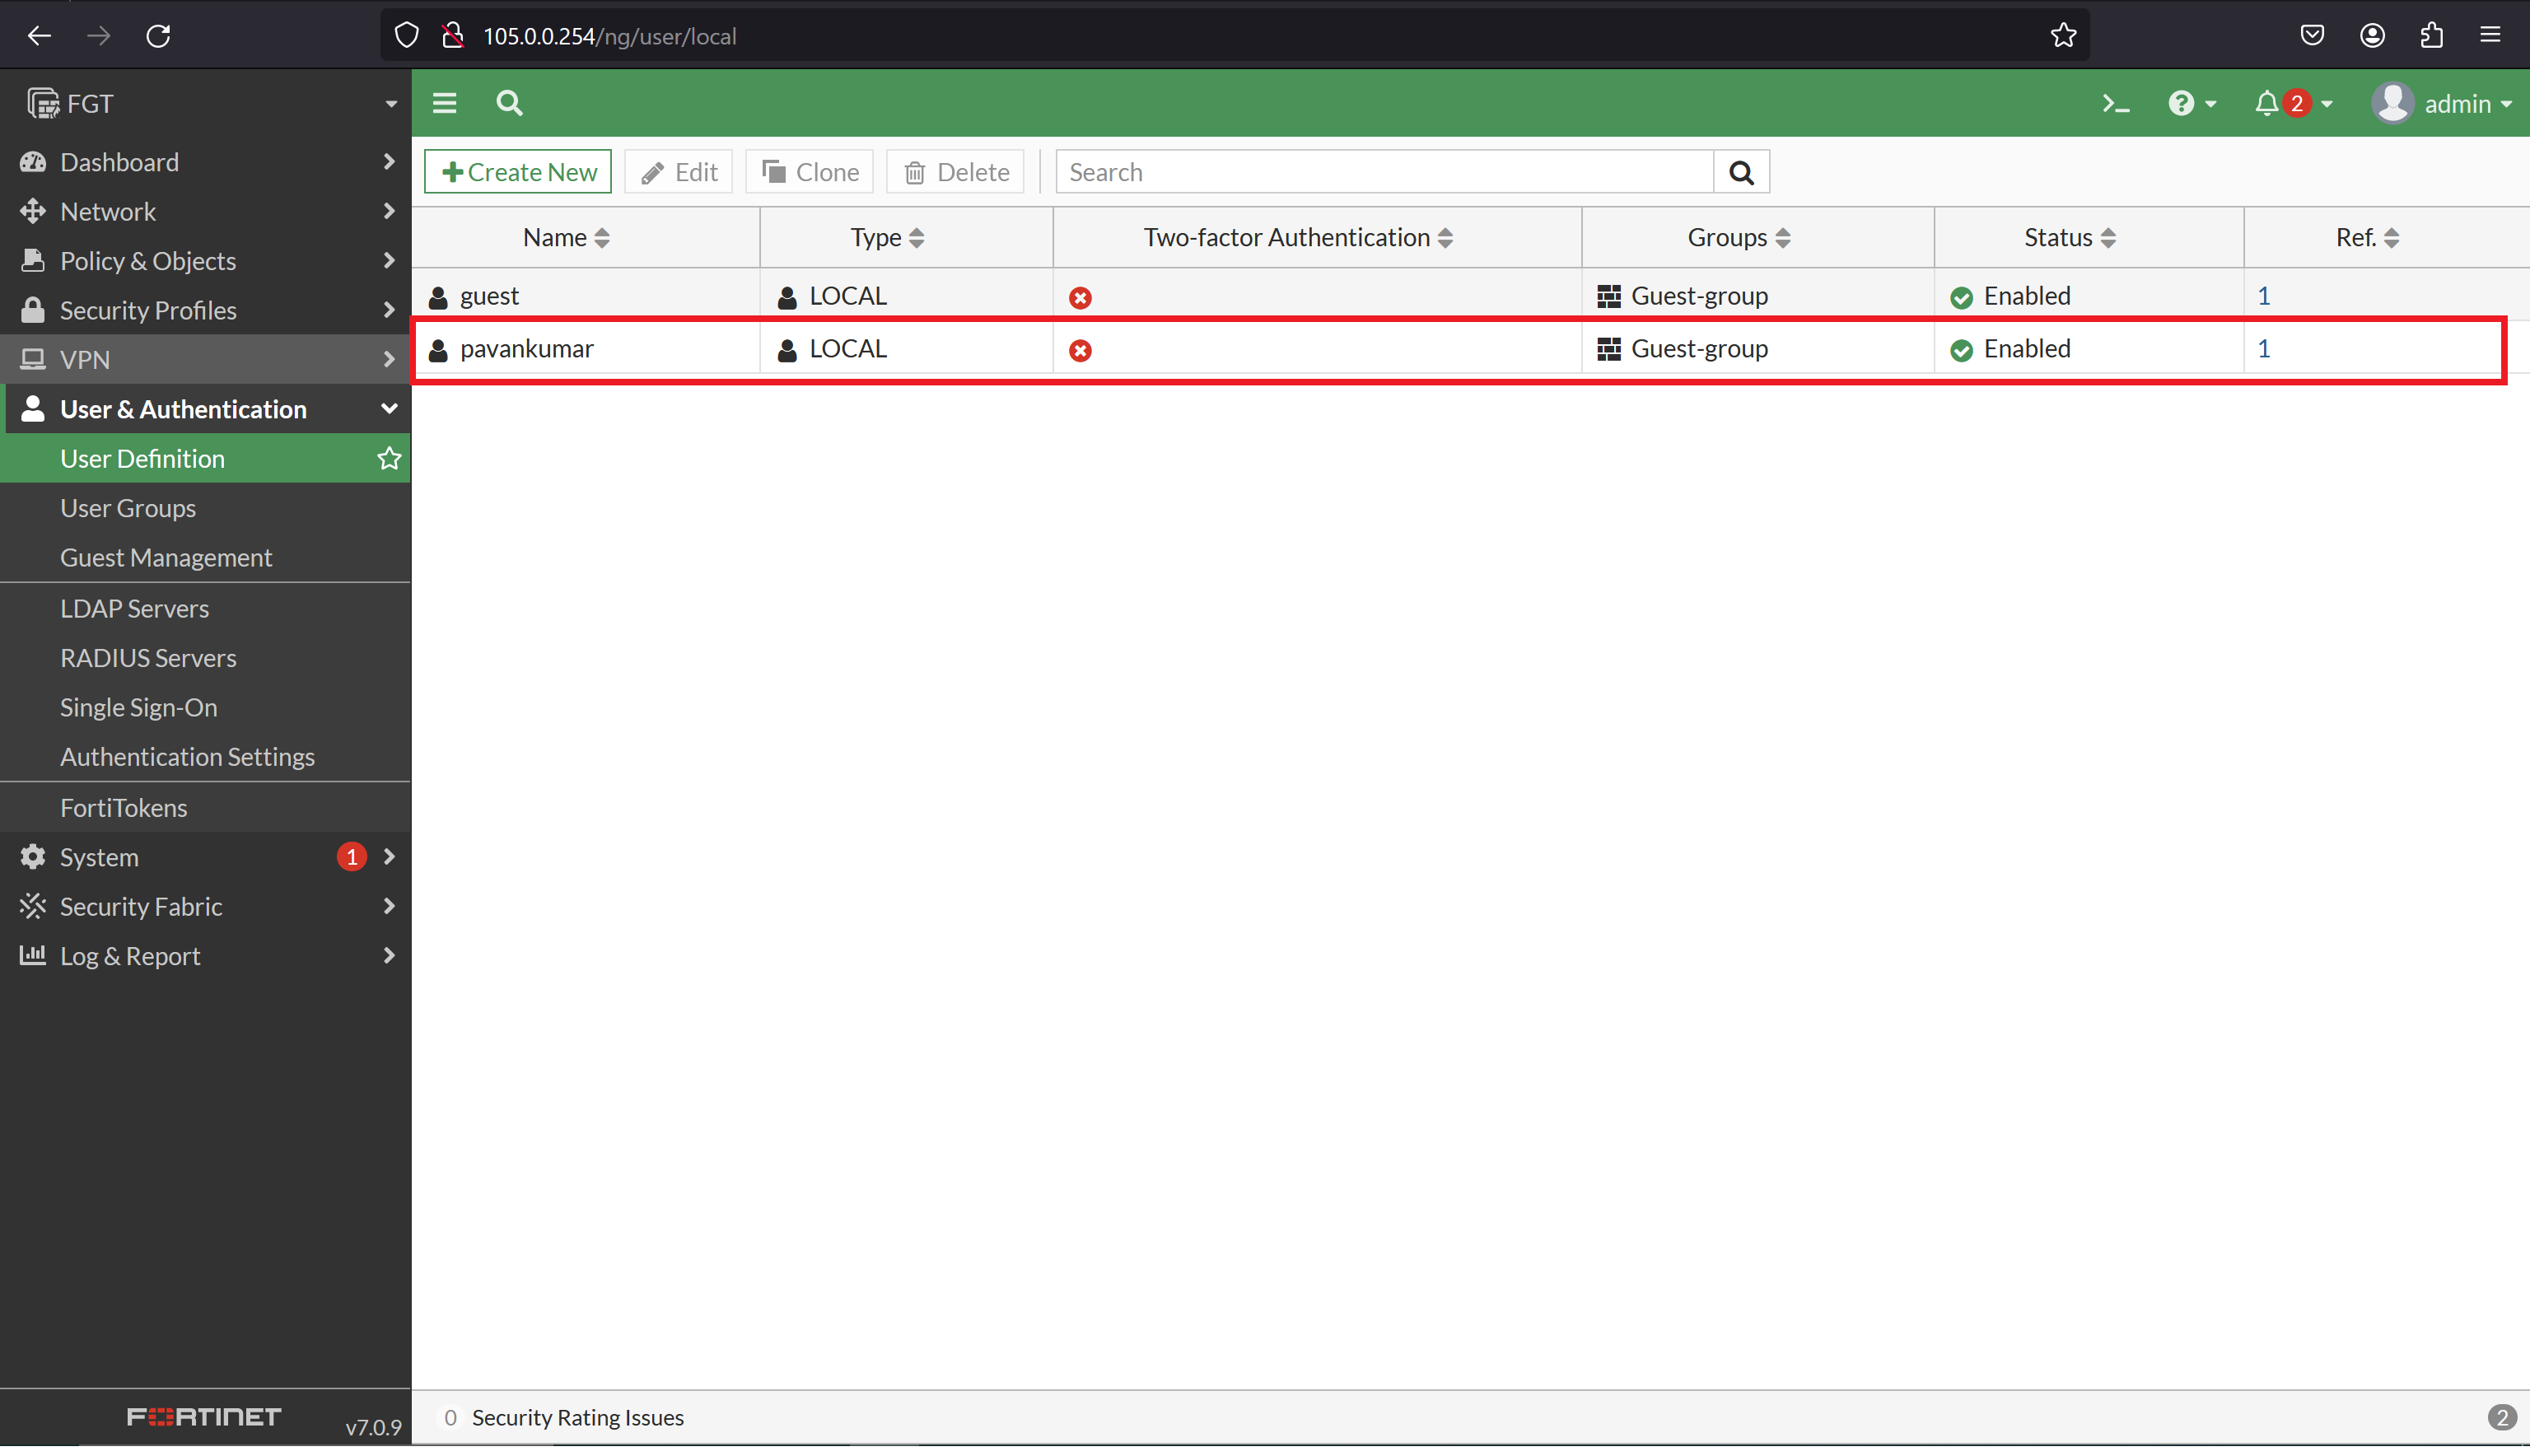
Our new user has been created and assigned to the default group.
II. Create Authentication Policies[Captive Portal]
Demo:
Here we are authenticating LAN users to access the DMZ web browser. below image shows without Captive portal or firewall authentication.
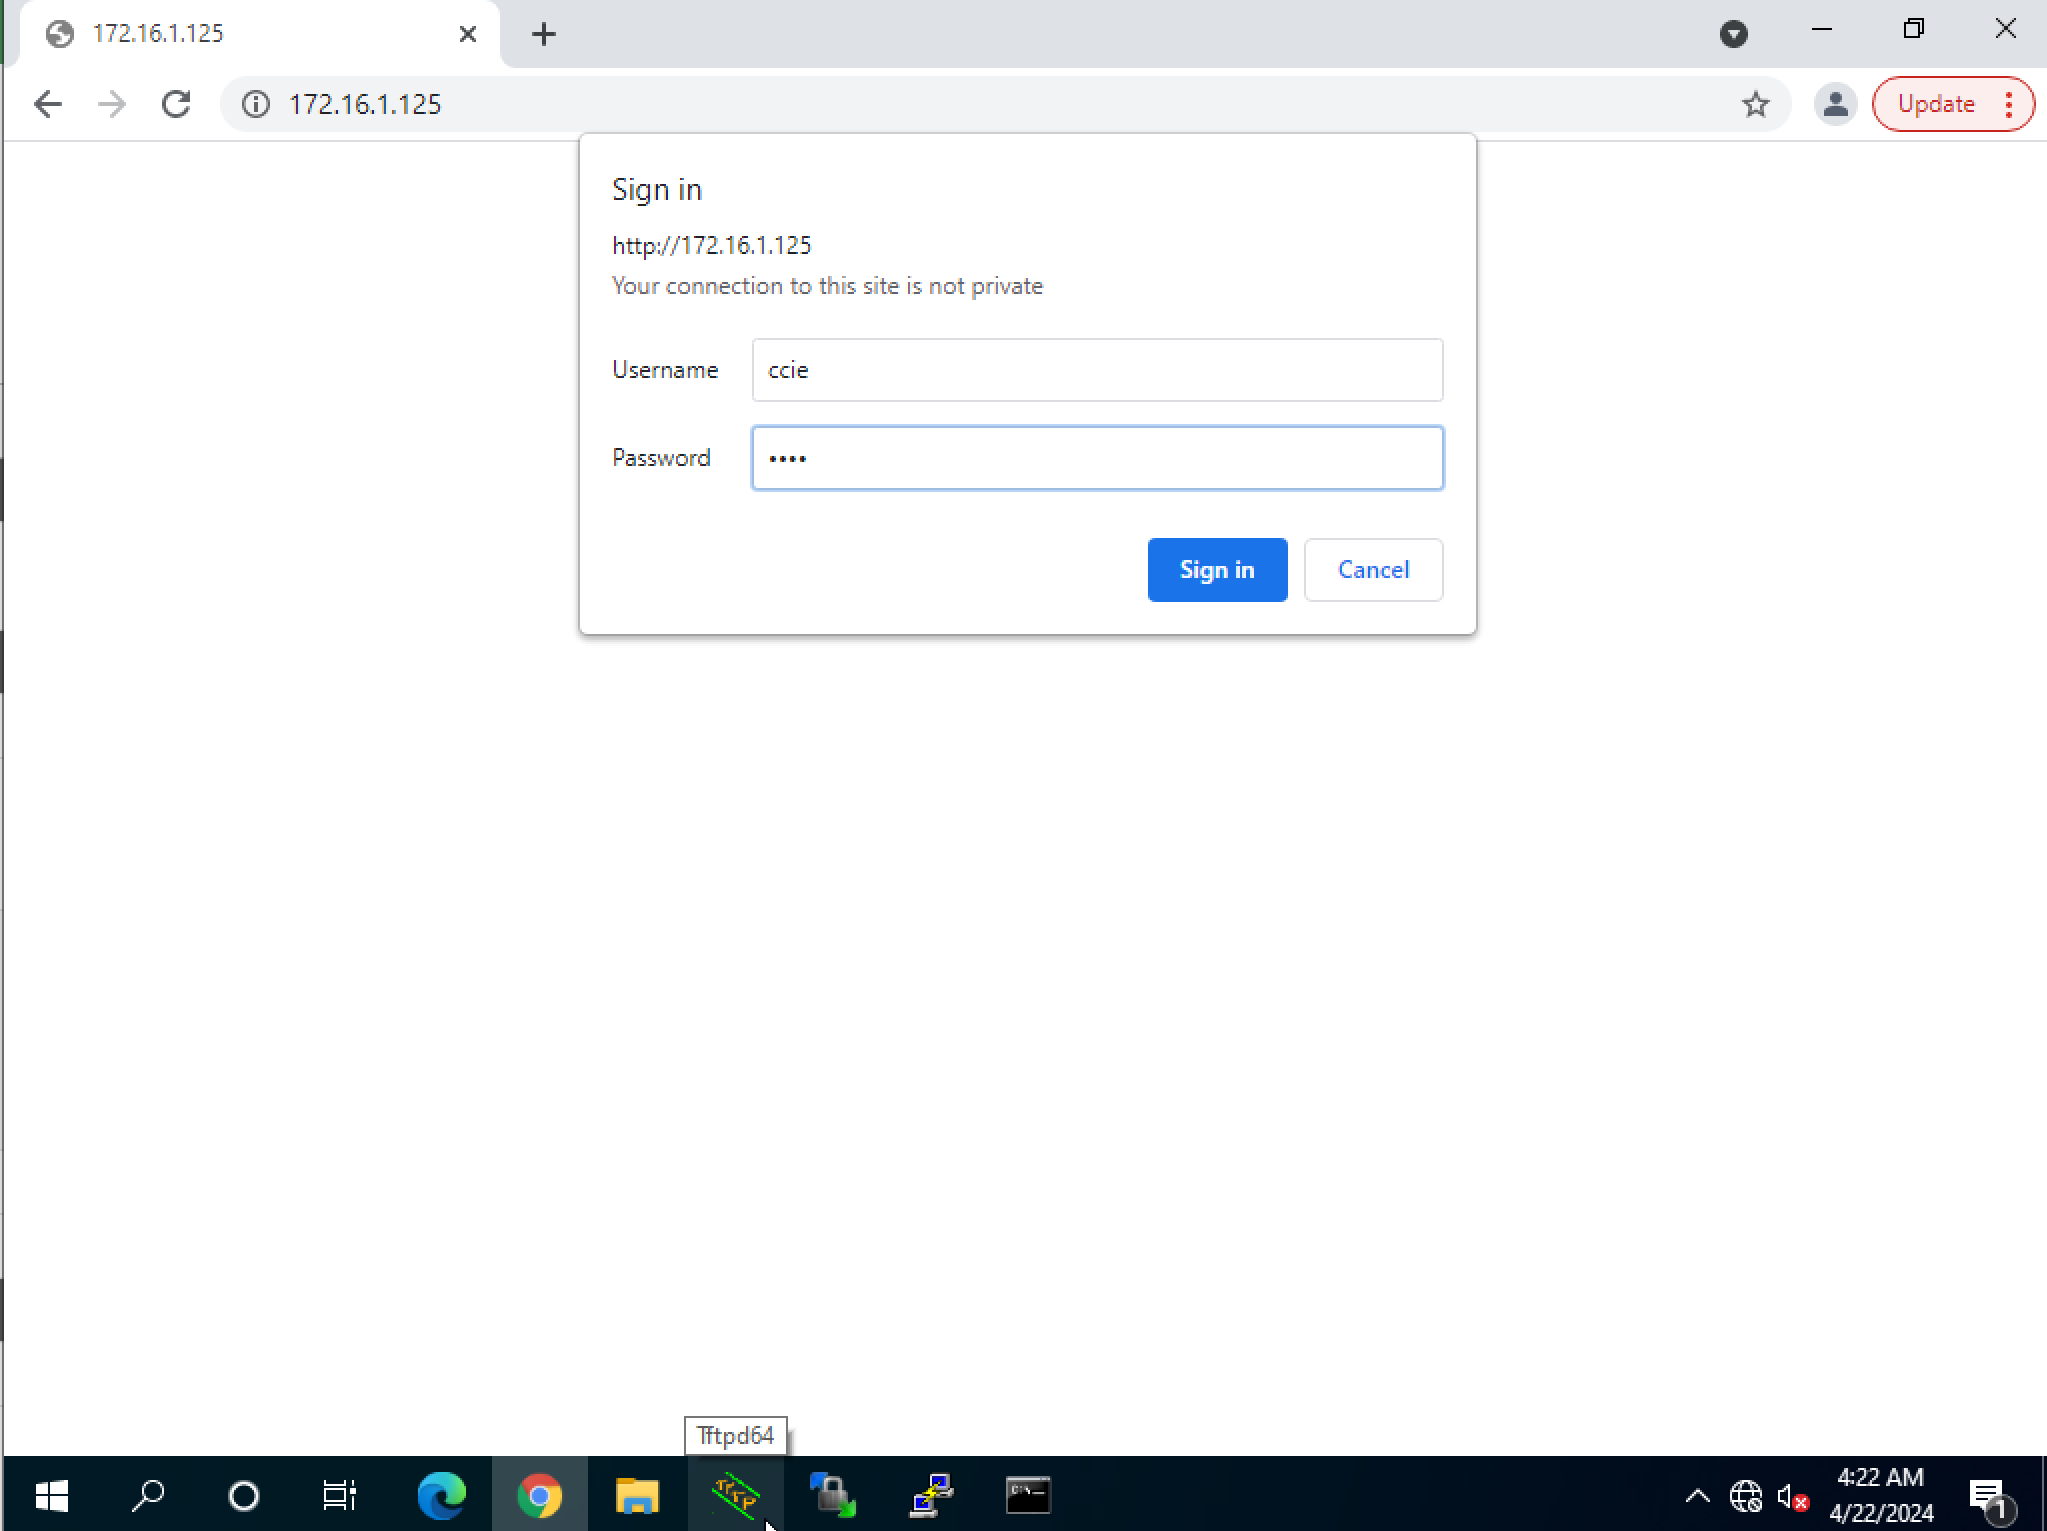
Assign created Policy to LAN interface,
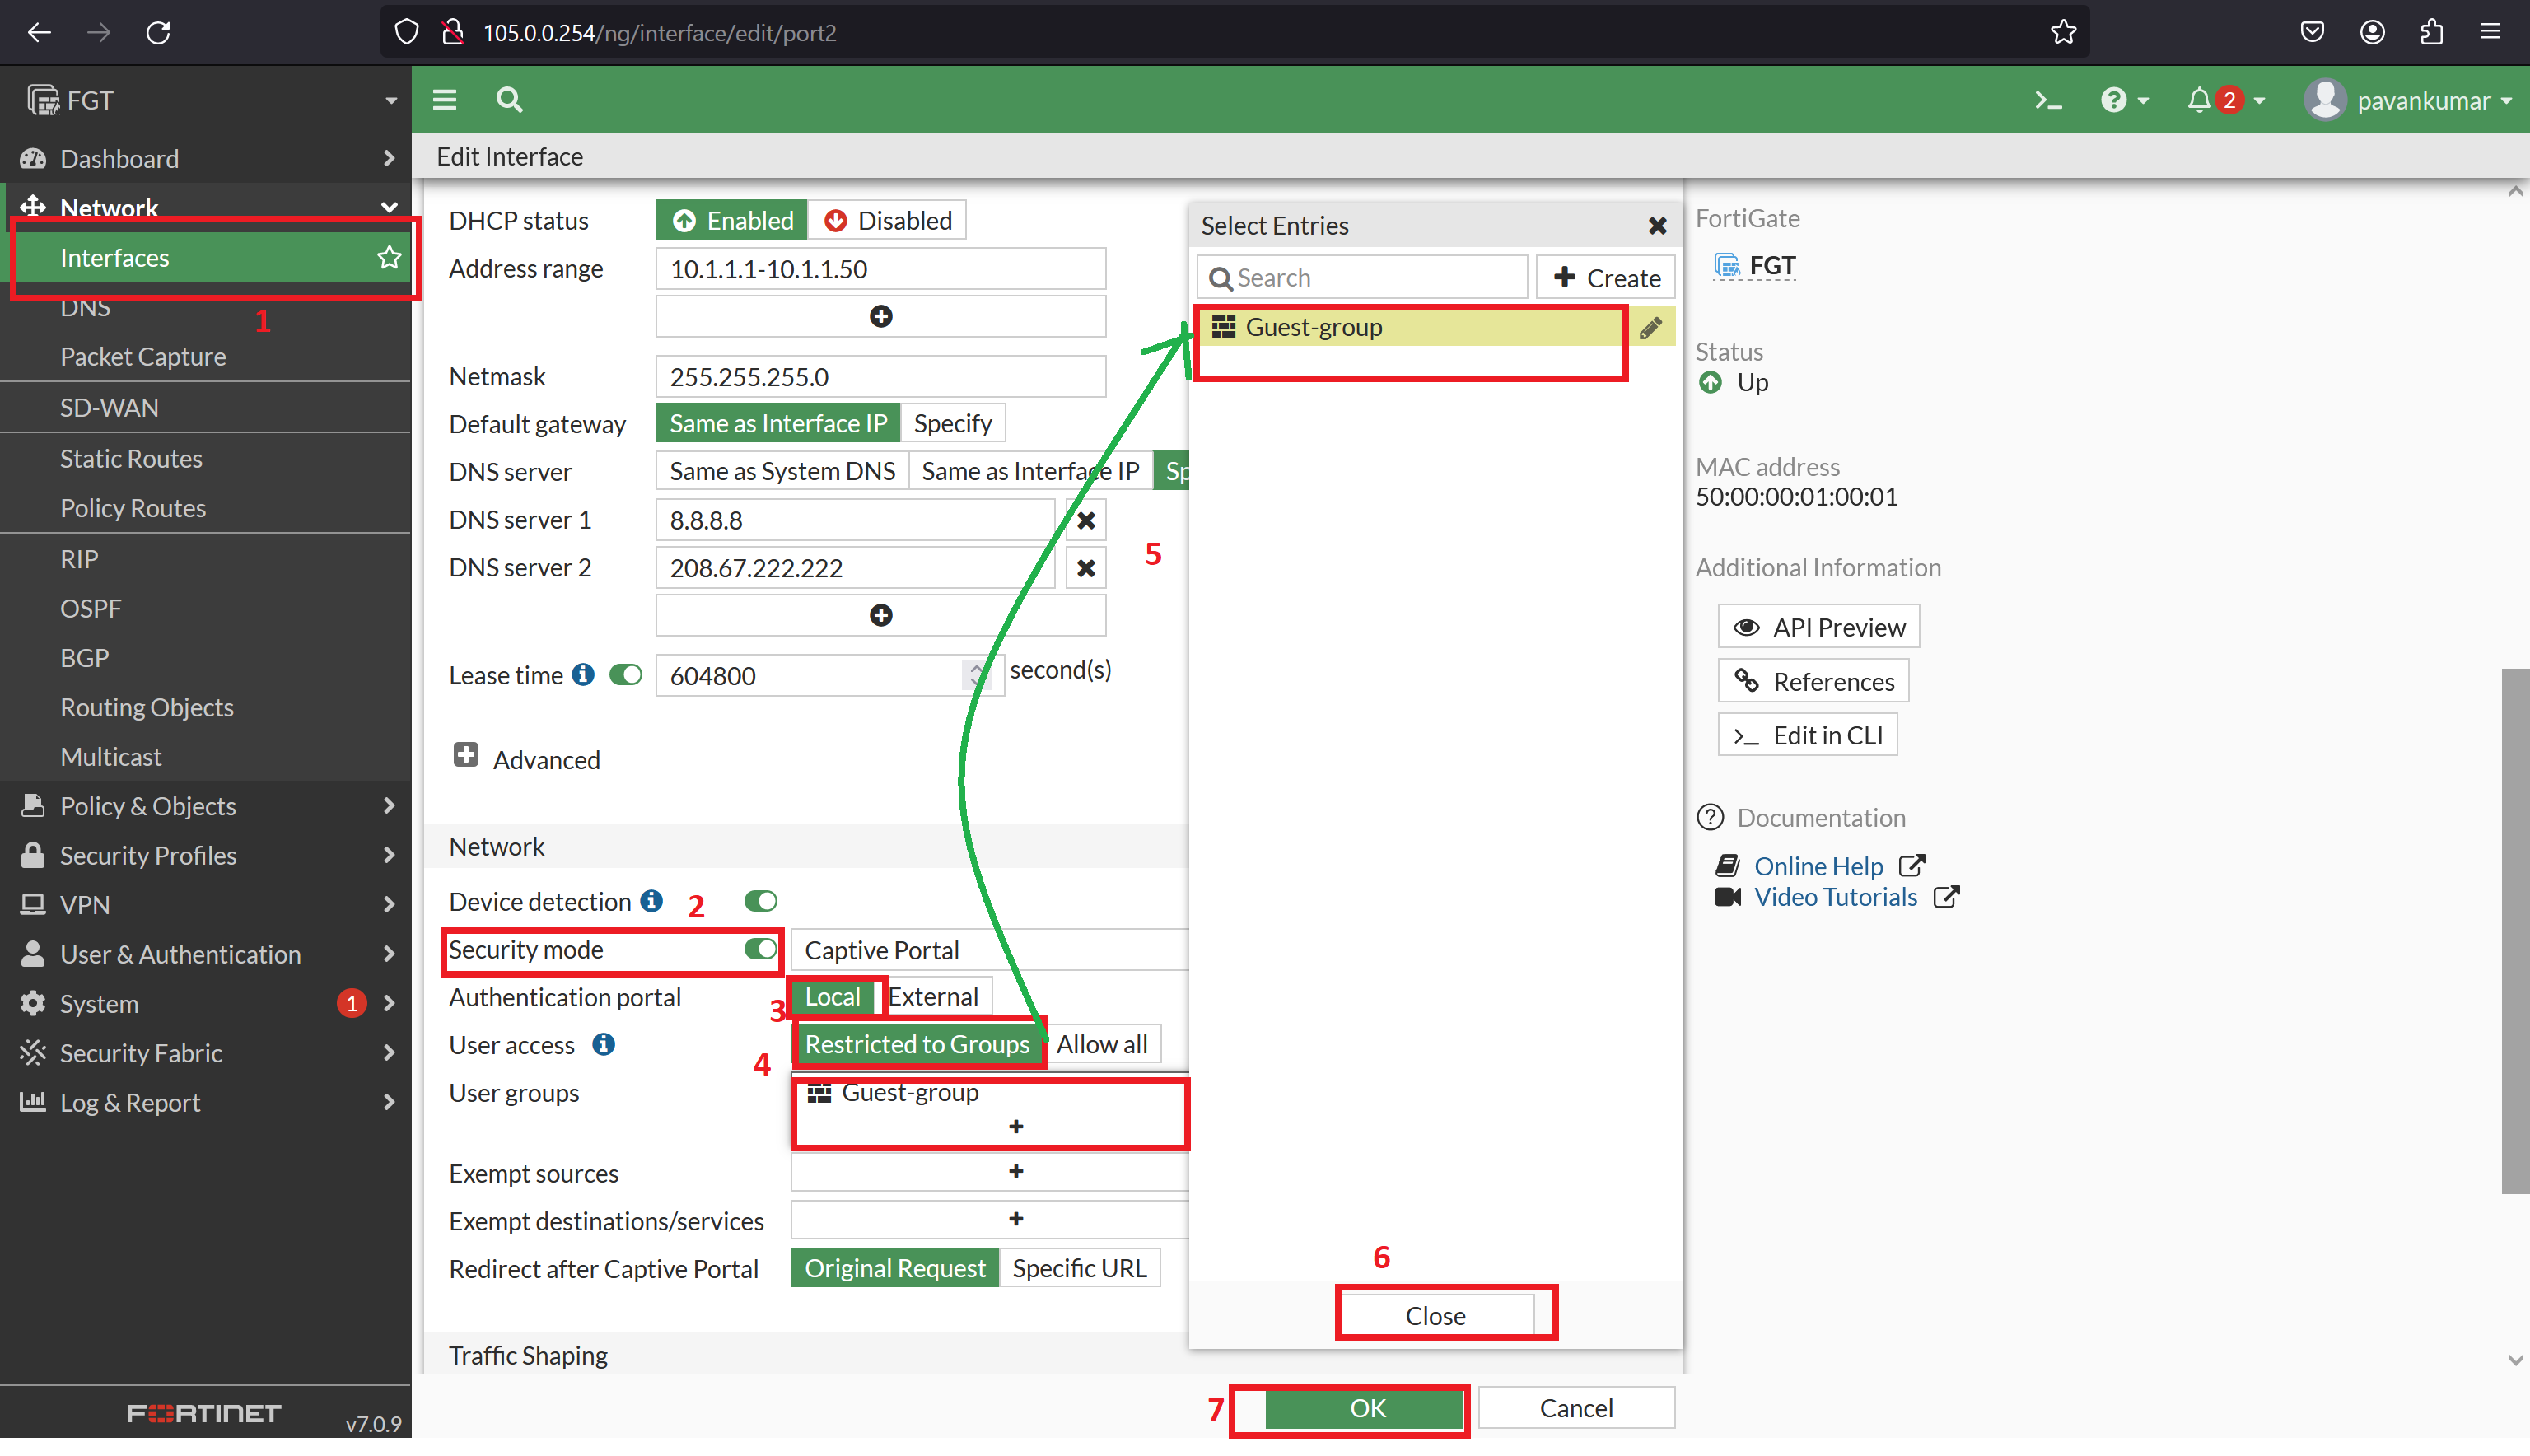
Steps:
- go to Network —> Interface
- enable the security mode and captive portal for Local authentication for Guest group.
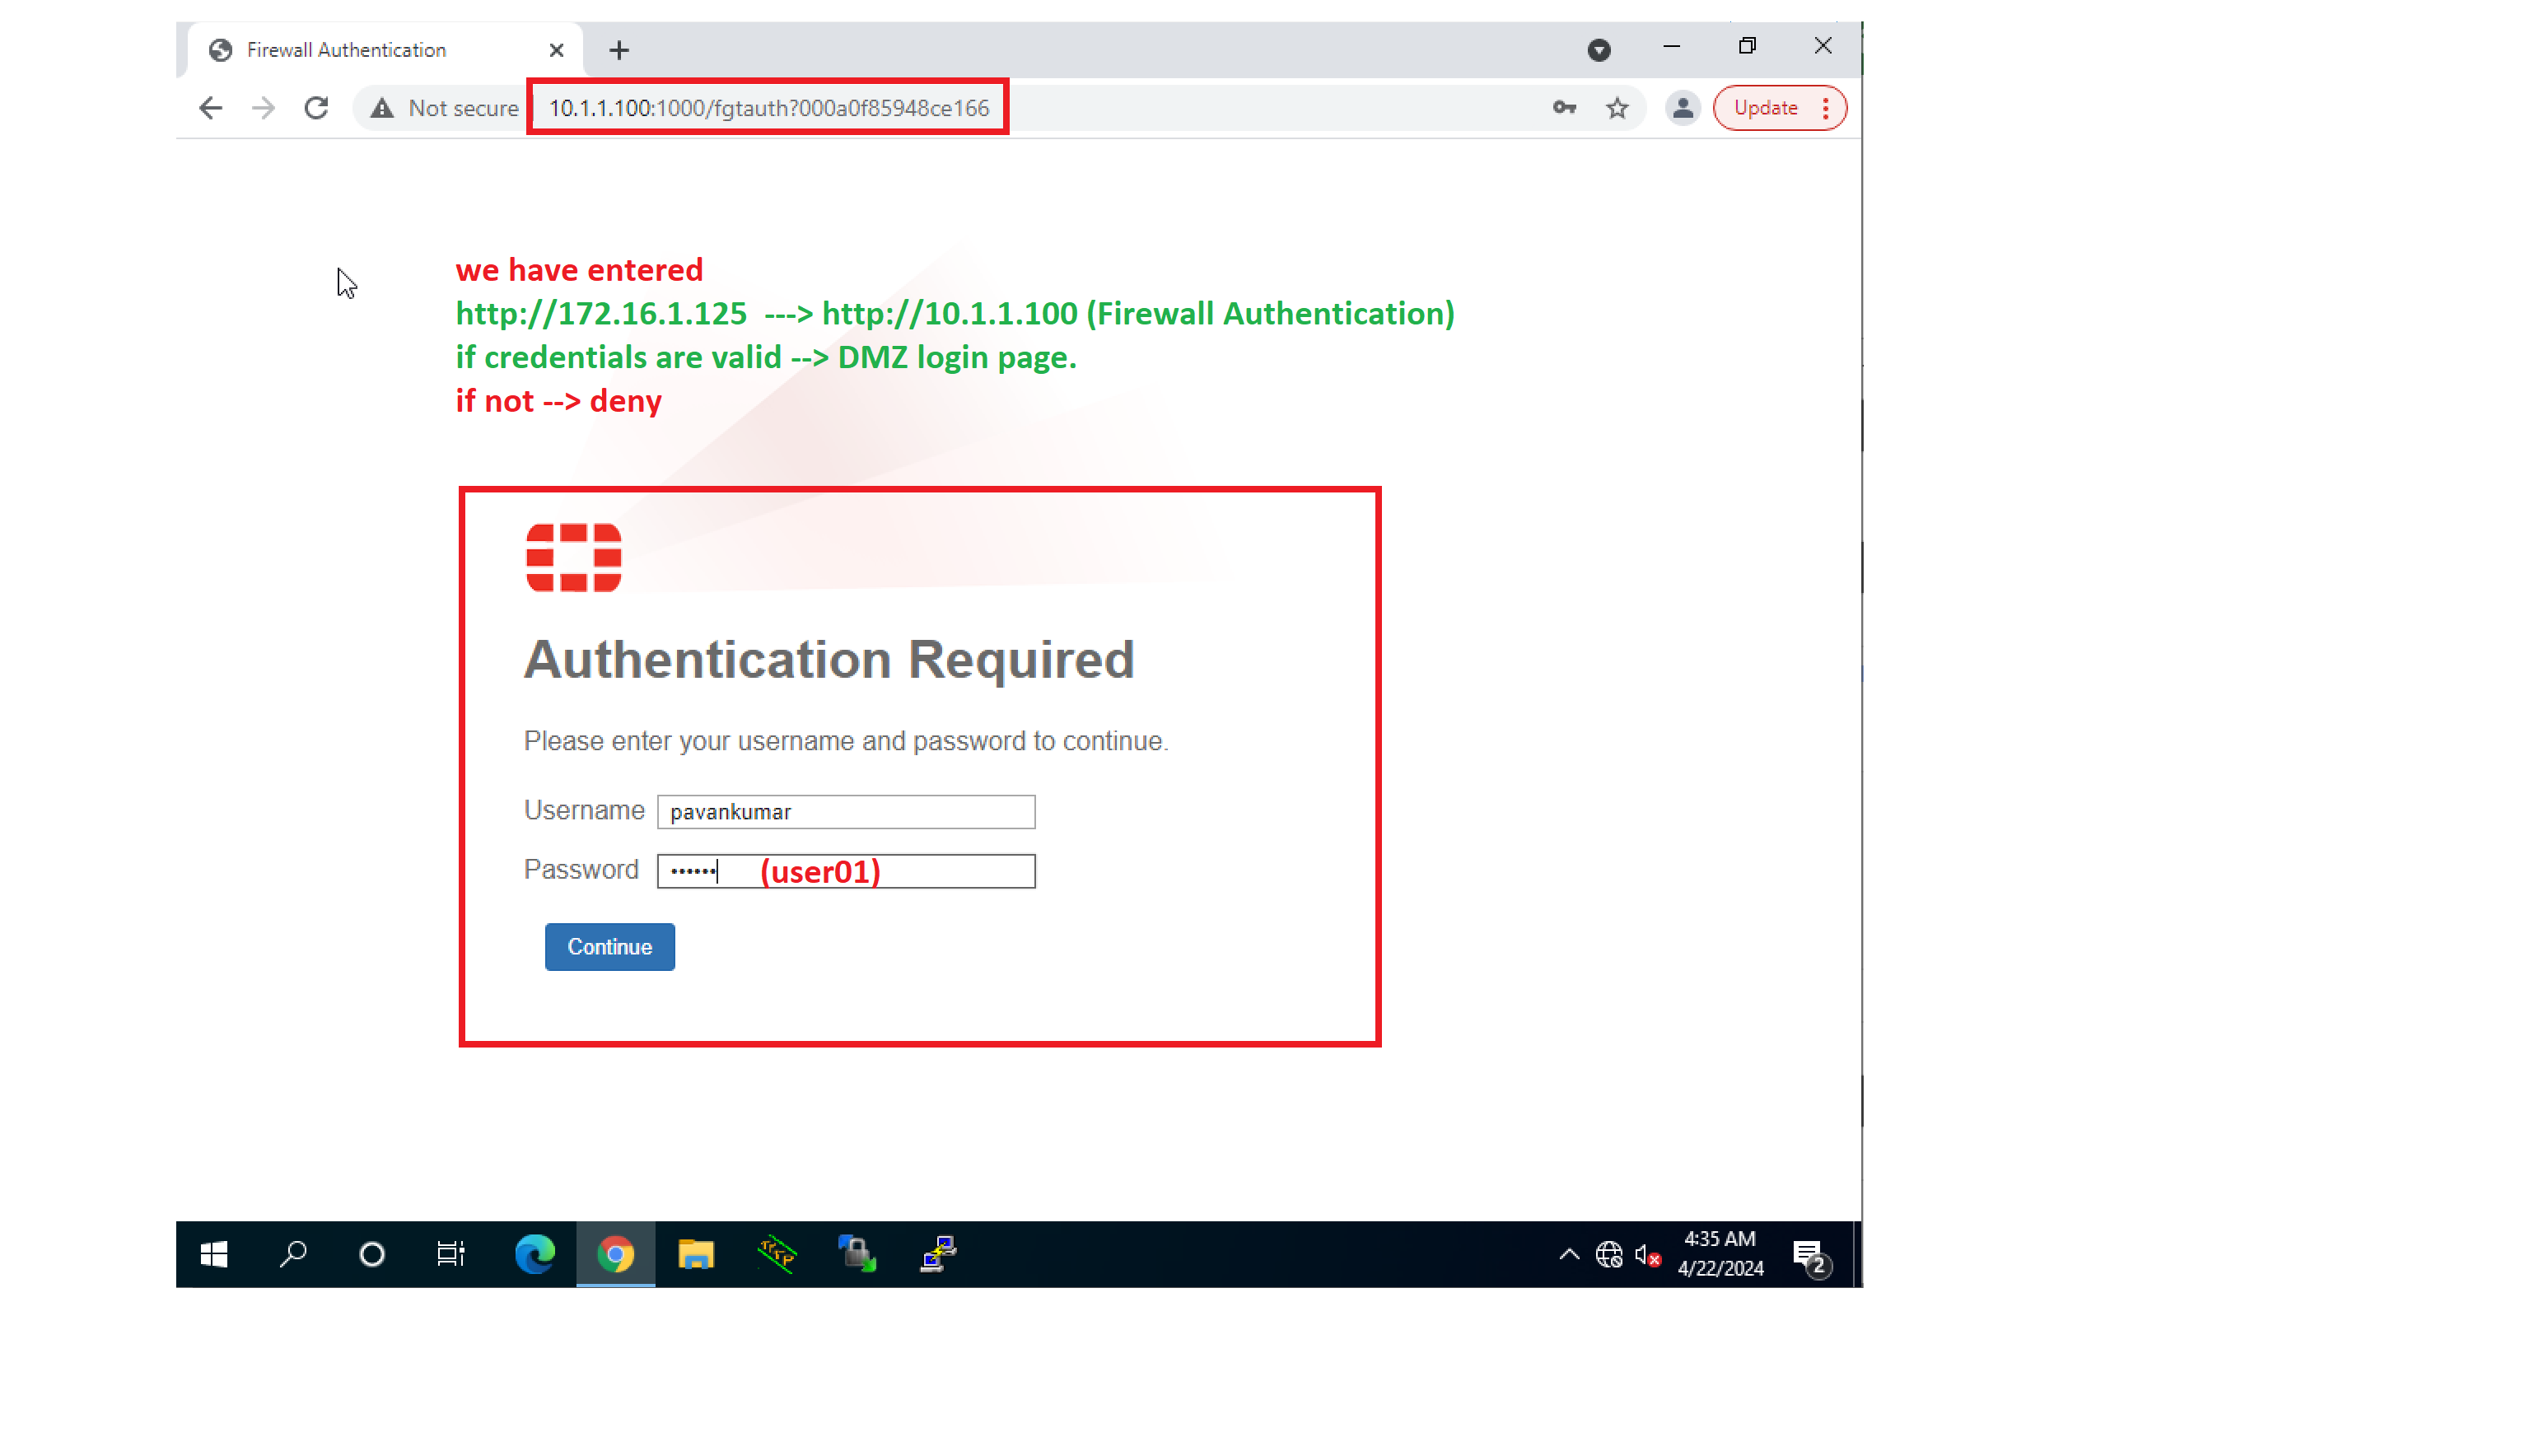
We are going to access DMZ web server but this time we don’t get direct DMZ login page, before accessing we have to be authenticated by Firewall
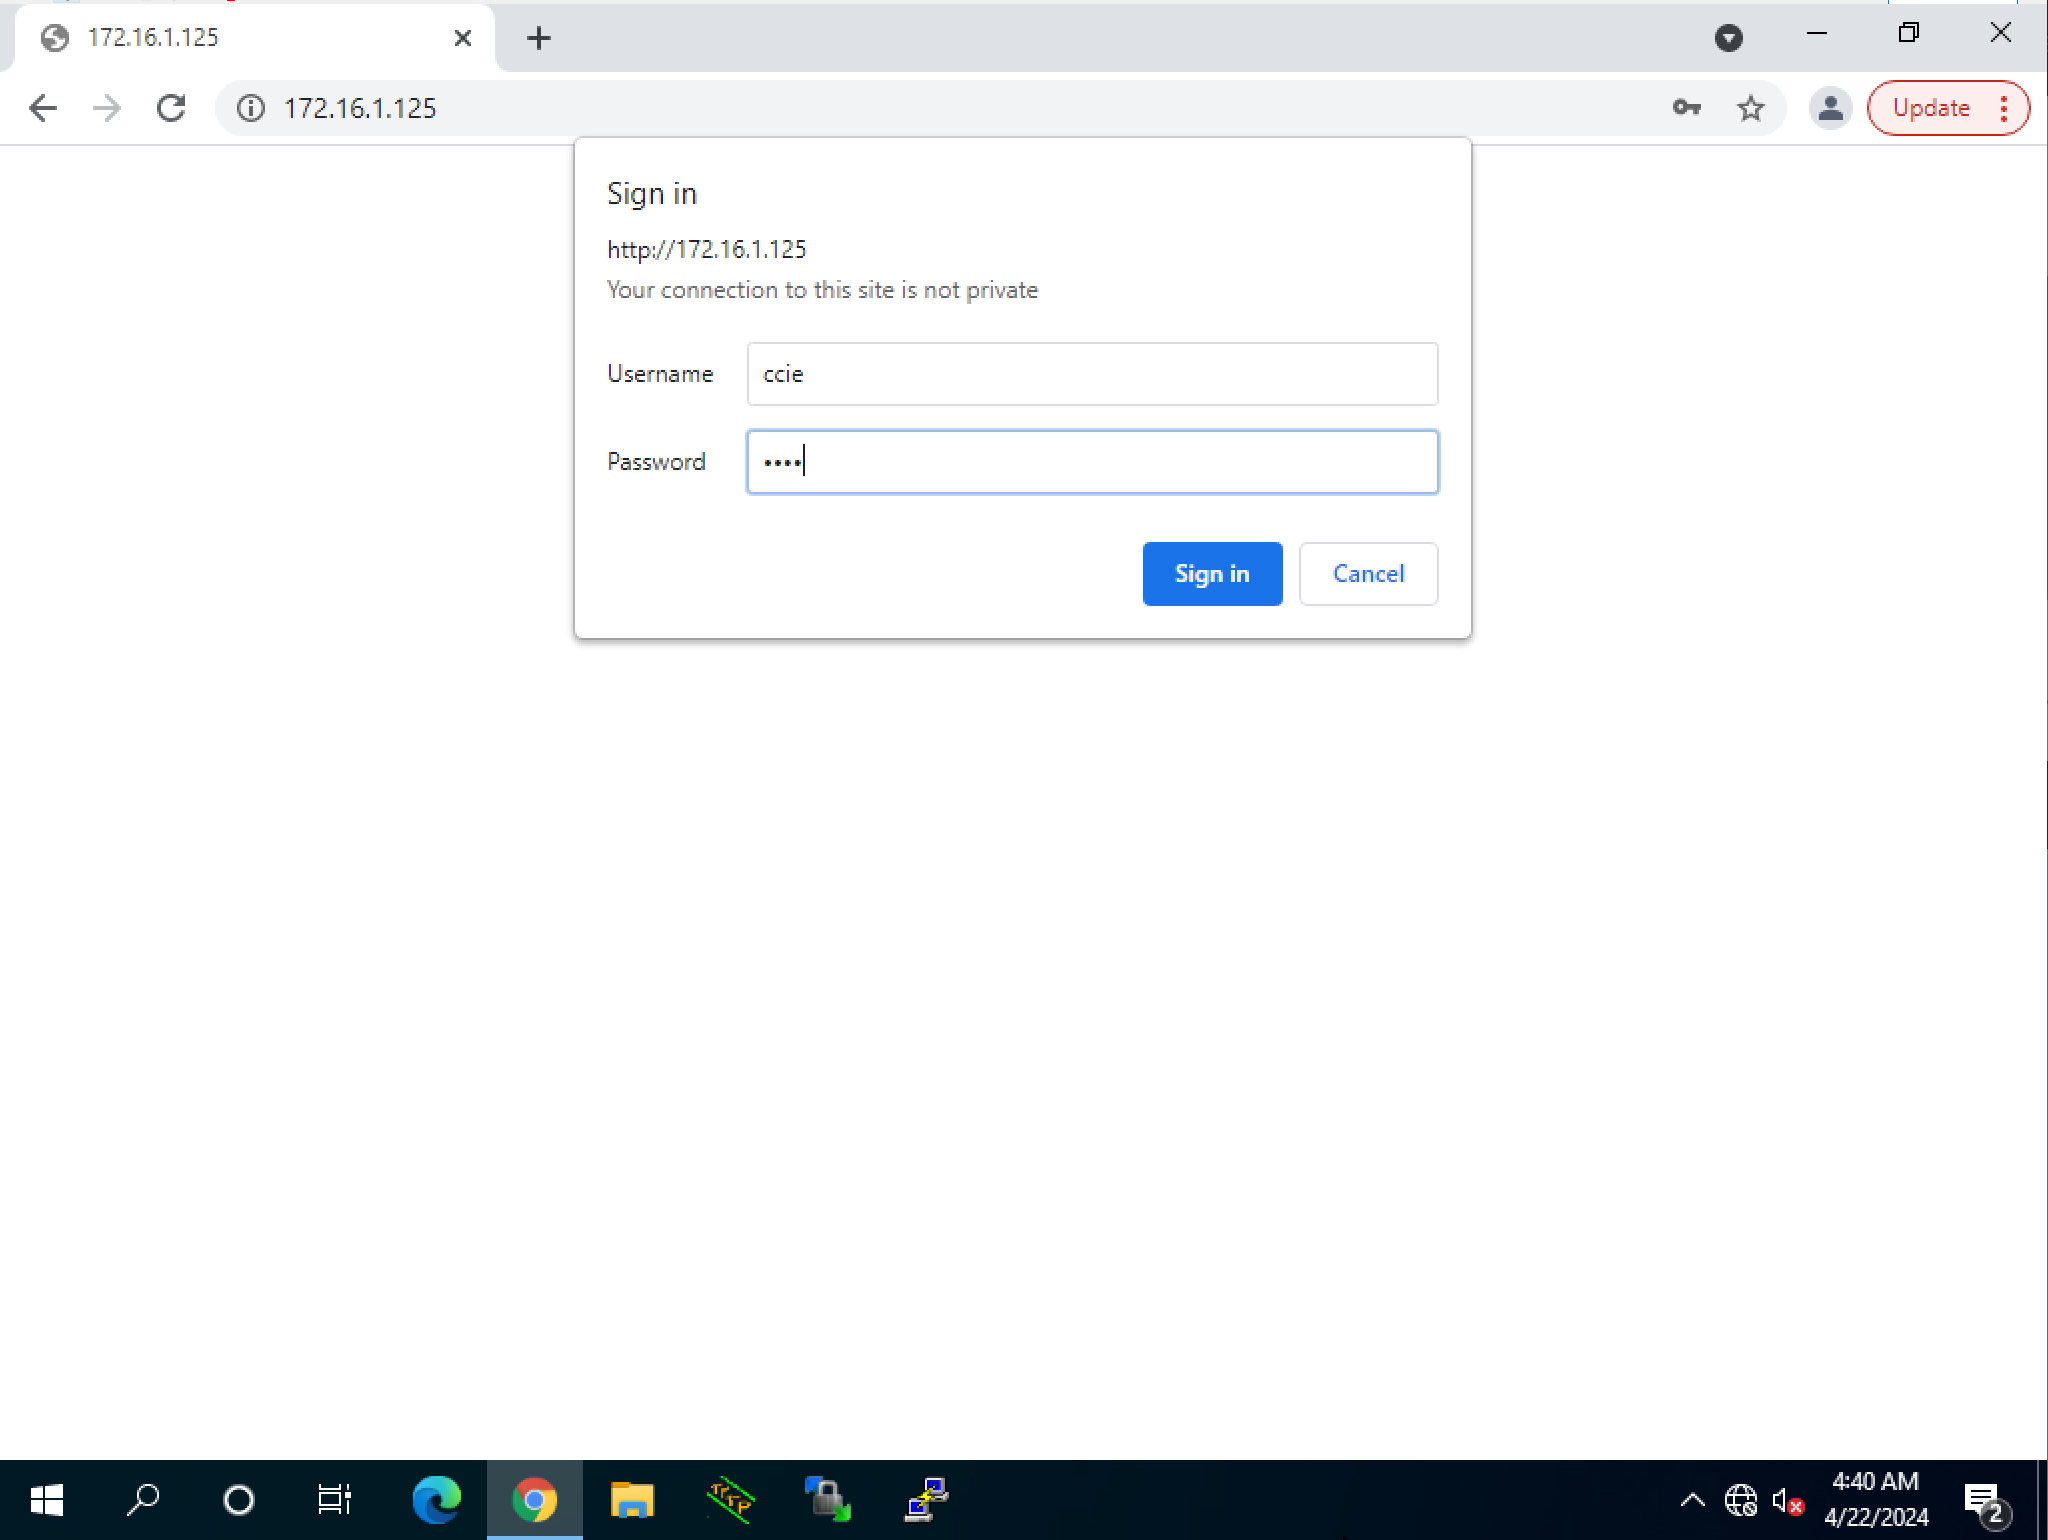
I have entered valid credentials so I can able to access the DMZ server.
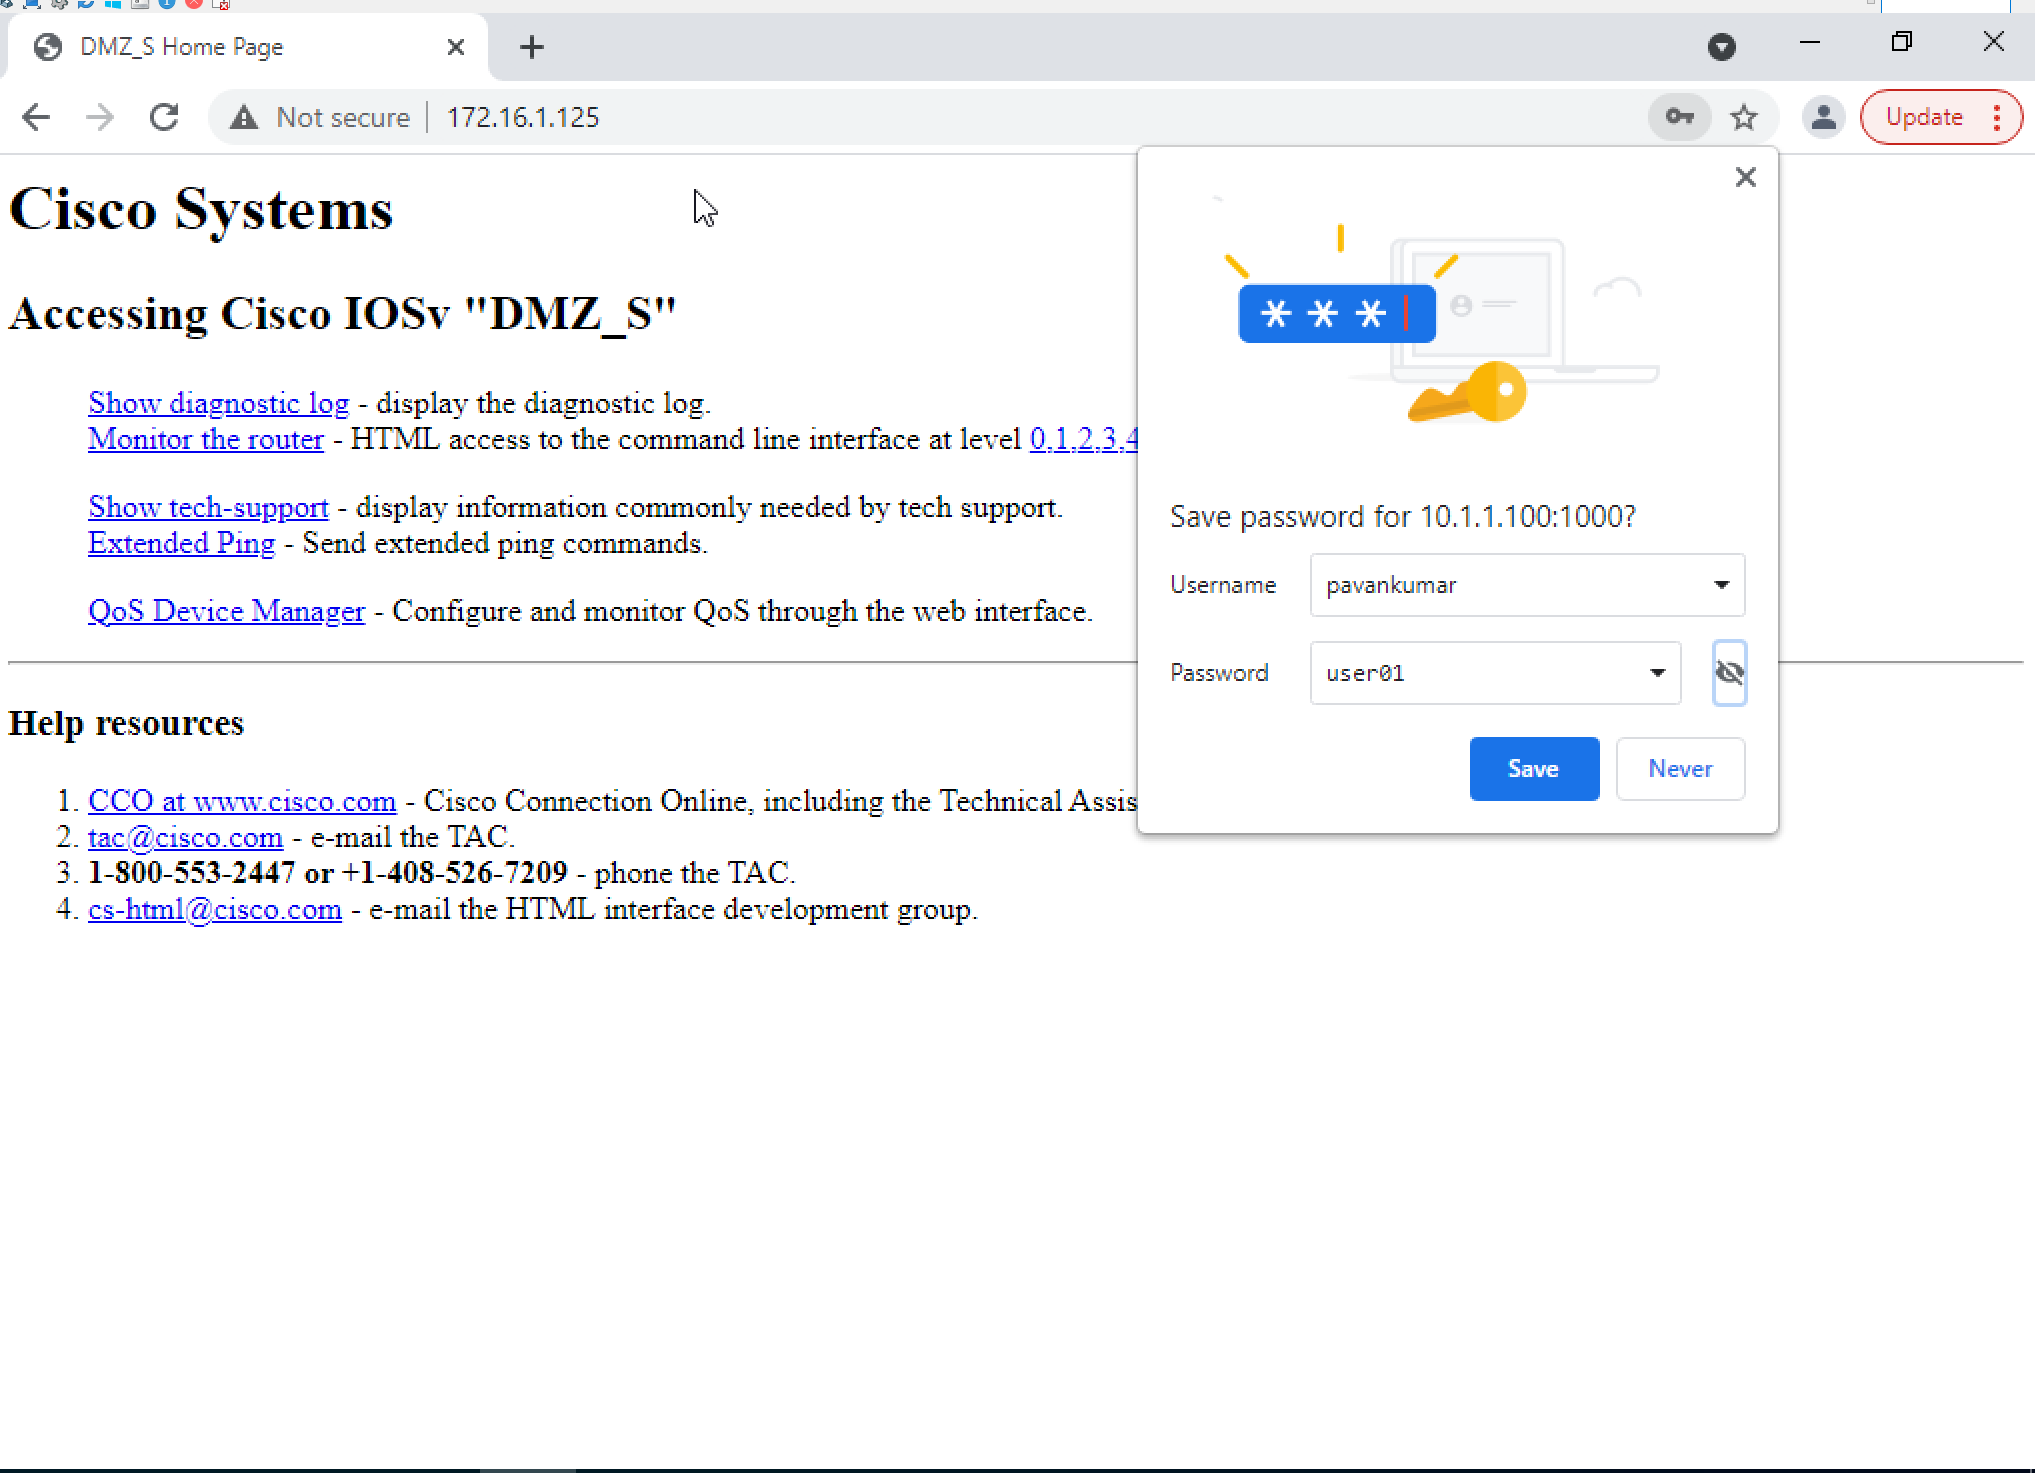
Getting DMZ Home Page after Successfully Authenticated.
To check the User activity on Firewall, Go to Monitor → Firewall User Monitor
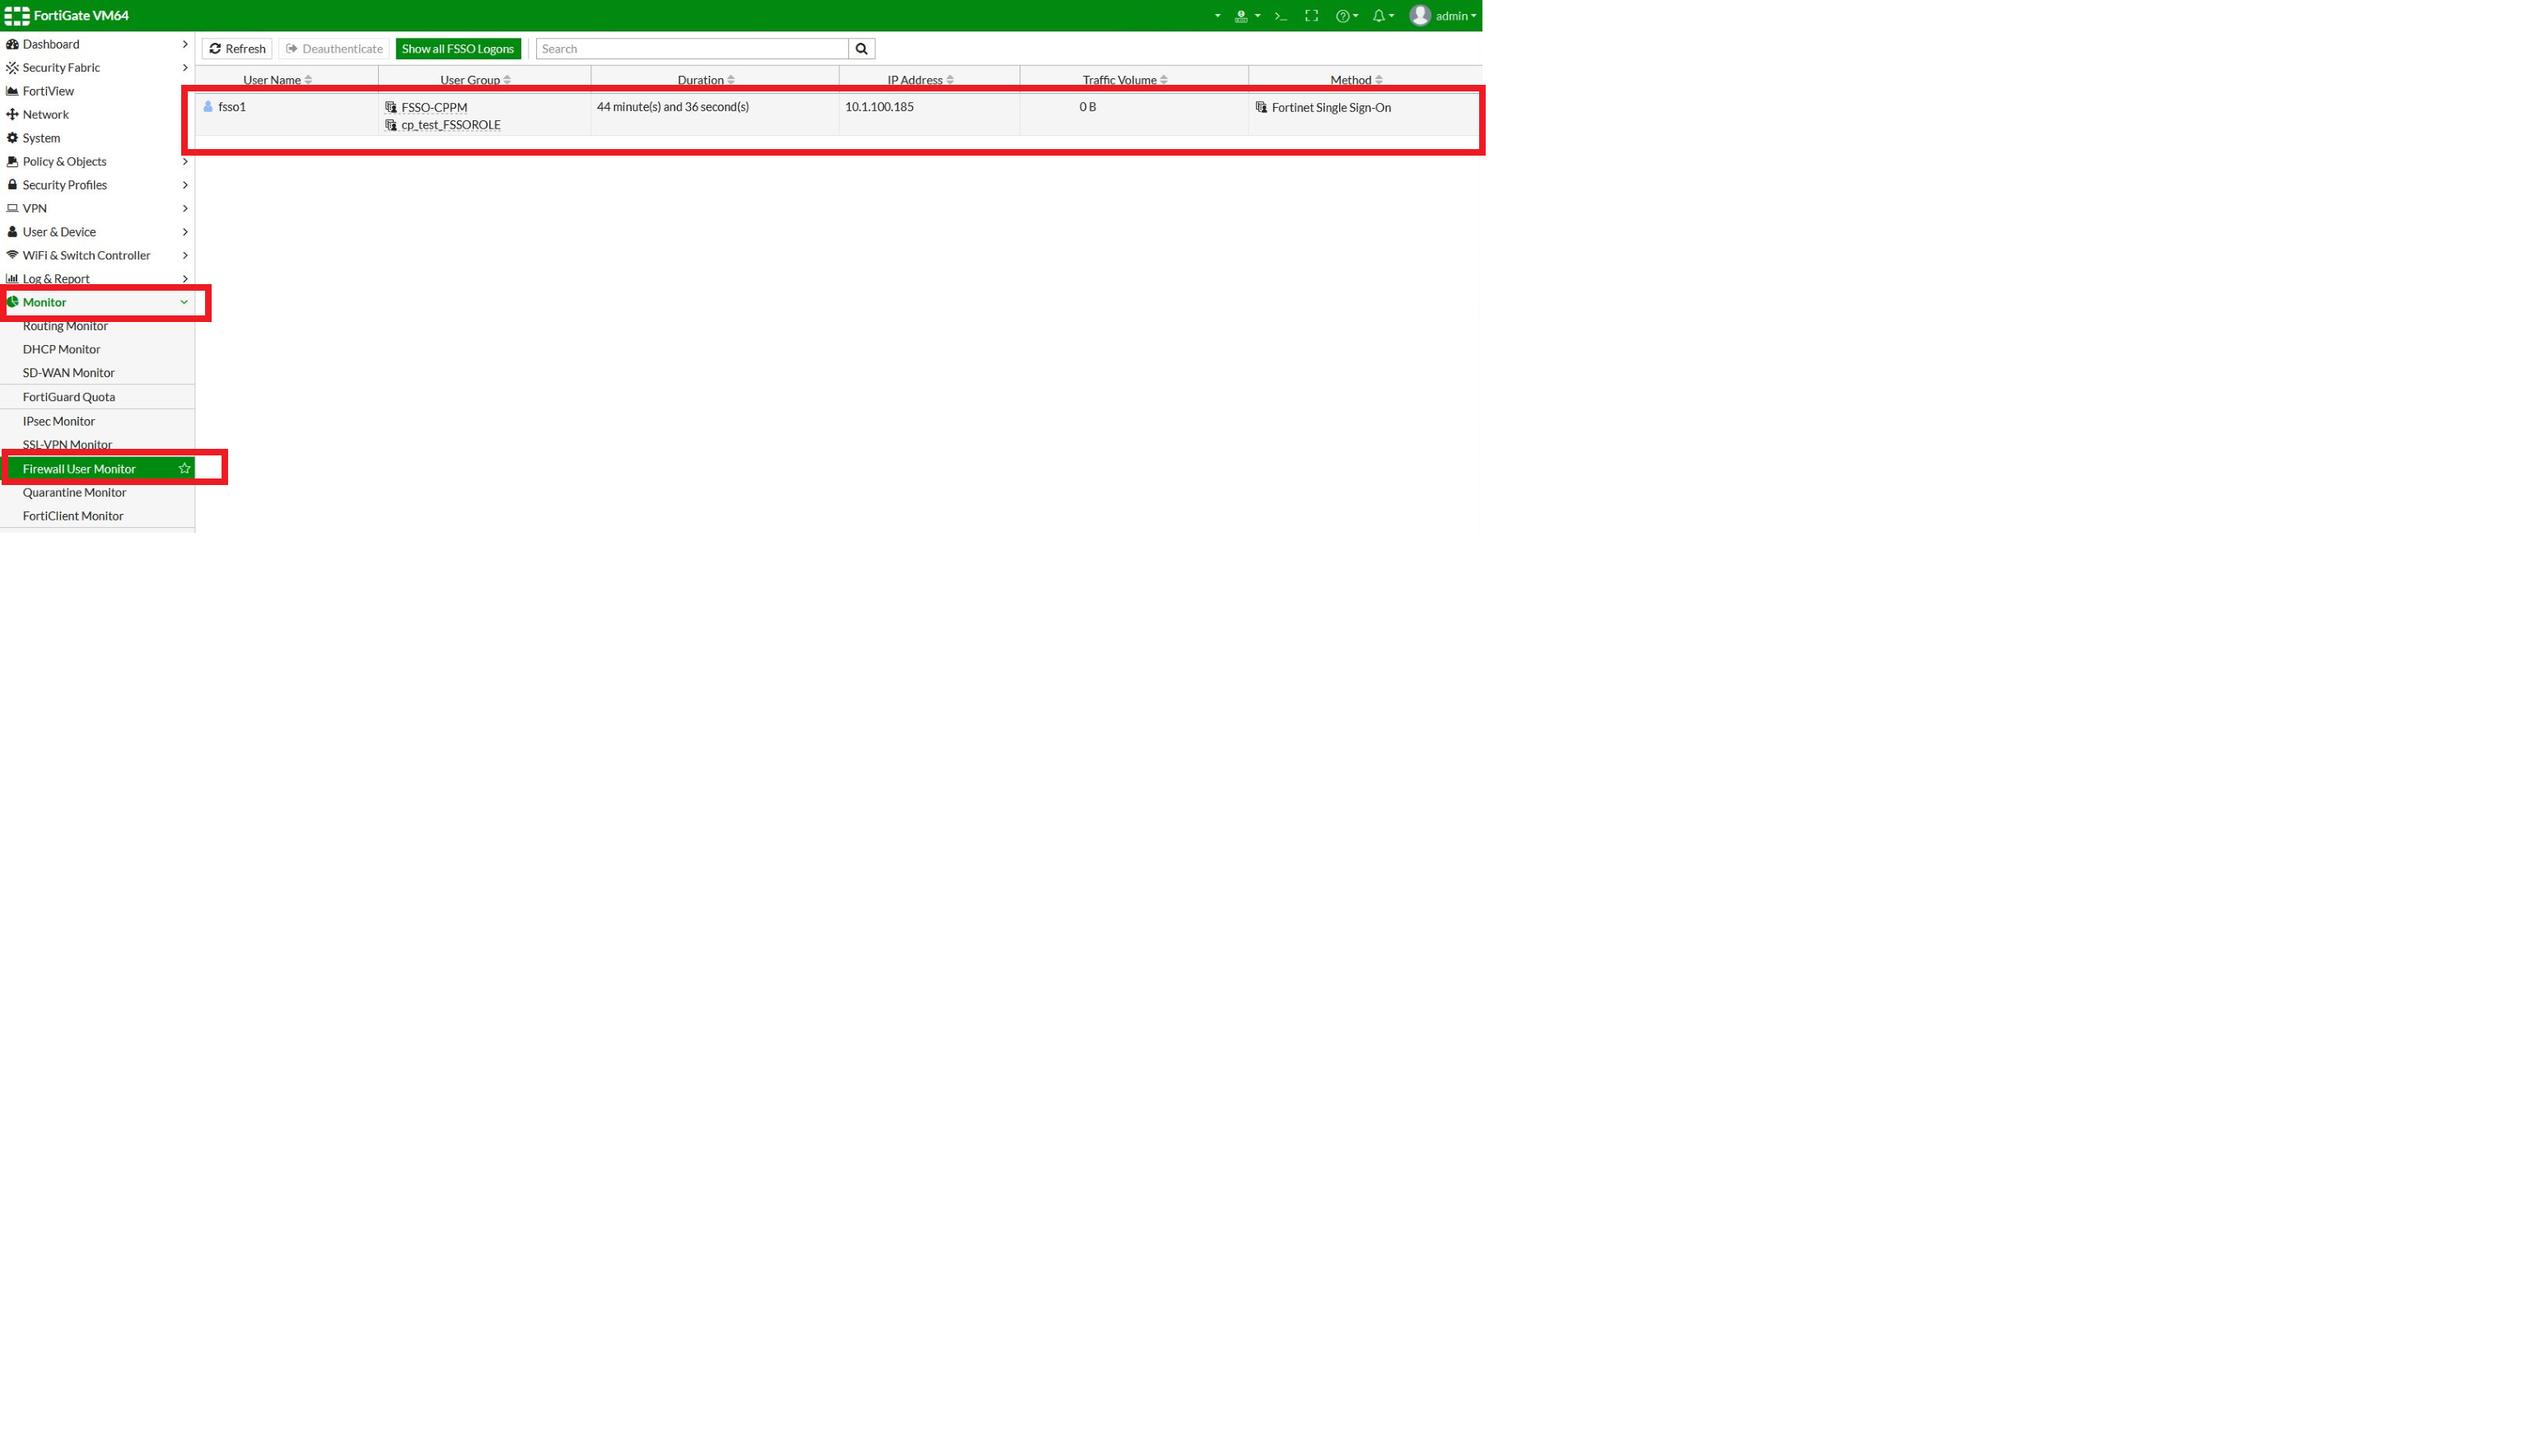
Summary:
Module 4 of the FortiGate firewall course focuses on firewall authentication. Here’s a summary of the topics covered:
- Creating User and Policies: This topic covers the process of creating users and policies on the FortiGate firewall. It includes creating local users with authentication privileges and configuring firewall policies to control traffic flow based on defined criteria.
- Create Authentication Policies (Captive Portal): Captive Portal authentication allows administrators to authenticate users before granting access to network resources. This topic explains how to configure authentication policies using Captive Portal to enforce user authentication requirements.
- Monitor Firewall Users: Monitoring firewall users is crucial for maintaining network security and performance. This topic covers how to monitor and track user activities on the FortiGate firewall, including viewing logged-in users, session details, and authentication logs.
By covering these topics, Module 4 provides administrators with the knowledge and skills to effectively manage firewall authentication, create user and policy configurations, and monitor user activities to ensure network security and compliance.
MODULE 5
Security Profiles
Table of contents:
- Application Control
- Web Filtering
- File Filter
- DNS Filter
- Antivirus
- Intrusion Prevention
- Video Filter
- SSL/SSH Inspection Profile
Security Profiles on FortiGate Firewall
Security profiles on FortiGate firewall provide advanced threat protection and content filtering capabilities to safeguard networks from various cyber threats. Here’s a detailed overview of each security profile:
1. Application Control
- Purpose: Application Control allows administrators to monitor and control applications’ usage within the network, including identifying and blocking unauthorized or risky applications.
- Features: Application identification, application-based policies, application usage monitoring, and application-based traffic shaping.
Demo:
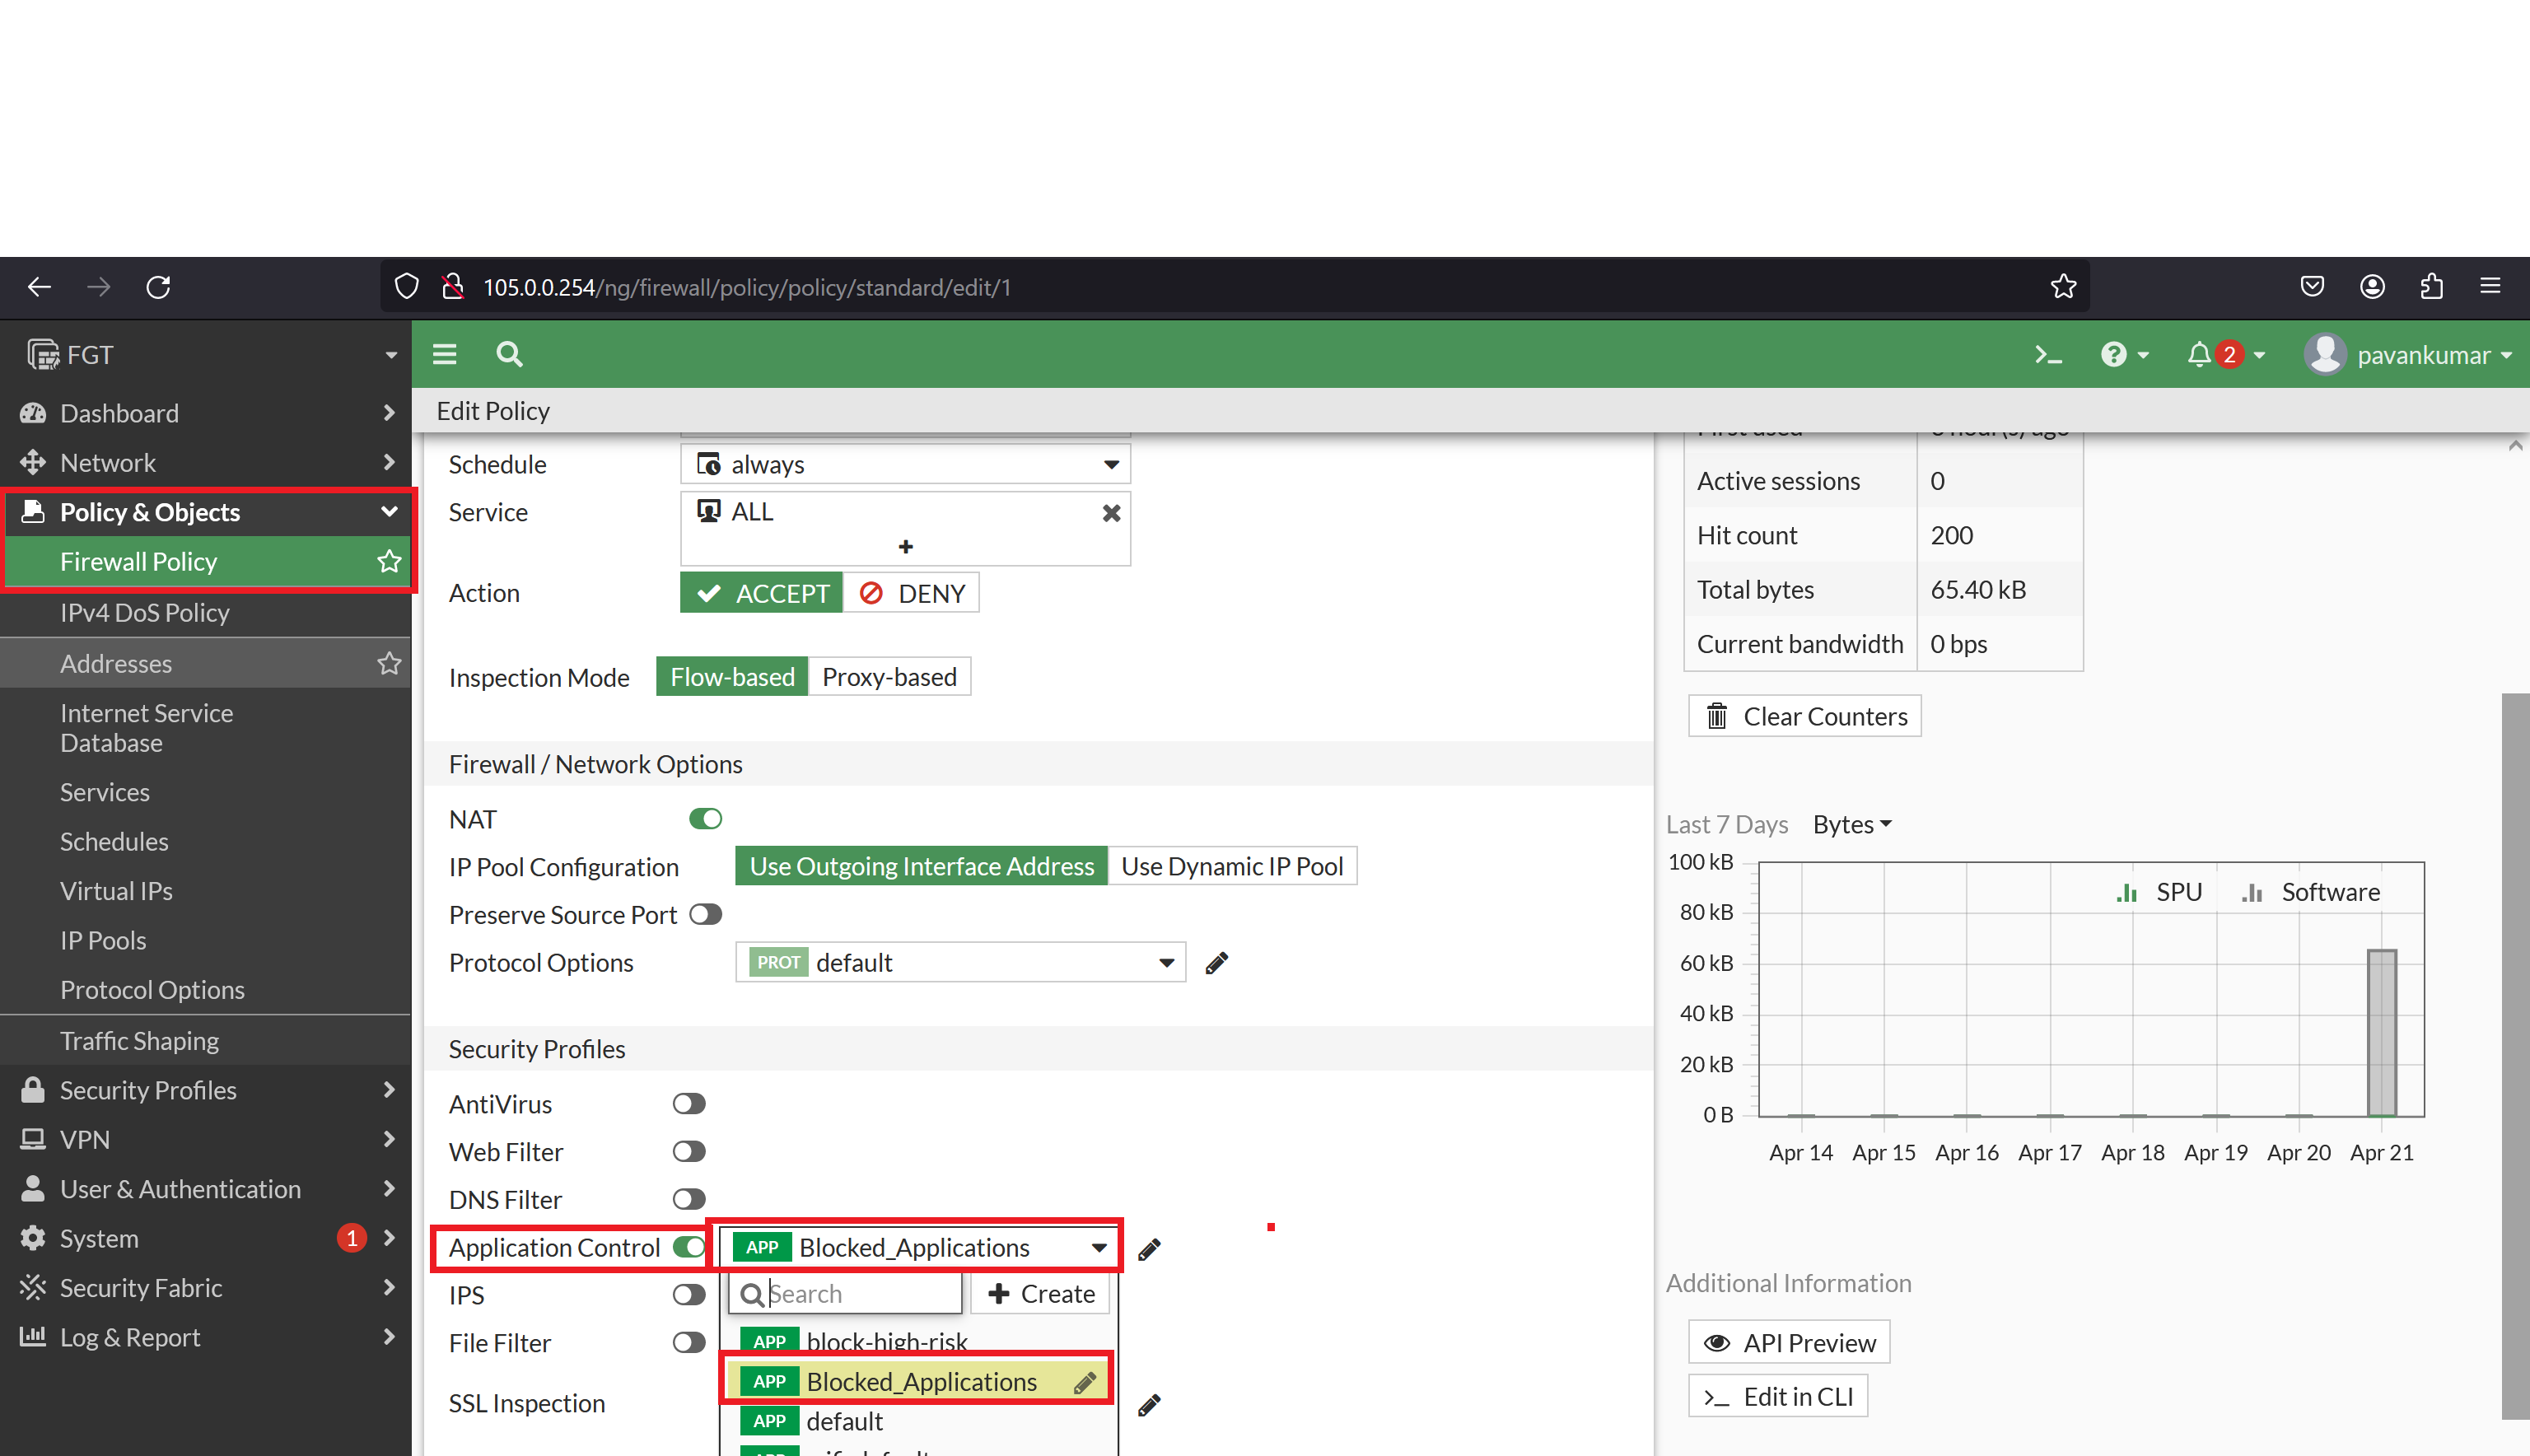
To configure the Application control Go to Security Profiles —> Application Control
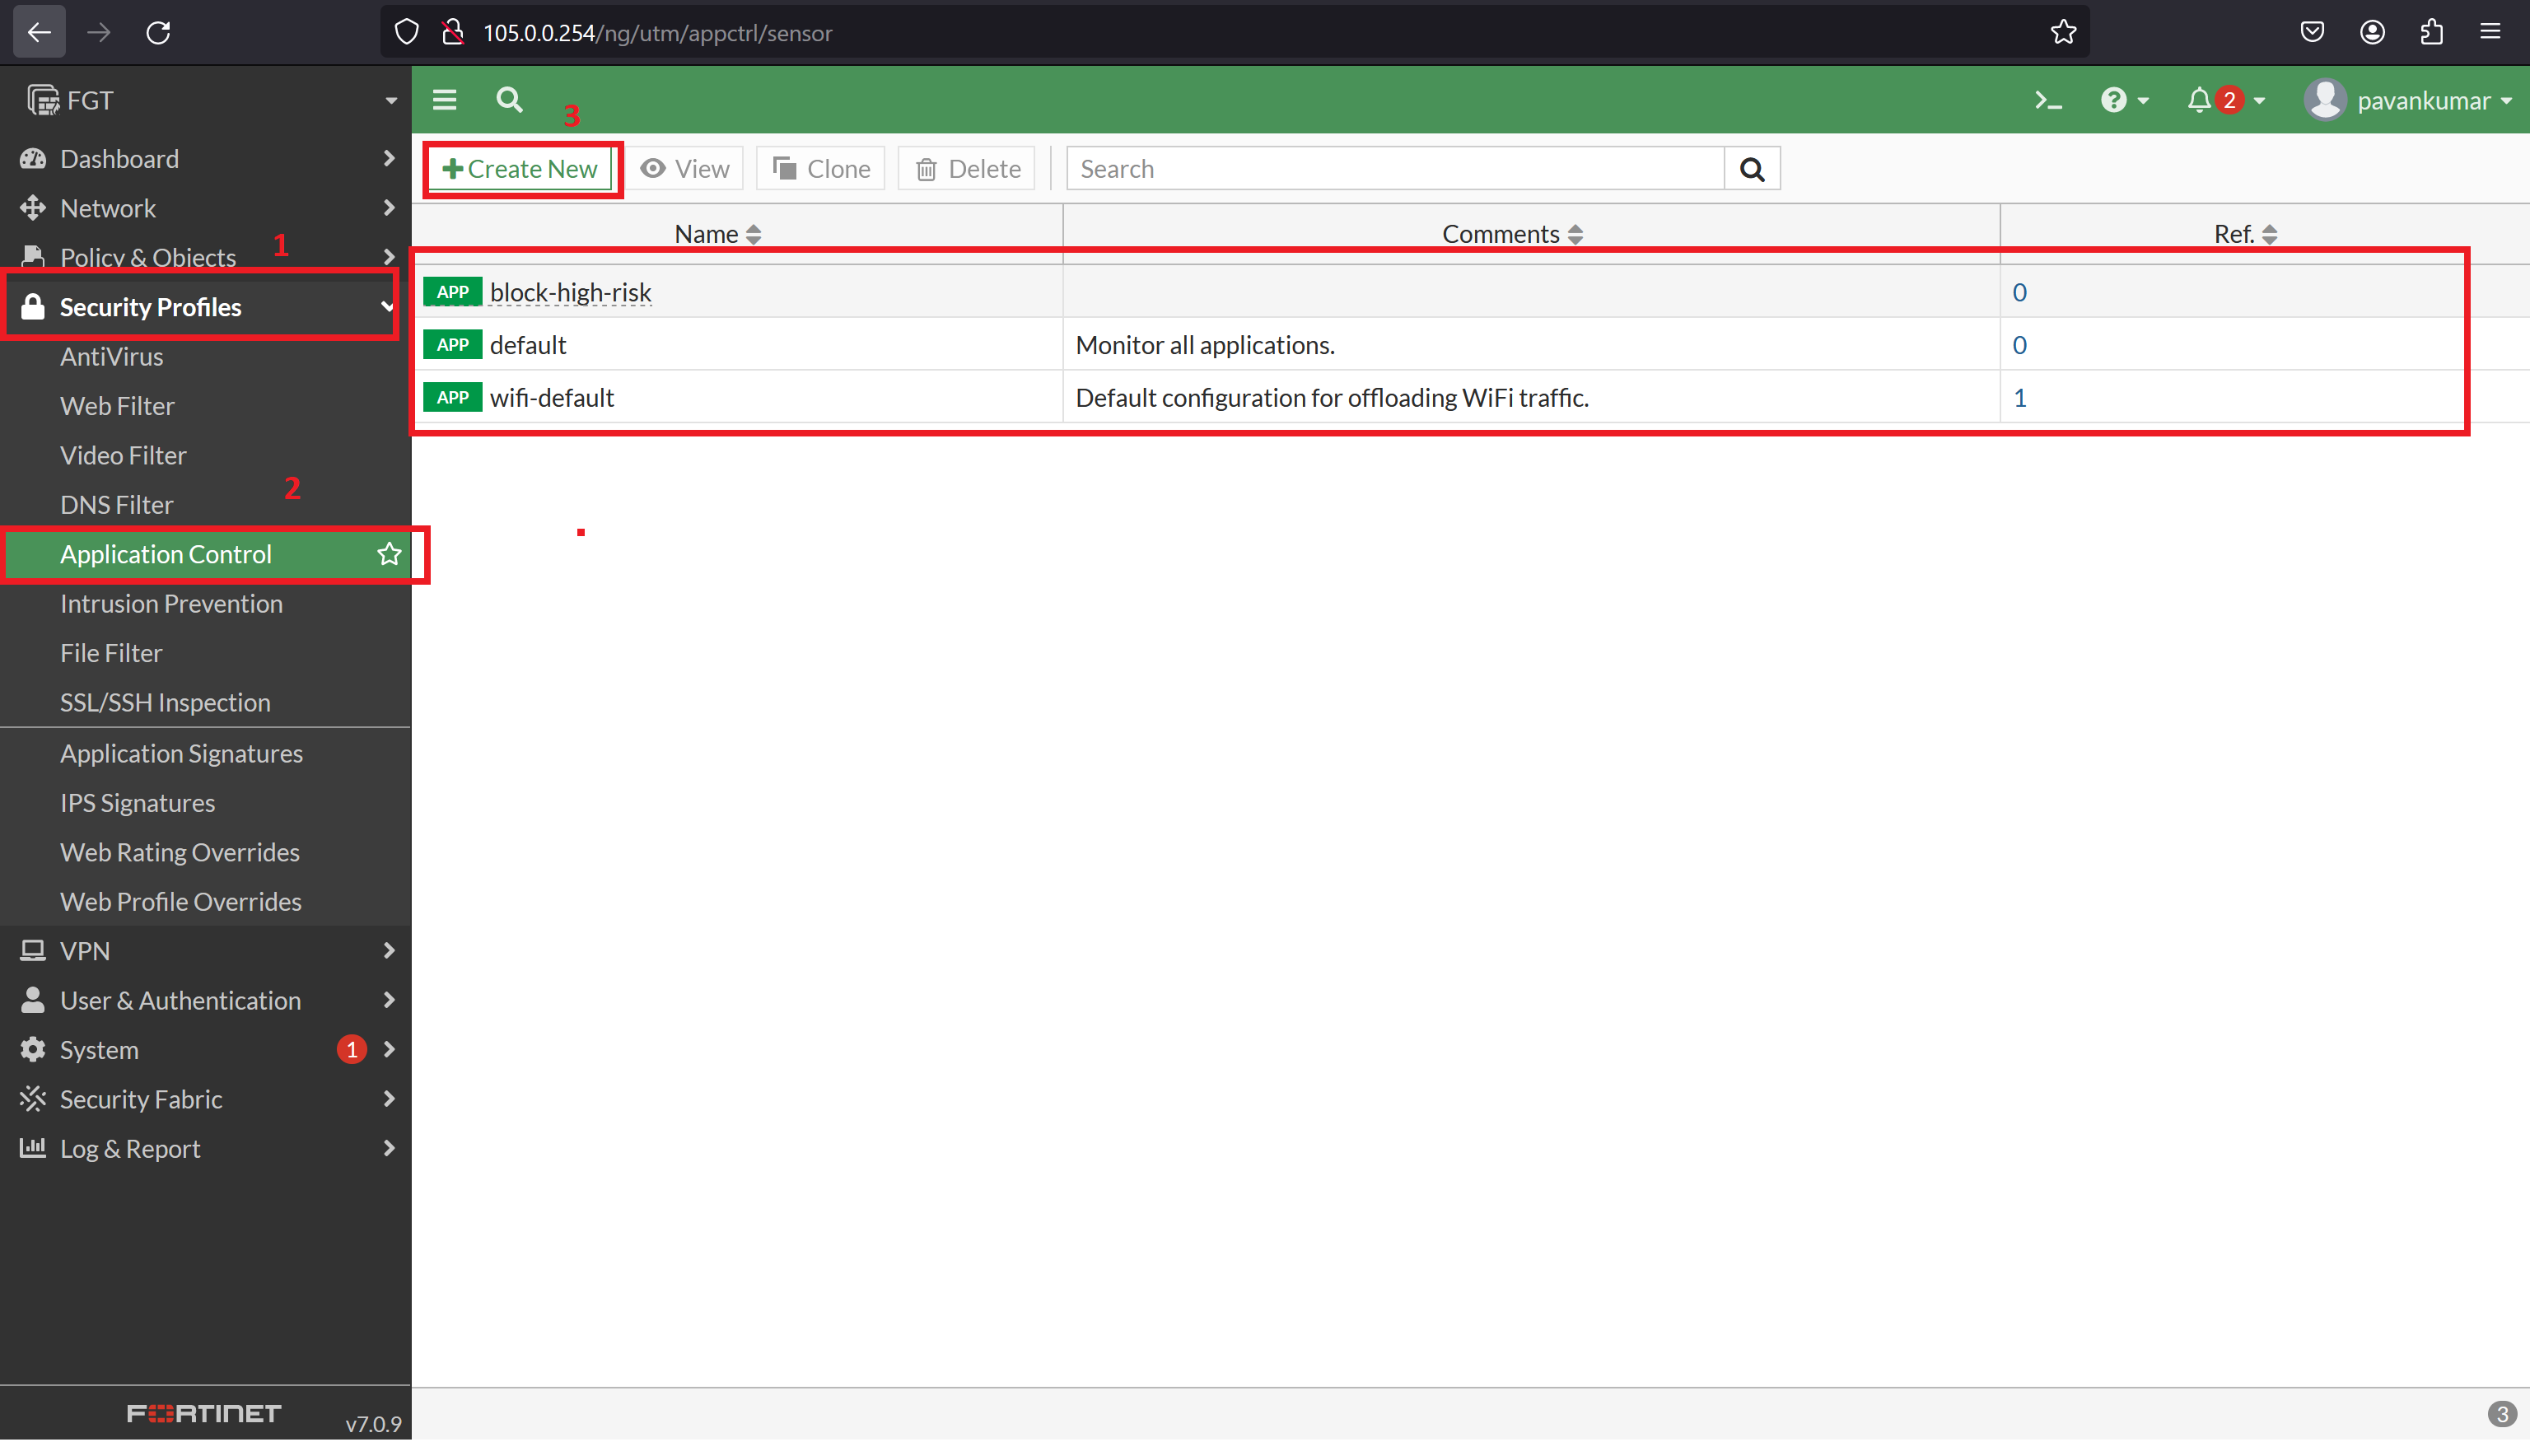
Select the Application you want block and apply action as Block.
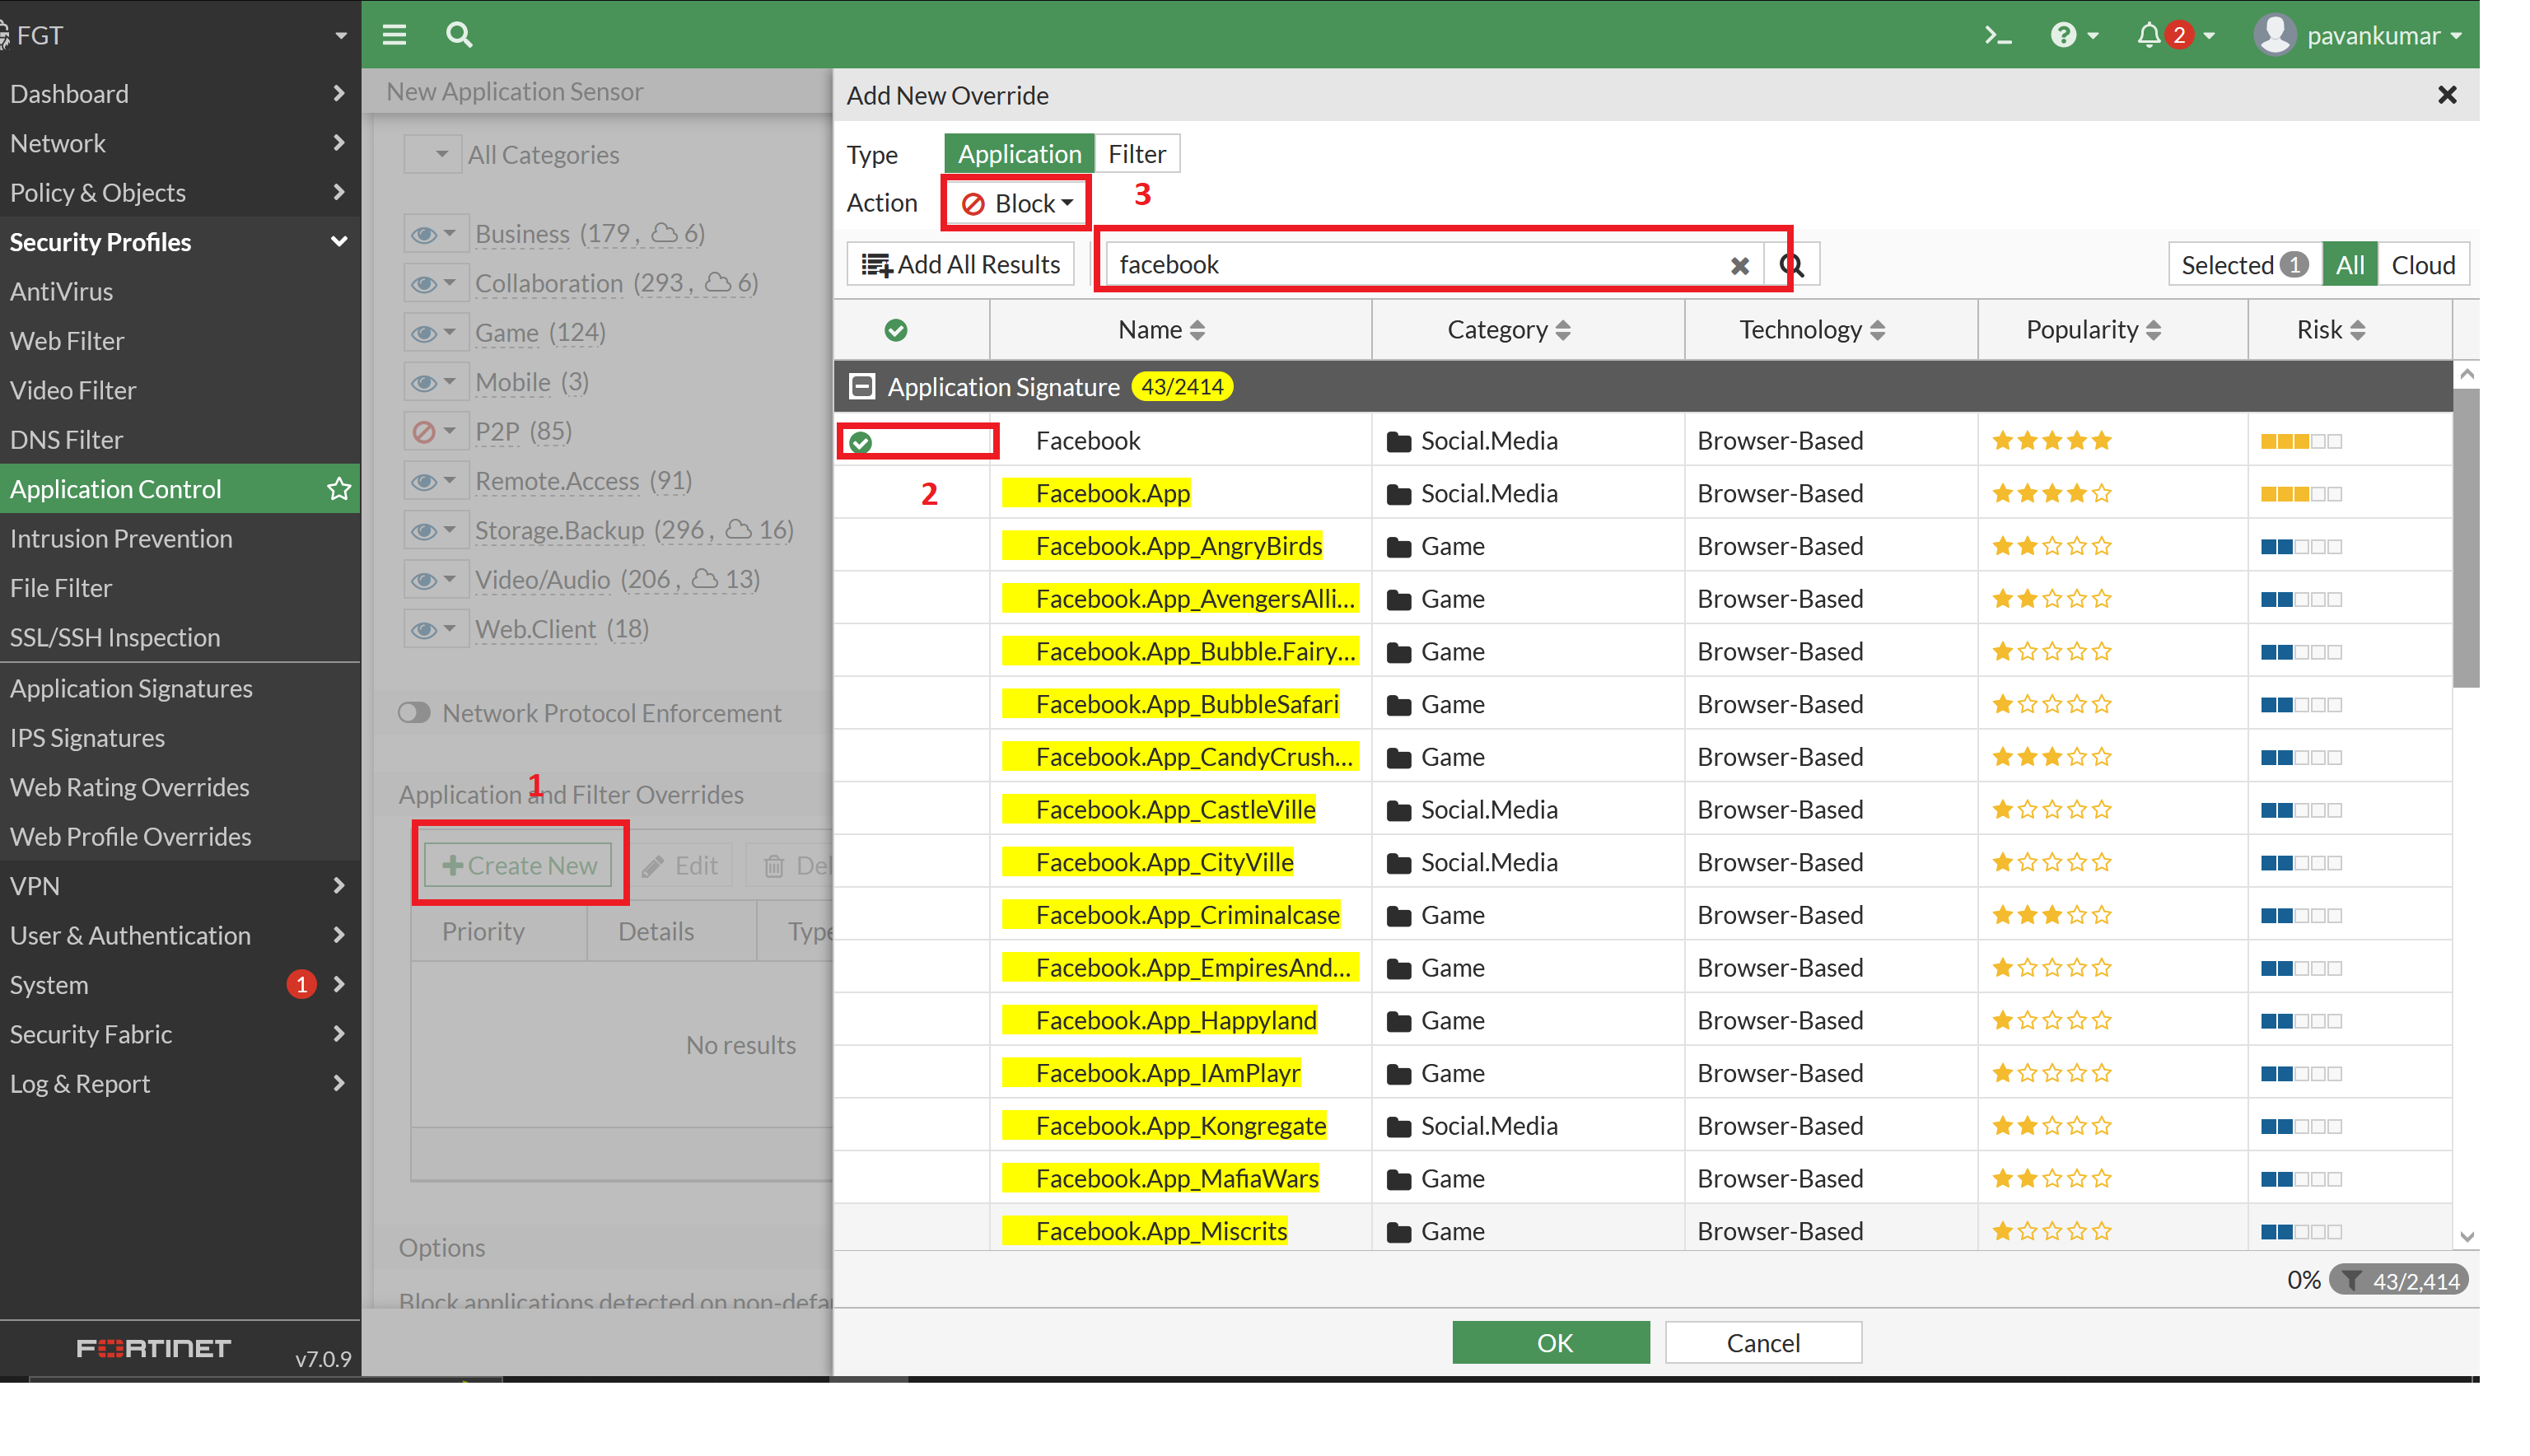
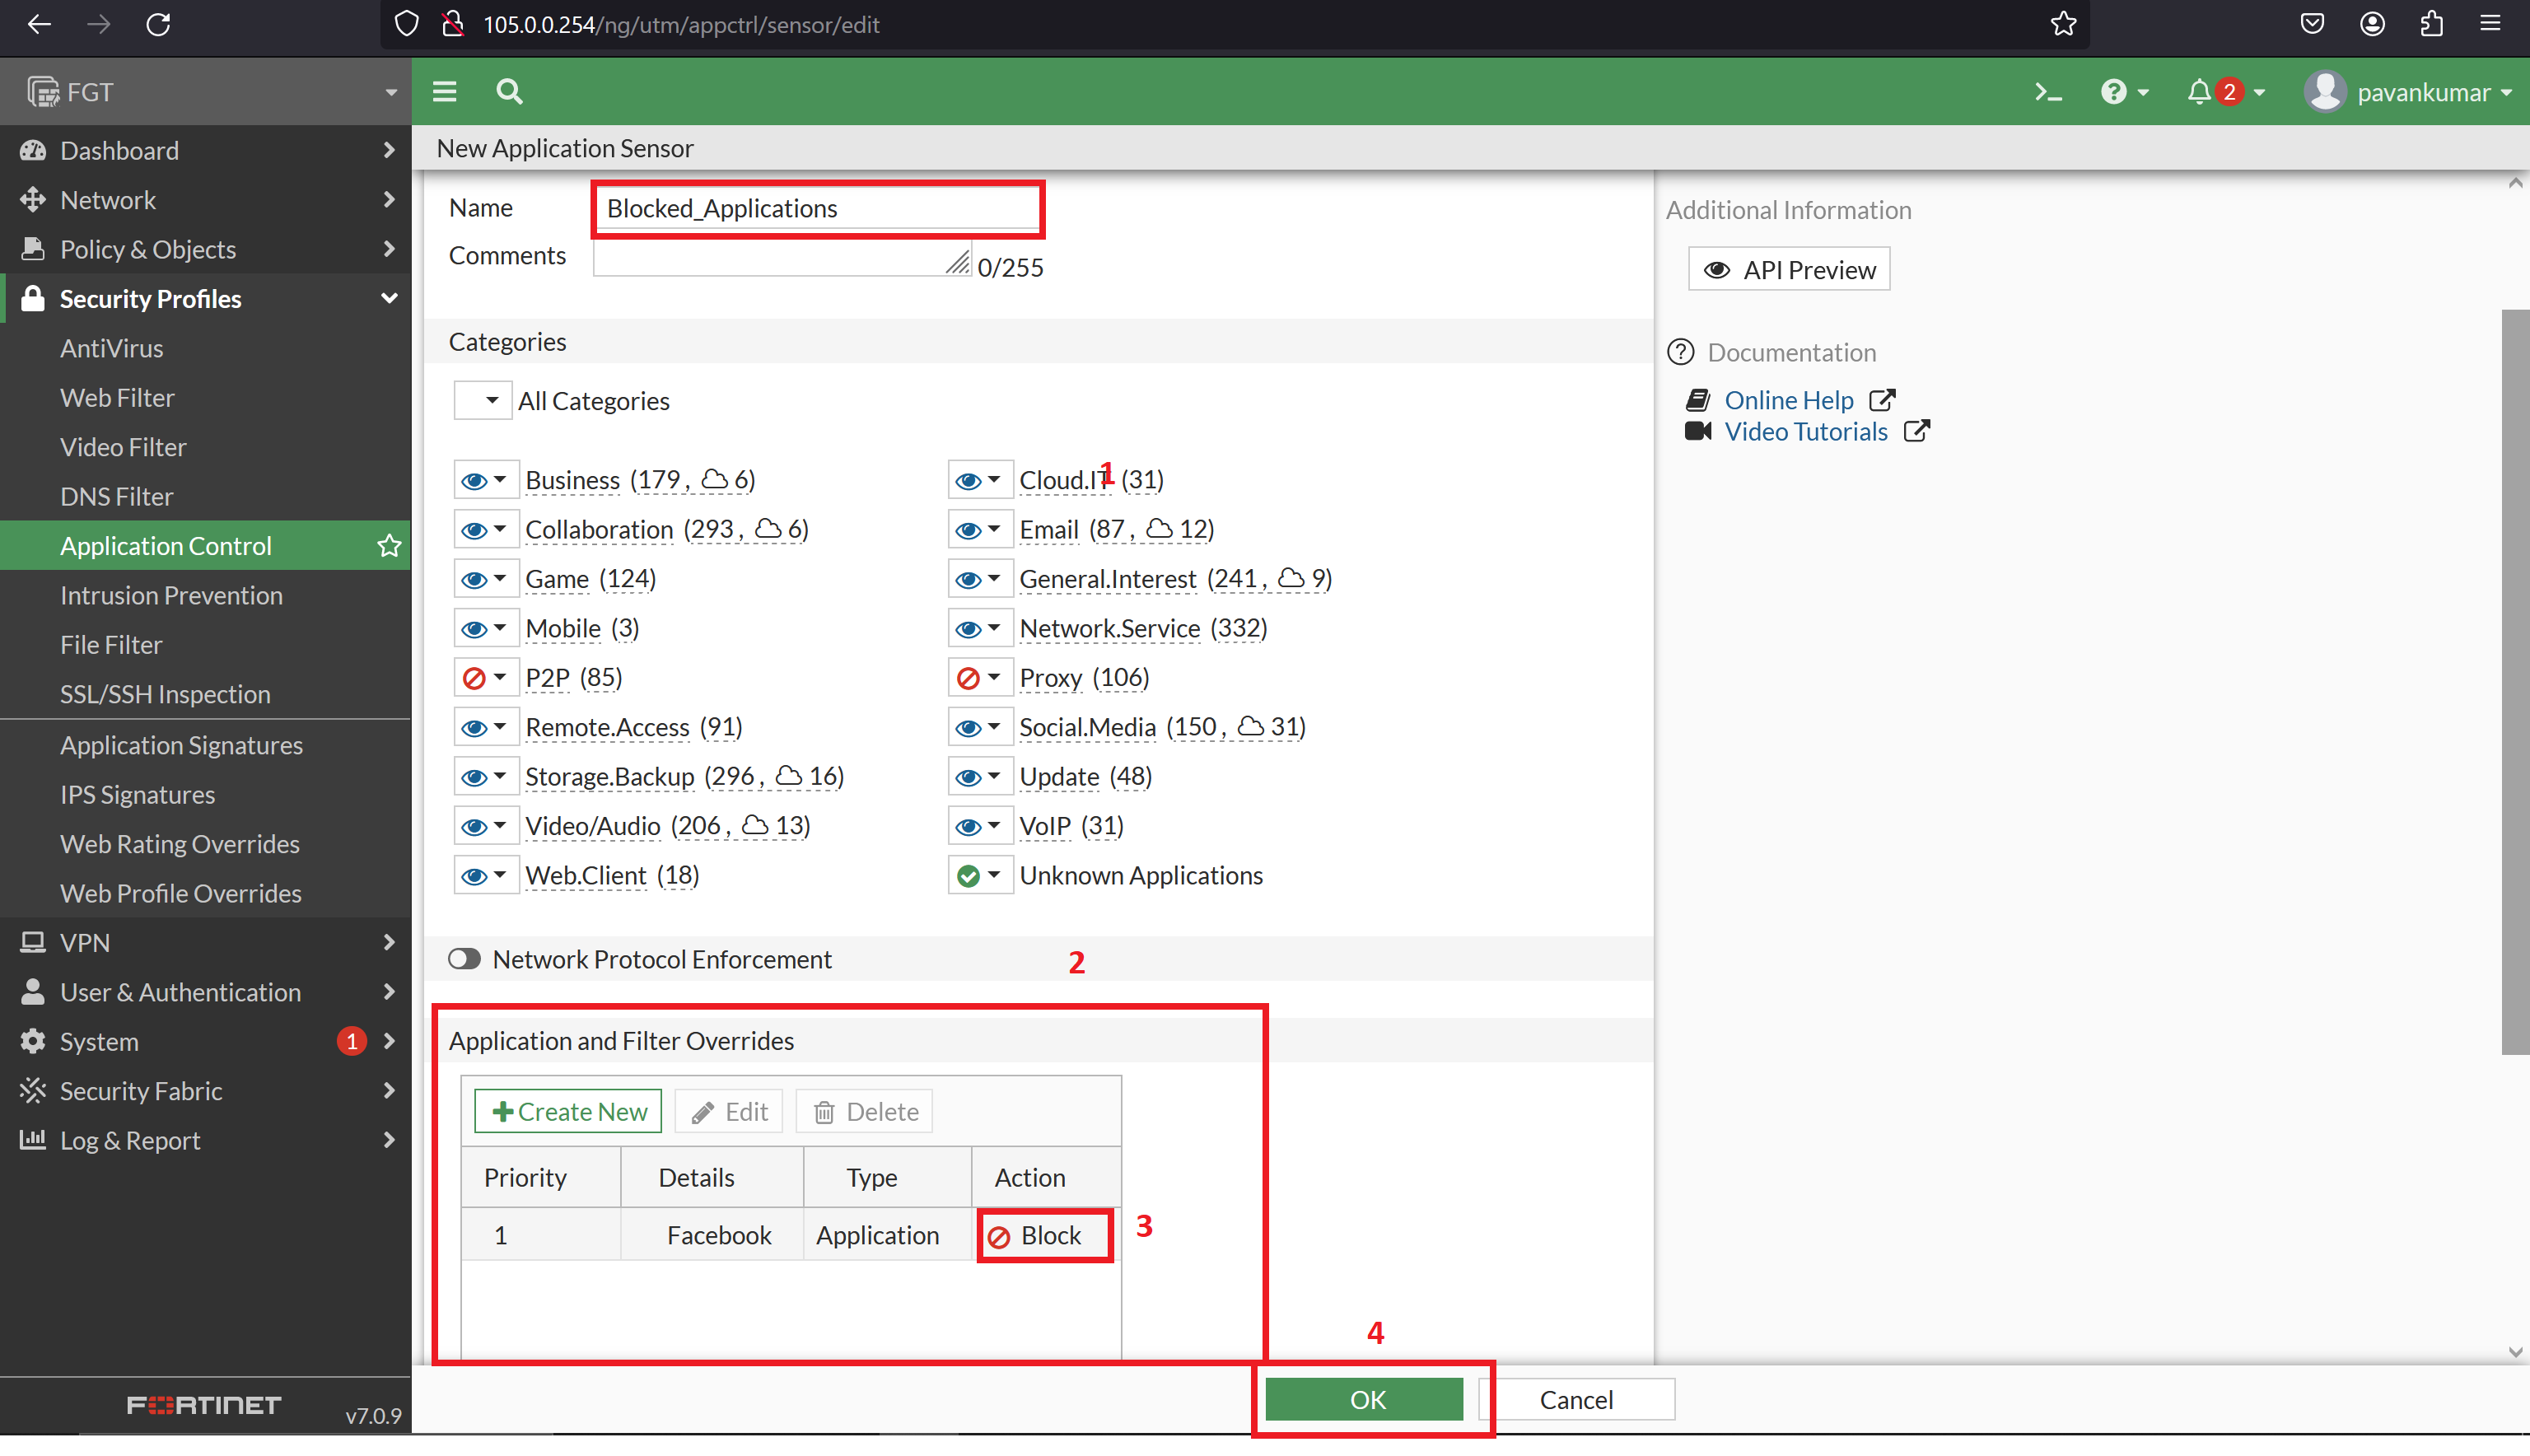
Apply the Policy which we have created on Firewall & Objects as per requirements.
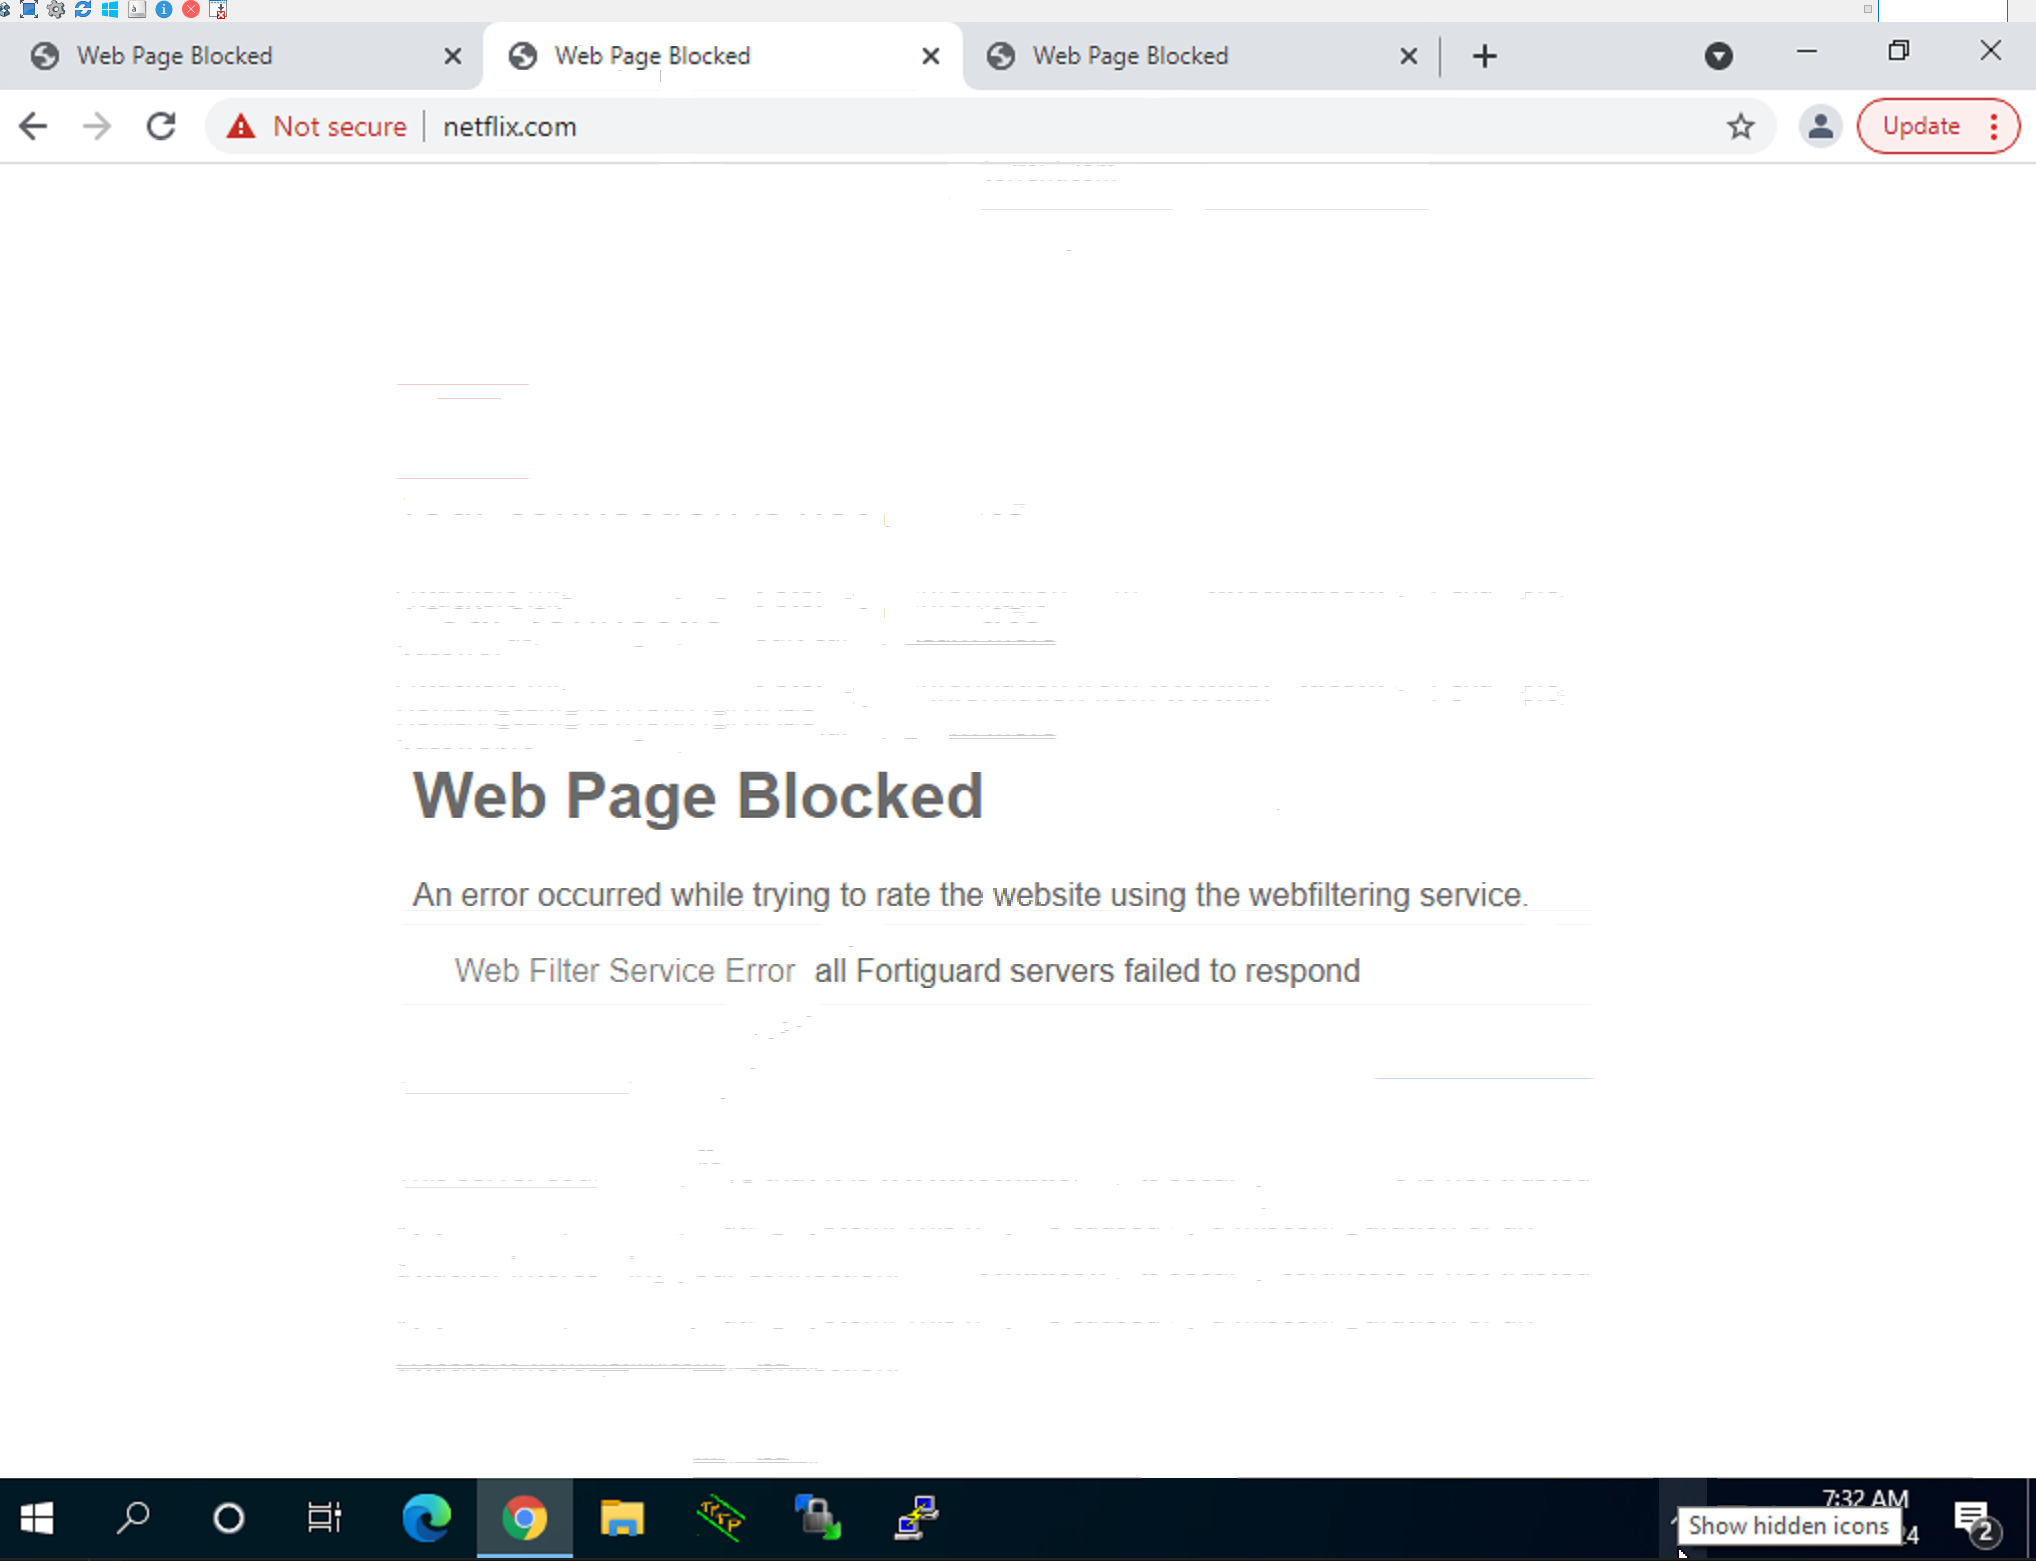
2. Web Filtering
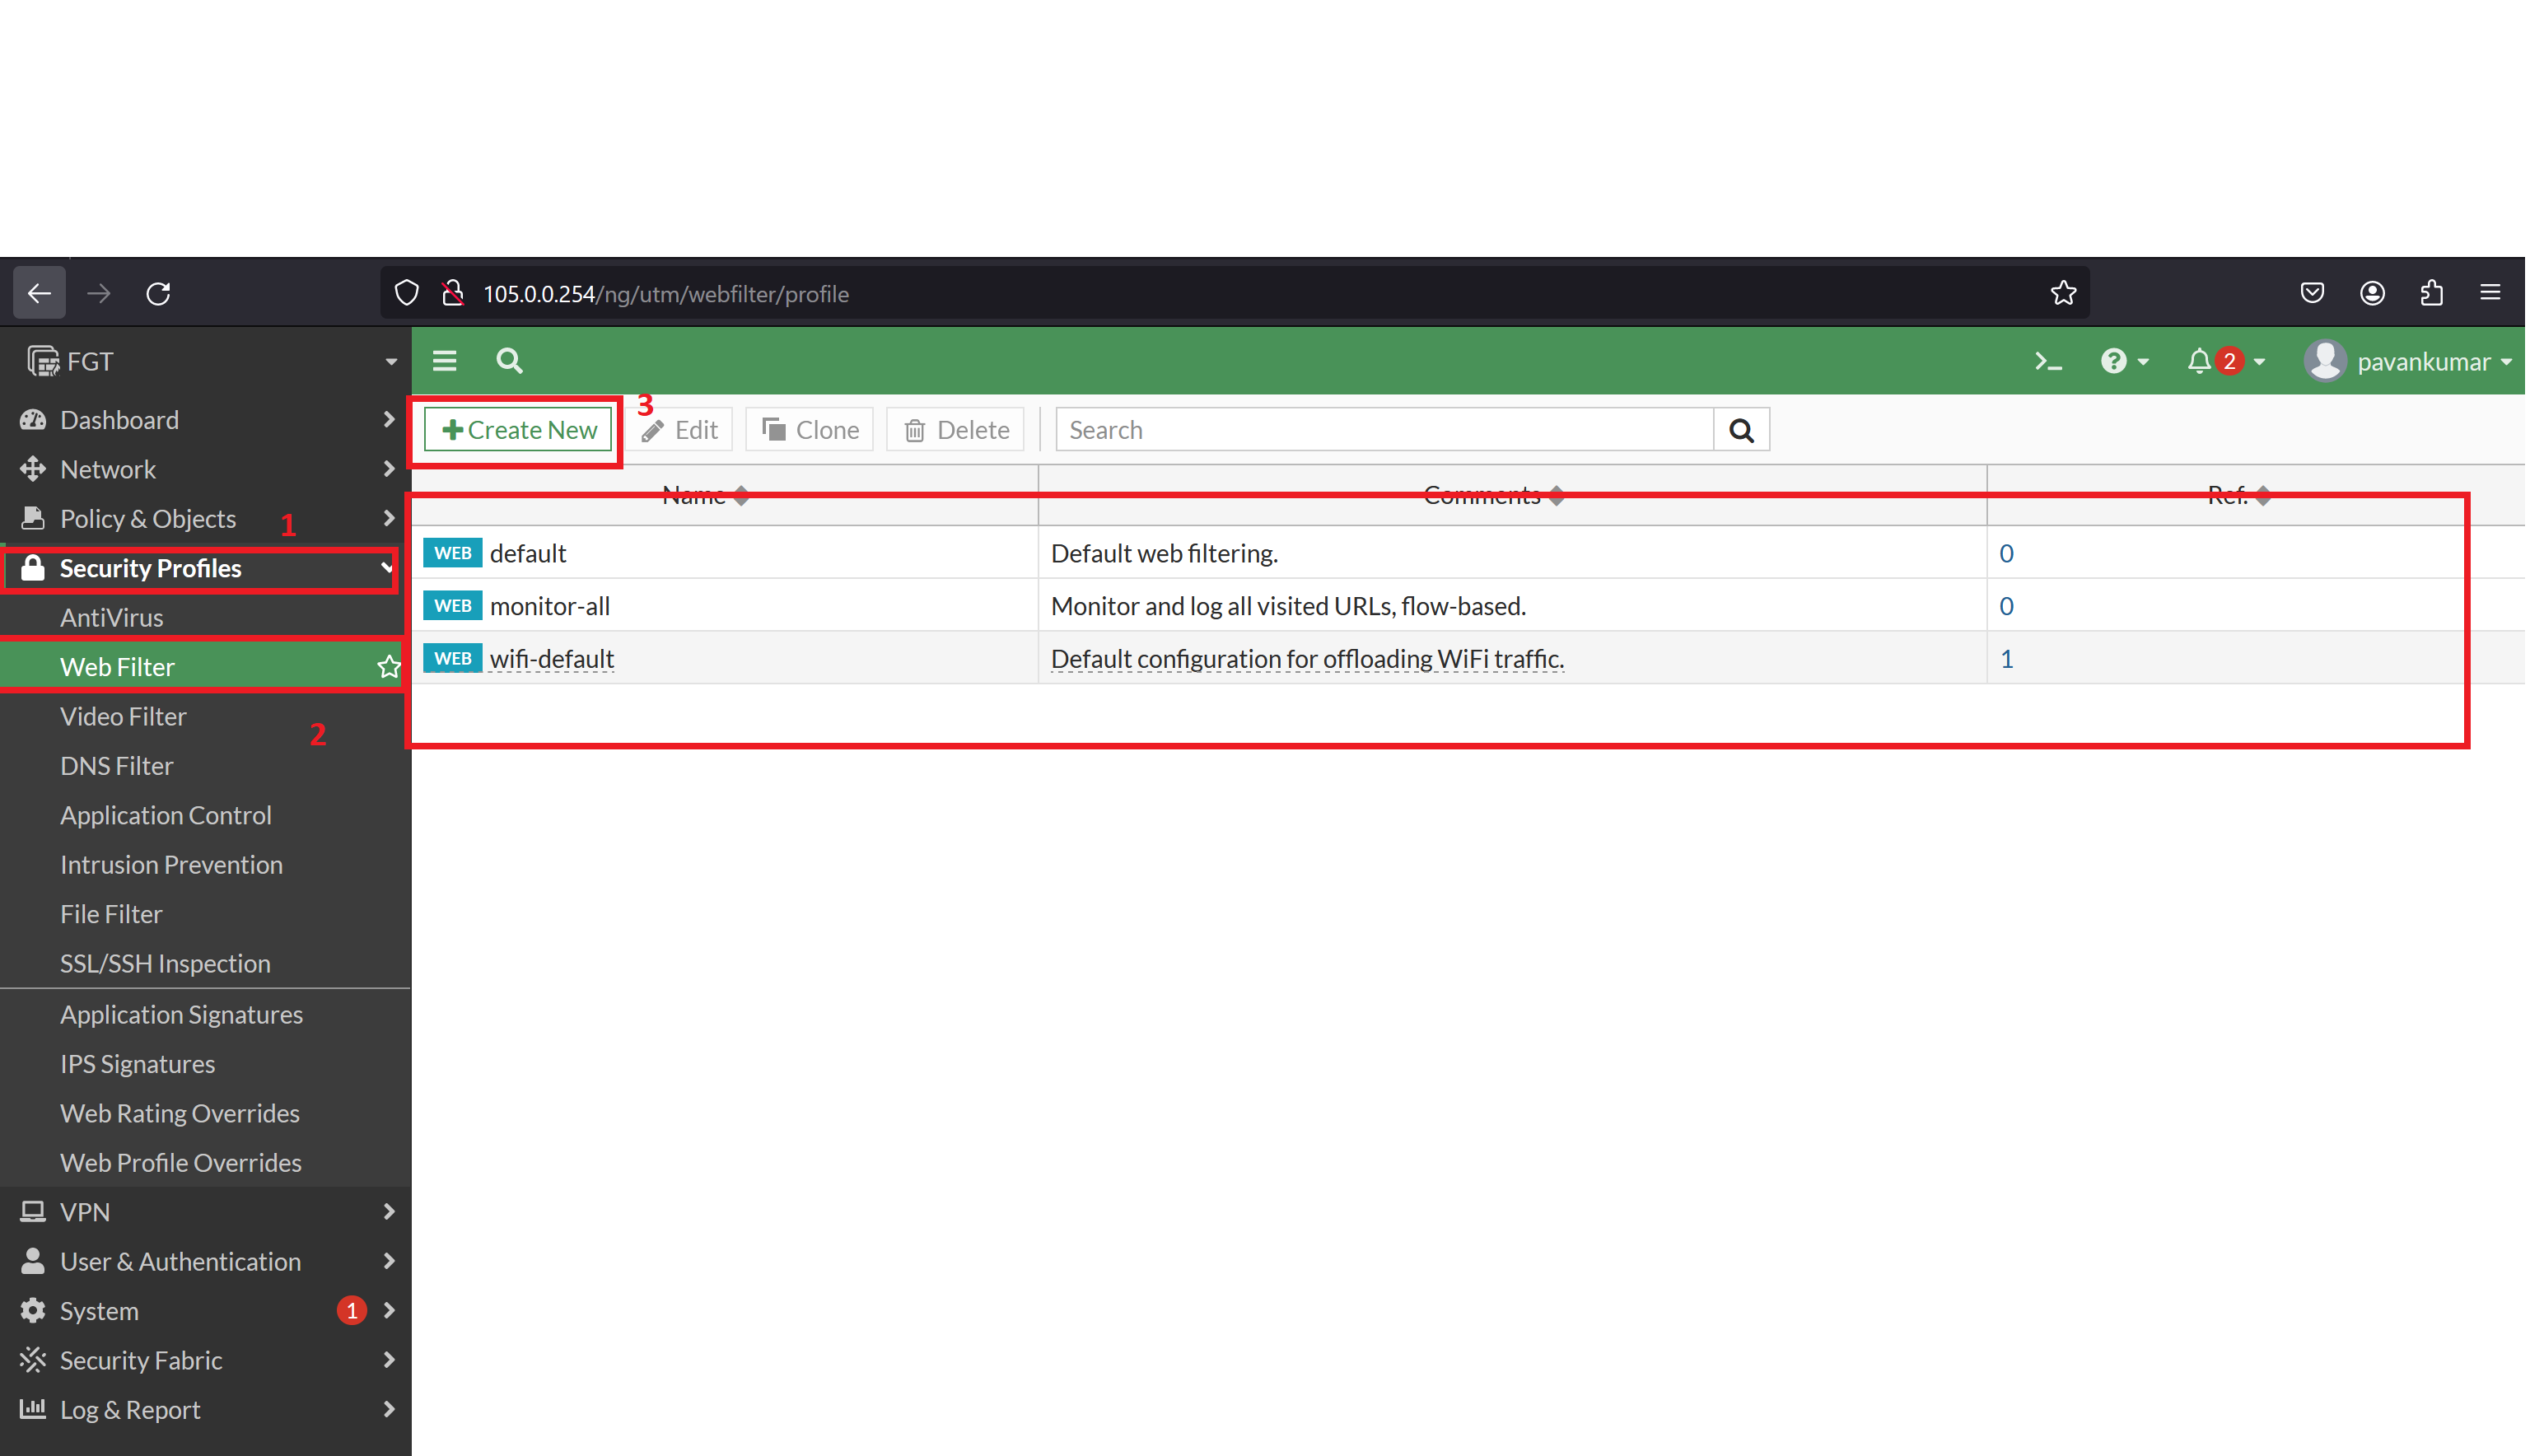
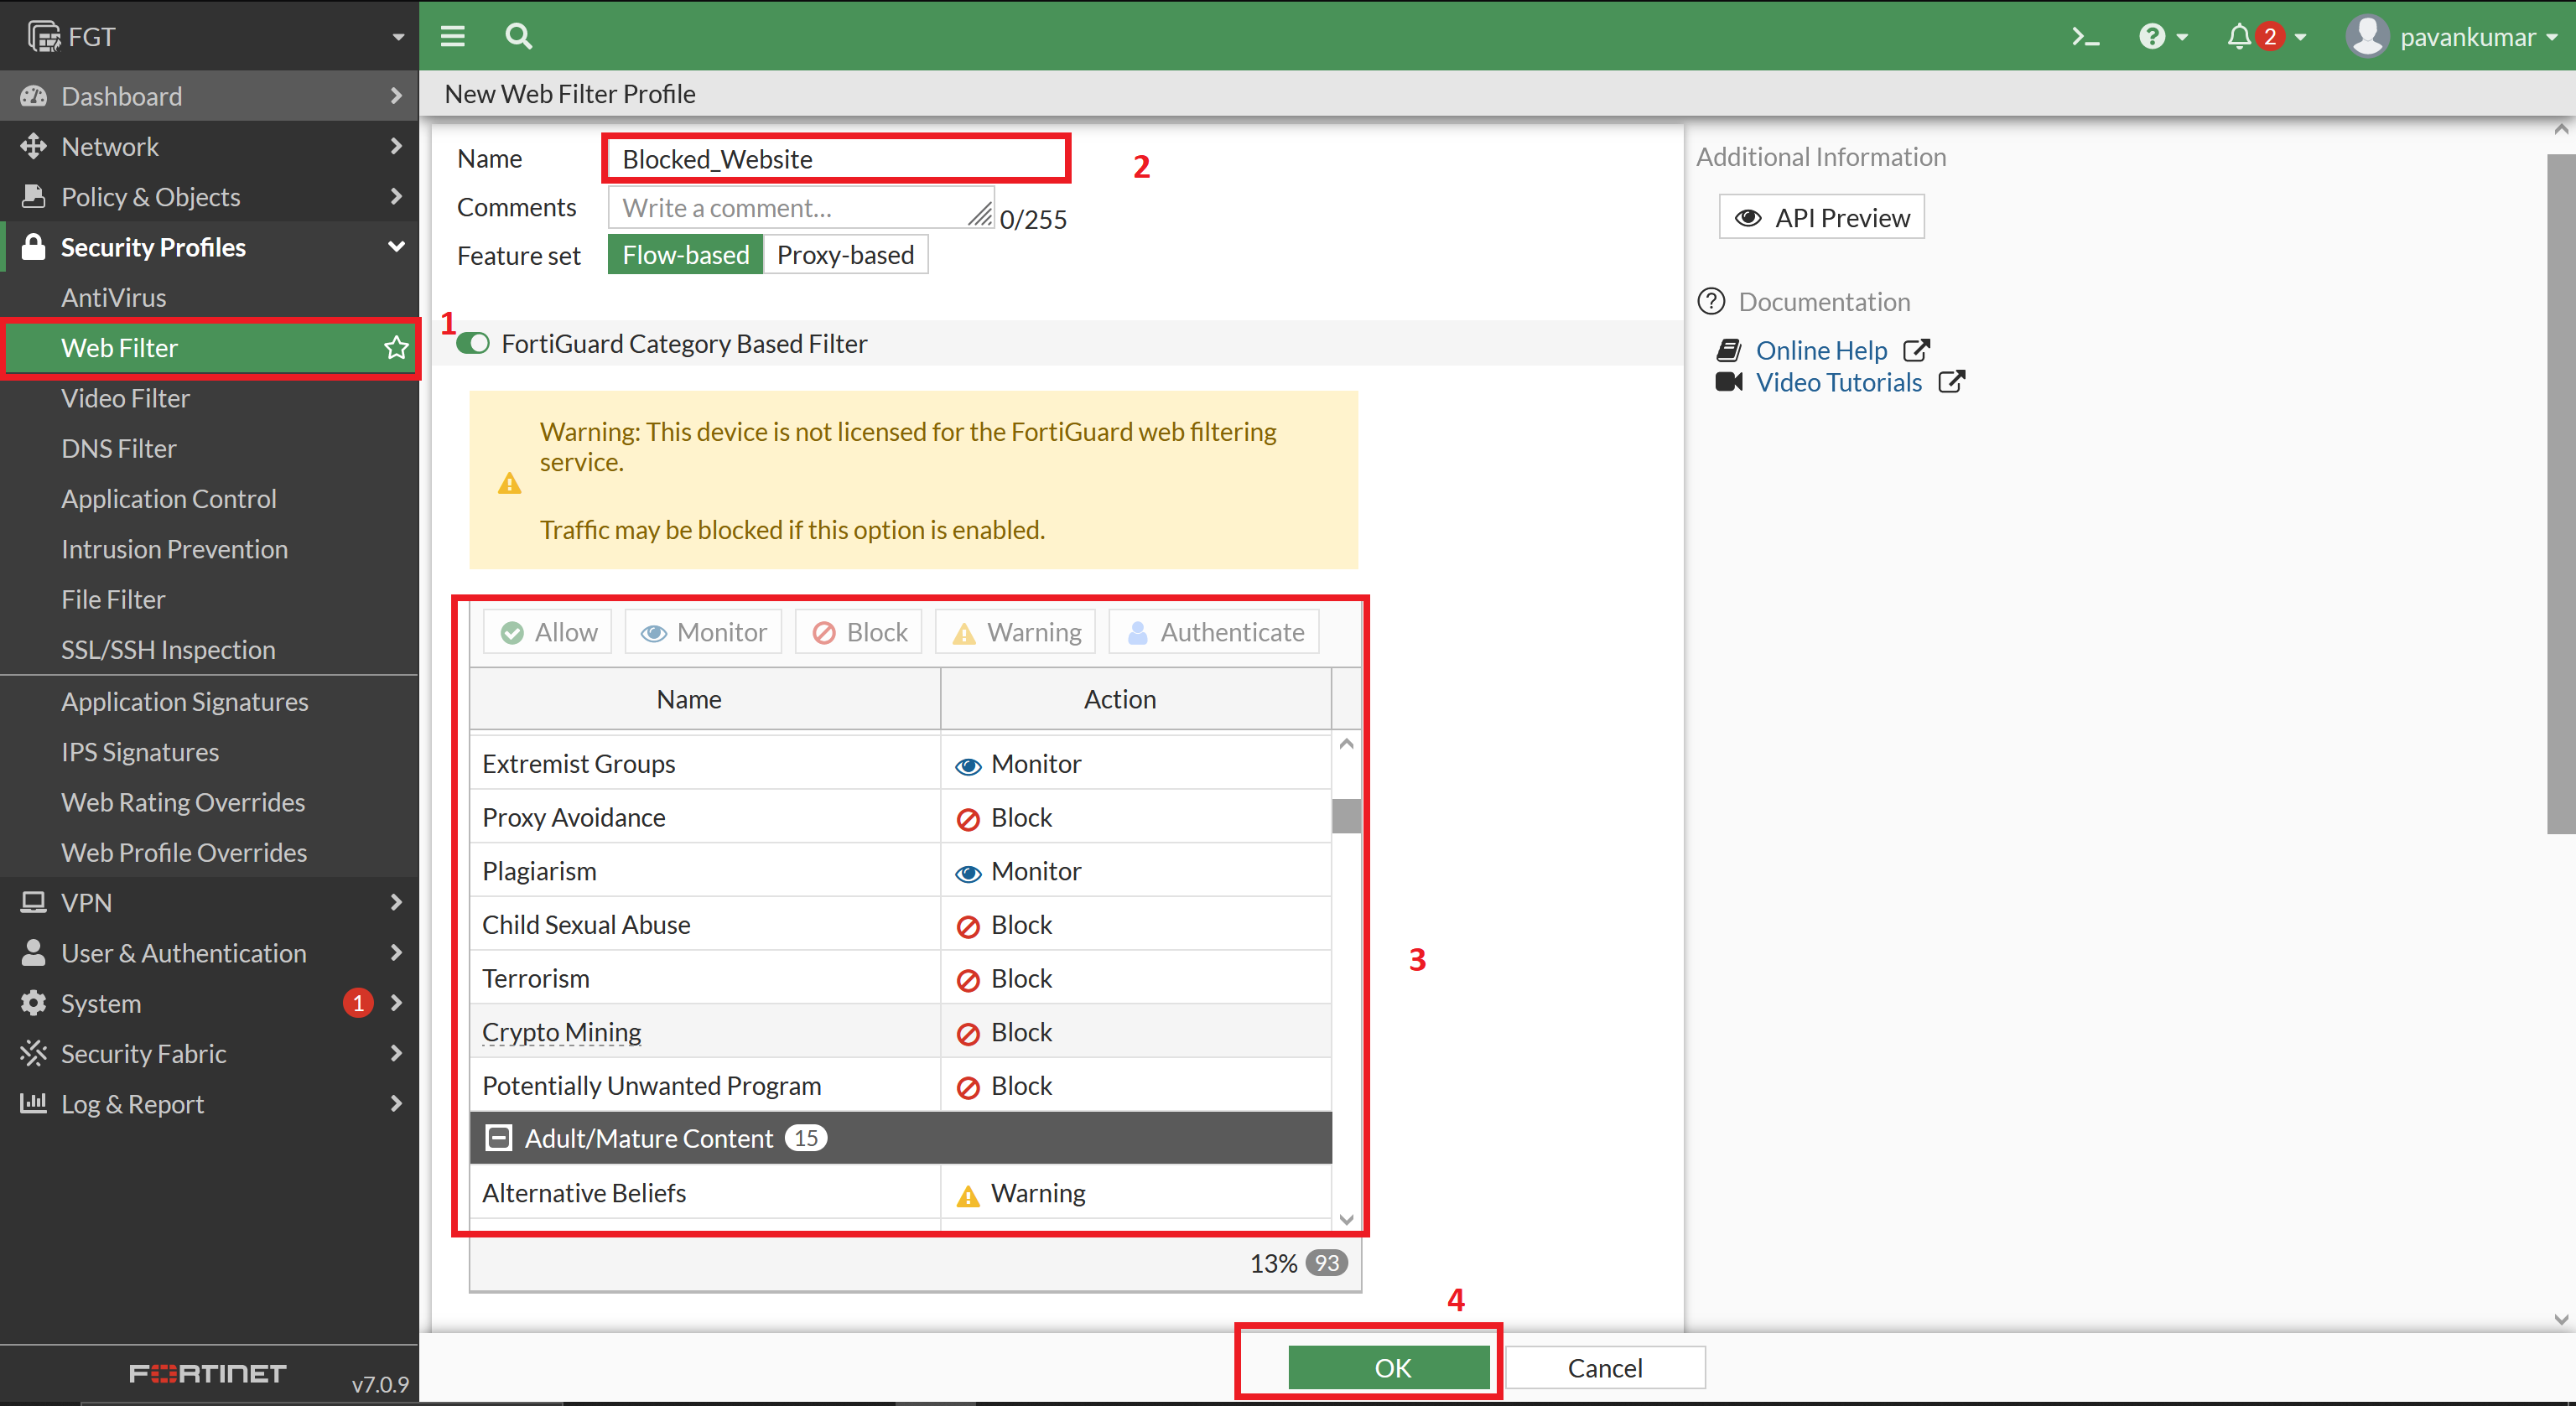
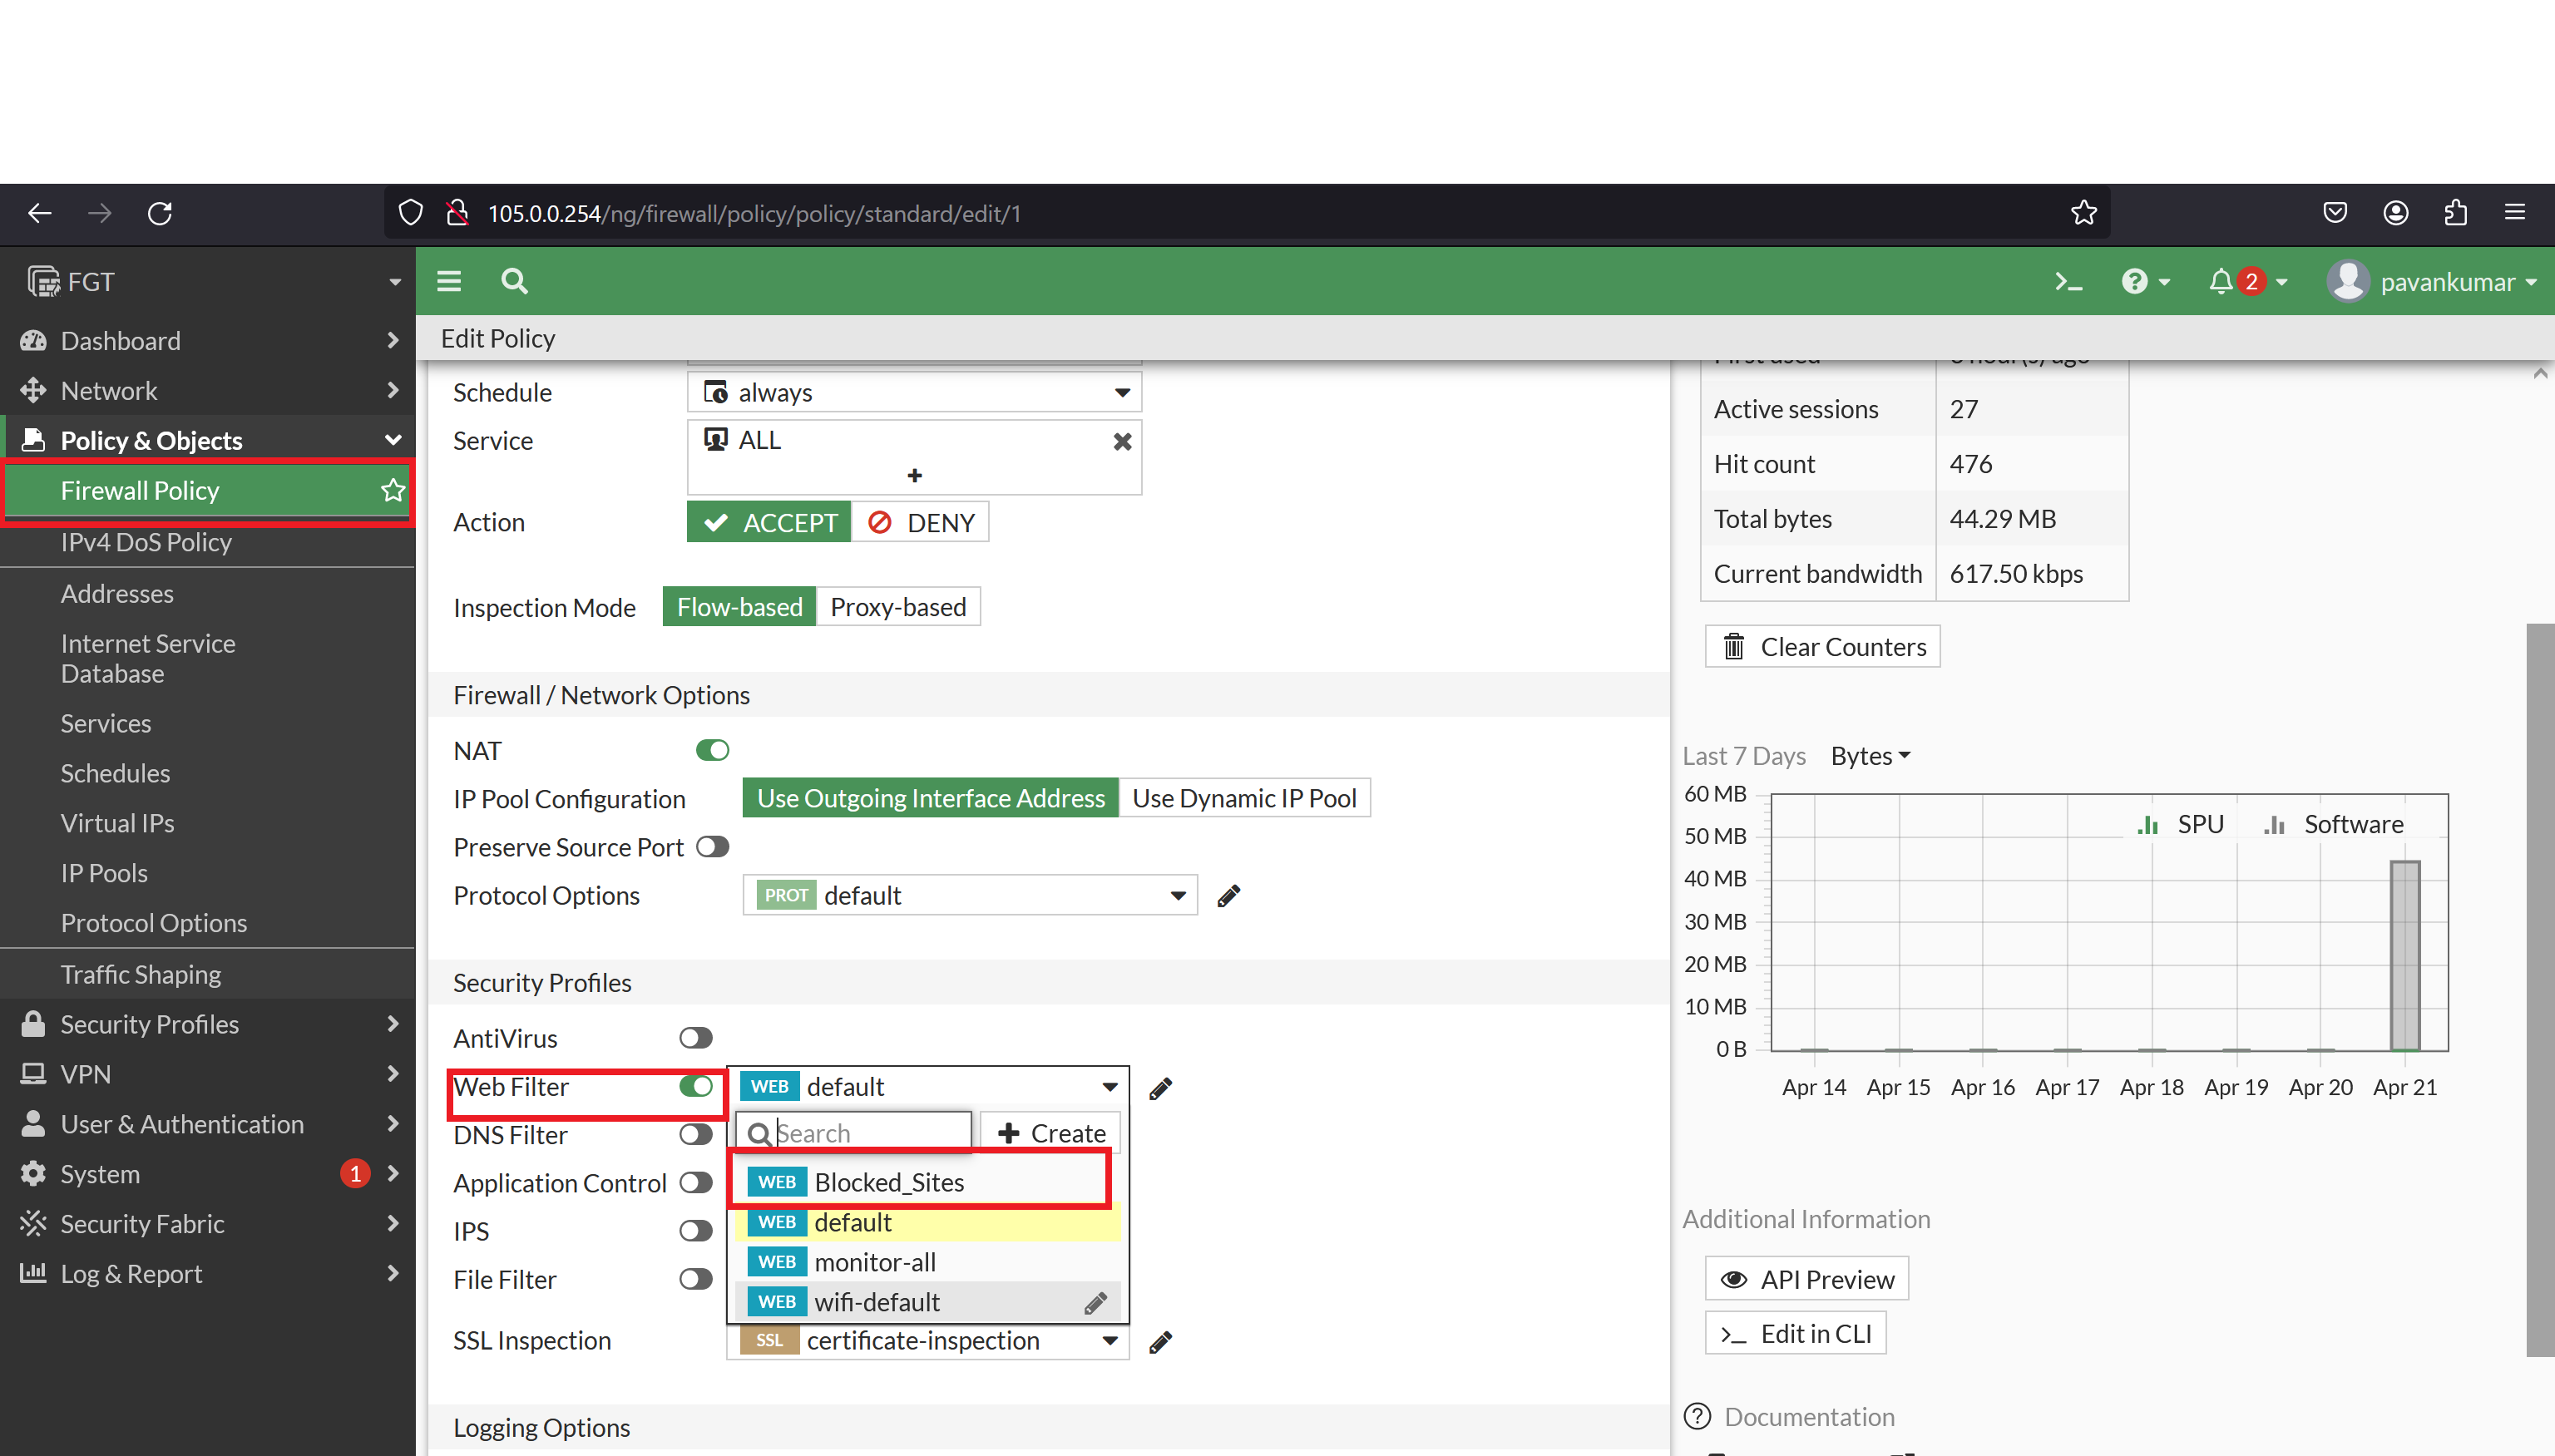
- Purpose: Web Filtering enables administrators to control access to websites based on categories, URLs, or specific content types, providing protection against malicious or inappropriate web content.
- Features: URL filtering, content filtering, antivirus scanning of web traffic, safe search enforcement, and SSL inspection for HTTPS websites.
Demo:
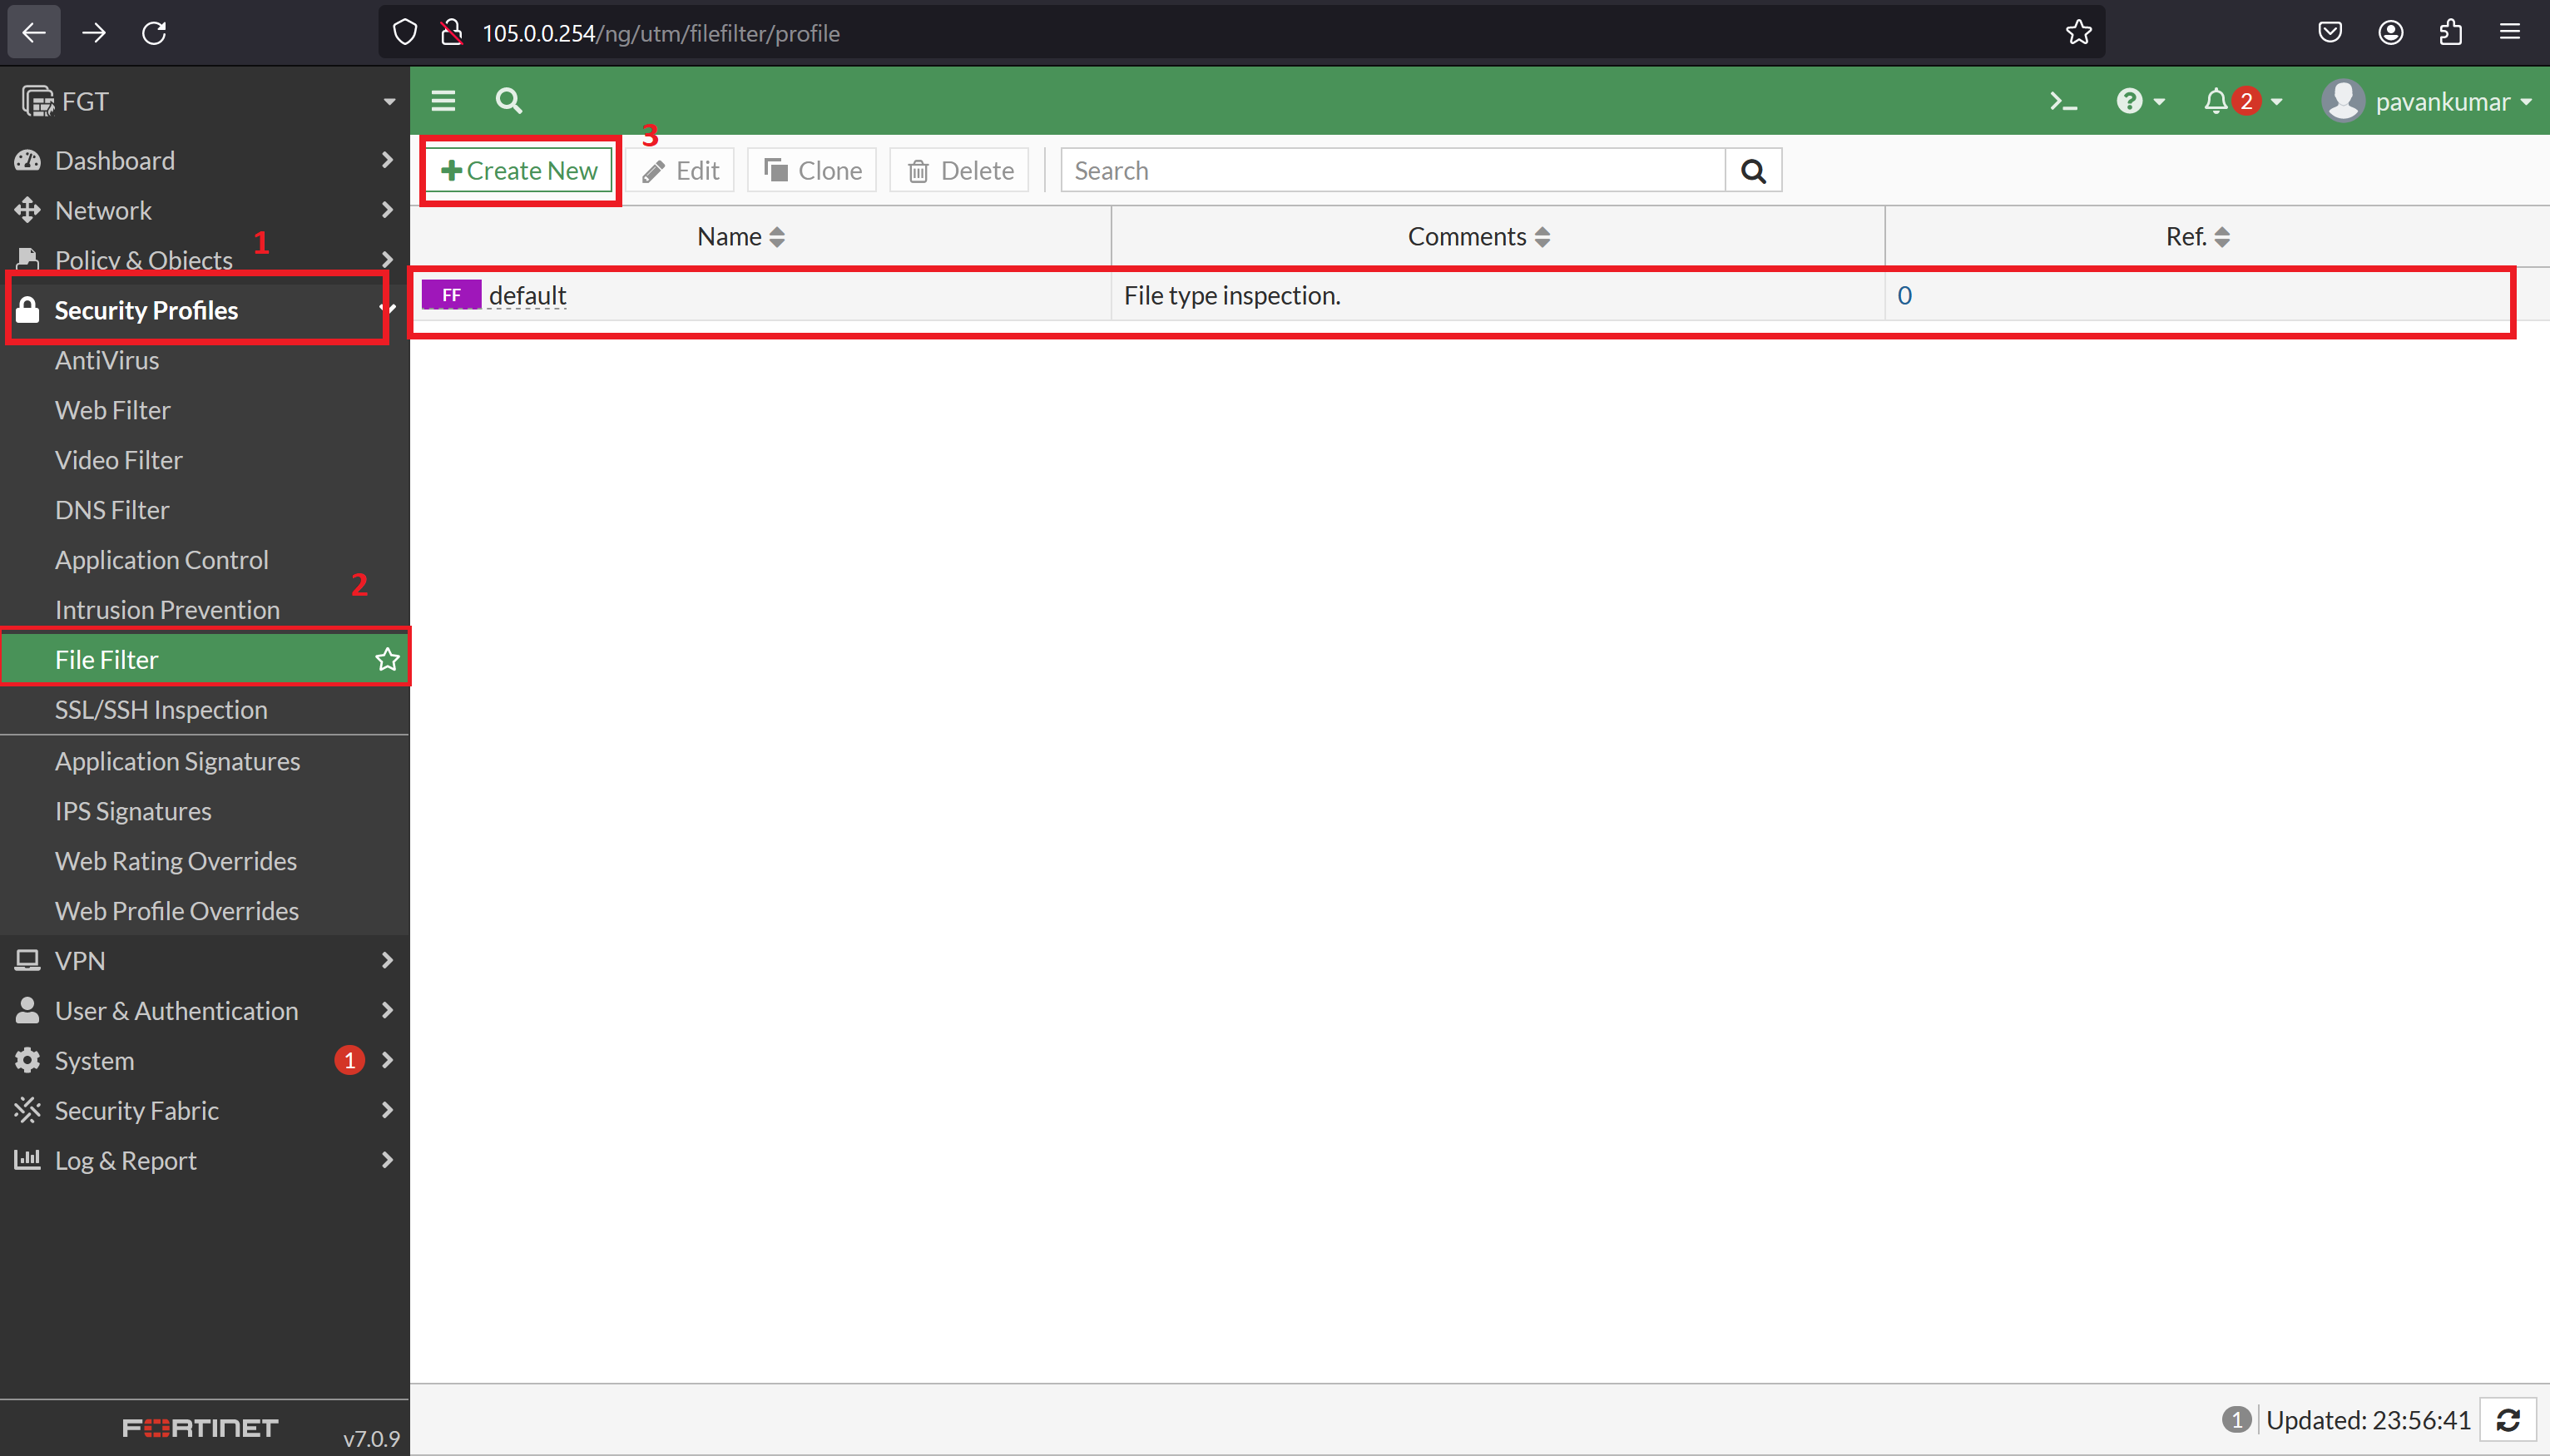
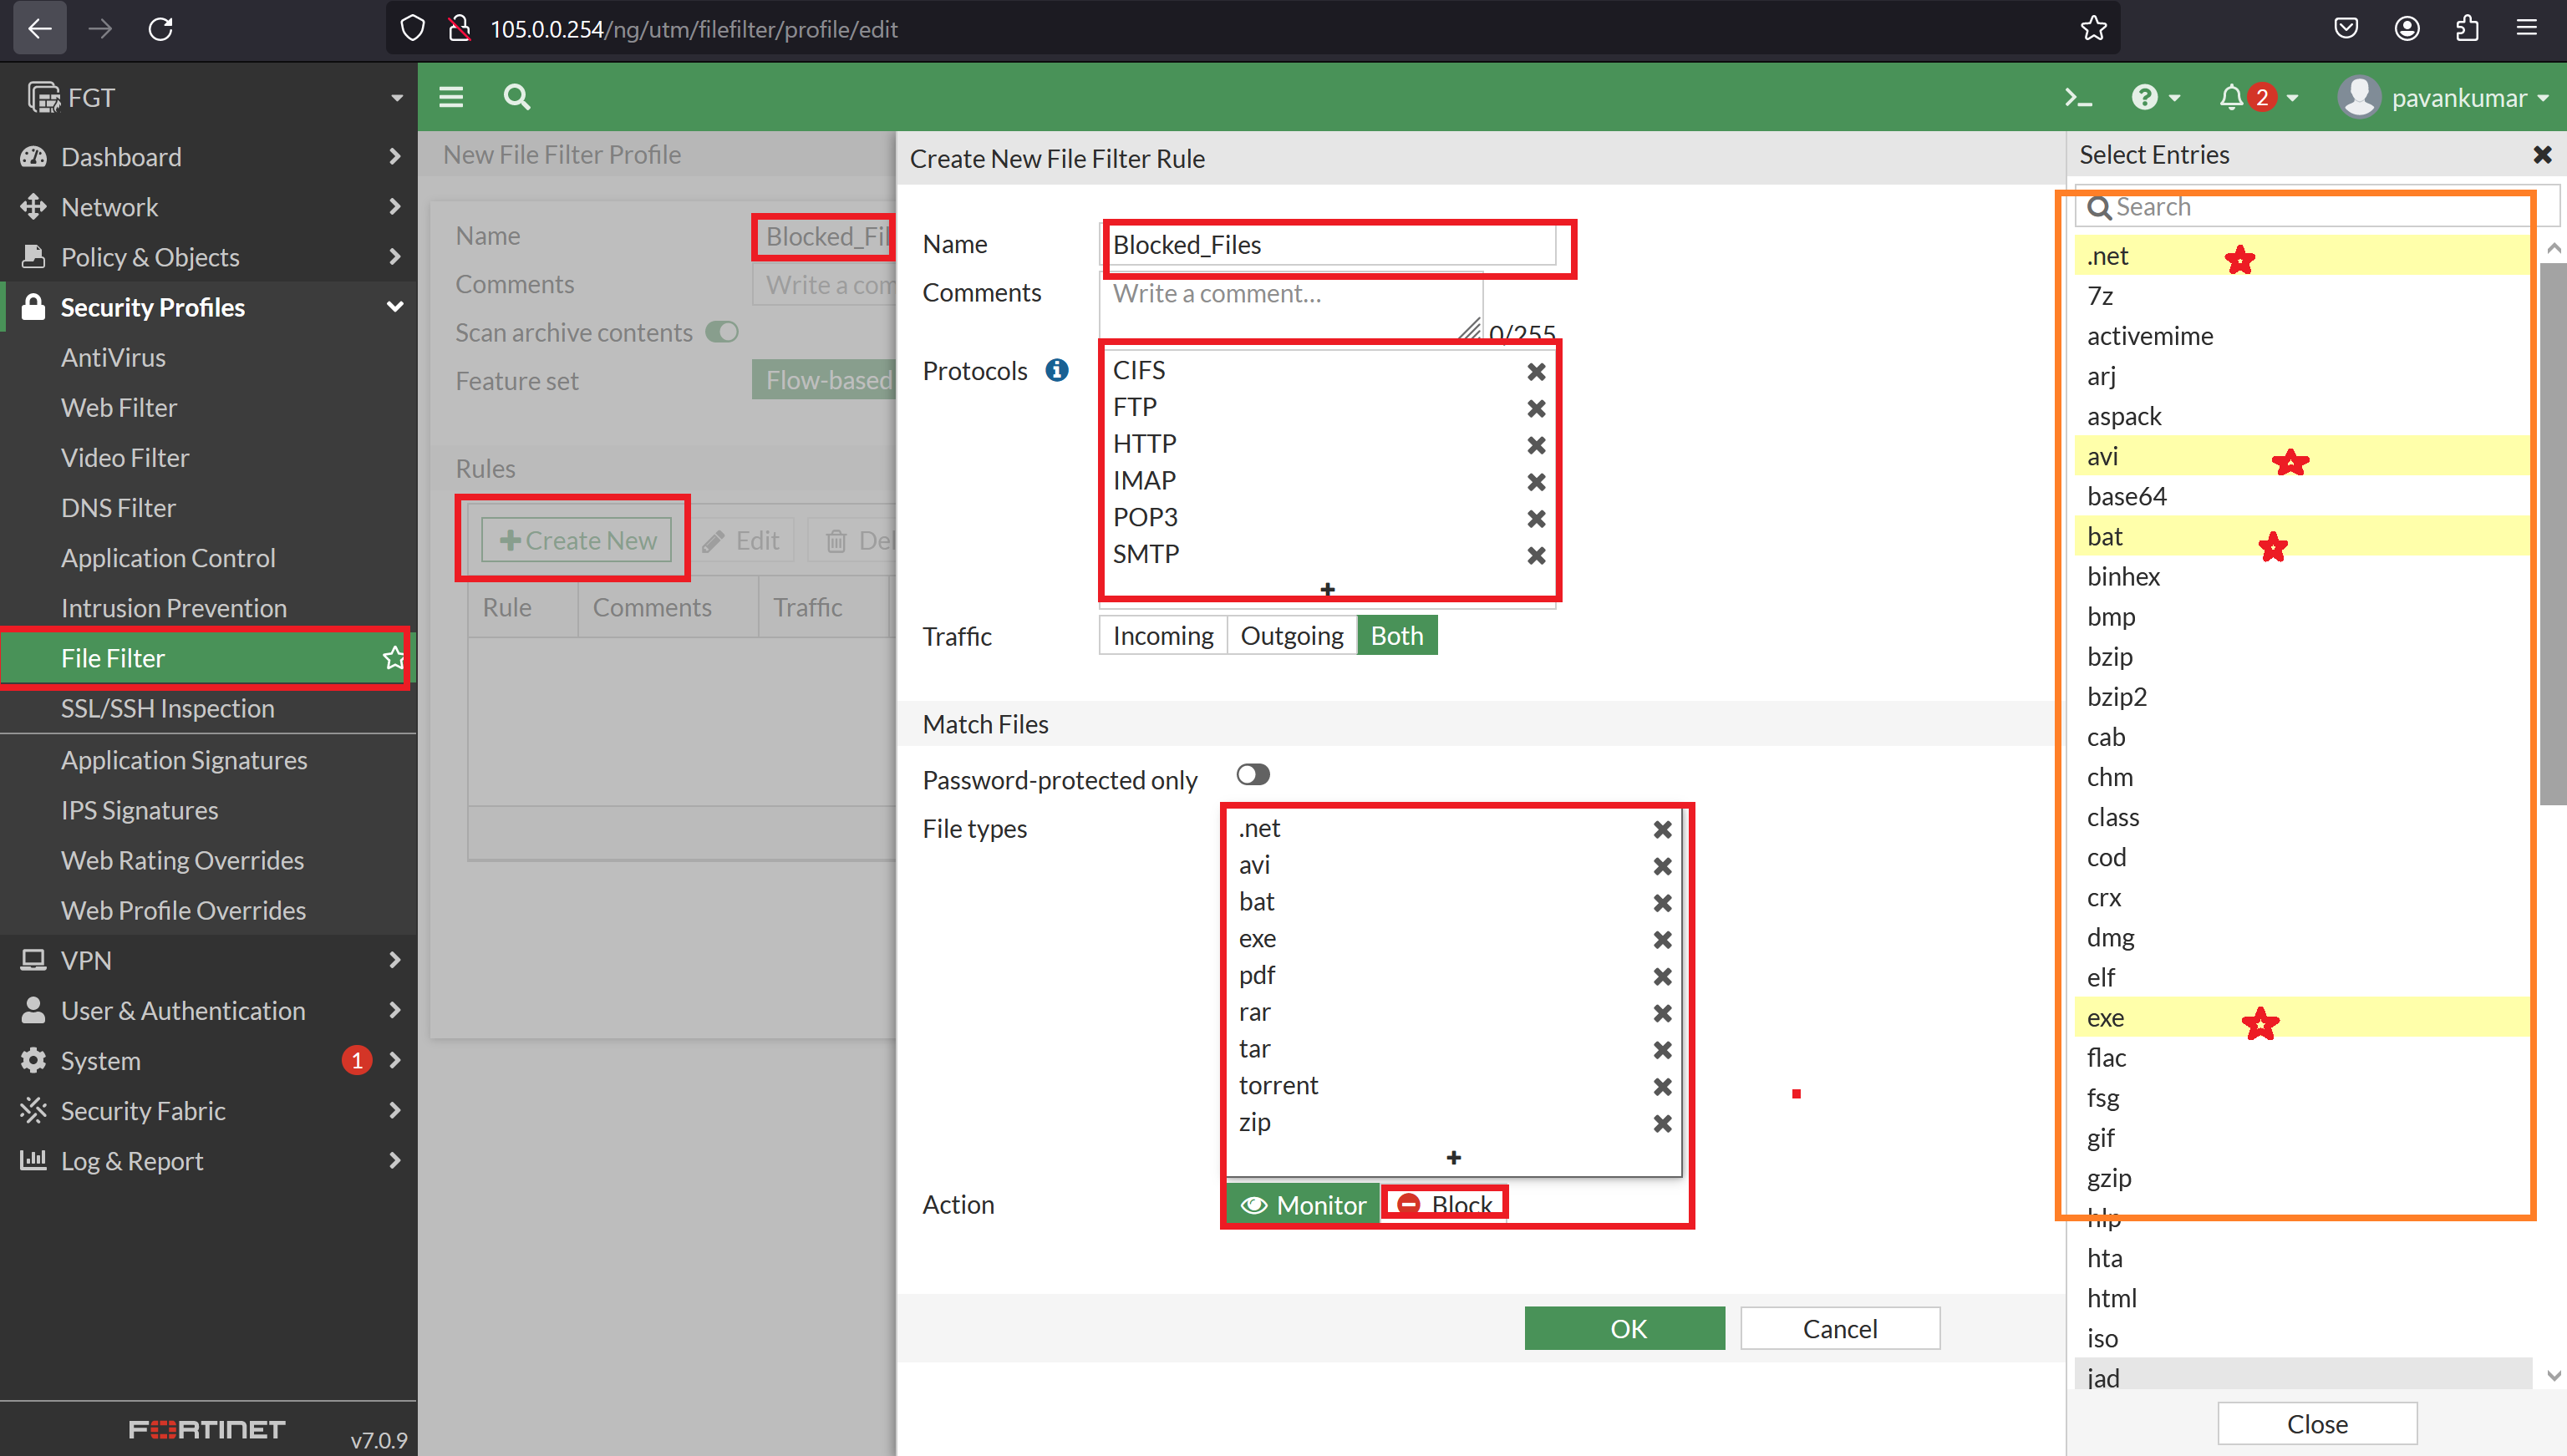
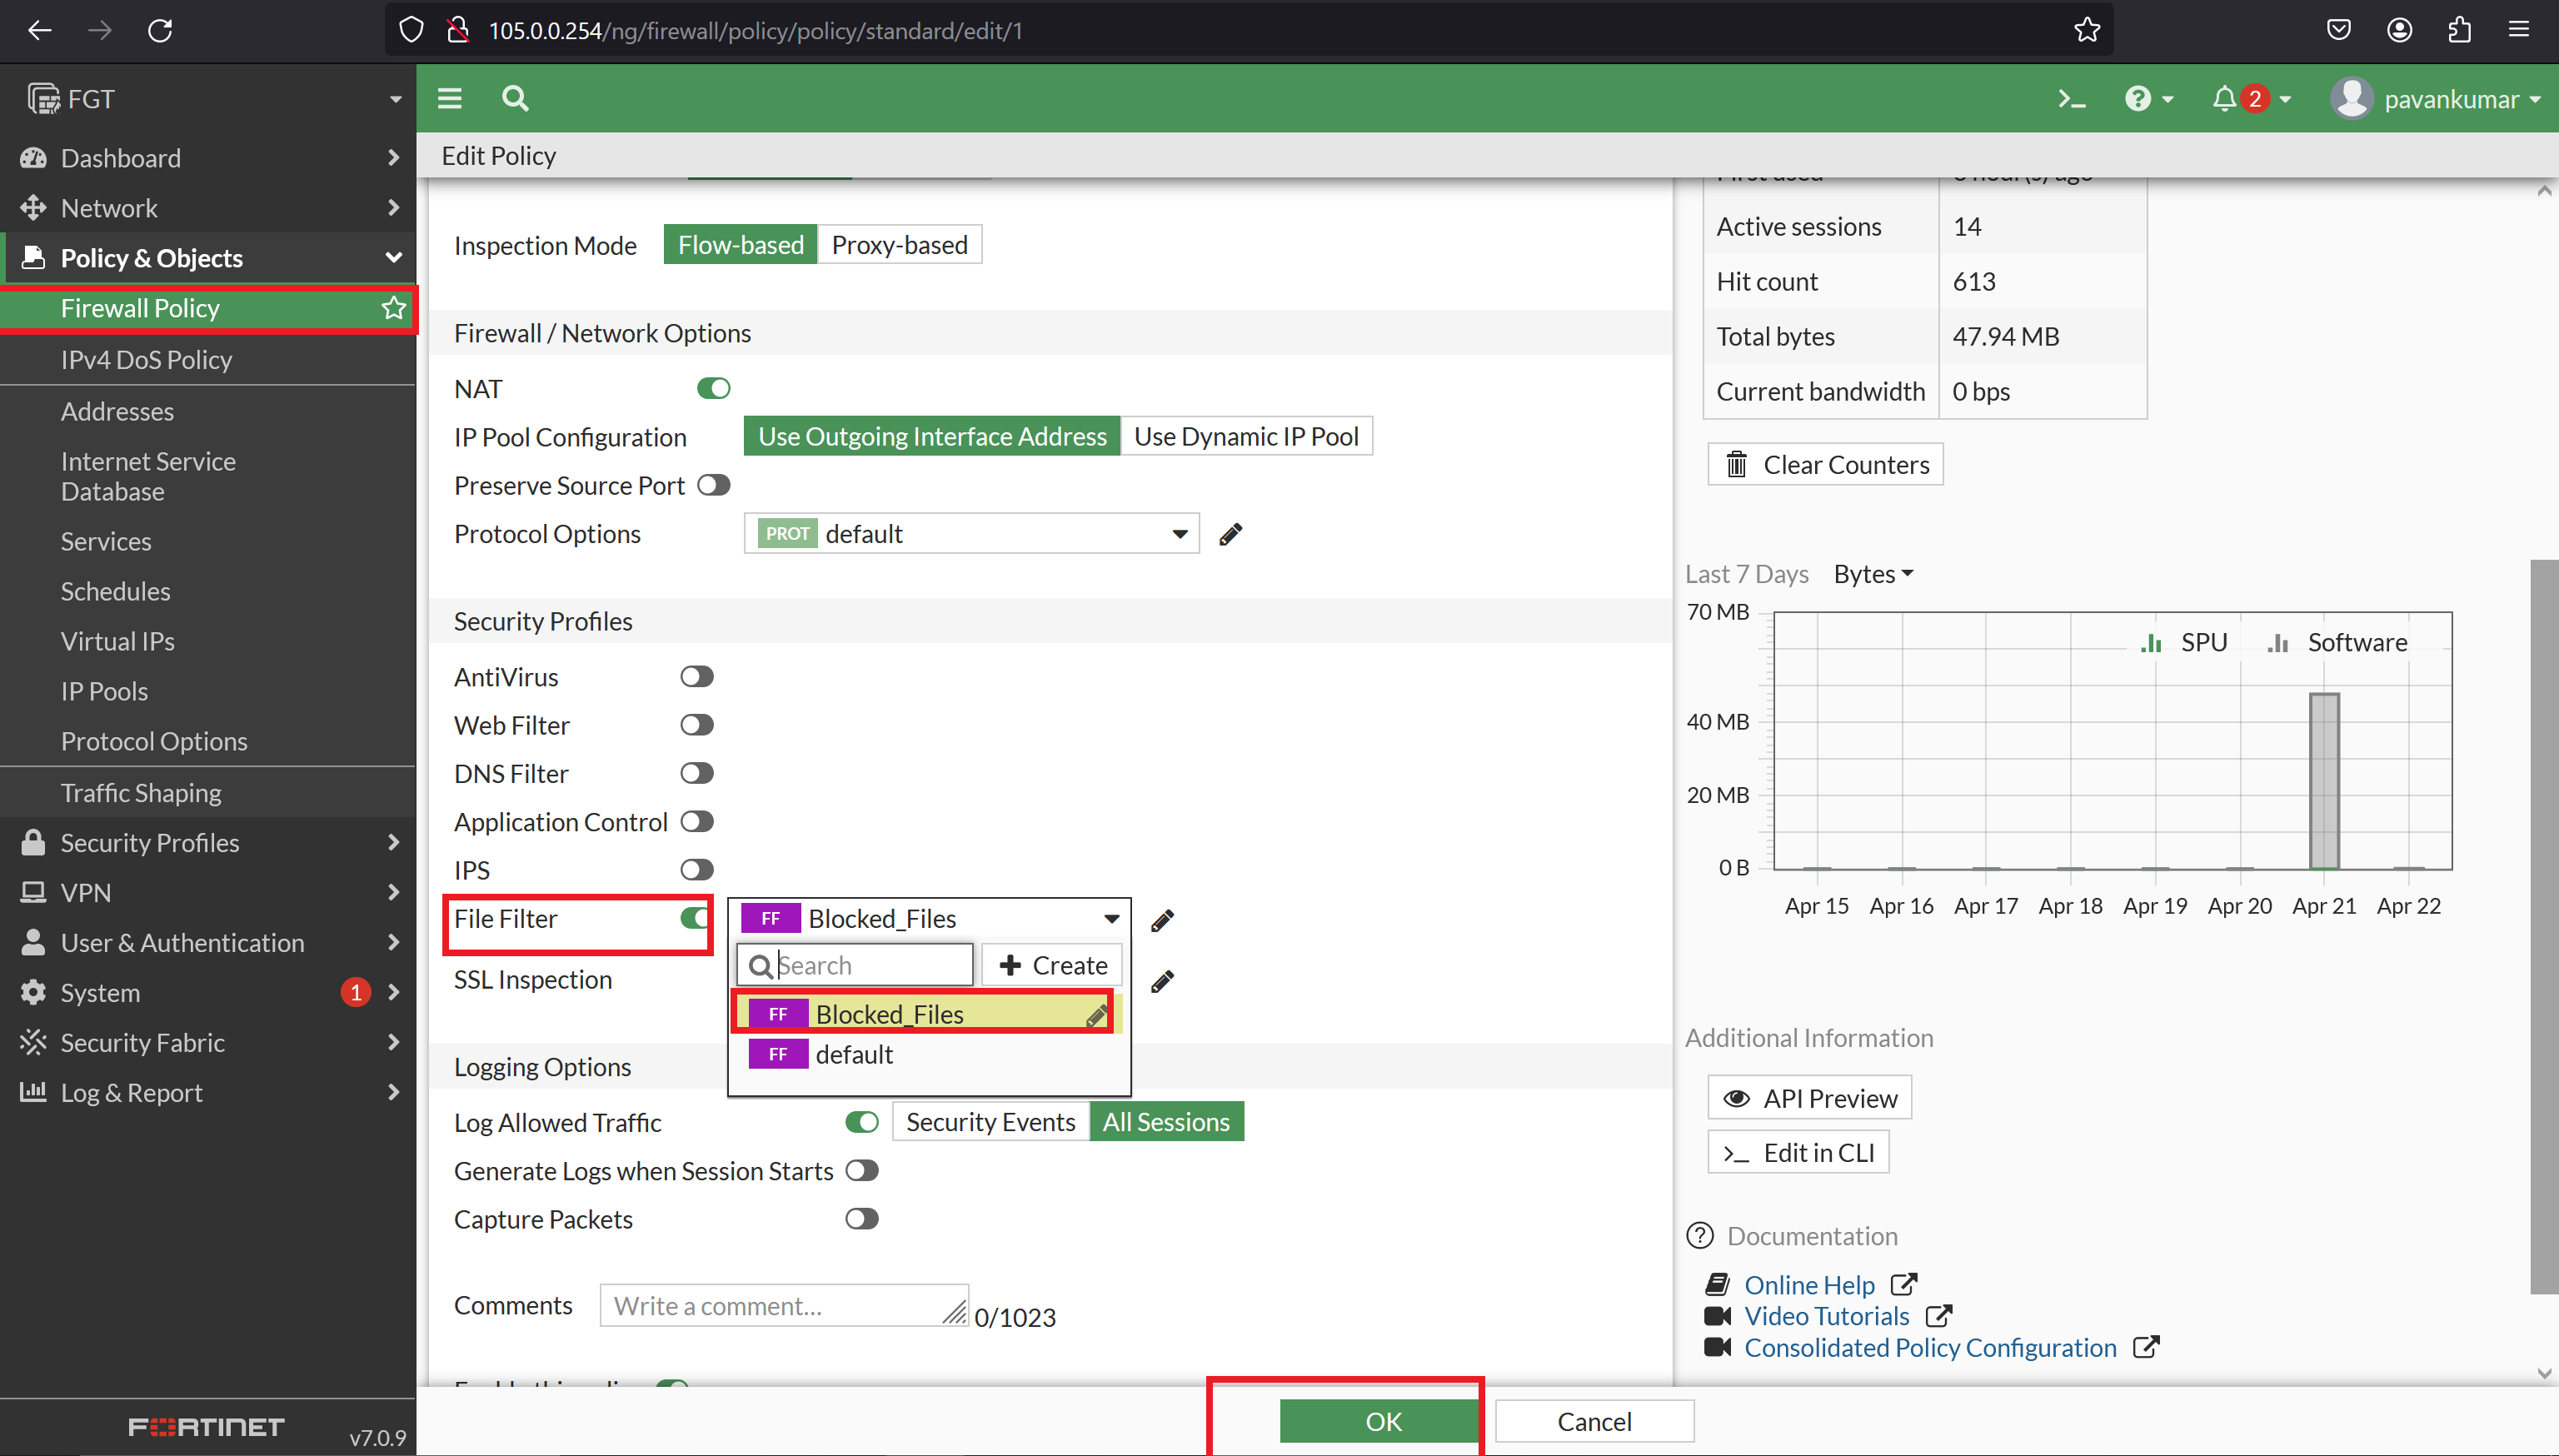
3. File Filter
- Purpose: File Filter scans file transfers for malware, malicious content, and unauthorized file types, helping to prevent the spread of malware and enforce data loss prevention policies.
- Features: File type filtering, antivirus scanning of file transfers, quarantine and blocking of infected files, and granular control over allowed file types.
Demo:
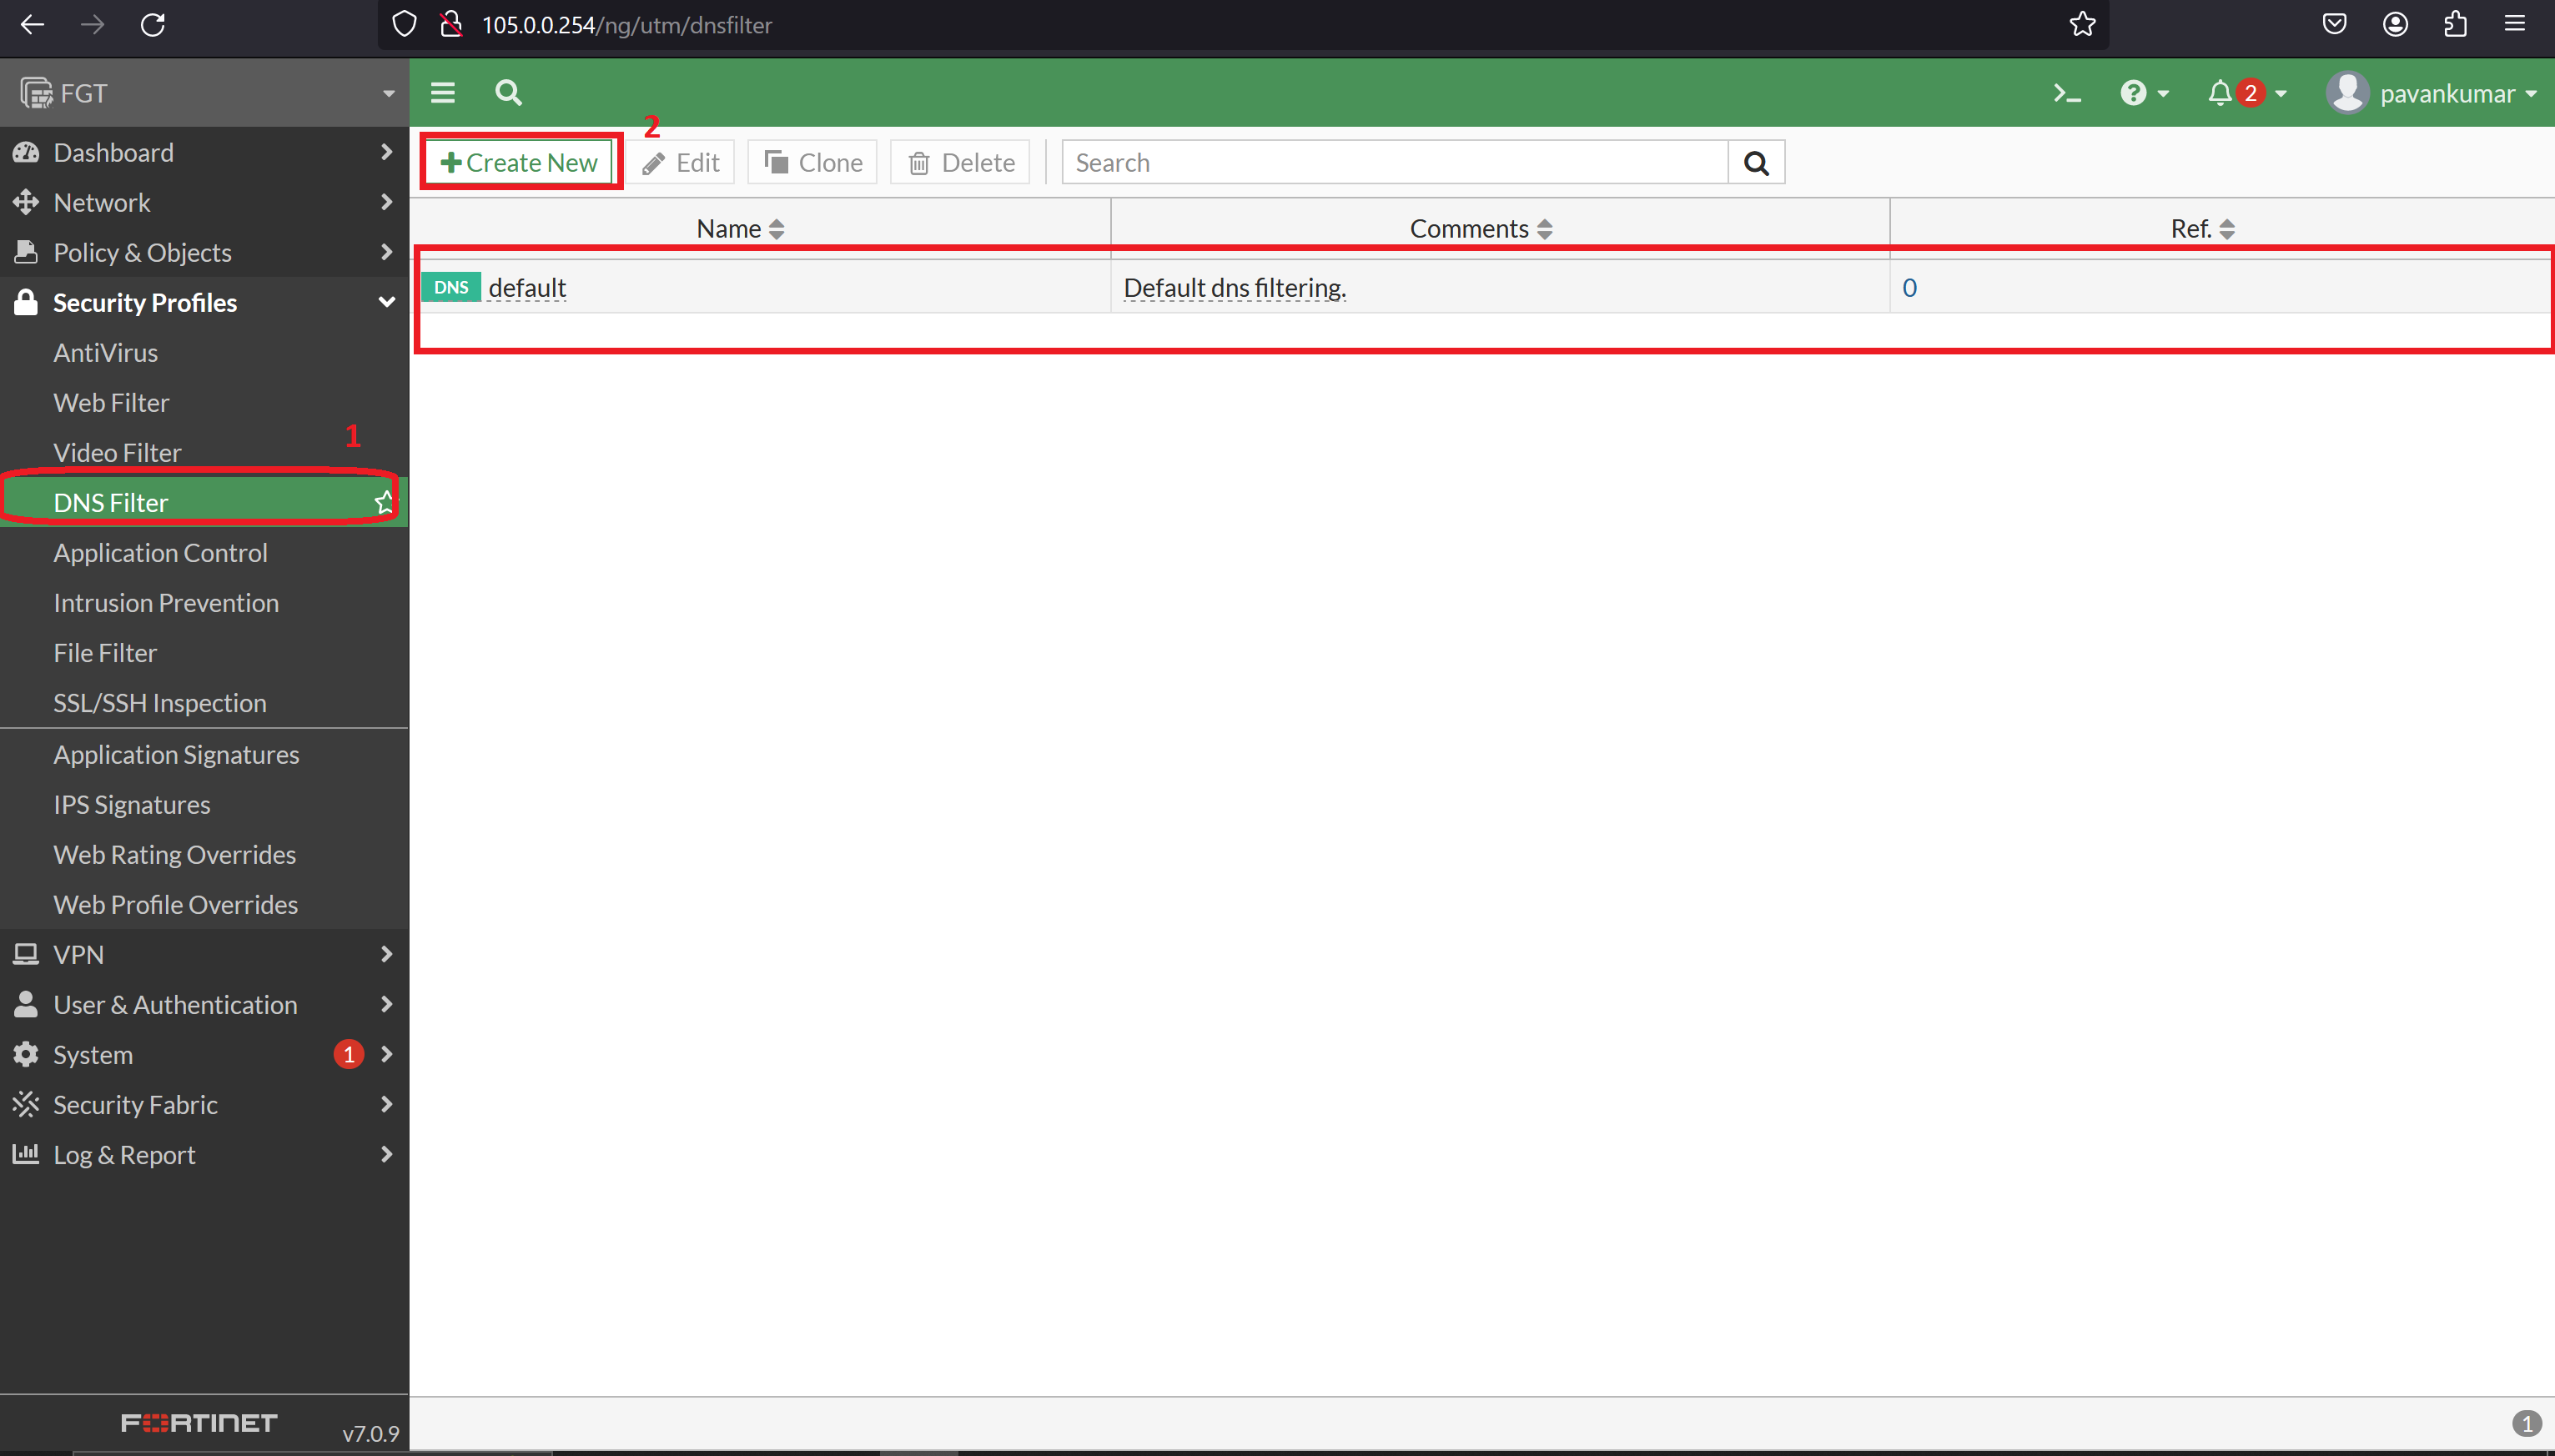
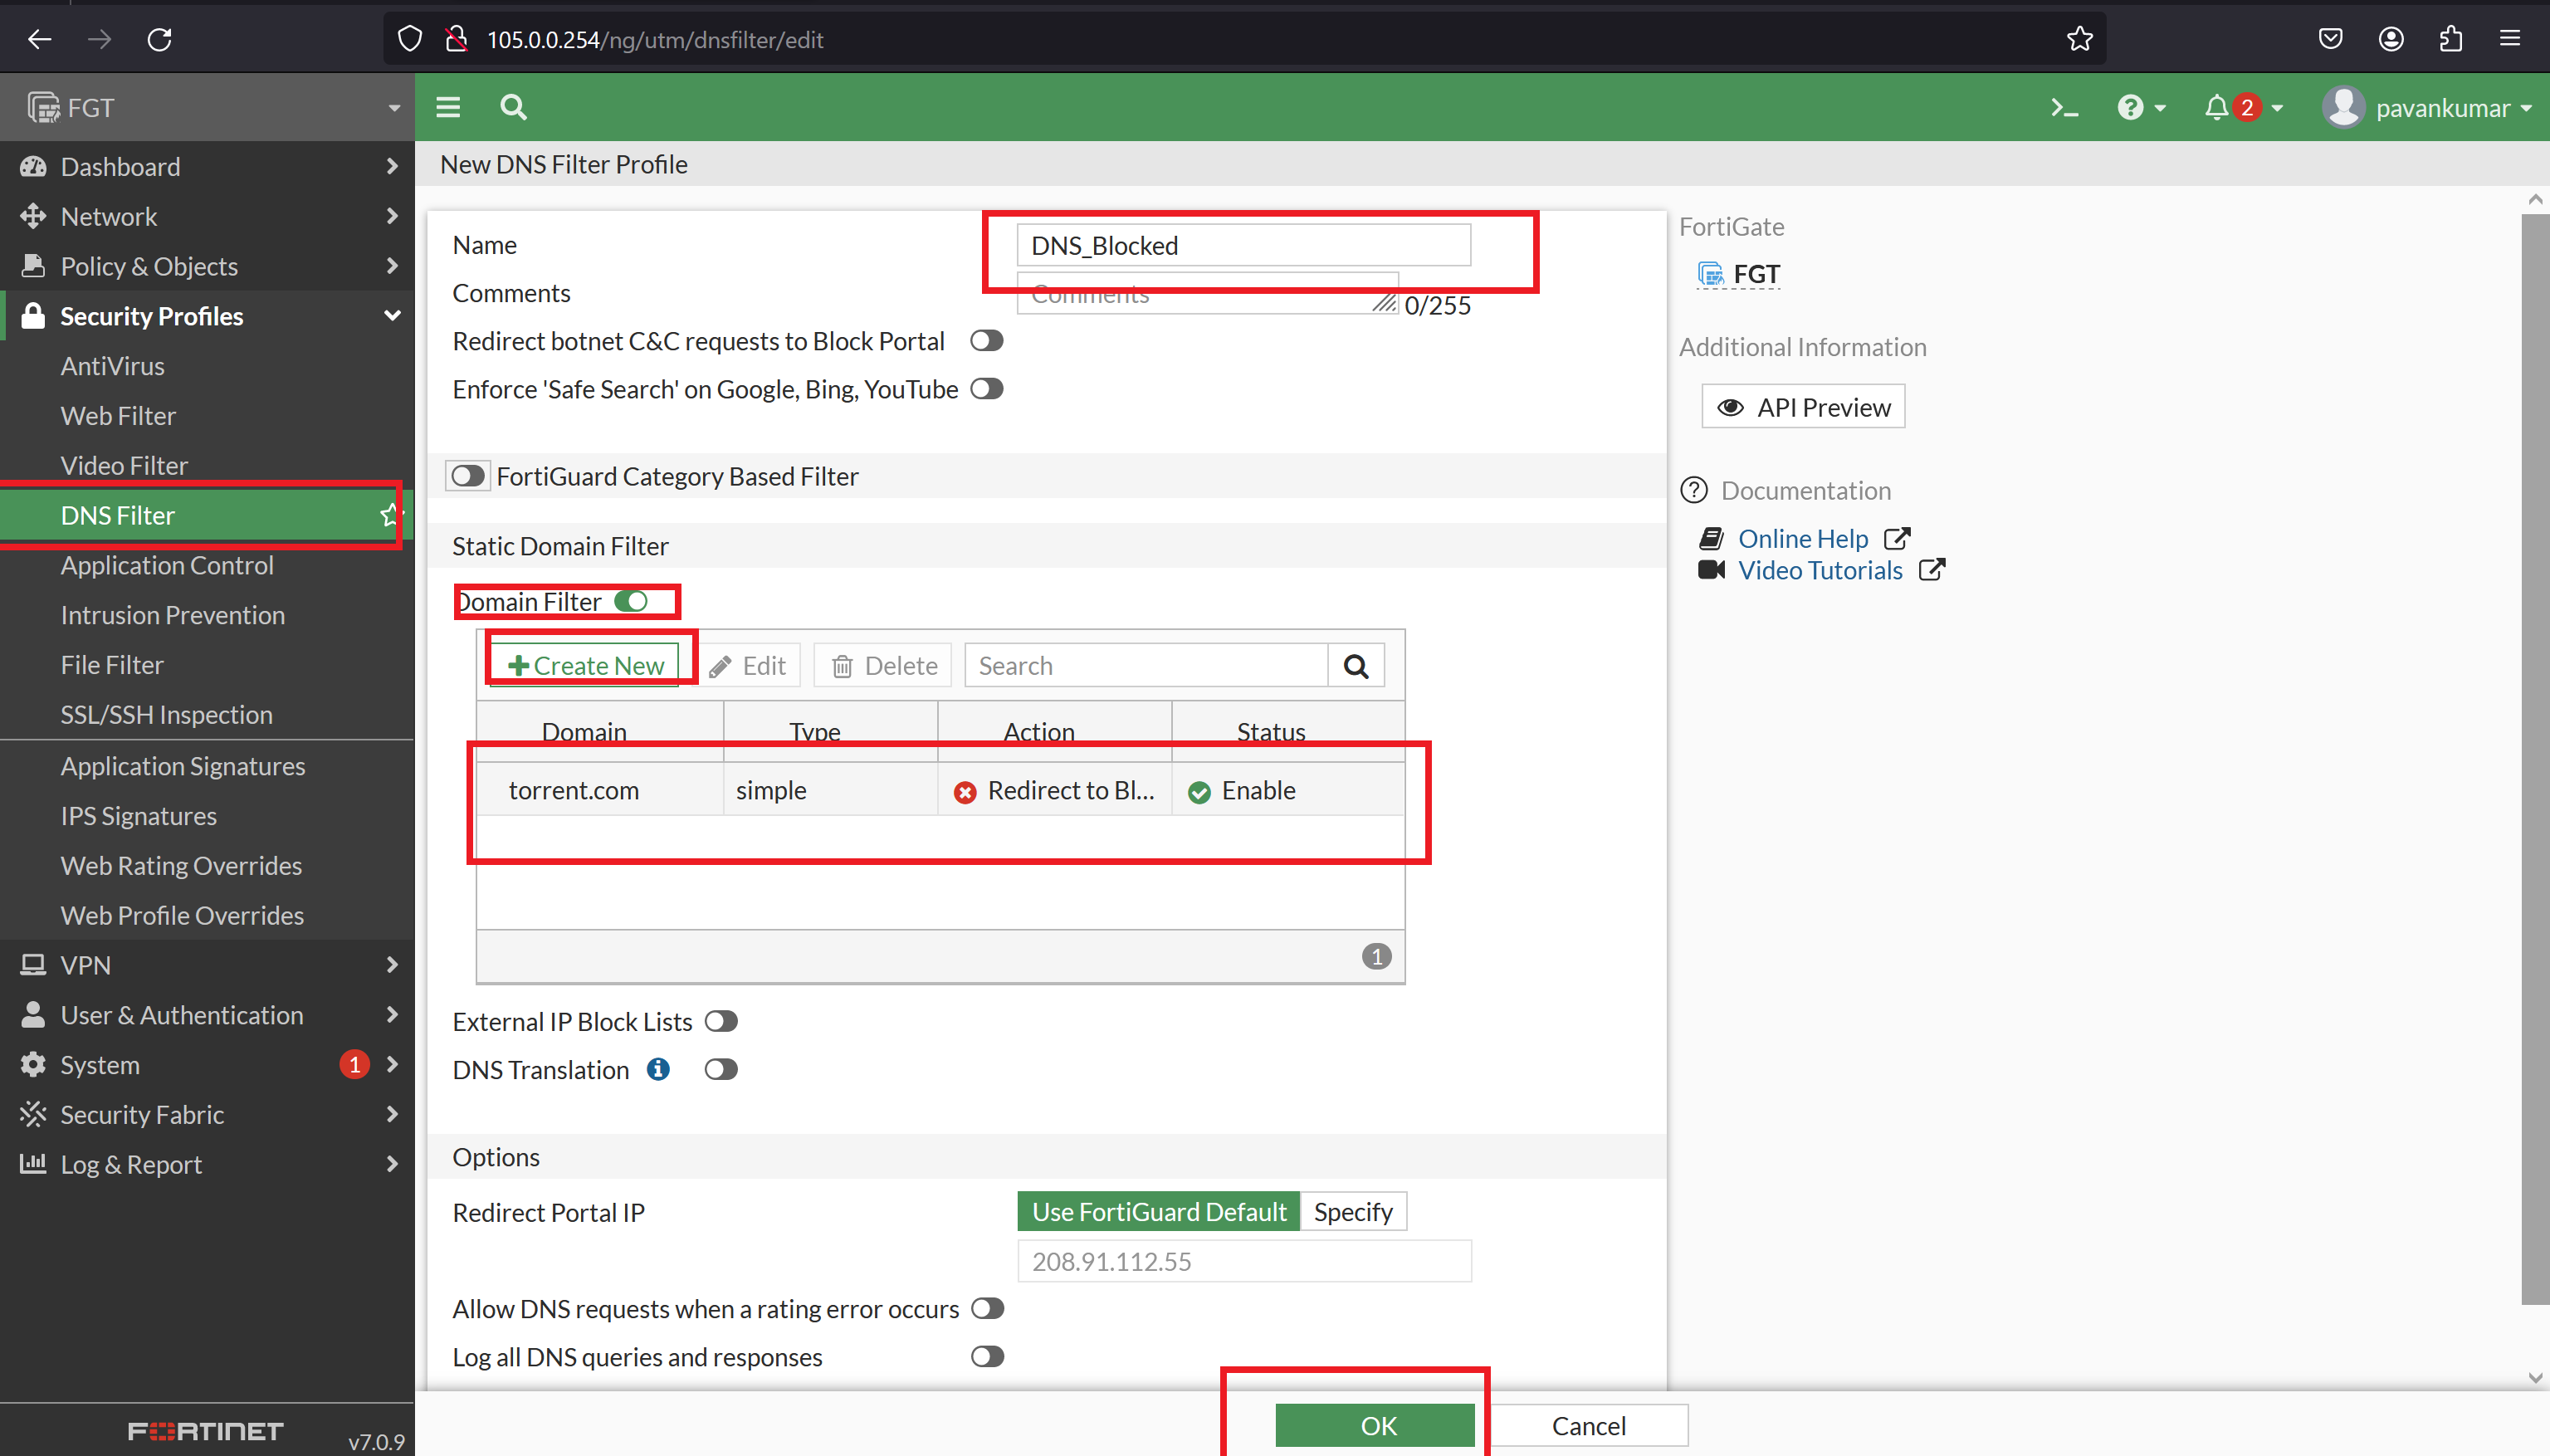
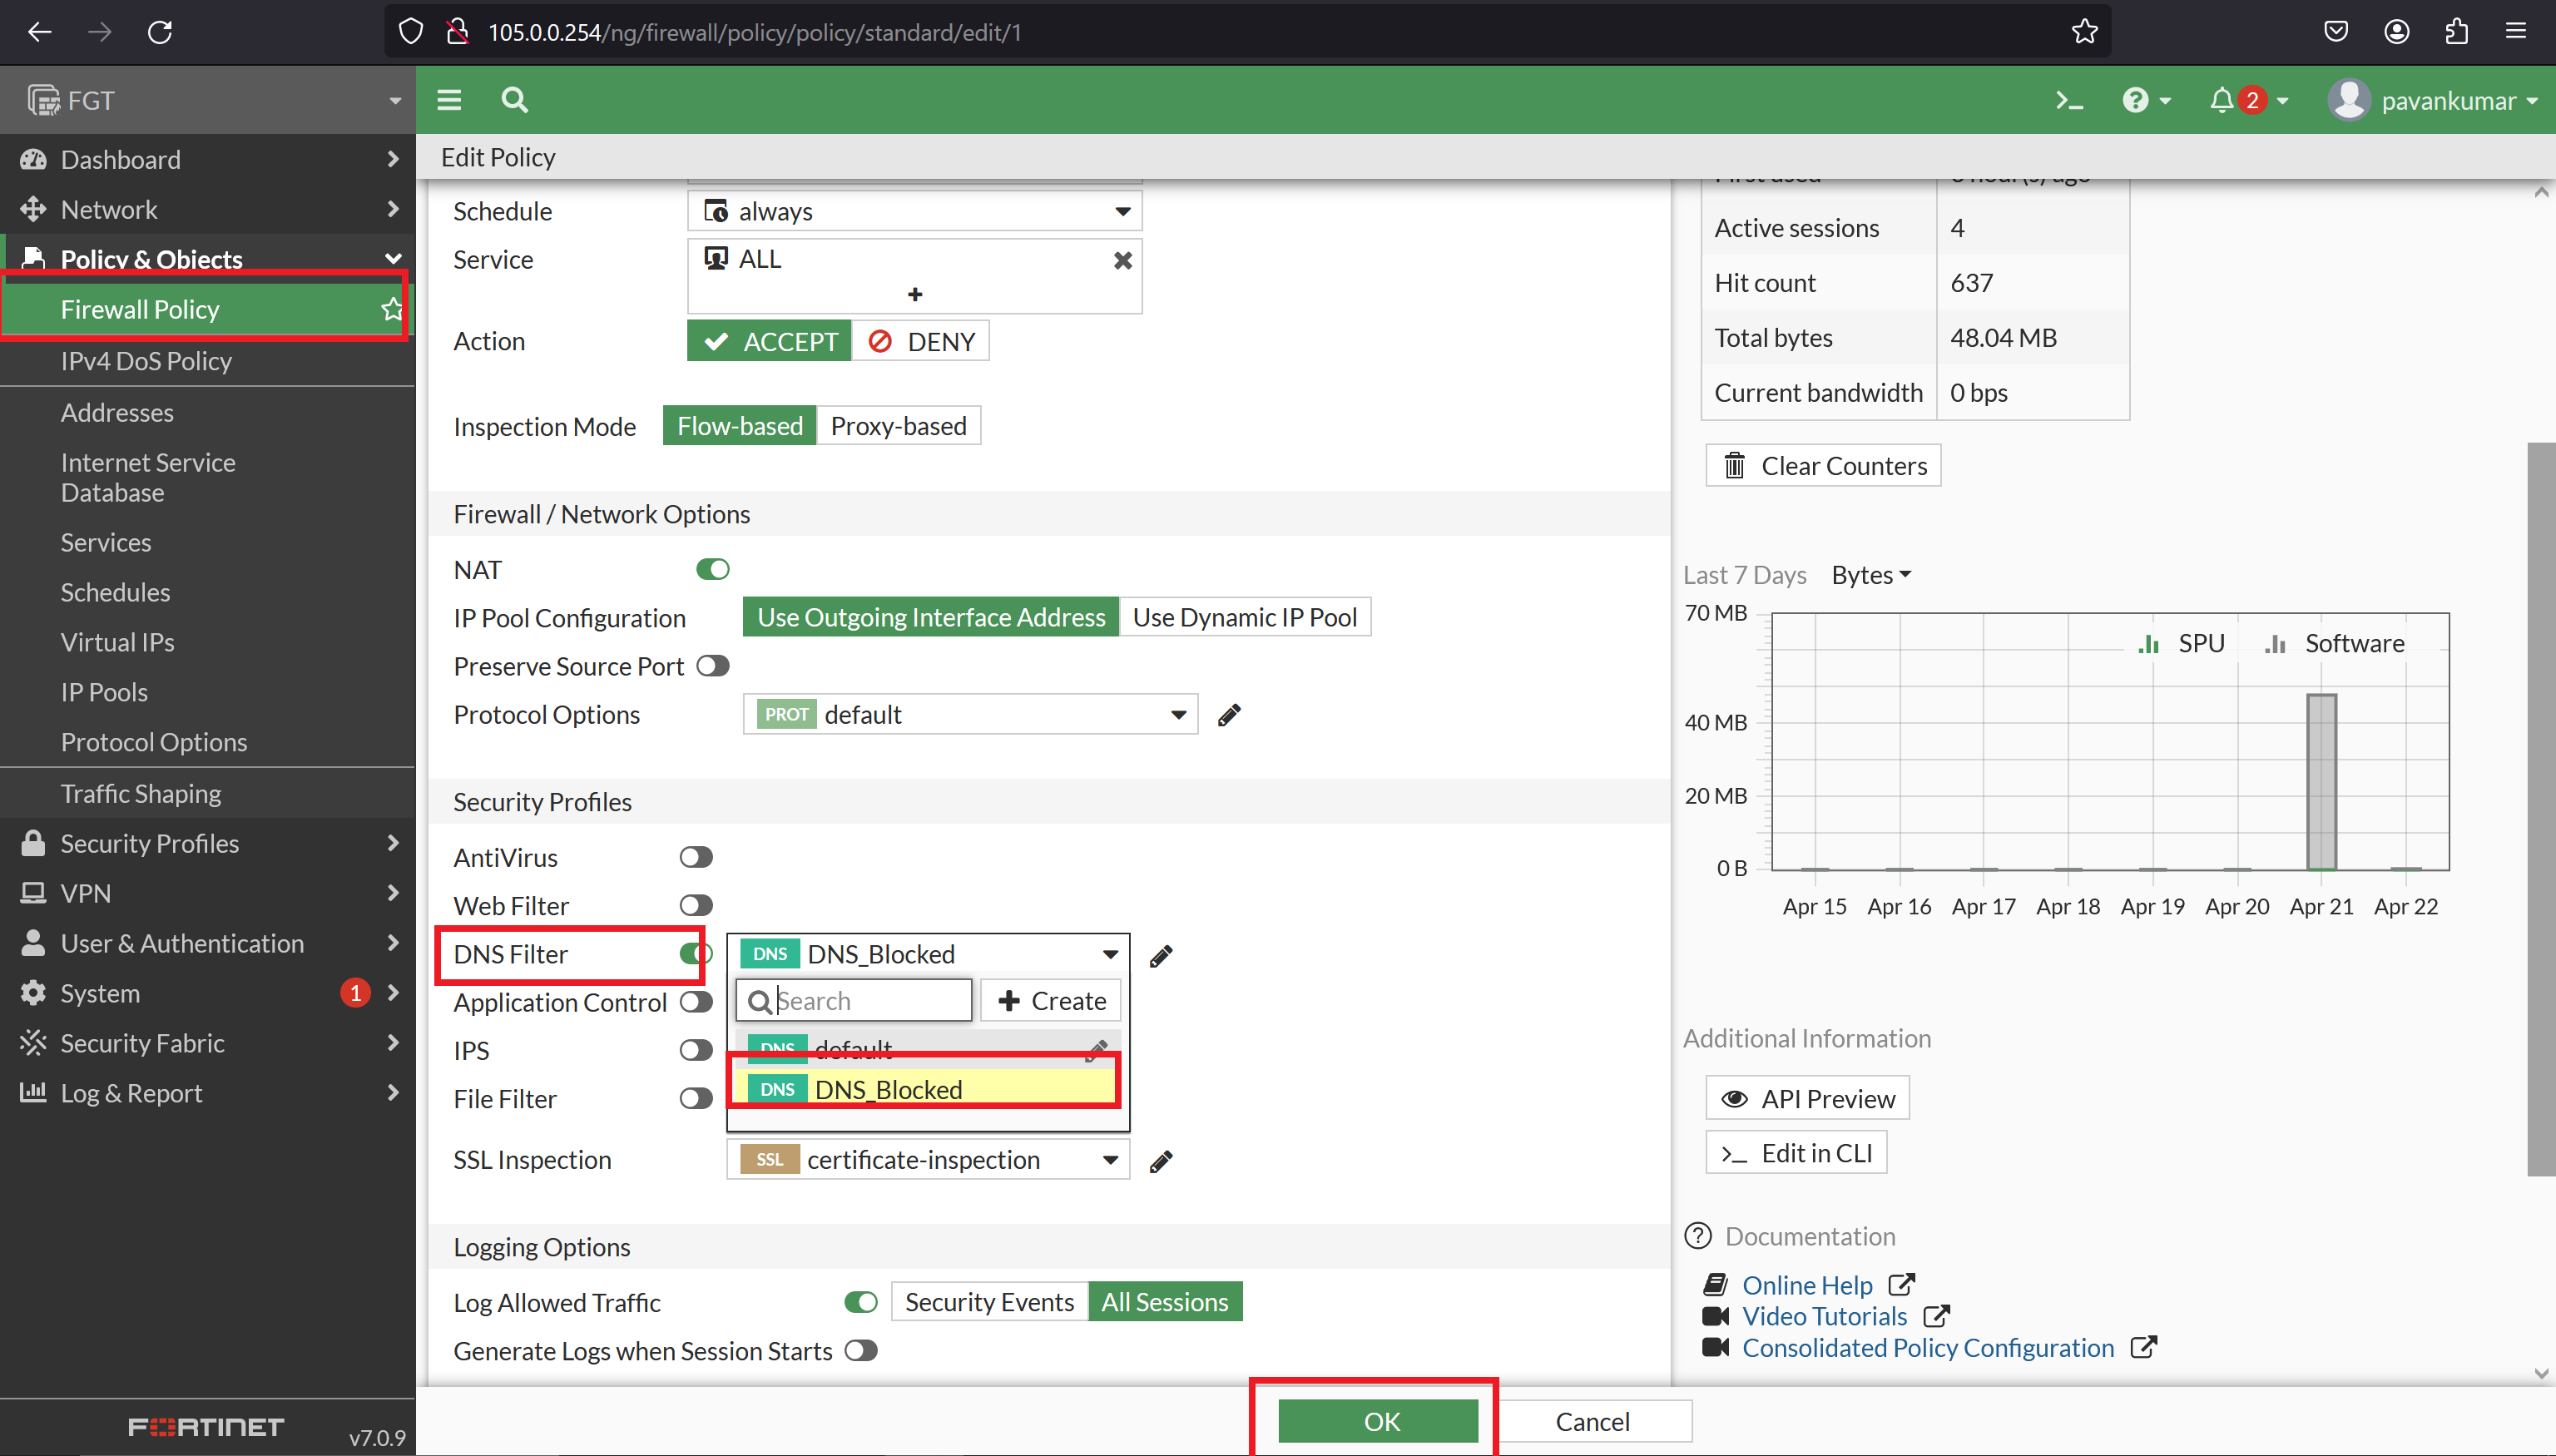
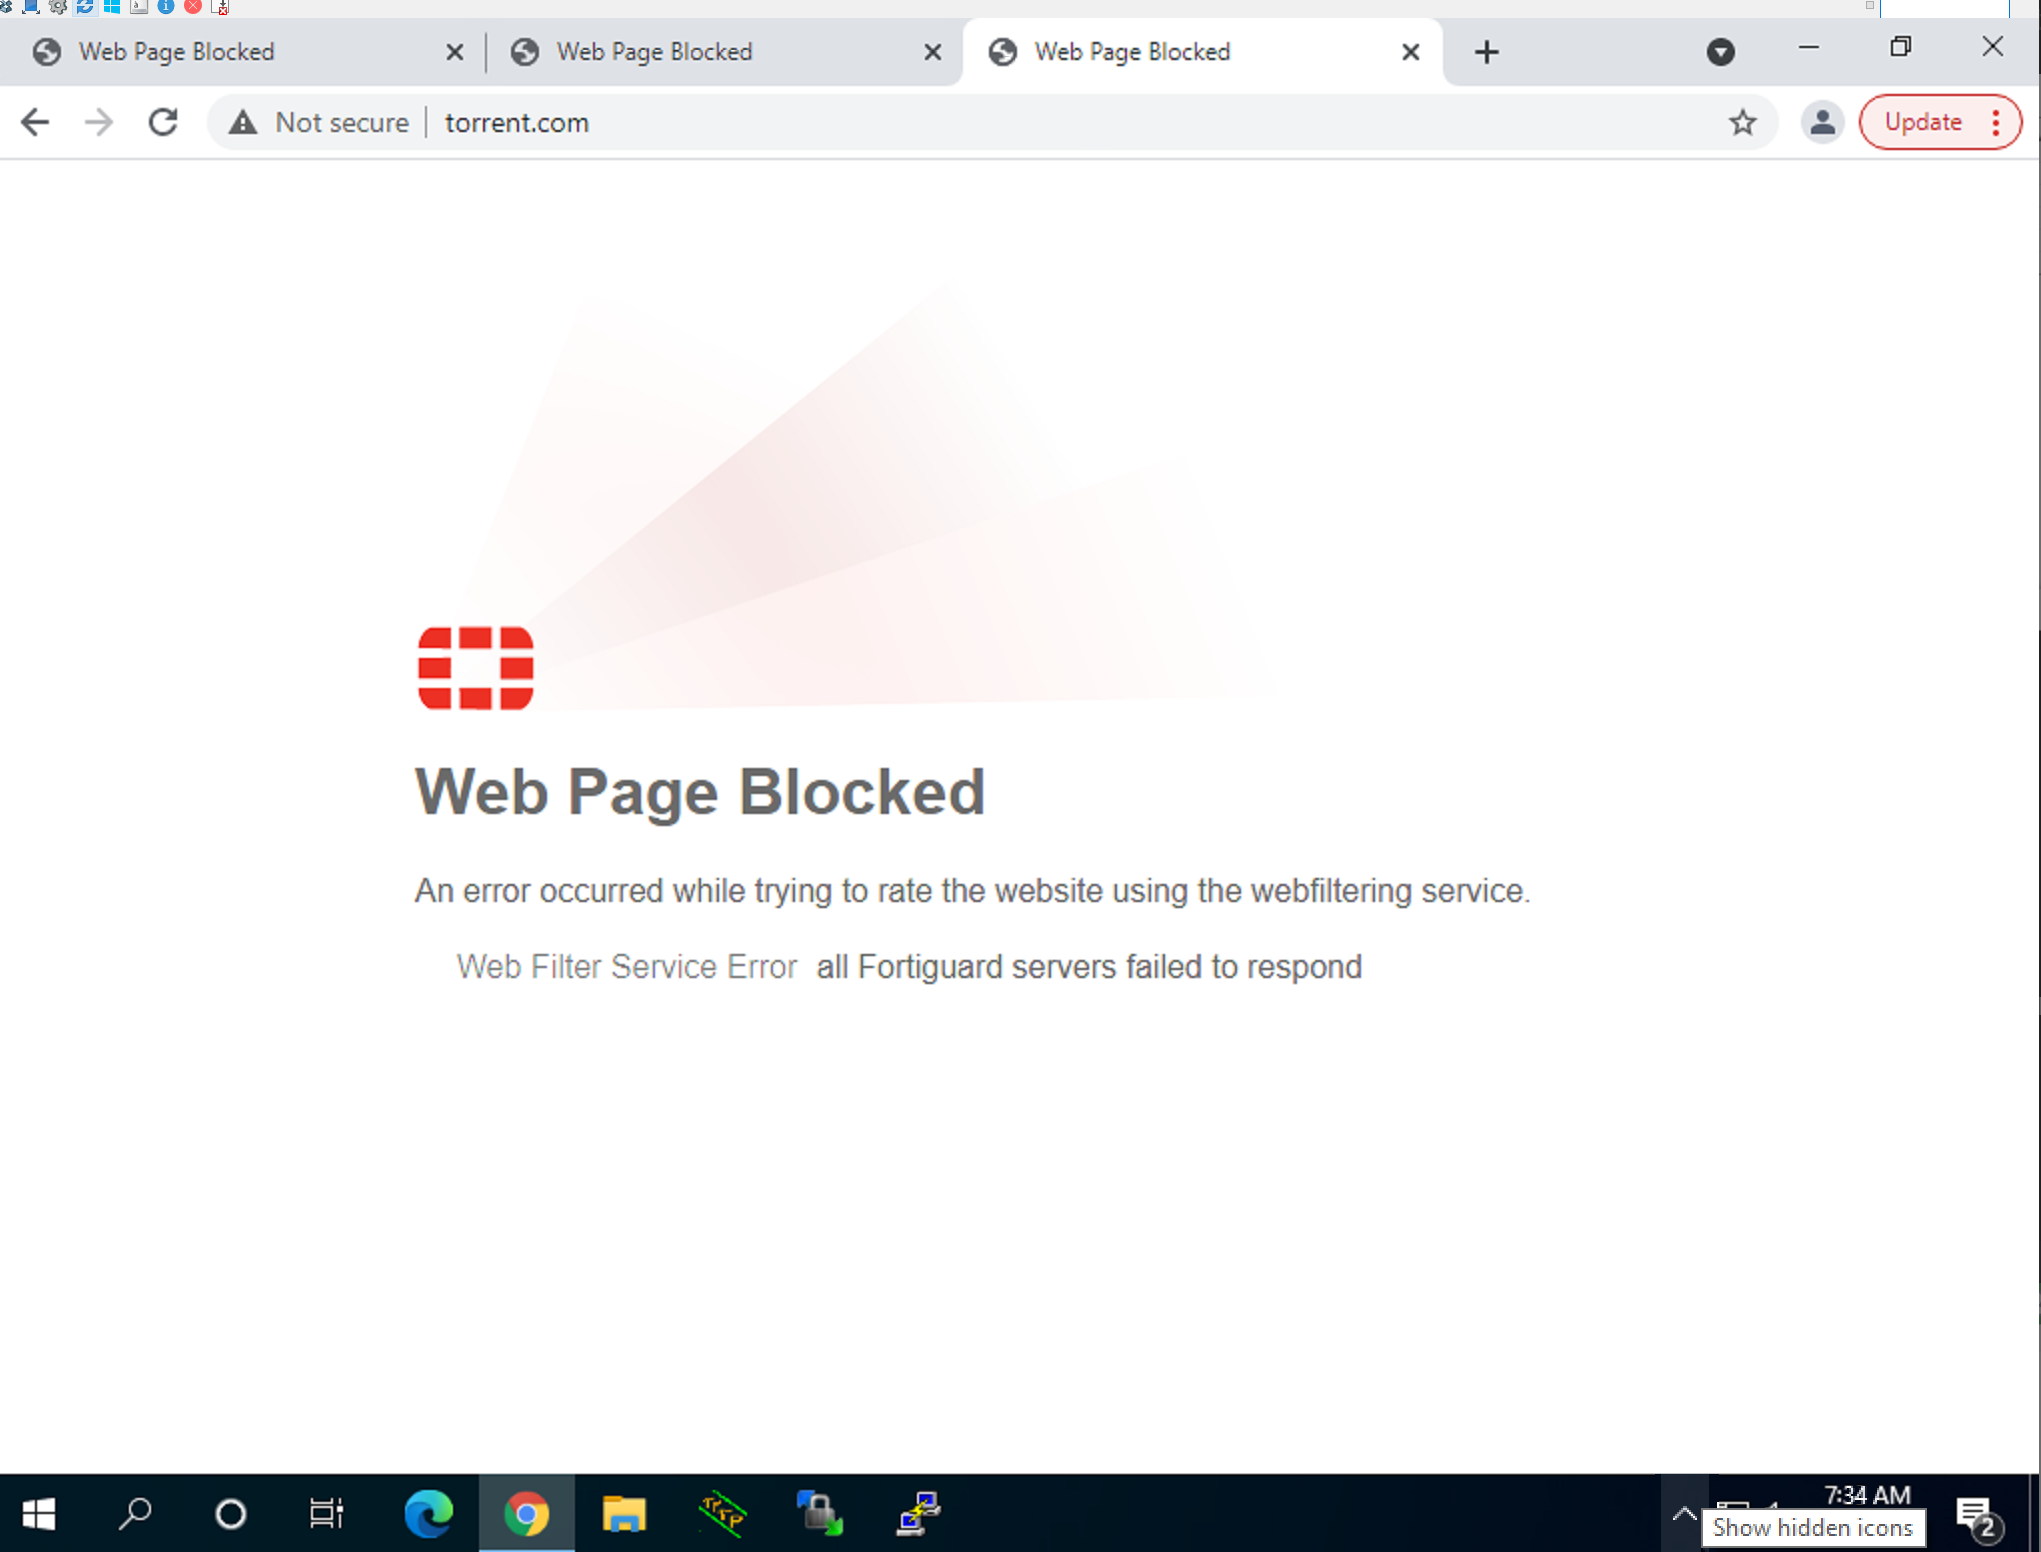
4. DNS Filter
- Purpose: DNS Filter blocks access to malicious or inappropriate domains by filtering DNS requests, providing an additional layer of security against phishing attacks, malware distribution, and access to undesirable content.
- Features: Domain filtering, domain reputation-based blocking, DNS sinkholing, and integration with threat intelligence feeds.
Demo:
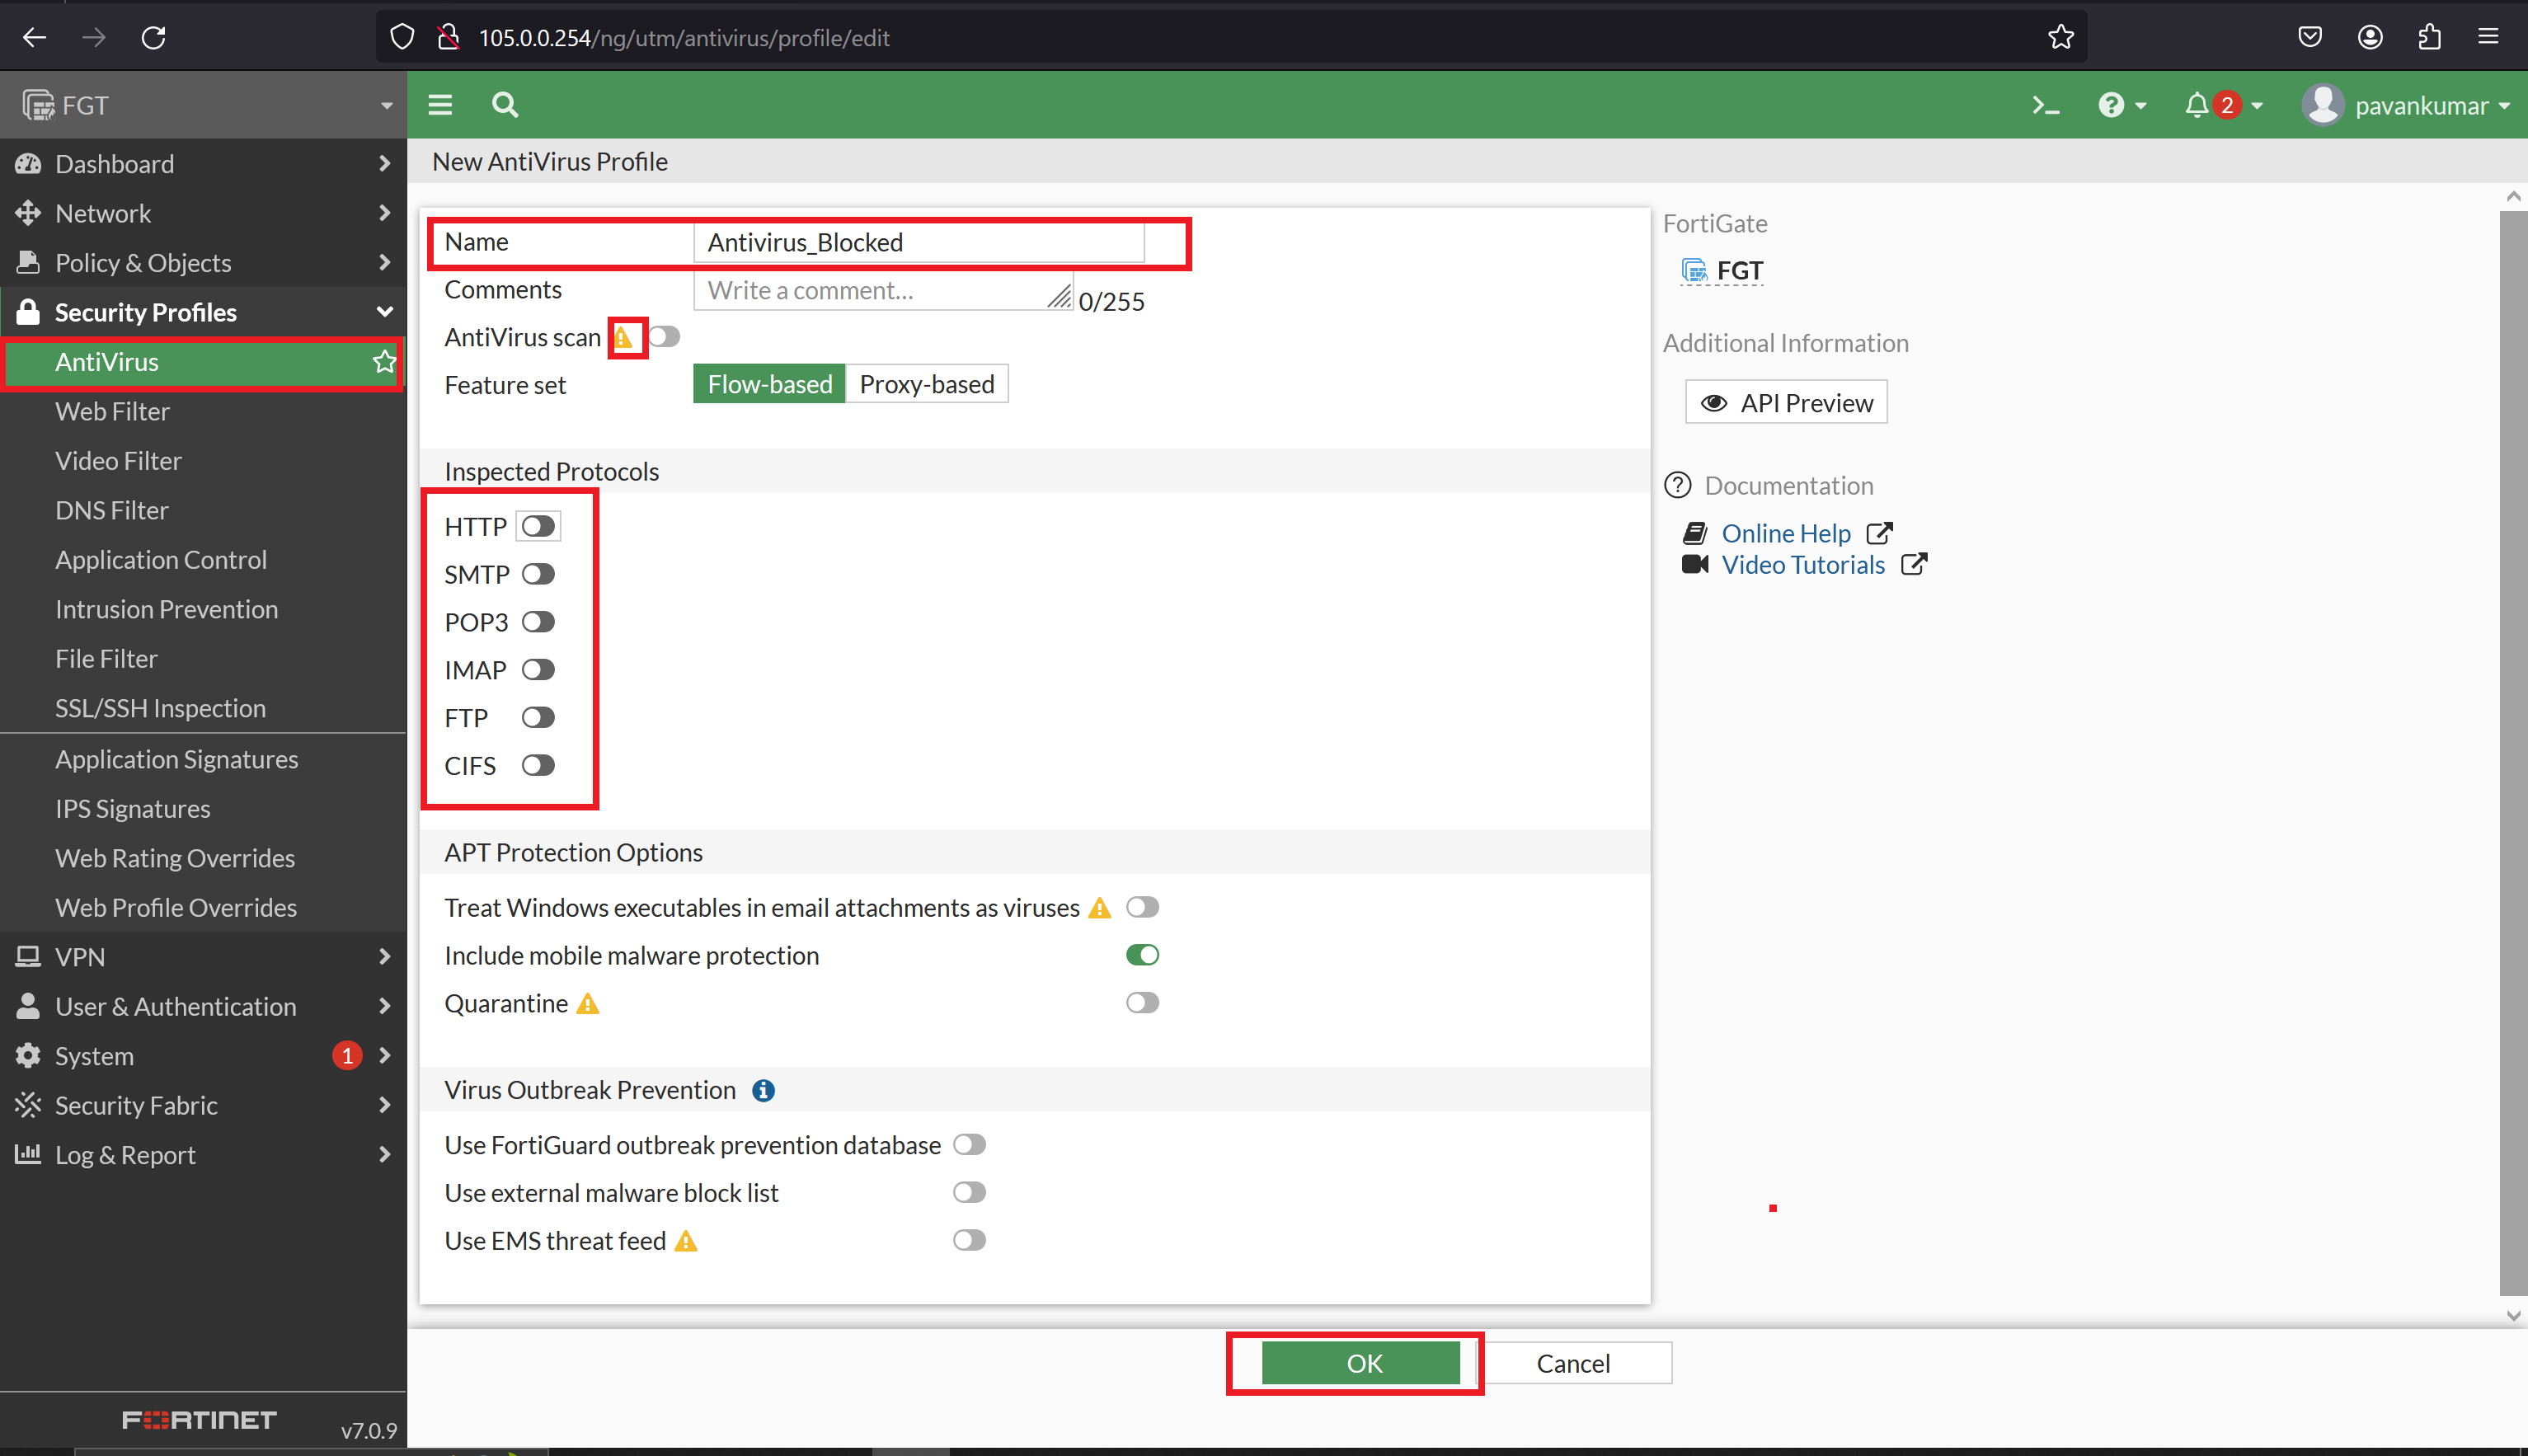
5. Antivirus
- Purpose: Antivirus scans network traffic for known malware, viruses, and other malicious content, protecting endpoints and networks from infection.
- Features: Real-time antivirus scanning, heuristic analysis, signature-based detection, quarantine and removal of infected files, and automatic updates of antivirus definitions.
For Antivirus Filtering we need valid License.
6. Intrusion Prevention
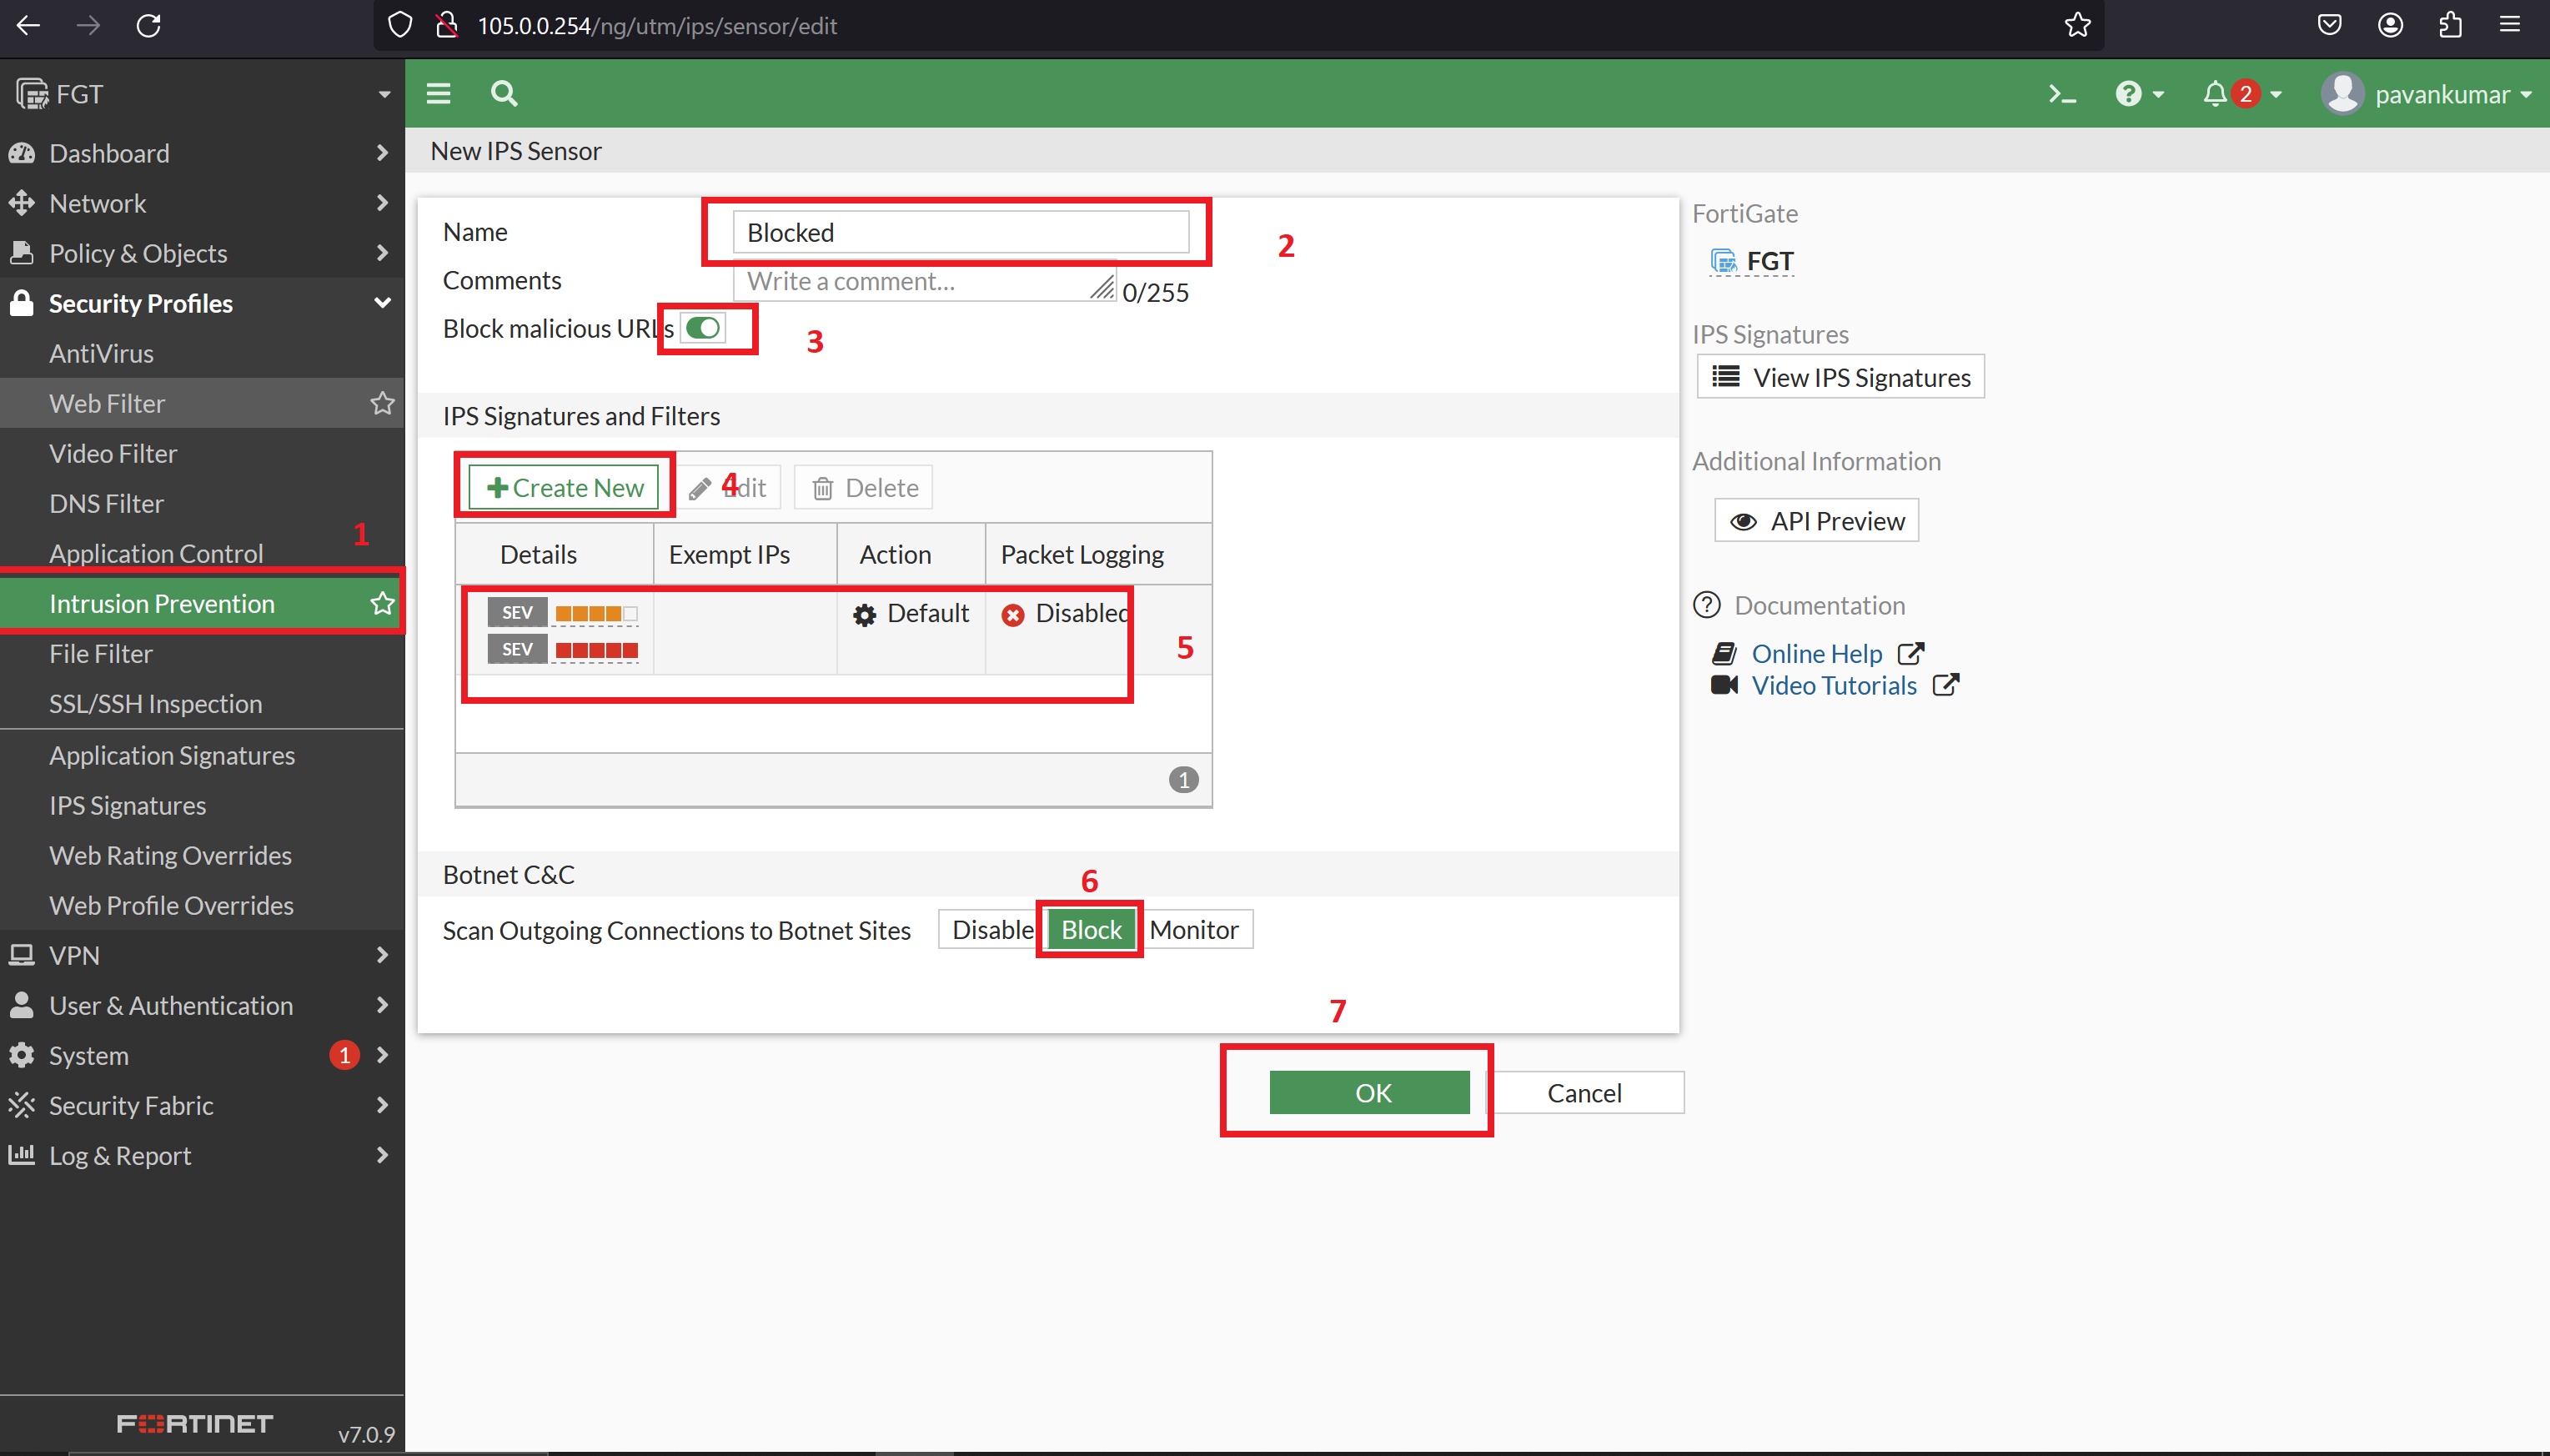
- Purpose: Intrusion Prevention System (IPS) identifies and blocks network-based attacks, including exploits, vulnerabilities, and malicious traffic patterns, to prevent unauthorized access and data breaches.
- Features: Signature-based detection, anomaly-based detection, protocol inspection, traffic anomaly detection, and blocking of known attack vectors.
Demo:
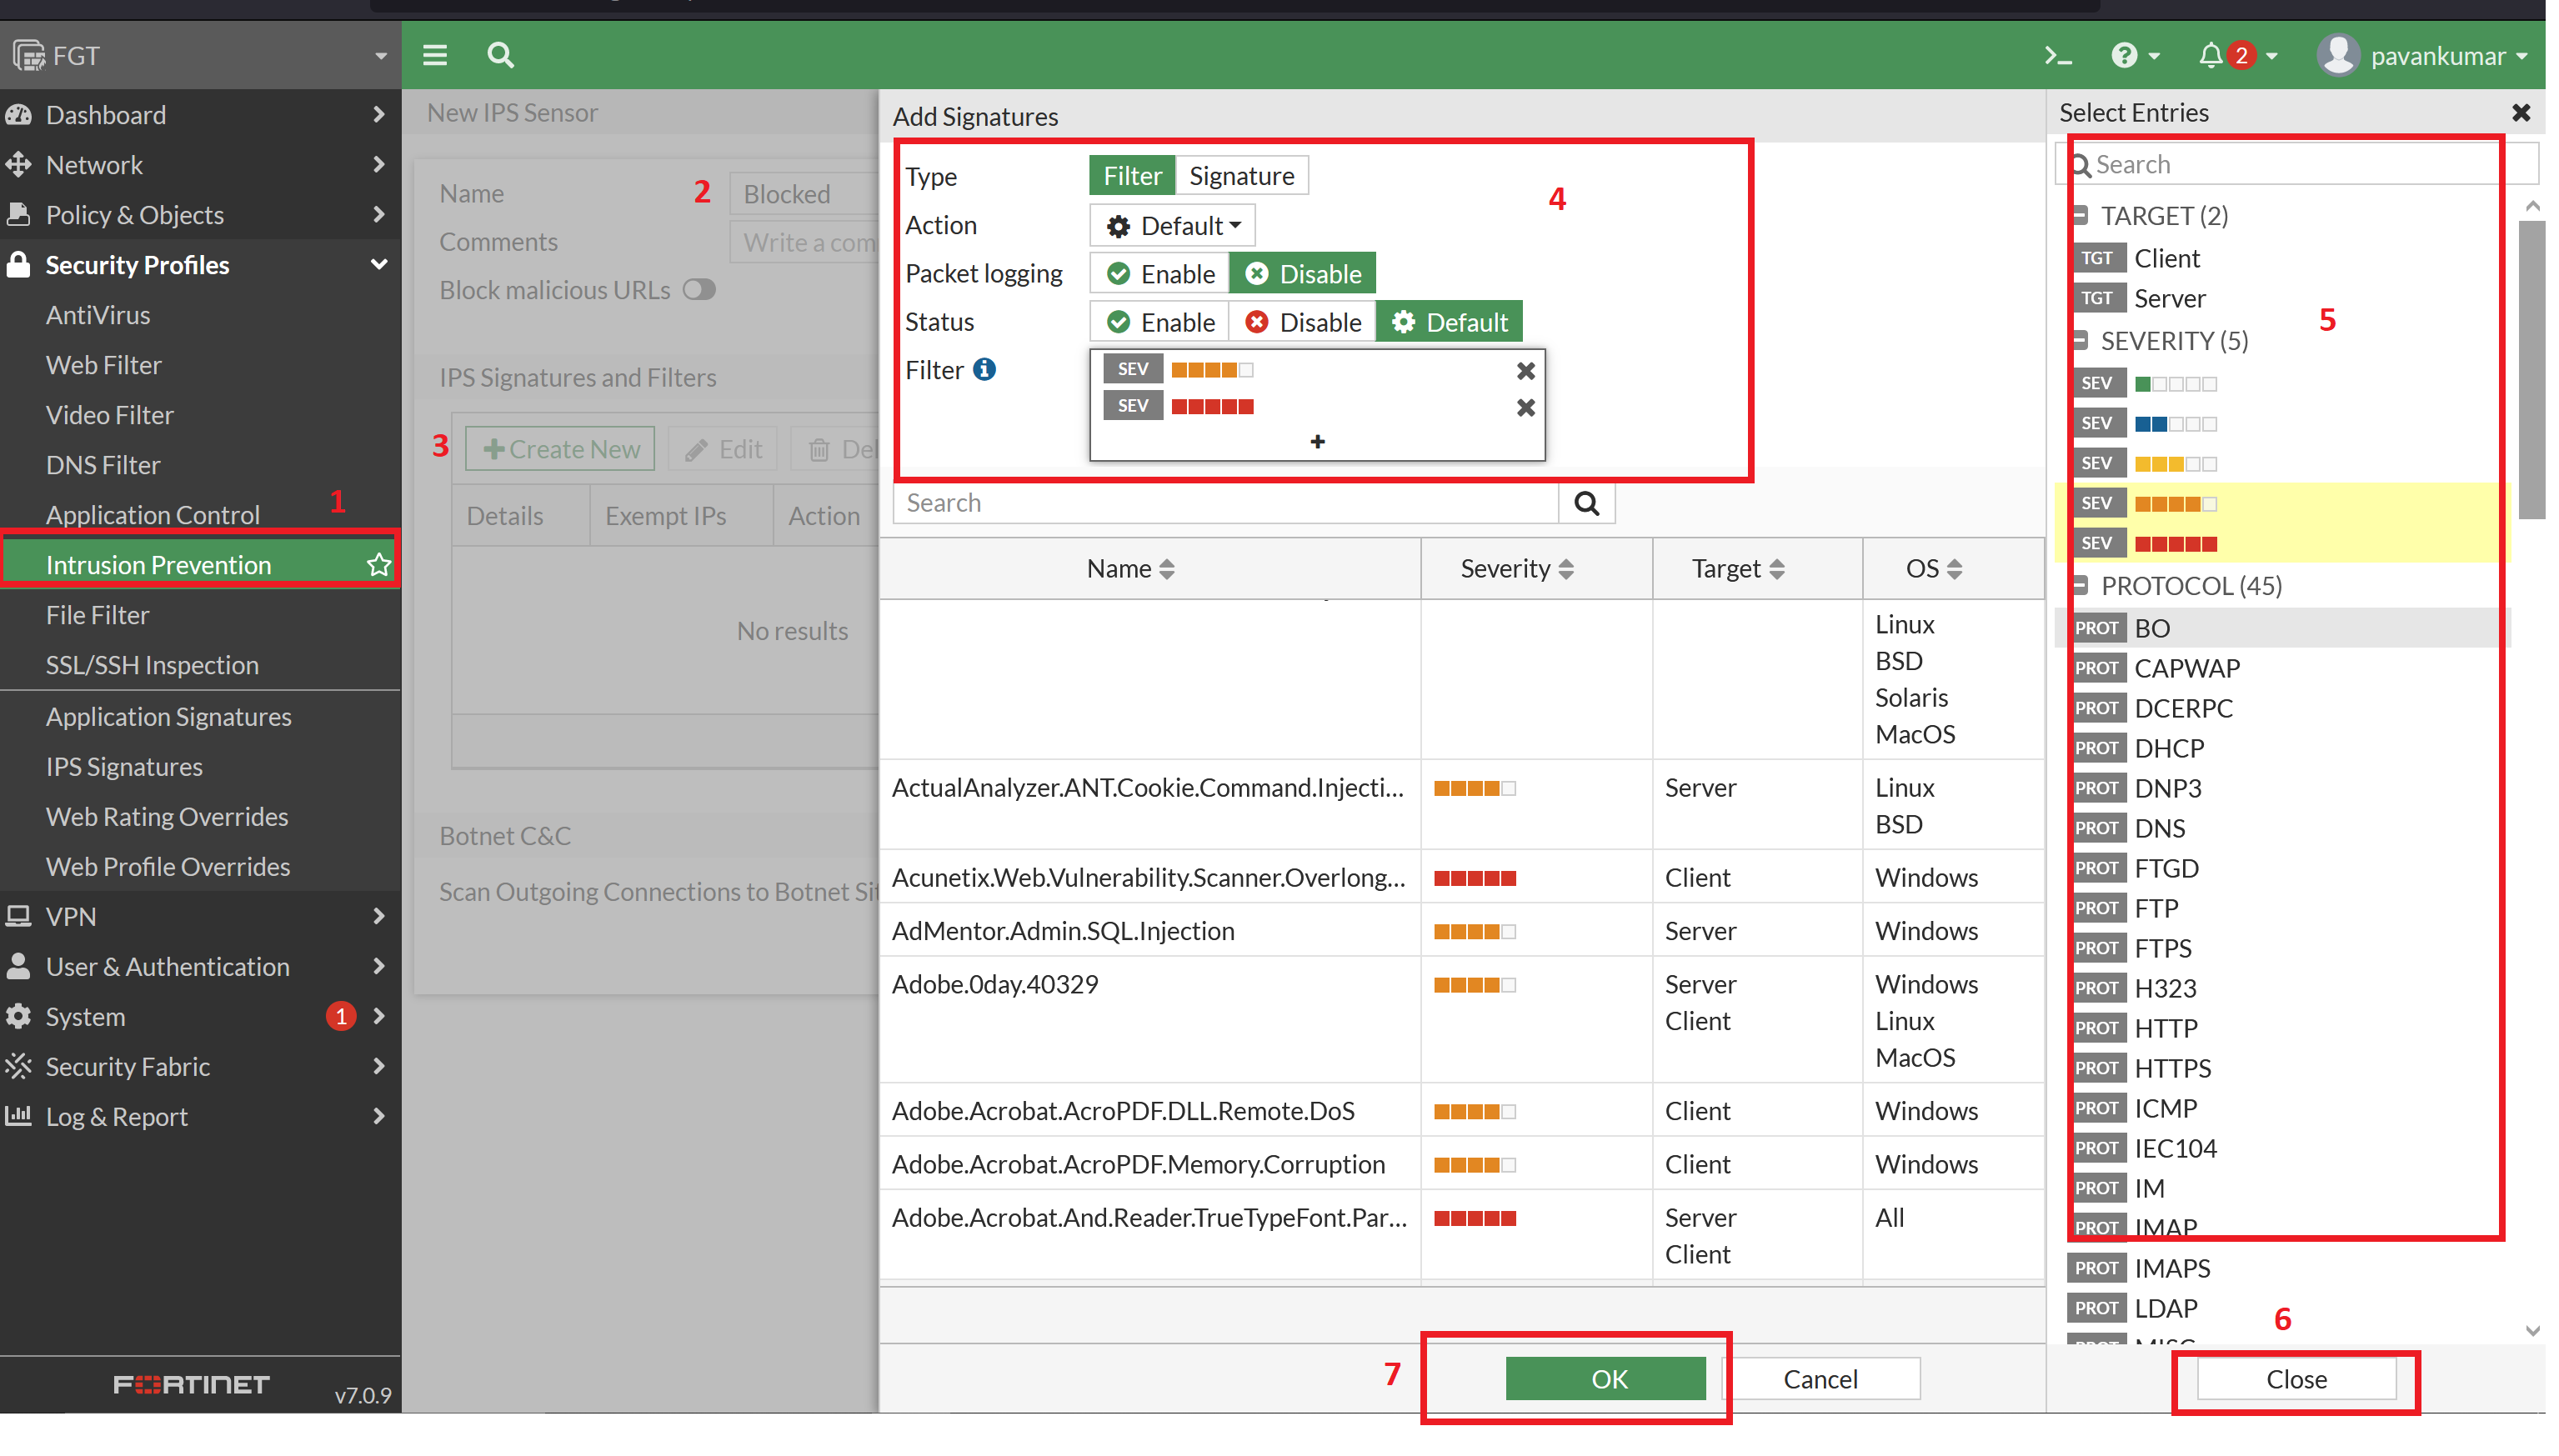
Apply it, as previous we added to required Policy or Zone.
7. Video Filter
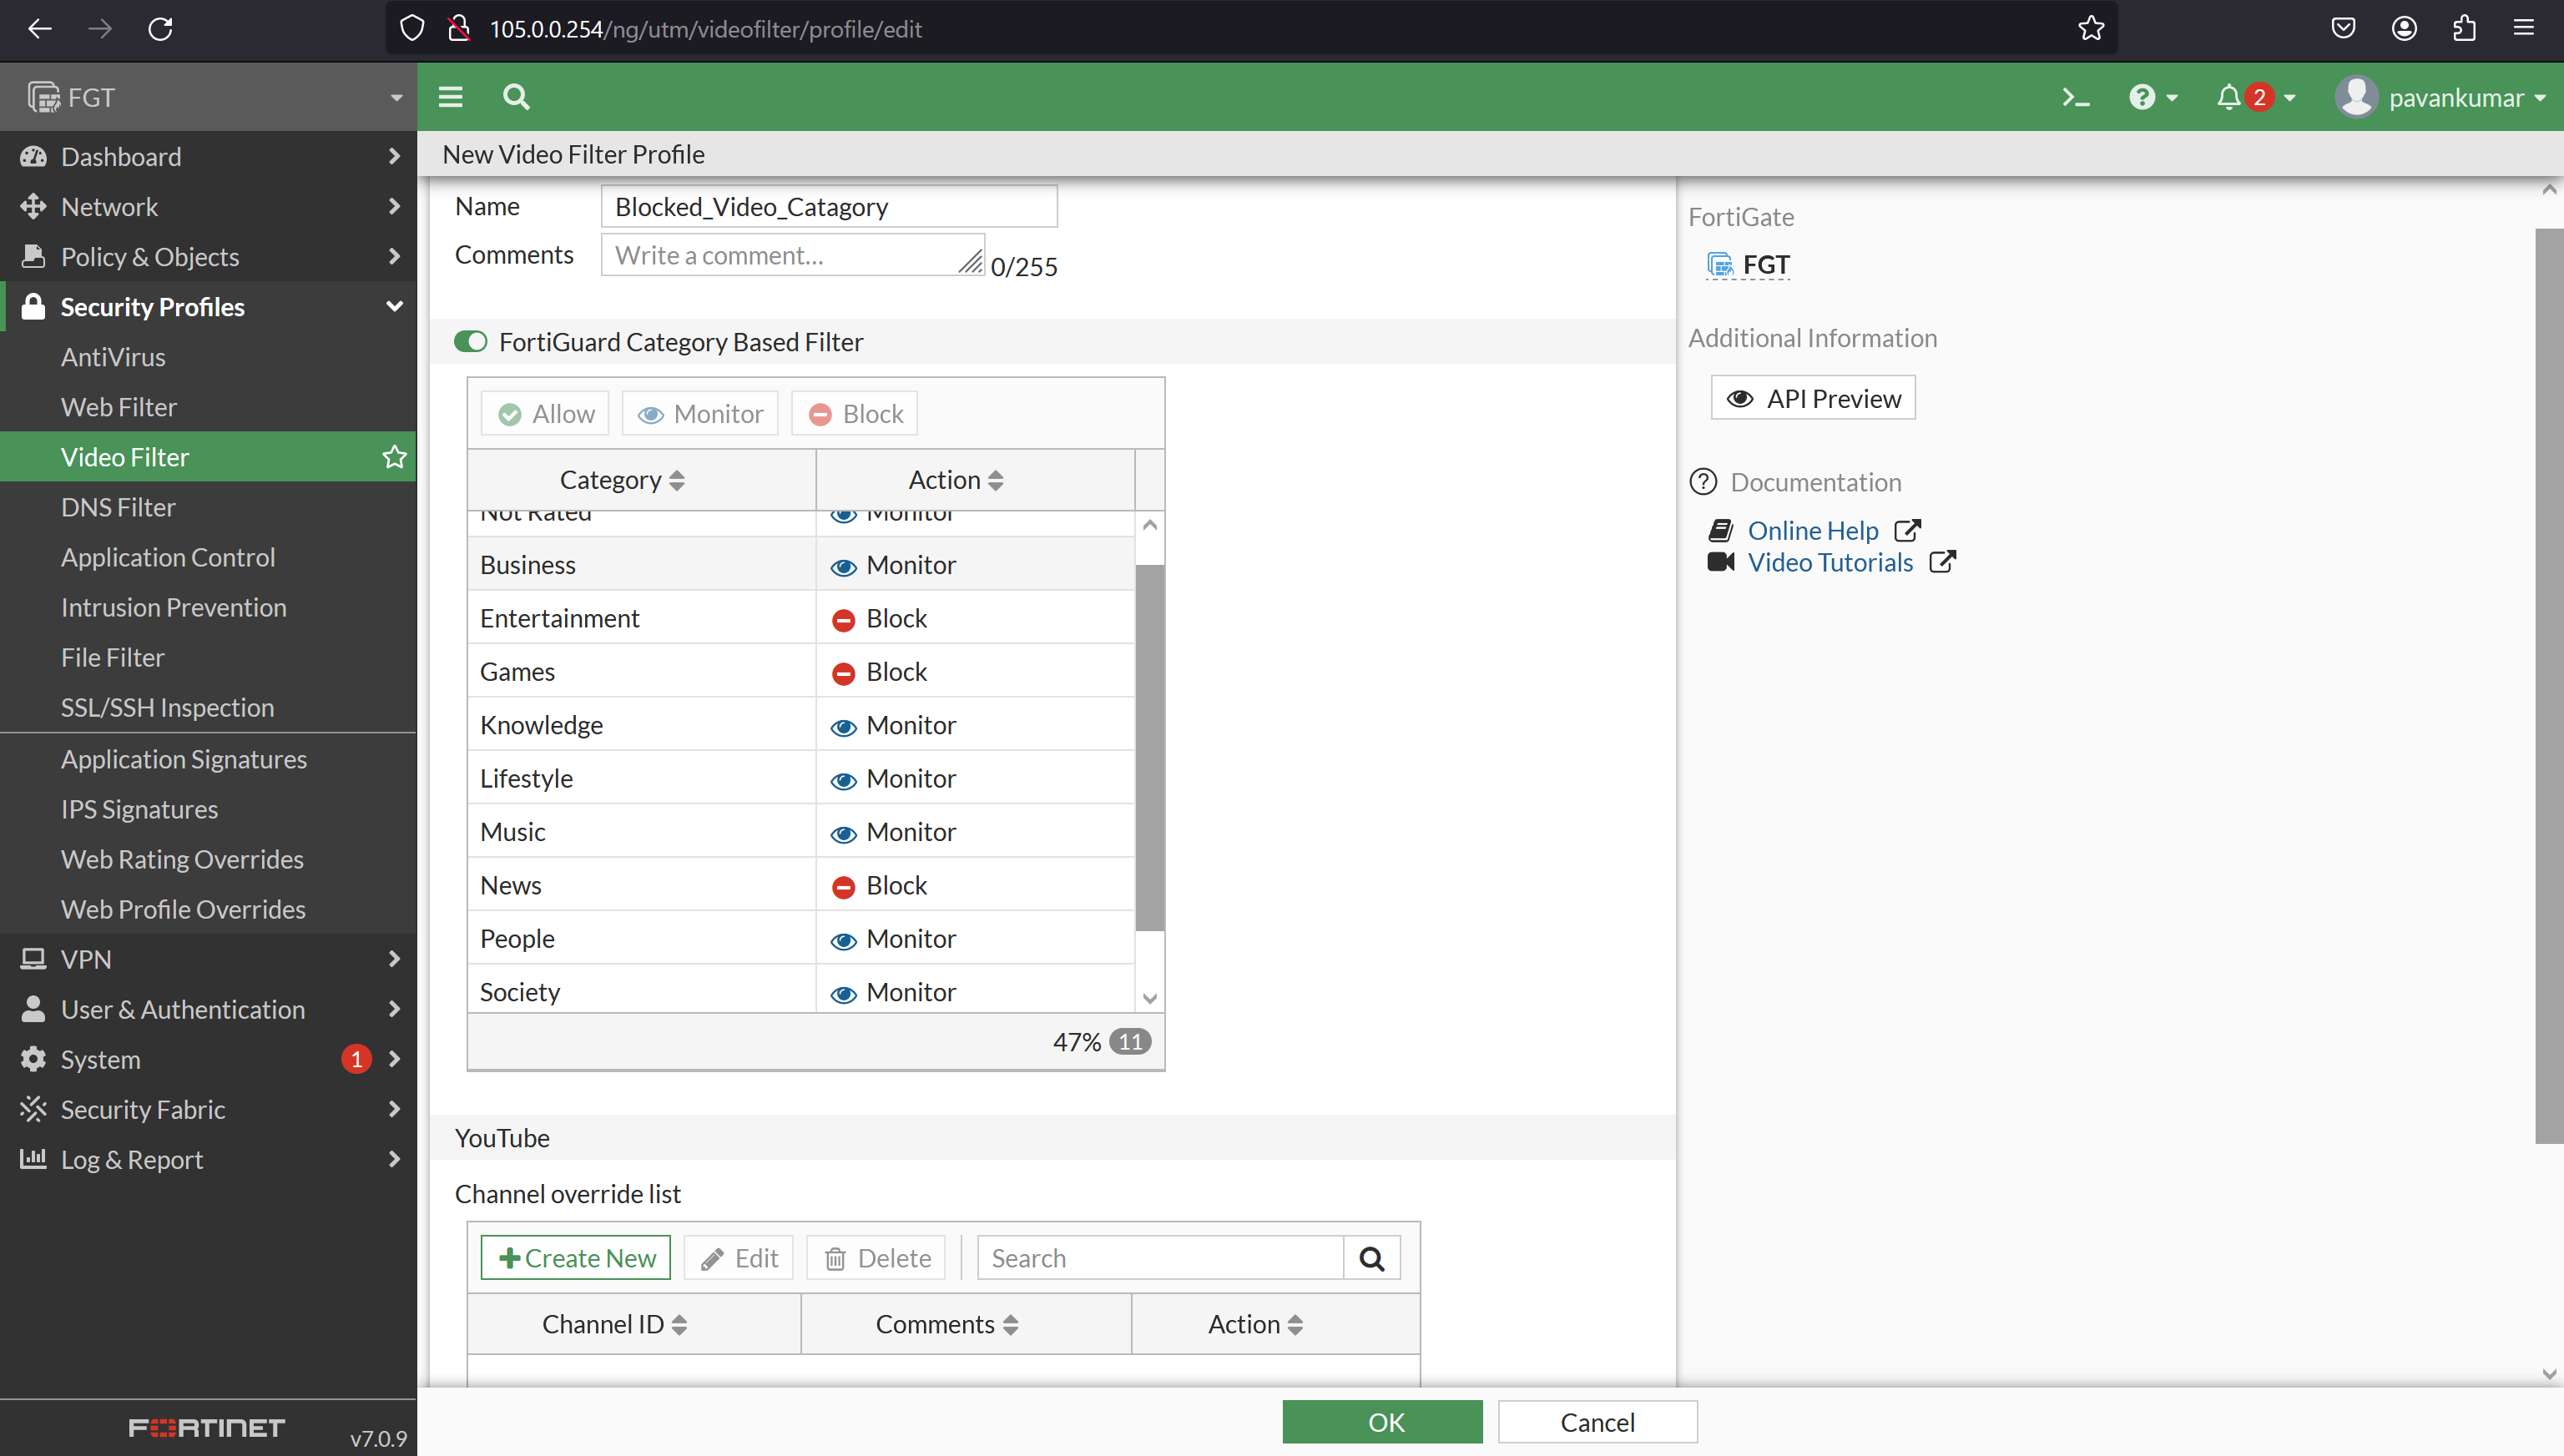
- Purpose: Video Filter controls access to streaming video content based on categories, URLs, or specific content types, helping to optimize bandwidth usage and enforce acceptable use policies.
- Features: Video streaming control, bandwidth management for video content, content filtering based on video categories, and visibility into video traffic usage.
Demo:
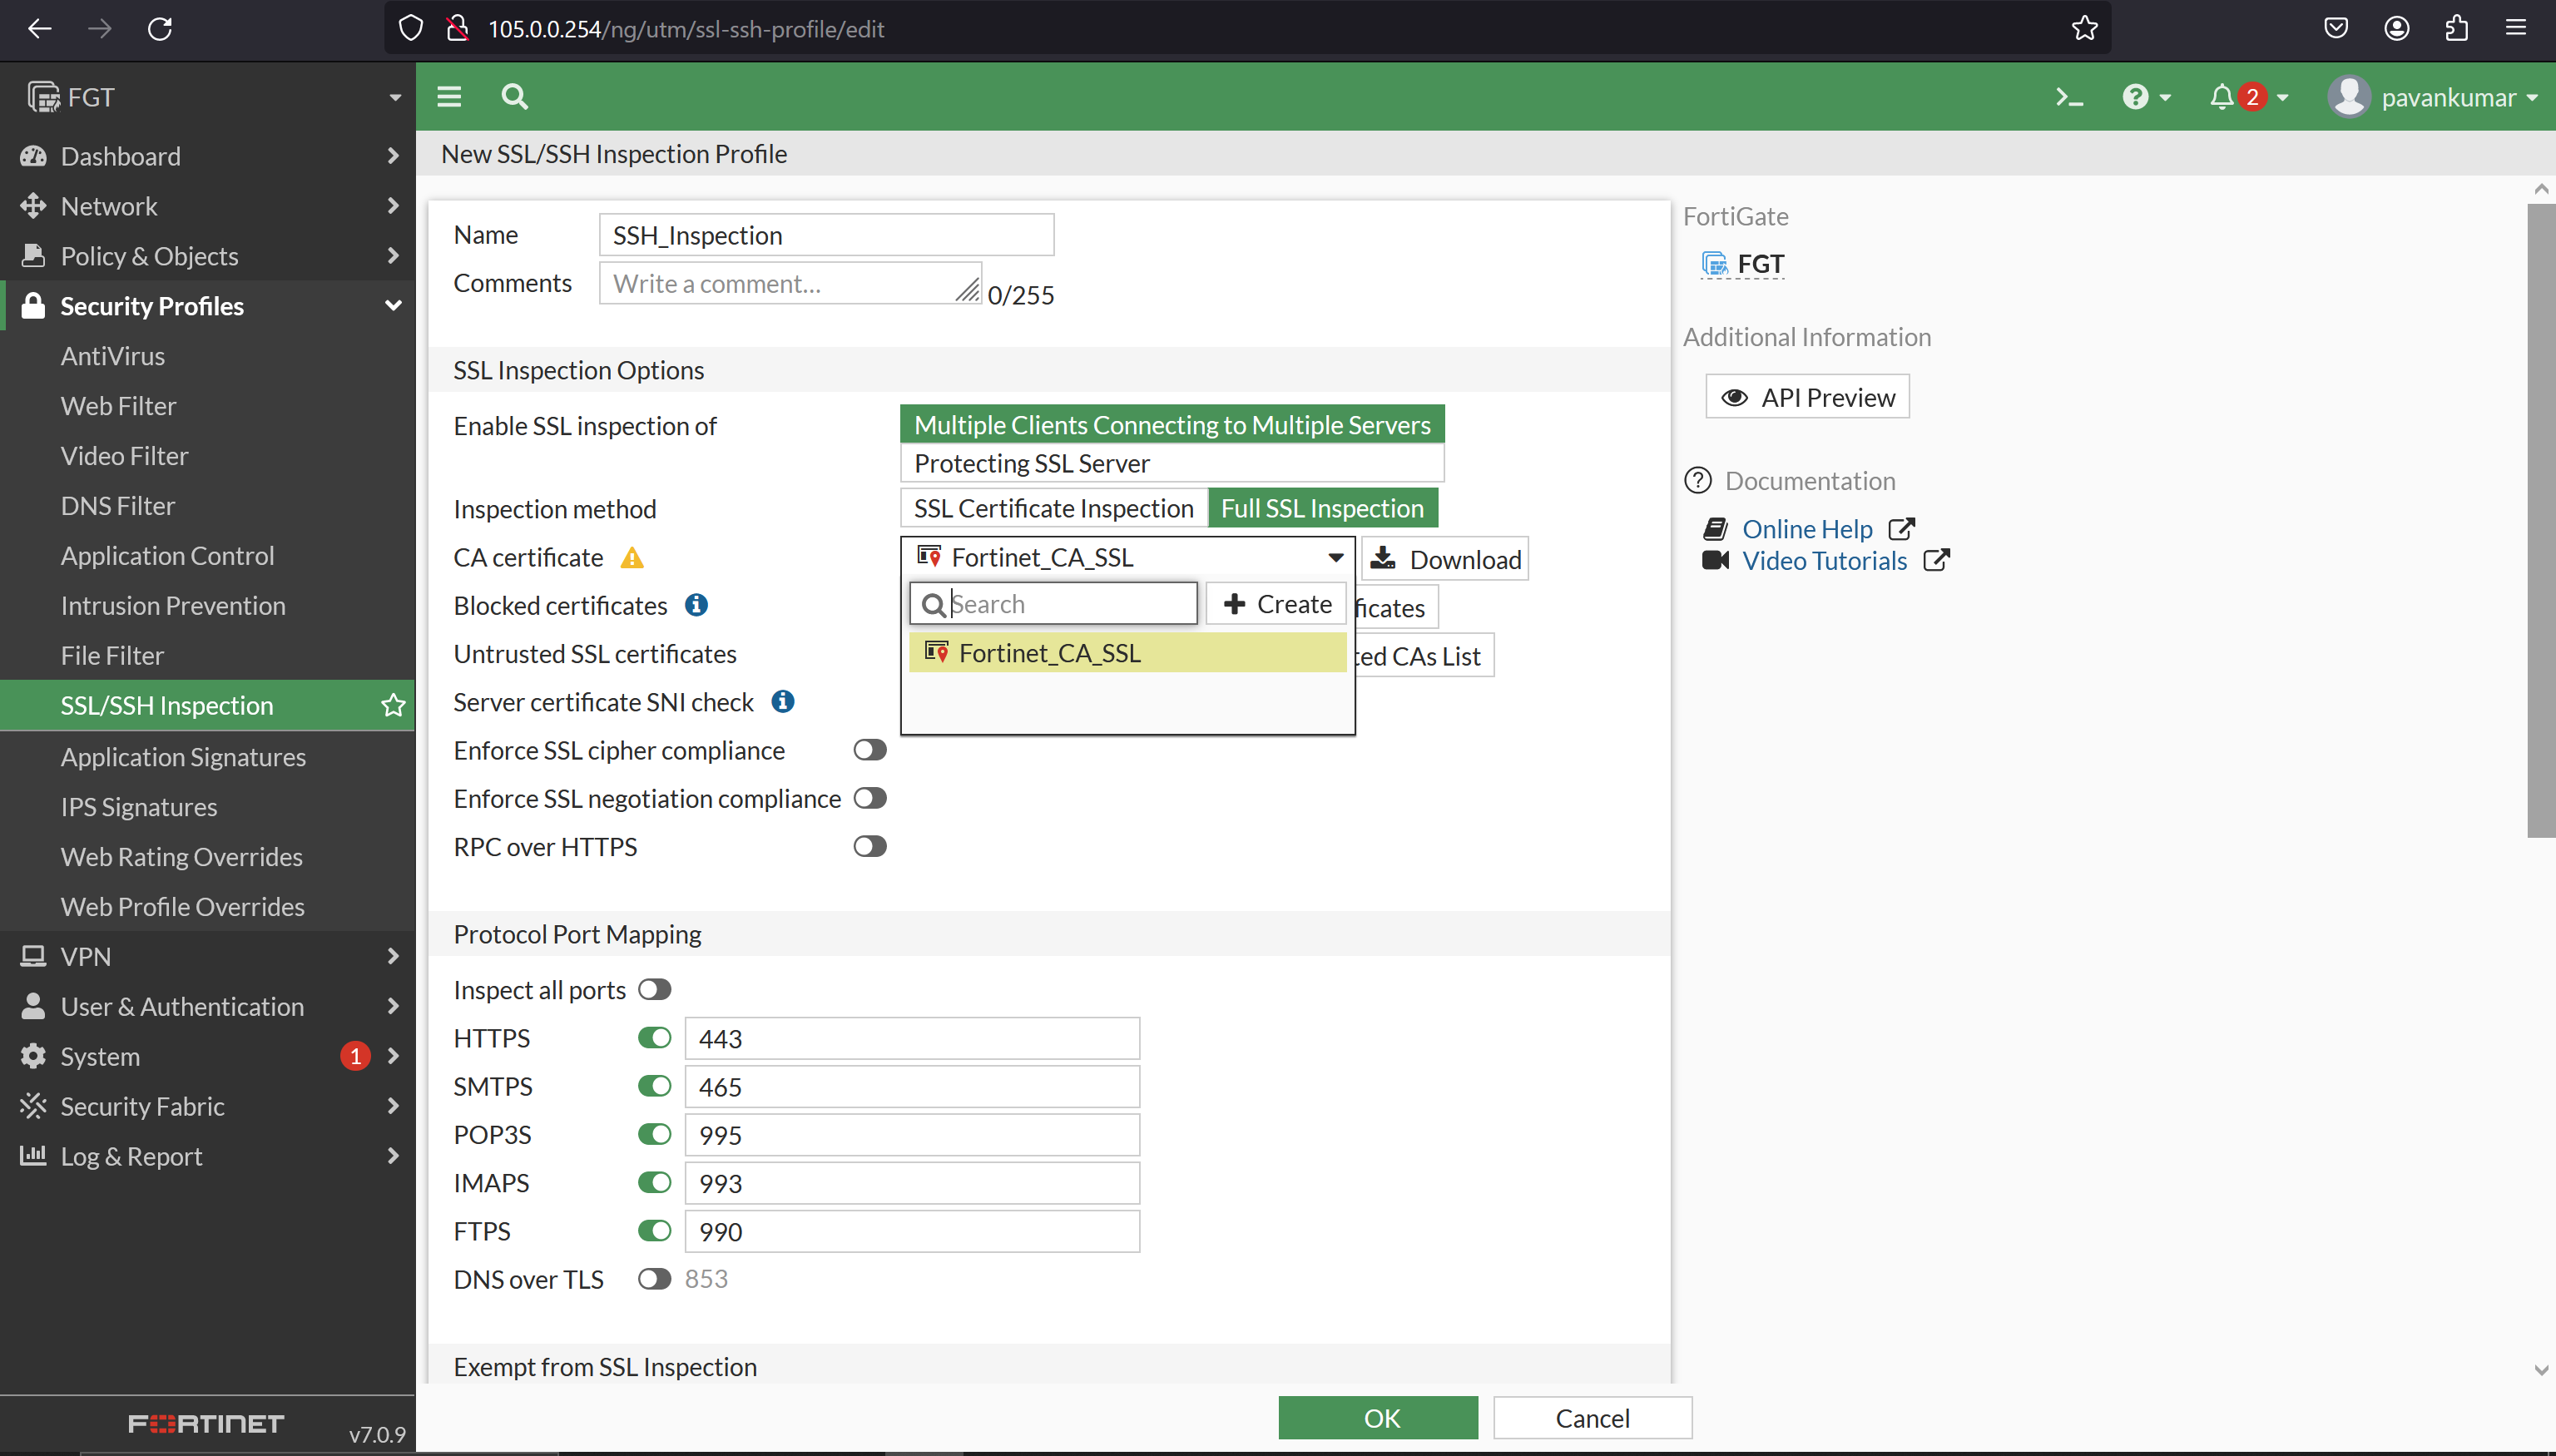
8. SSL/SSH Inspection Profile
- Purpose: SSL/SSH Inspection decrypts and inspects encrypted SSL/TLS or SSH traffic to detect and prevent threats hidden within encrypted communications, providing visibility into encrypted traffic and enforcing security policies.
- Features: SSL/TLS decryption, certificate inspection, SSL handshake validation, encryption protocol enforcement, and application control for decrypted traffic.
Demo:
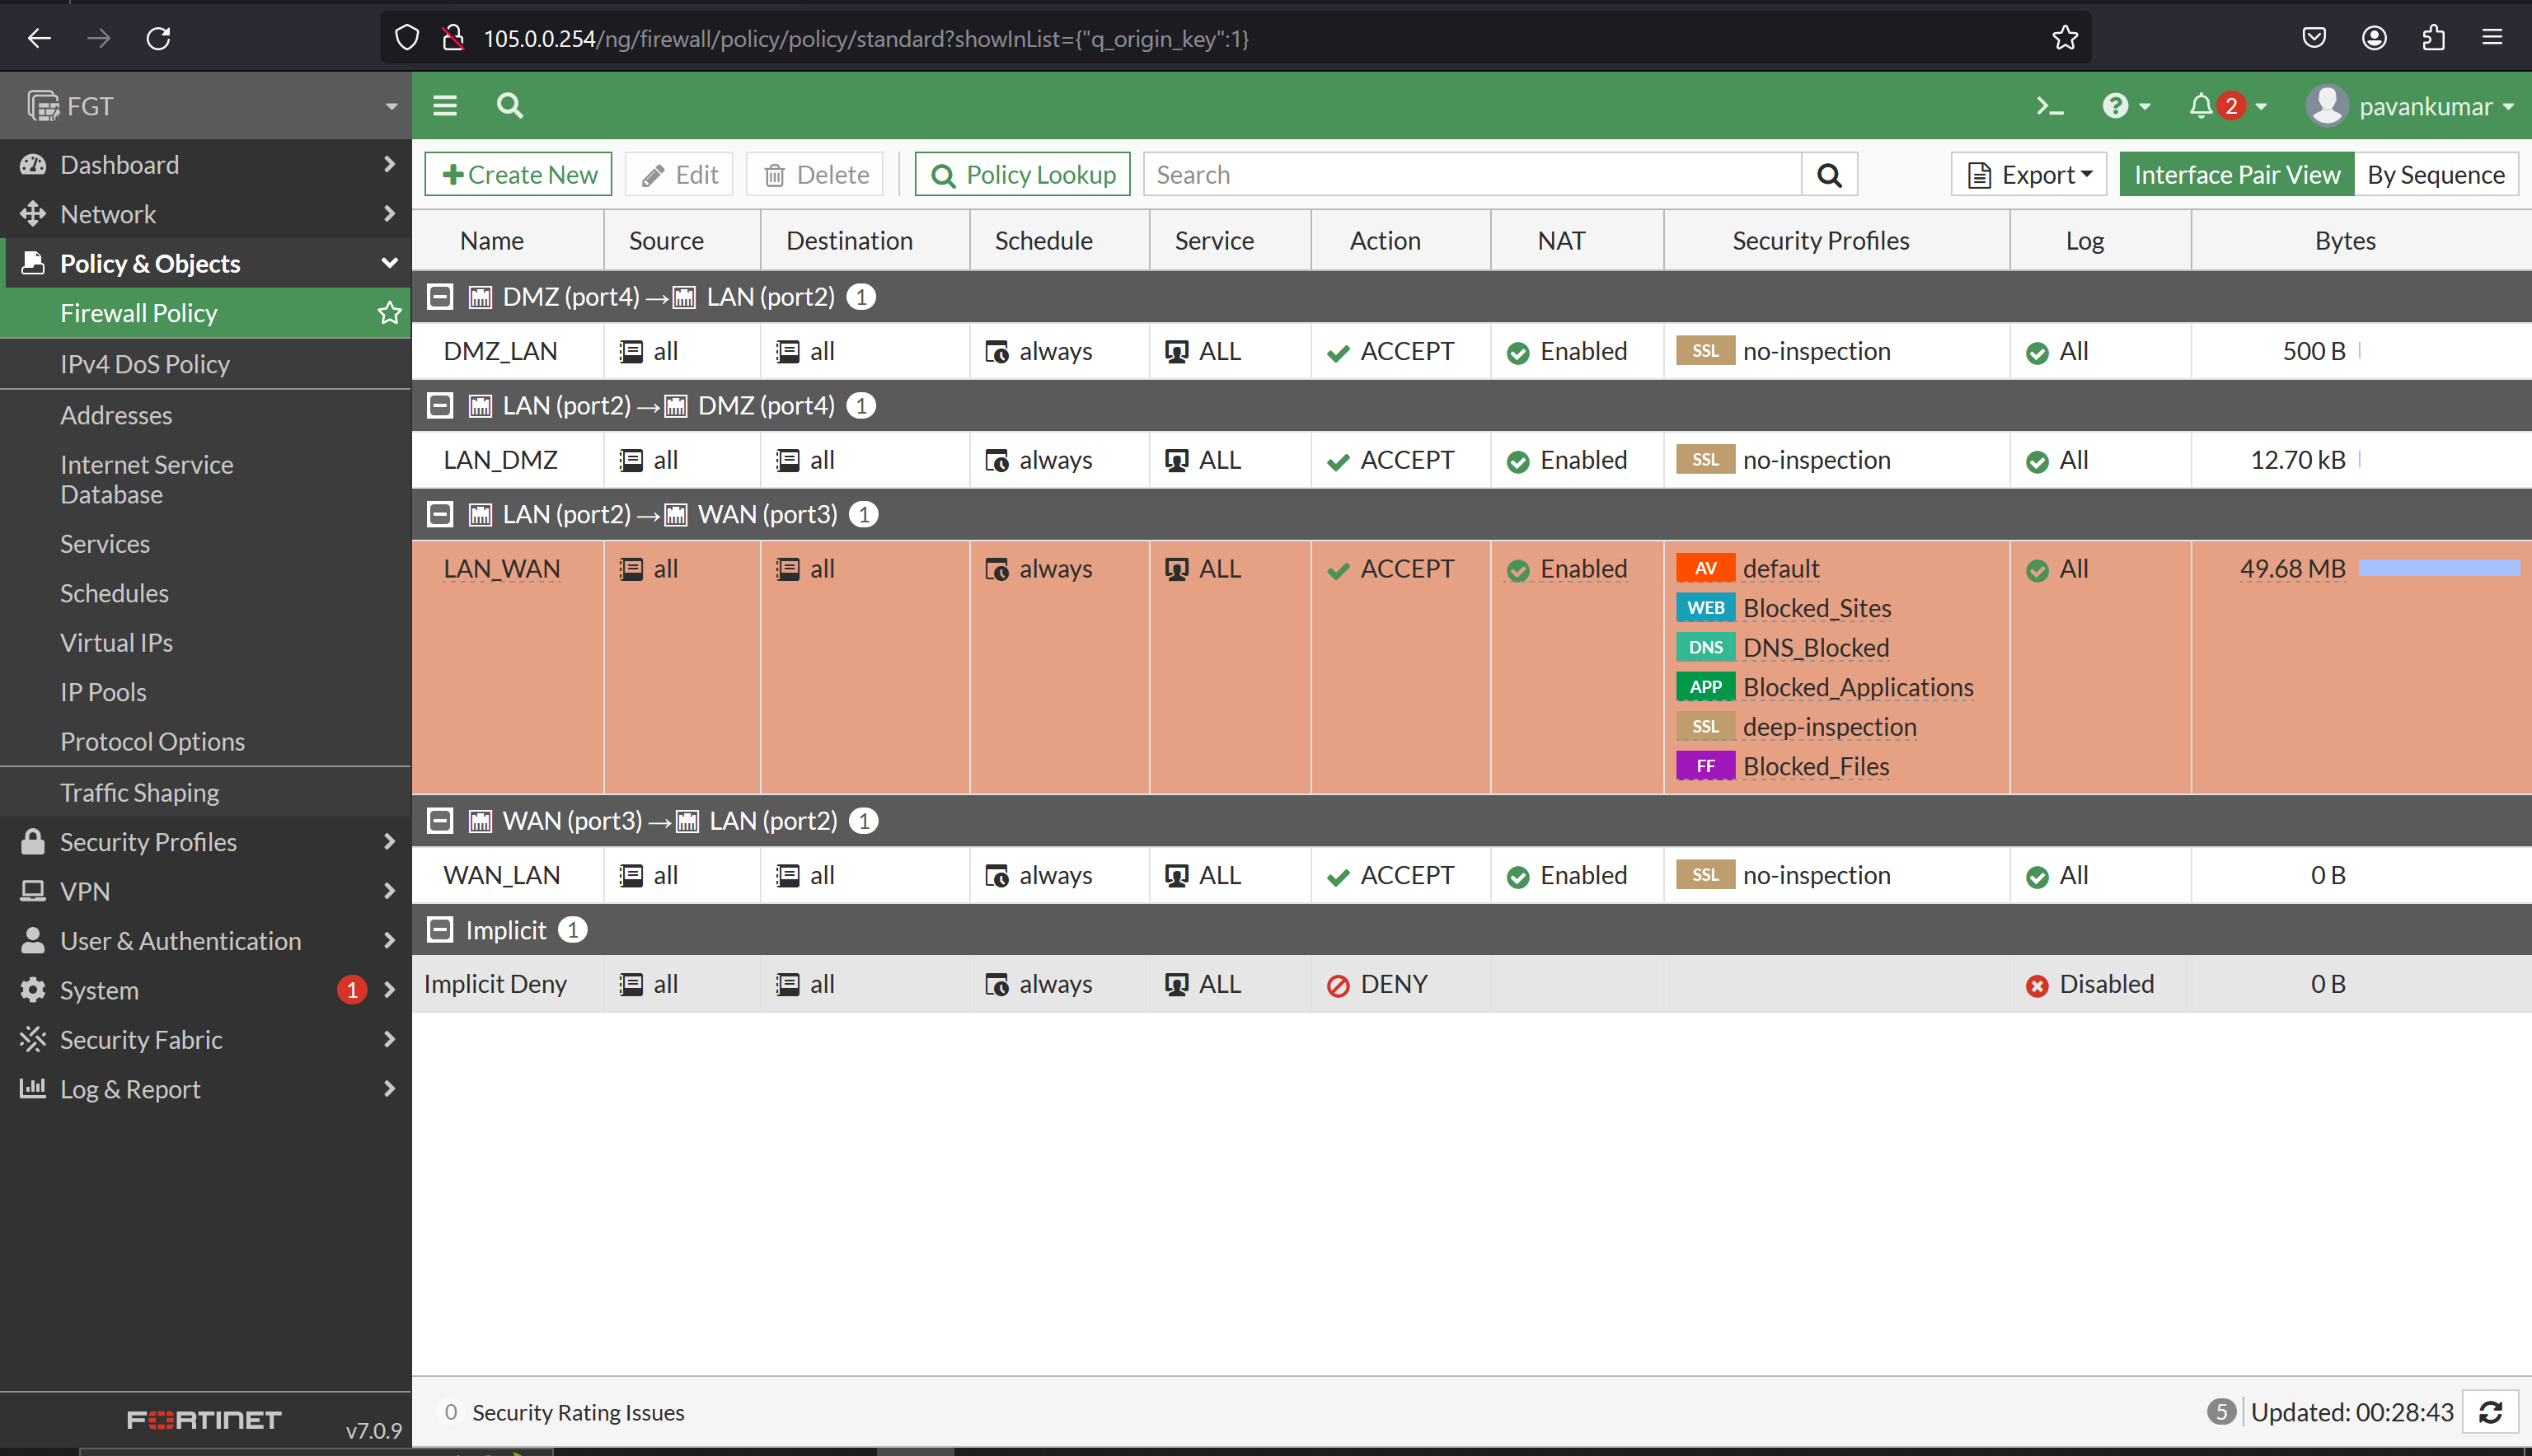
The Policy has configured LAN_WAN traffic.
Summary:
Module 5 of the FortiGate firewall course focuses on security profiles, which are essential components for safeguarding networks against various cyber threats and enforcing security policies. Here’s a summary of the security profiles covered:
- Application Control: Allows administrators to monitor and control the usage of applications within the network, helping to identify and block unauthorized or risky applications.
- Web Filtering: Enables administrators to control access to websites based on categories, URLs, or specific content types, providing protection against malicious or inappropriate web content.
- File Filter: Scans file transfers for malware, malicious content, and unauthorized file types, helping to prevent the spread of malware and enforce data loss prevention policies.
- DNS Filter: Blocks access to malicious or inappropriate domains by filtering DNS requests, providing an additional layer of security against phishing attacks, malware distribution, and access to undesirable content.
- Antivirus: Scans network traffic for known malware, viruses, and other malicious content, protecting endpoints and networks from infection.
- Intrusion Prevention: Identifies and blocks network-based attacks, including exploits, vulnerabilities, and malicious traffic patterns, to prevent unauthorized access and data breaches.
- Video Filter: Controls access to streaming video content based on categories, URLs, or specific content types, helping to optimize bandwidth usage and enforce acceptable use policies.
- SSL/SSH Inspection Profile: Decrypts and inspects encrypted SSL/TLS or SSH traffic to detect and prevent threats hidden within encrypted communications, providing visibility into encrypted traffic and enforcing security policies.
By understanding and configuring these security profiles, administrators can implement comprehensive threat protection measures and enforce security policies to safeguard their networks effectively against cyber threats.
MODULE 6
Logging and Monitoring
Table of contents:
- Understanding Log severity levels
- Understanding Logs & Sublog types
- Understanding Log structures
- Configuring log settings
- Redirect logs to Syslog & SNMP
- Fortigate One-Arm Sniffer & SPAN
FortiGate Firewall Logging and Monitoring
Logging and monitoring are essential components of network security, providing visibility into network activity, detecting threats, and troubleshooting issues. FortiGate firewall offers comprehensive logging and monitoring capabilities to help administrators effectively manage their network environments.
1. Understanding Log Severity Levels
Log severity levels indicate the importance or severity of logged events. FortiGate firewall categorizes logs into different severity levels, including:
- Emergency: System is unusable.
- Alert: Immediate action is required.
- Critical: Critical conditions.
- Error: Error conditions.
- Warning: Warning conditions.
- Notice: Normal but significant condition.
- Informational: Informational messages.
- Debug: Debug-level messages.
2. Understanding Logs & Sublog Types
FortiGate firewall generates various types of logs to capture different aspects of network activity and security events. Common log types include:
- Traffic Logs: Capture information about traffic passing through the firewall, including source and destination IP addresses, ports, protocols, and actions taken.
- Event Logs: Record system events, such as configuration changes, system reboots, and HA failovers.
- Security Logs: Document security-related events, including intrusion prevention system (IPS) alerts, antivirus detections, and web filtering violations.
3. Understanding Log Structures
Logs generated by the FortiGate firewall follow a structured format, typically including the following information:
- Timestamp: Date and time when the event occurred.
- Source IP: IP address of the source device or user.
- Destination IP: IP address of the destination device or resource.
- Action: Action taken by the firewall (e.g., allow, deny).
- Severity: Severity level of the event.
- Description: Description of the event or log entry.
- Event Type: Type of event (e.g., traffic, security, system).
4. Configuring Log Settings
Administrators can configure log settings on the FortiGate firewall to customize logging behavior and control which events are logged. Key configuration options include:
- Log Filters: Define criteria for filtering logs based on specific attributes, such as severity level, source/destination IP addresses, or event type.
- Log Storage: Specify the maximum log file size, retention period, and storage location for logs.
- Log Rotation: Configure log rotation settings to manage log file size and prevent disk space exhaustion.
5. Redirect Logs to Syslog & SNMP
FortiGate firewall supports sending logs to external logging and monitoring systems via Syslog and SNMP protocols. This allows administrators to centralize log management and integrate firewall logs with existing monitoring platforms. Key steps include:
- Syslog Configuration: Configure the firewall to send logs to a Syslog server by specifying the server IP address, port, and logging format.
- SNMP Configuration: Set up SNMP traps to send log notifications to an SNMP management system for real-time monitoring and alerting.
Demo:
Sample Log data:
memory-traffic-forward-2024-04-22_0036.log
LAN_WAN Forwarded Traffic Logs:
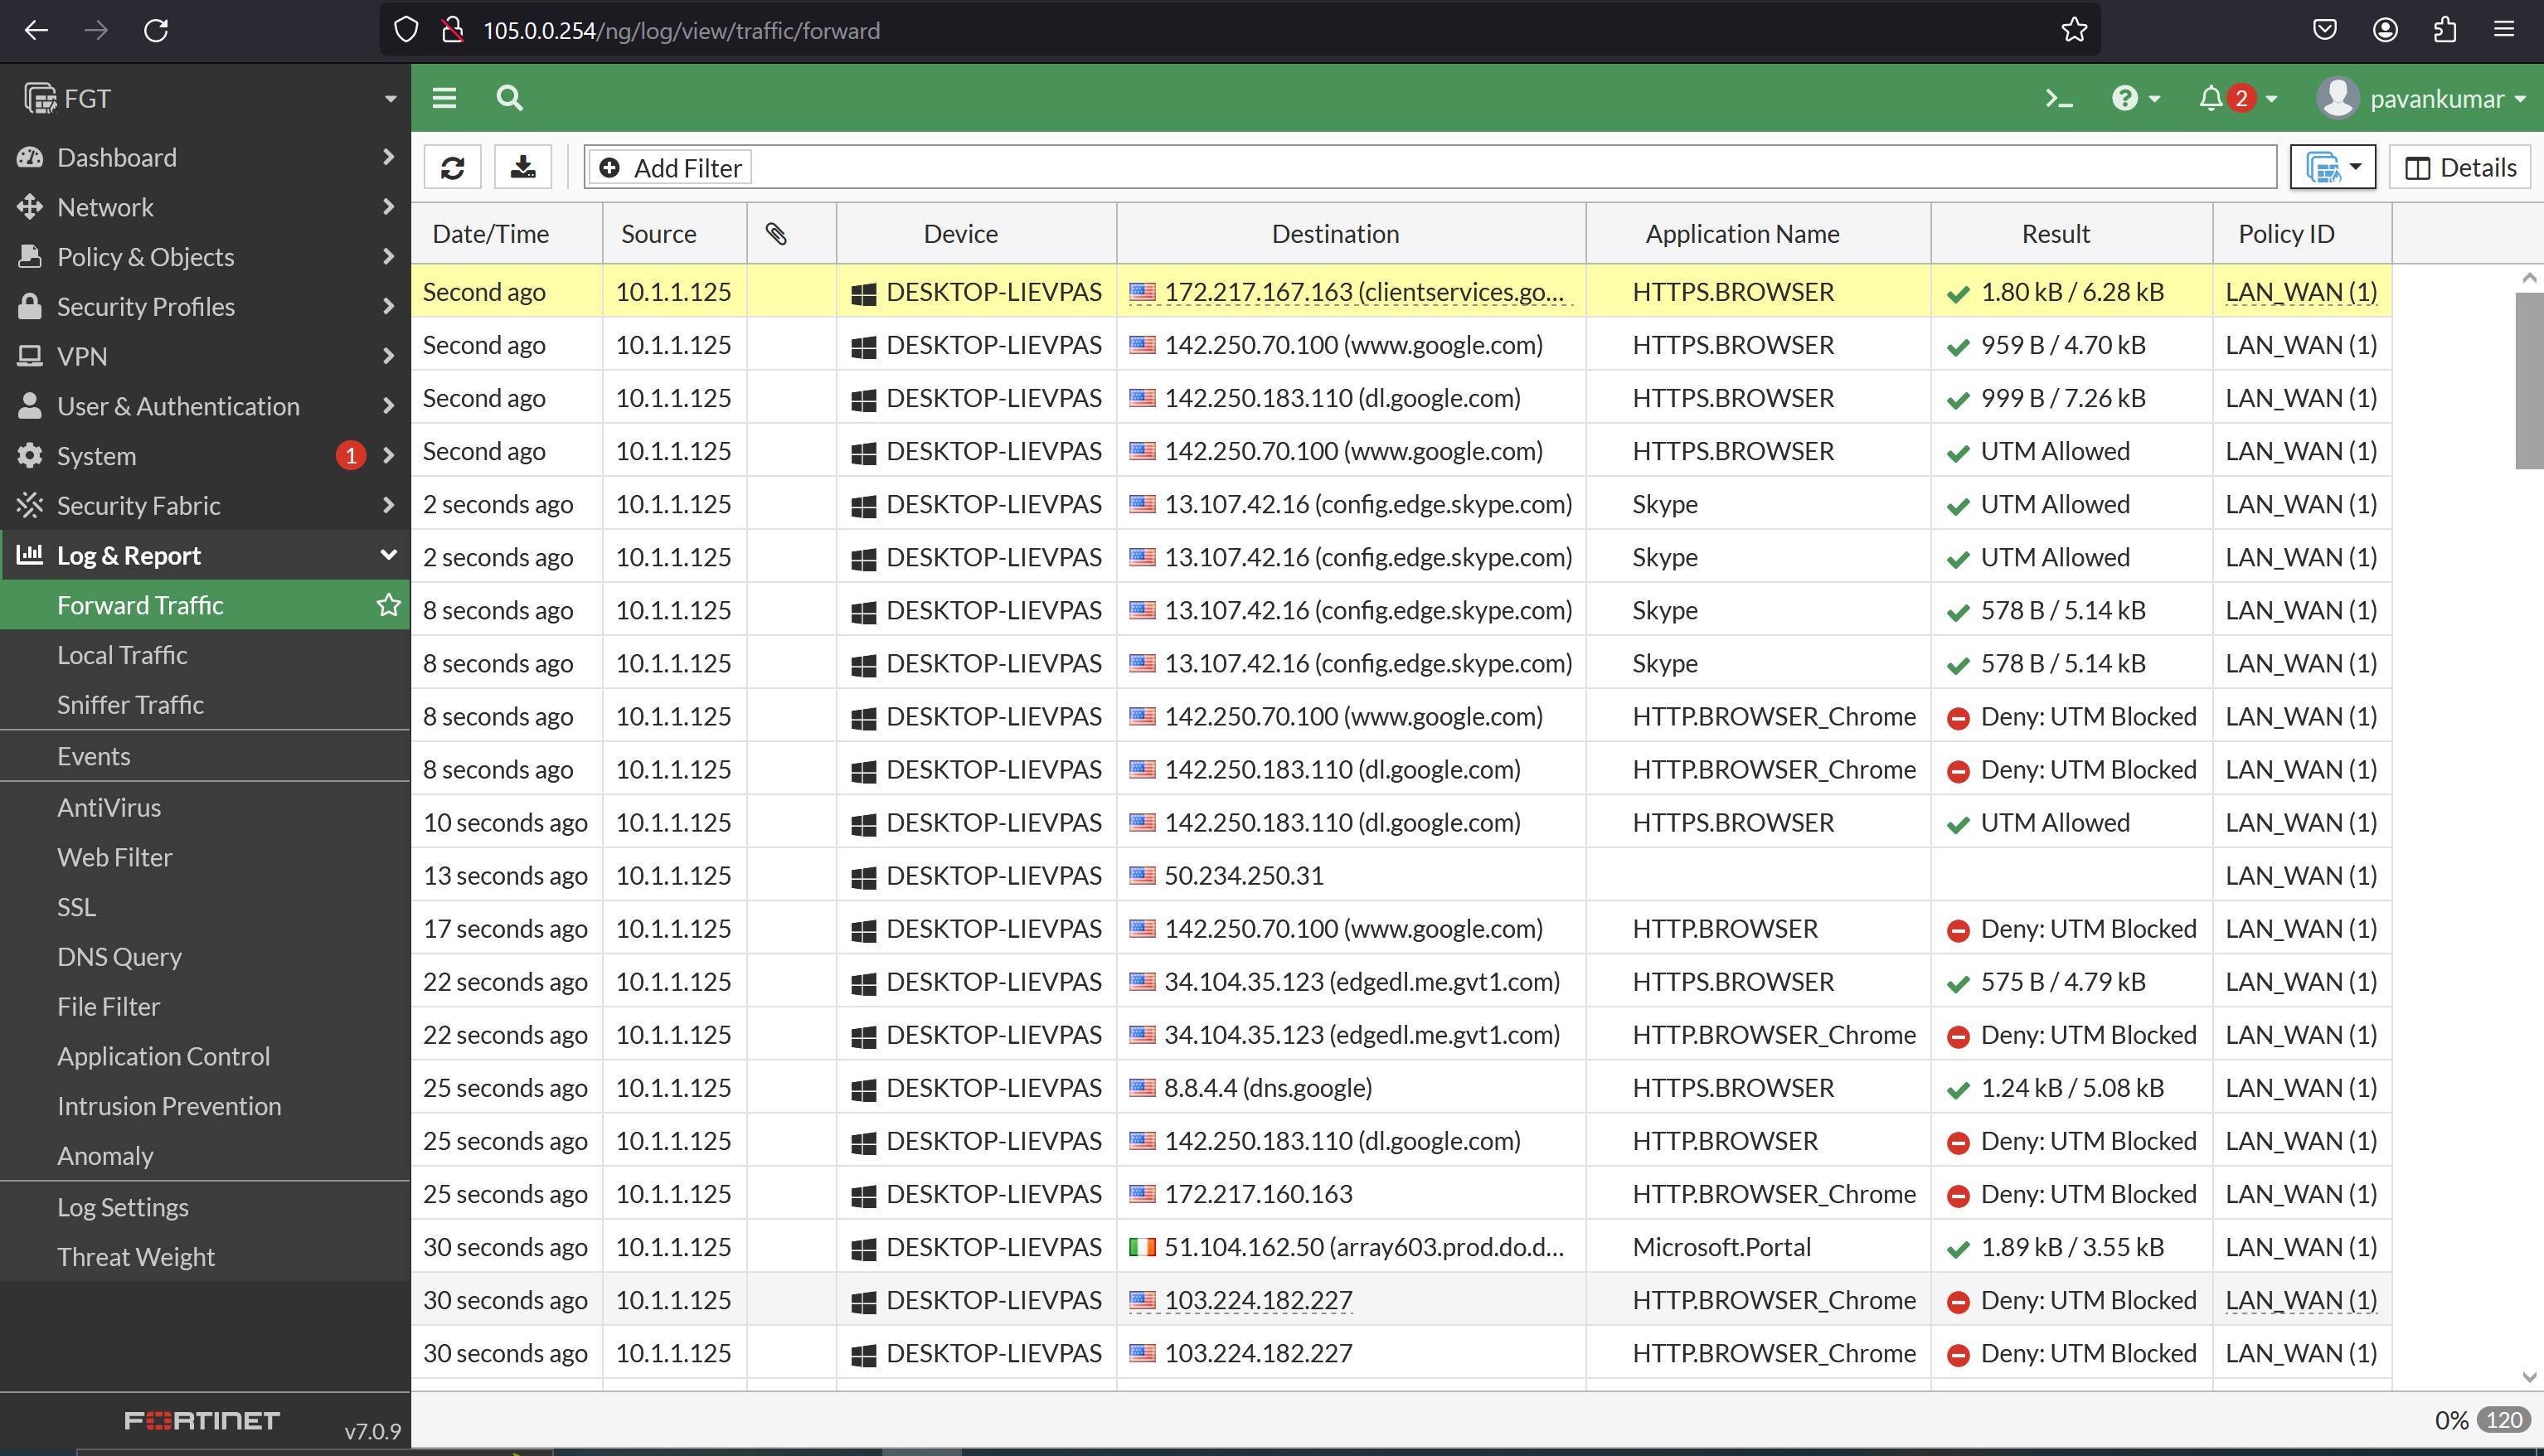
Web Filter Applied Policy Triggered Logs:
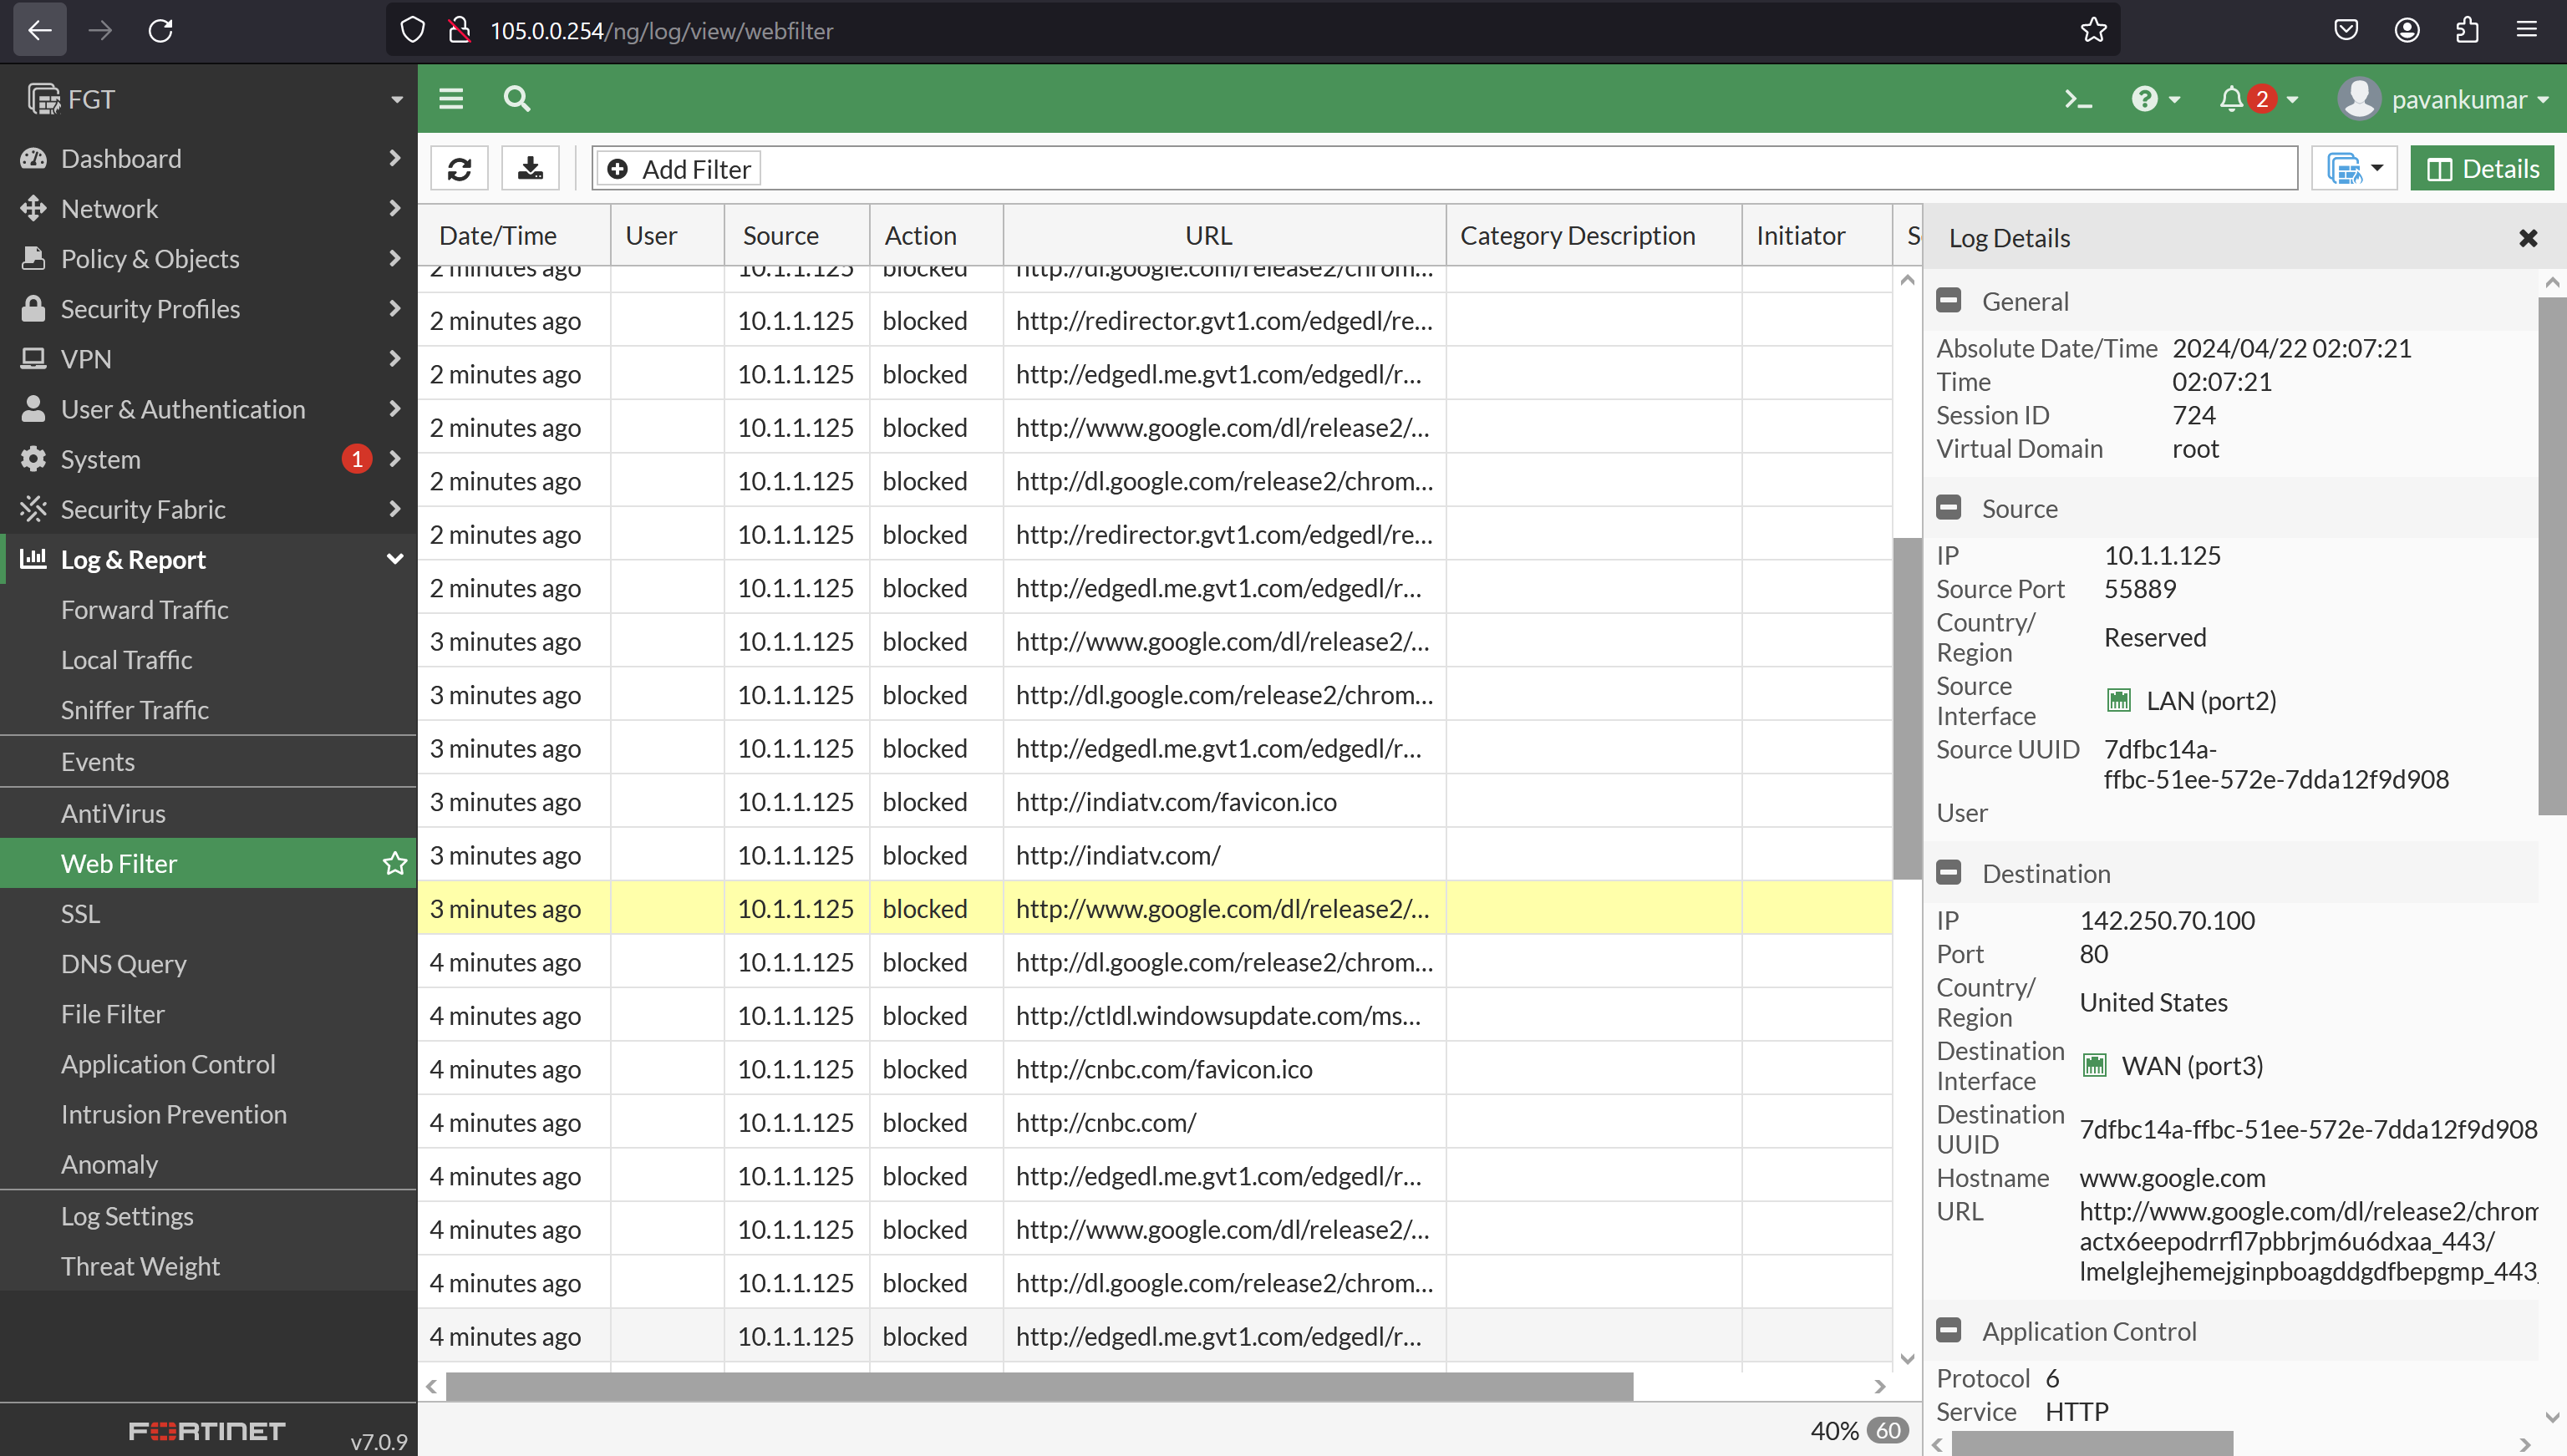
Sending Logs to External Syslog Server:
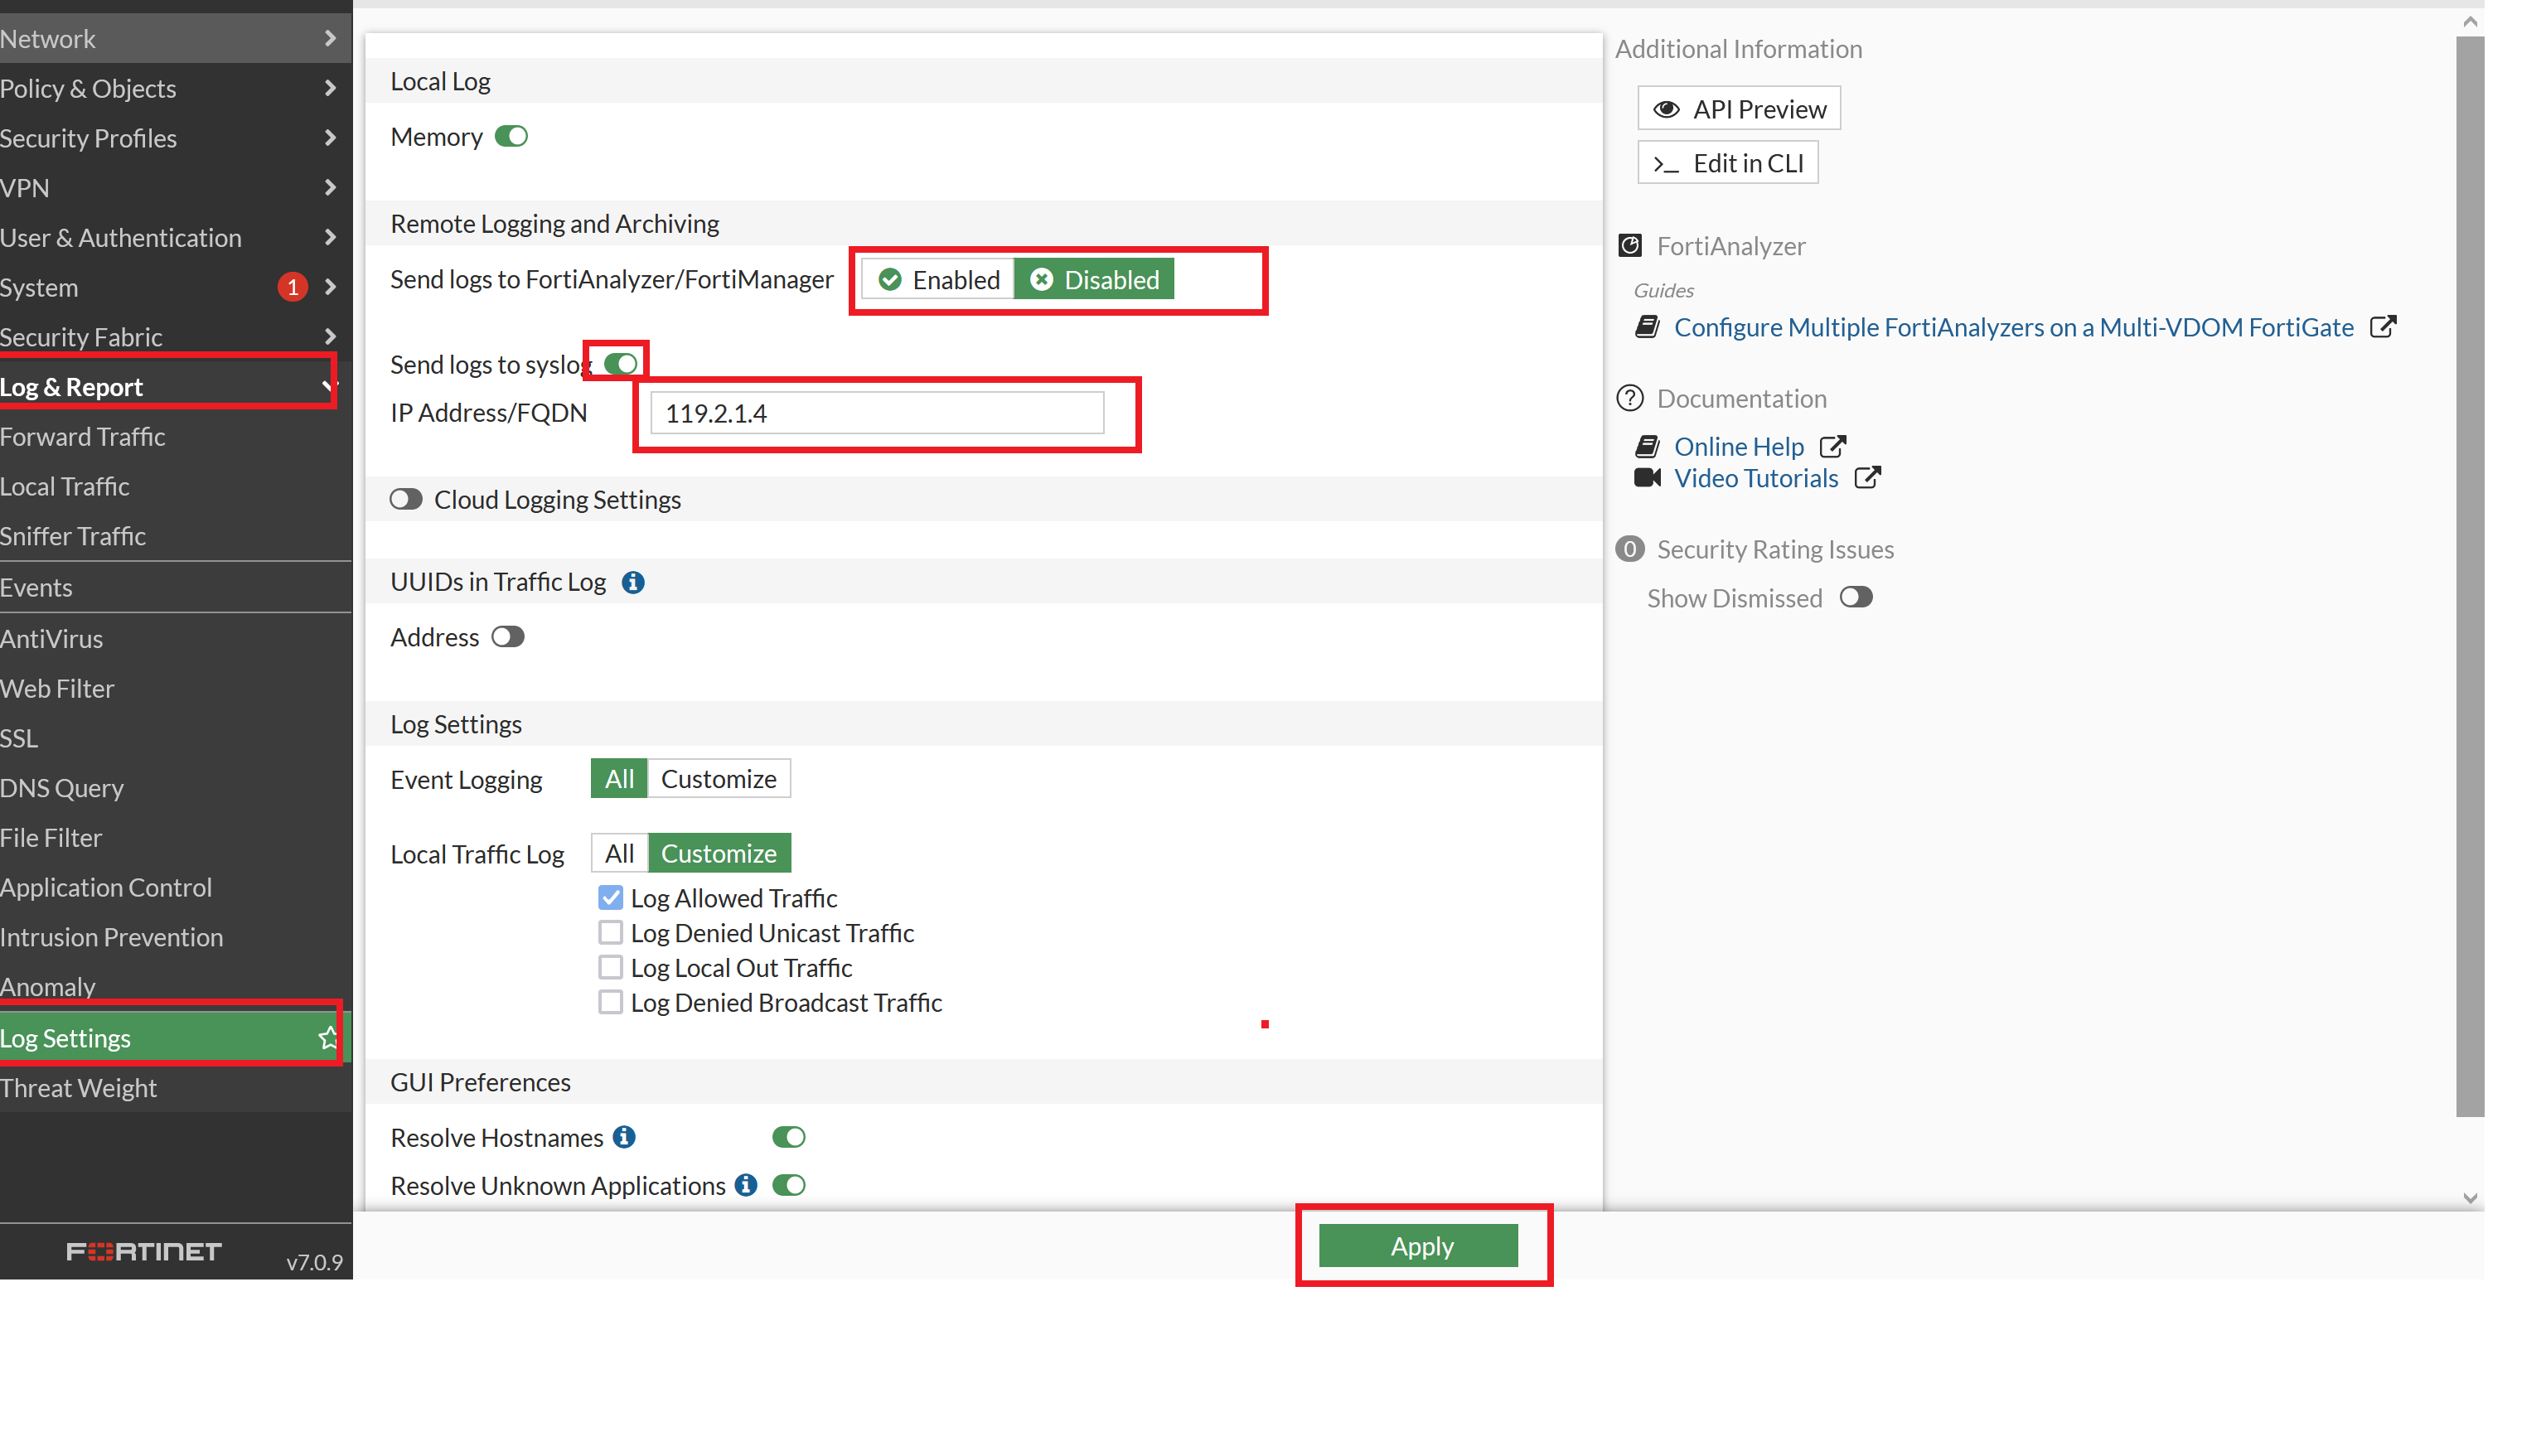
6. FortiGate Firewall One-Arm Sniffer Configuration:
1. Enable Sniffer:
- Log in to your FortiGate firewall using a web browser or SSH.
- Navigate to the CLI (Command Line Interface) or the GUI (Graphical User Interface).
- Enable the sniffer feature. You can do this through the CLI using the following command:
config system settings set sniffer-enabled enable end - Alternatively, in the GUI, you can navigate to System > Settings and then enable the sniffer from there.
2. Configure One-Arm Sniffer Interface:
- Determine which interface you want to use for the one-arm sniffer. This interface should be connected to the network segment you want to monitor.
- Configure the interface as a sniffer interface. In the CLI:
config system interface edit <interface_name> set sniffer-mode sniffer set vdom <vdom_name> // If applicable set ip <interface_IP/netmask> set allowaccess ping https ssh next end - Replace
<interface_name>with the actual name of your interface, and<vdom_name>with the virtual domain name if applicable.
3. Set Sniffer Filters (Optional):
- You can specify filters to capture specific traffic, such as by source/destination IP, port, protocol, etc. This step is optional but can be useful for focusing on relevant traffic.
- Filters can be set using the following CLI command:
config system sniffer filter
edit <filter_name>
set sniffer <interface_name>
set source <source_IP/netmask>  // Optional
set destination <destination_IP/netmask>  // Optional
set port <port_number>  // Optional
set protocol <protocol>  // Optional
next
end
4. Start Sniffer:
- Once configured, start the sniffer to begin capturing network traffic. Use the following command:
diagnose sniffer packet <interface_name> <filter_name> // If filters are configured
5. View Sniffer Output:
- You can view the captured packets either directly on the CLI or by exporting them to a file for analysis using Wireshark or similar tools.
7. Cisco Switch SPAN Monitor Source and Destination Configuration:
1. Define SPAN Session:
- Log in to your Cisco switch using a console connection or SSH.
- Determine which ports you want to monitor (source ports) and where you want to send the monitored traffic (destination port).
- Configure a SPAN session. In the CLI:
monitor session <session_number> source interface <source_interface> // Source ports monitor session <session_number> destination interface <destination_interface> // Destination port - Replace
<session_number>with the desired session number,<source_interface>with the source interface(s) to be monitored, and<destination_interface>with the destination interface to which the monitored traffic will be sent.
2. Configure SPAN Type (Optional):
- By default, SPAN sessions are configured as local SPAN, meaning the monitored traffic stays within the switch. If you want to send the traffic to a remote device for analysis, you’ll need to configure a Remote SPAN (RSPAN) or Encapsulated Remote SPAN (ERSPAN) session.
3. Verify SPAN Configuration:
- After configuring the SPAN session, verify the configuration to ensure it’s correct. You can use the following command:
show monitor session <session_number>
4. Start Monitoring:
- Once the SPAN session is configured, it automatically starts monitoring traffic on the specified source ports and sends it to the destination port.
5. Analyze Monitored Traffic:
- You can connect a monitoring device (e.g., a packet analyzer or network monitoring tool) to the destination port to capture and analyze the monitored traffic.
These configurations should help you set up One-Arm Sniffer on FortiGate firewall and SPAN monitoring on a Cisco switch effectively. Remember to adjust the settings according to your specific network requirements and security policies.
Demo:
Sample Topology:
Cisco Switch ports which are connected to the PC and Firewall, configured SPAN(Switch Port Analyzer):
Fortigate port2 make it interface type as One-Arm Sniffer, Follow the Image Instructions:
Generating traffic from the PC towards the internet, all packets are sent to Firewall as well:
To check the Packet sniffed from the PC, go to “Logs & Report” –> “Sniffer Traffic”:
Sample Log data:
memory-traffic-sniffer-2024-04-22_2048.log
Summary:
- Covers log severity levels, helping prioritize security events effectively.
- Explores various log types, including Traffic Logs, Event Logs, and Security Logs.
- Details the structured format of logs, aiding in efficient interpretation.
- Discusses configuring log settings for tailored logging behavior.
- Demonstrates redirecting logs to external systems like Syslog and SNMP for centralized monitoring.
- Gives a hands-on and good understanding of FortiGate packet sniffing and SPAN configuration.
This module equips administrators with the knowledge to efficiently monitor network activity, detect security incidents, and ensure the reliability of their network infrastructure.
MODULE 7
Basic IPSEC VPN
Table of contents:
- Understanding the Architecture of IPSEC
- Understanding IKE Phase 1 & 2
- Configure IPSEC between FortiGate to FortiGate
I. Understanding the Architecture of IPsec
IPsec (Internet Protocol Security) is a suite of protocols used to secure Internet protocol (IP) communications by authenticating and encrypting each IP packet of a communication session. The architecture of IPsec involves several components and protocols working together to establish secure communication channels. Here’s a detailed overview of the IPsec architecture:
1. Security Associations (SA)
- Purpose: Security Associations define the parameters for secure communication between two devices, including authentication and encryption algorithms, keys, and security parameters.
- Components: Each SA consists of a pair of security parameters index (SPI), source IP address, destination IP address, security protocol (AH or ESP), and security parameters such as encryption and authentication algorithms.
2. Security Associations Database (SAD)
- Purpose: The Security Associations Database stores active SAs negotiated between IPsec peers, allowing the system to quickly look up the parameters required to process inbound and outbound IPsec packets.
- Components: SAD contains entries for each active SA, including SPI, source and destination IP addresses, security protocol, encryption/authentication keys, and lifetime information.
3. Key Management Protocol
- Purpose: Key Management Protocols are used to negotiate and manage encryption keys required for establishing secure communication channels between IPsec peers.
- Protocols: Common Key Management Protocols include Internet Key Exchange (IKE) and IKEv2, which automate the negotiation and exchange of encryption keys, authentication parameters, and security policies.
4. Encapsulating Security Payload (ESP)
- Purpose: ESP provides confidentiality, integrity, and authentication for IP packets by encapsulating the payload in a secure envelope, encrypting it, and adding authentication data.
- Functions: ESP encrypts the IP payload using encryption algorithms such as AES or 3DES, adds authentication data to ensure packet integrity, and optionally provides anti-replay protection.
5. Authentication Header (AH)
- Purpose: AH provides data integrity, authentication, and anti-replay protection for IP packets by including a hash-based message authentication code (HMAC) in each packet.
- Functions: AH calculates a hash-based authentication code over the IP packet’s entire contents, including the IP header, ensuring the integrity of the packet and detecting any modifications.
II. Understanding IKE Phase 1 & 2
IKE (Internet Key Exchange) is a key management protocol used in IPsec VPNs to establish and manage secure communication channels between peers. IKE operates in two phases, known as Phase 1 and Phase 2, each serving distinct purposes in the VPN establishment process. Let’s delve into the details of each phase:
1. IKE Phase 1
- Purpose: Phase 1 establishes a secure channel for negotiating the parameters required for subsequent communications, including encryption algorithms, authentication methods, and session keys.
- Main Mode Exchange: Phase 1 typically employs Main Mode exchange, where peers authenticate each other and exchange encryption keys securely.
- Components:
- Authentication: Peers authenticate each other using pre-shared keys (PSK) or digital certificates to ensure mutual trust.
- Diffie-Hellman (DH) Exchange: Peers perform a DH key exchange to generate a shared secret used to derive encryption keys.
- Encryption and Integrity: Phase 1 negotiates encryption and integrity algorithms to protect subsequent IKE and IPsec communications.
- Parameters Negotiated: IKE Phase 1 negotiates parameters such as encryption algorithm, authentication method, DH group, and session lifetime.
Want to Know more about IKEv1: Click Here
2. IKE Phase 2
- Purpose: Phase 2 establishes security associations (SAs) for IPsec traffic, defining the parameters for encrypting and authenticating data packets exchanged between peers.
- Quick Mode Exchange: Phase 2 typically uses Quick Mode exchange, which focuses on negotiating IPsec parameters efficiently.
- Components:
- Encryption and Authentication: Phase 2 negotiates encryption and authentication algorithms specifically for IPsec traffic protection.
- IPsec SA Establishment: Peers establish one or more IPsec SAs, each defining the parameters for encrypting and authenticating data packets.
- Traffic Selector Negotiation: Peers agree on which traffic will be protected by IPsec, defining source and destination IP addresses and protocols.
- Parameters Negotiated: IKE Phase 2 negotiates parameters such as encryption algorithm, authentication method, IPsec mode (tunnel or transport), and IPsec SAs.
##
III. Configuring IPsec between FortiGate to FortiGate
IPsec VPNs provide secure communication between networks or devices over the internet by encrypting and authenticating data traffic. Configuring IPsec between FortiGate firewalls involves several steps to establish a secure VPN tunnel. Here’s a detailed guide:
1. Pre-requisites
- Ensure both FortiGate firewalls have valid licenses for IPsec VPN.
- Determine the public IP addresses of both FortiGate firewalls.
- Establish connectivity between the public IP addresses of the two FortiGate firewalls.
2. Configure Phase 1 (IKE)
On FortiGate A:
- Navigate to VPN > IPsec > Wizard.
- Select Custom VPN Tunnel (No Template) and click Next.
- Enter a Name for the VPN tunnel and click Next.
- Configure Phase 1 parameters:
- Remote Gateway: Public IP address of FortiGate B.
- Authentication Method: Pre-shared Key or Digital Certificate.
- Pre-shared Key: Enter a shared secret for authentication.
- Encryption Algorithm: Select desired encryption algorithm.
- Authentication Algorithm: Select desired authentication algorithm.
- Diffie-Hellman Group: Select DH group for key exchange.
- Click Next and then Finish.
On FortiGate B:
- Repeat the same steps as above, configuring Phase 1 parameters with the public IP address of FortiGate A.
3. Configure Phase 2
On FortiGate A:
- Navigate to VPN > IPsec > Wizard.
- Select Custom VPN Tunnel (No Template) and click Next.
- Enter the same Name used for Phase 1 and click Next.
- Configure Phase 2 parameters:
- Remote Gateway: Public IP address of FortiGate B.
- Local Interface: Select the outgoing interface.
- Encryption Algorithm: Select the encryption algorithm.
- Authentication Algorithm: Select the authentication algorithm.
- PFS: Enable Perfect Forward Secrecy if required.
- Click Next and then Finish.
On FortiGate B:
- Repeat the same steps as above, configuring Phase 2 parameters with the public IP address of FortiGate A.
4. Verify and Monitor
- Once Phase 1 and Phase 2 configurations are completed on both FortiGate firewalls, the VPN tunnel should be established automatically.
- Navigate to VPN > Monitor > IPsec Monitor to verify the status of the VPN tunnel.
- Monitor traffic and logs to ensure the proper functioning of the IPsec VPN tunnel.
Demo:
Sample Topology:
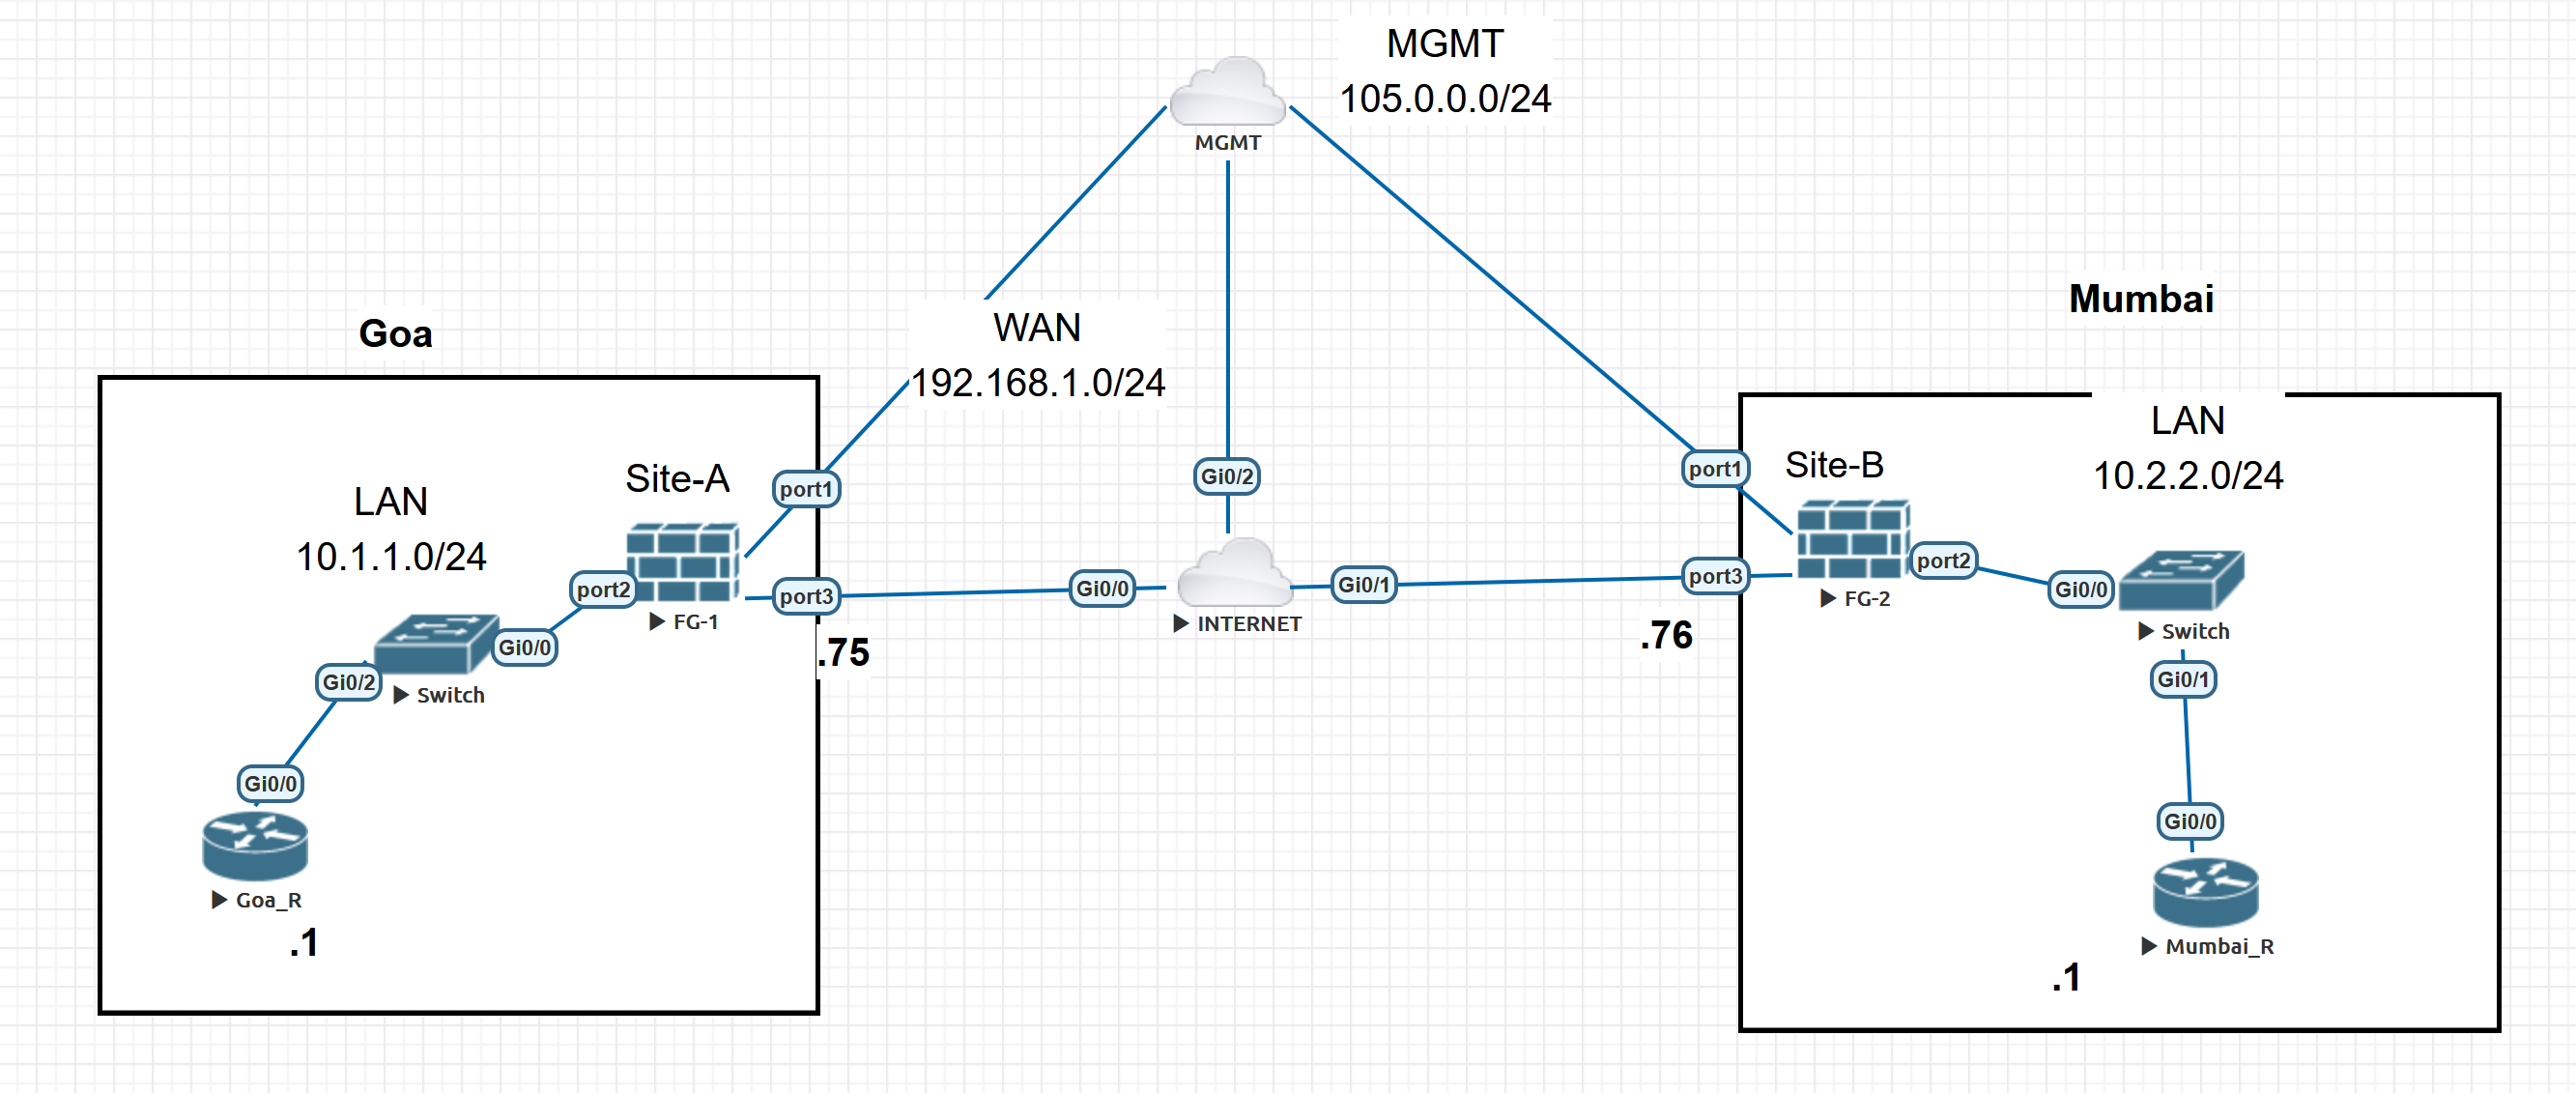
Site-A to Site-B [Site-to-Site] VPN. Go to VPN —> IPsec Wizard
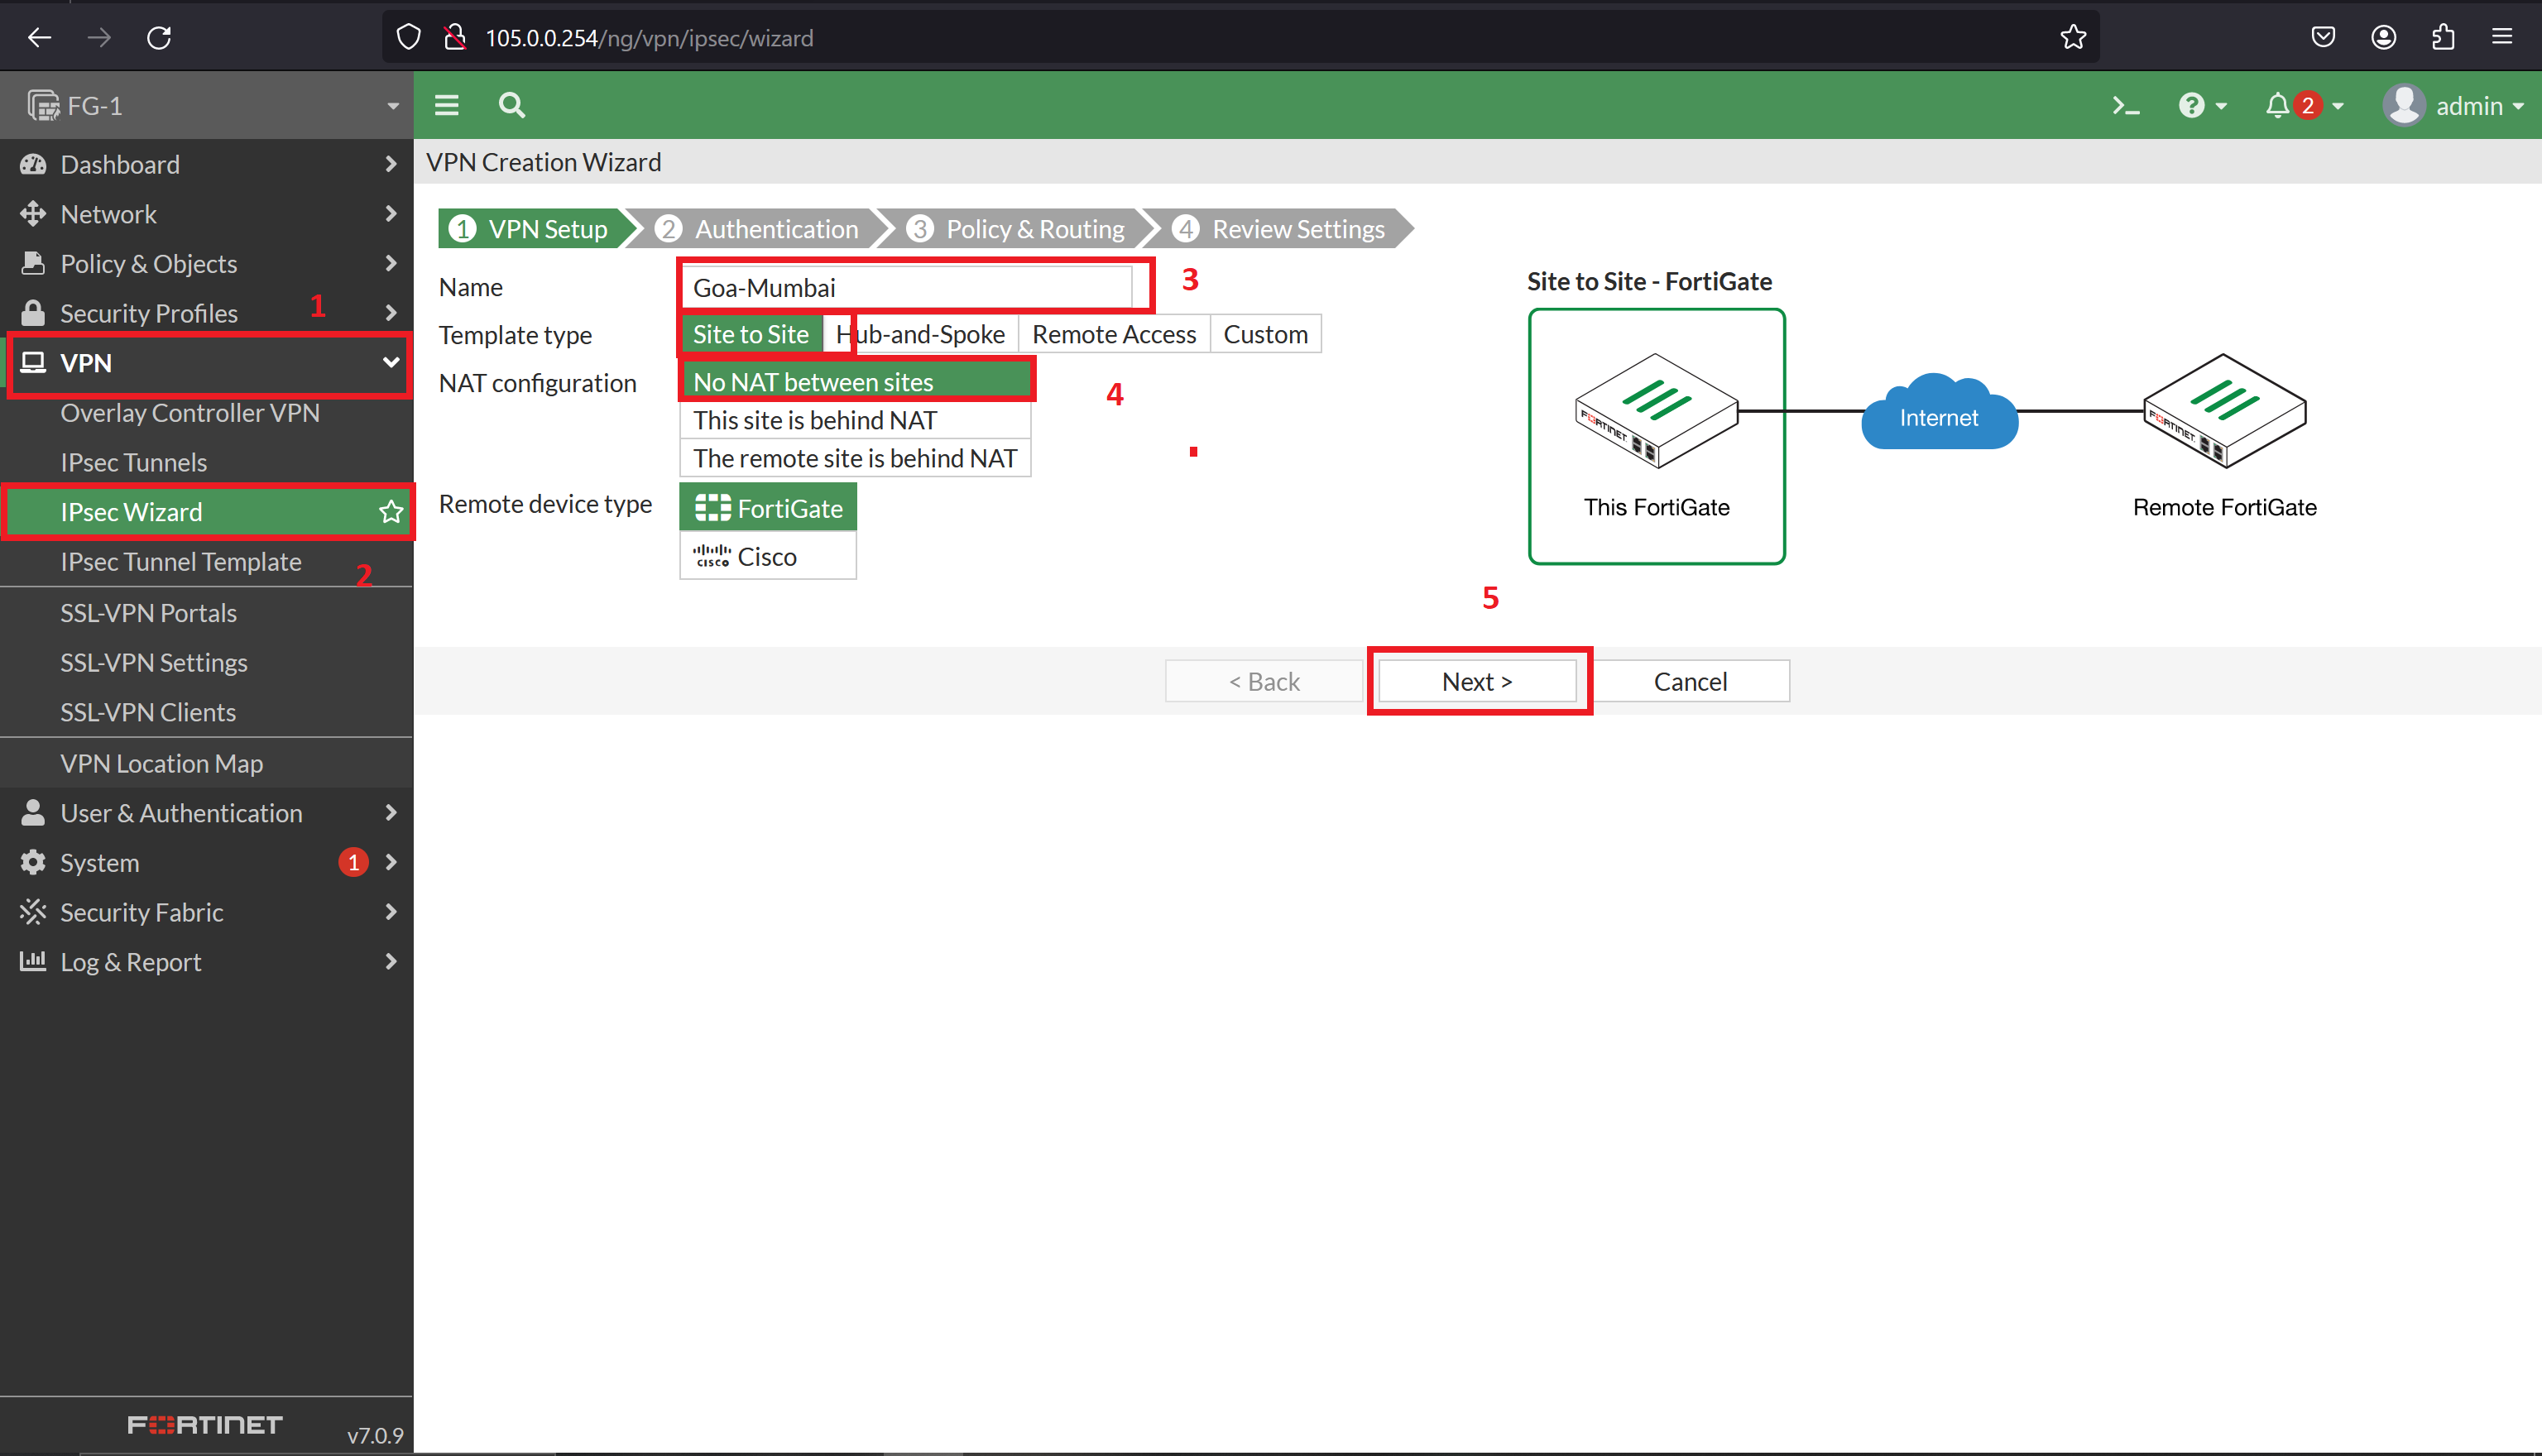
Enter the Remote Site Public IP along with PSK(pre-shared key).
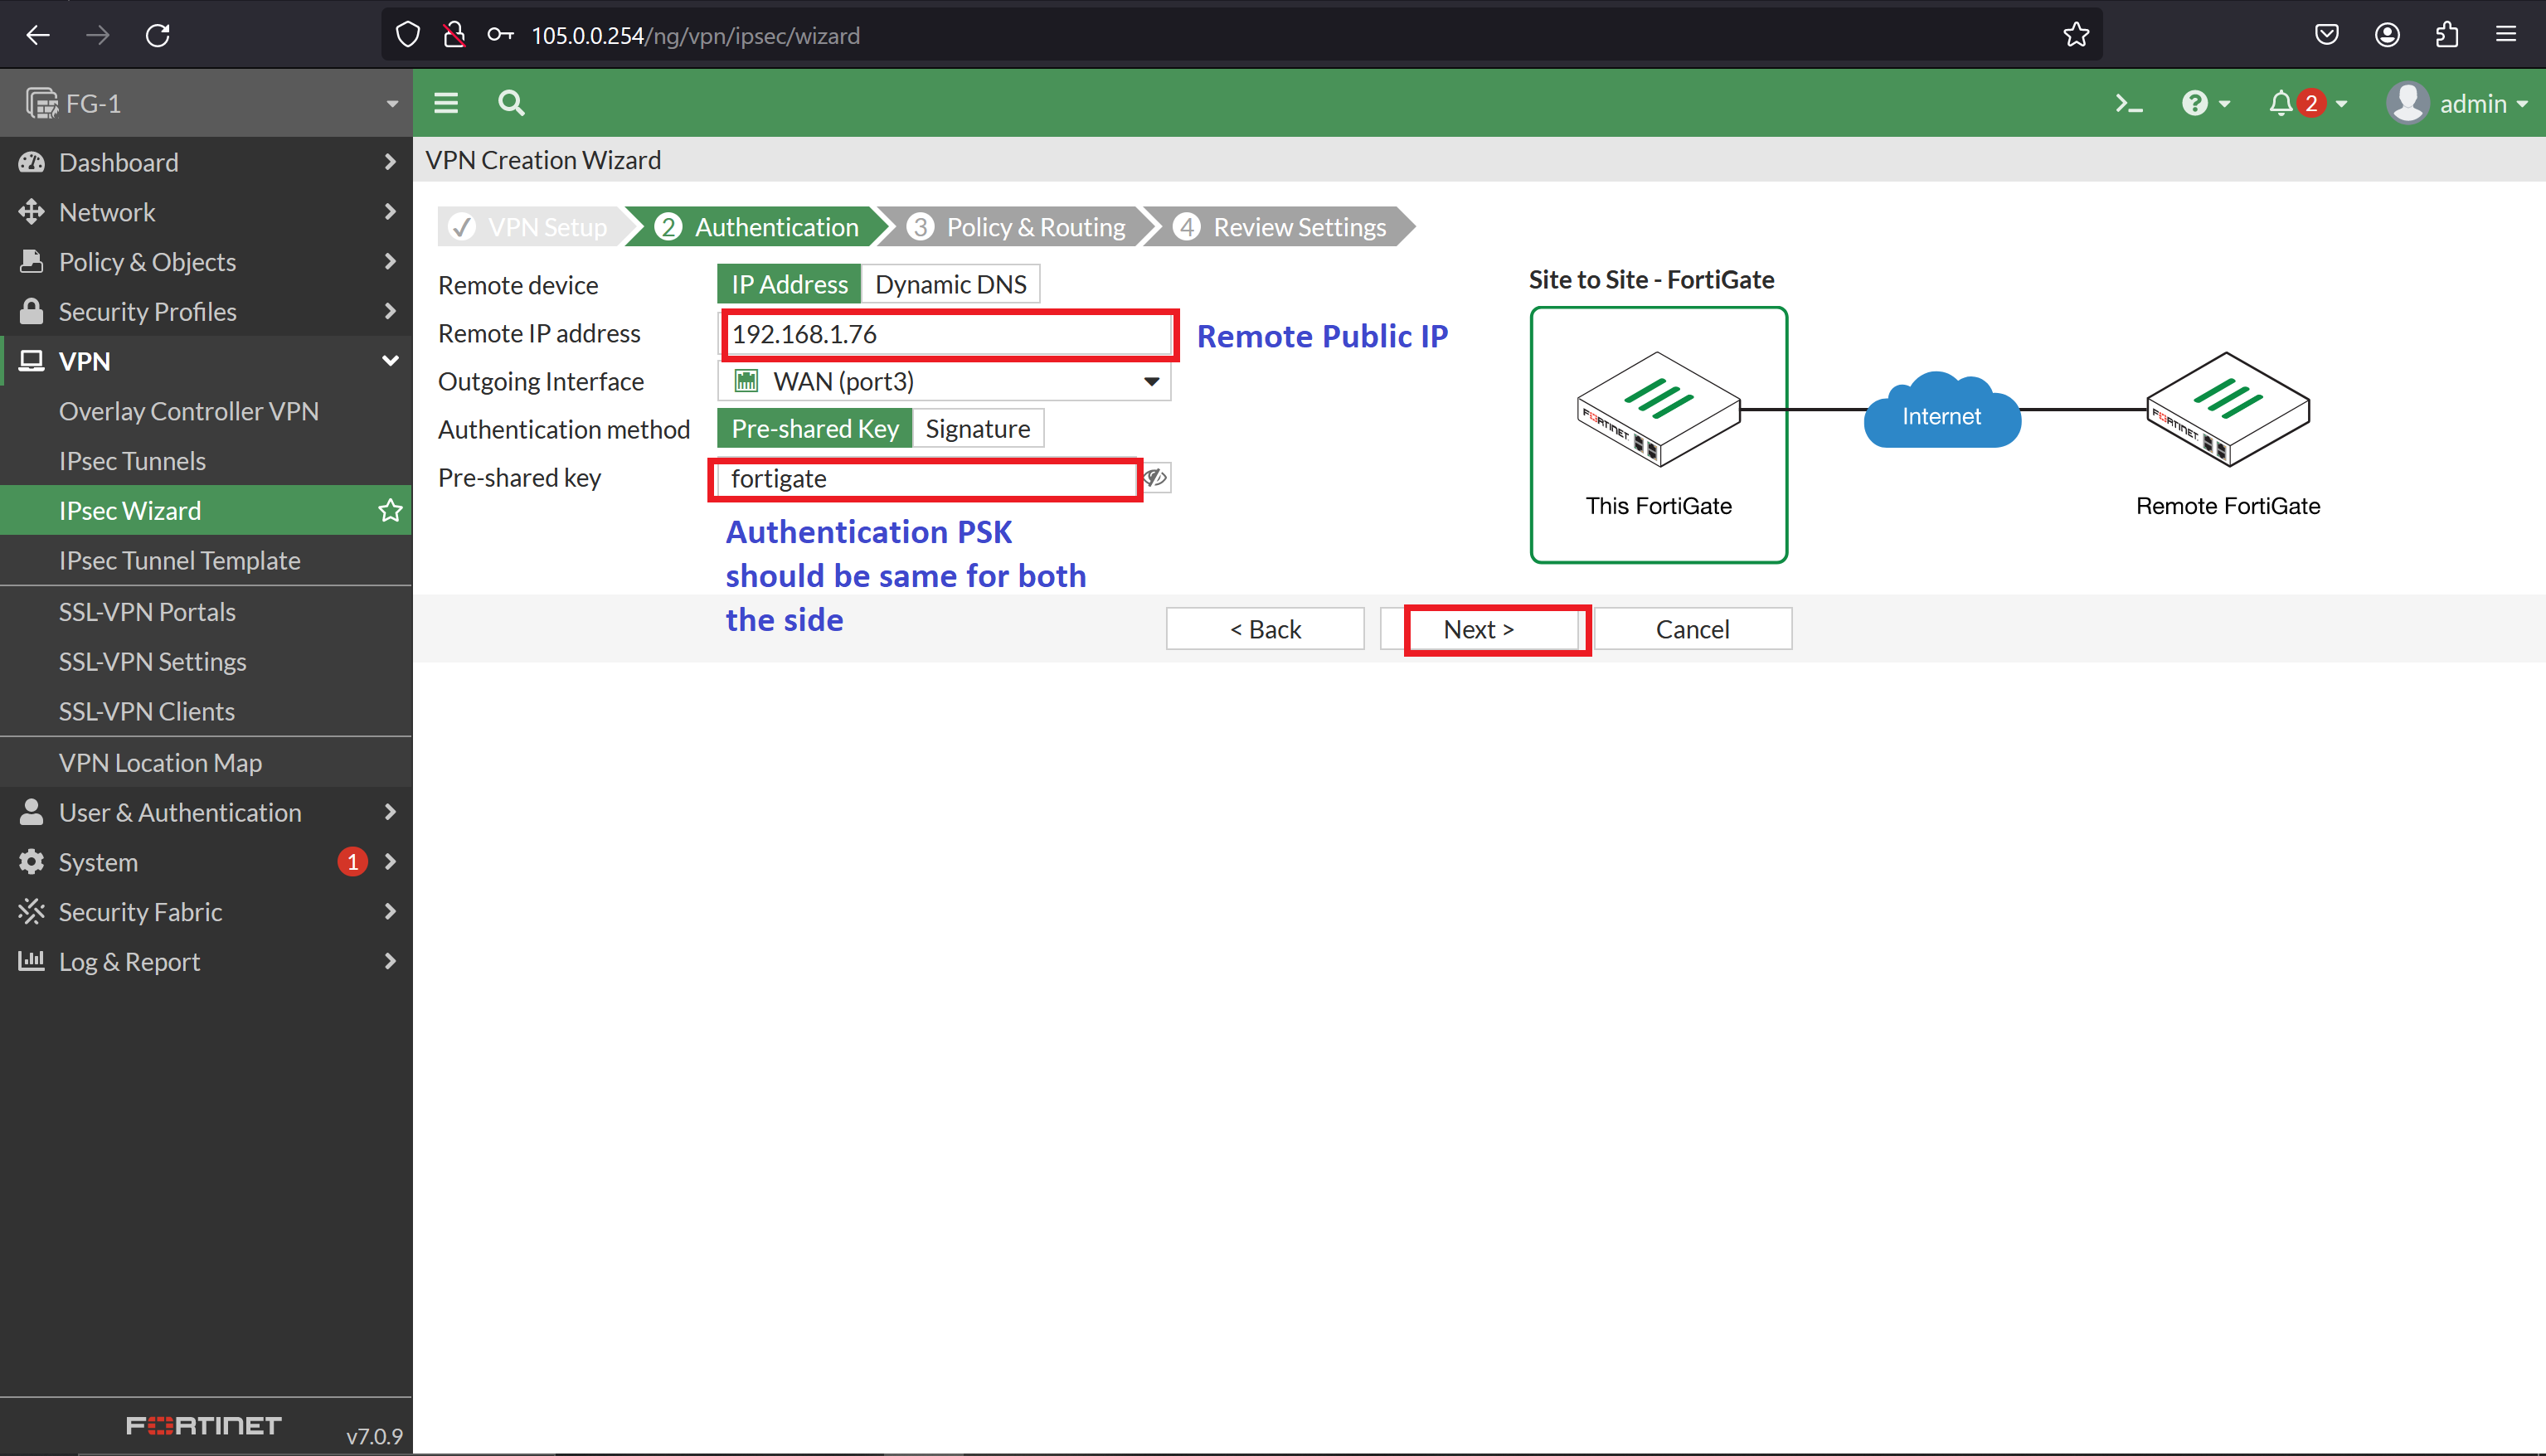
Now it is time to add the interesting network (private subnet of both sides)
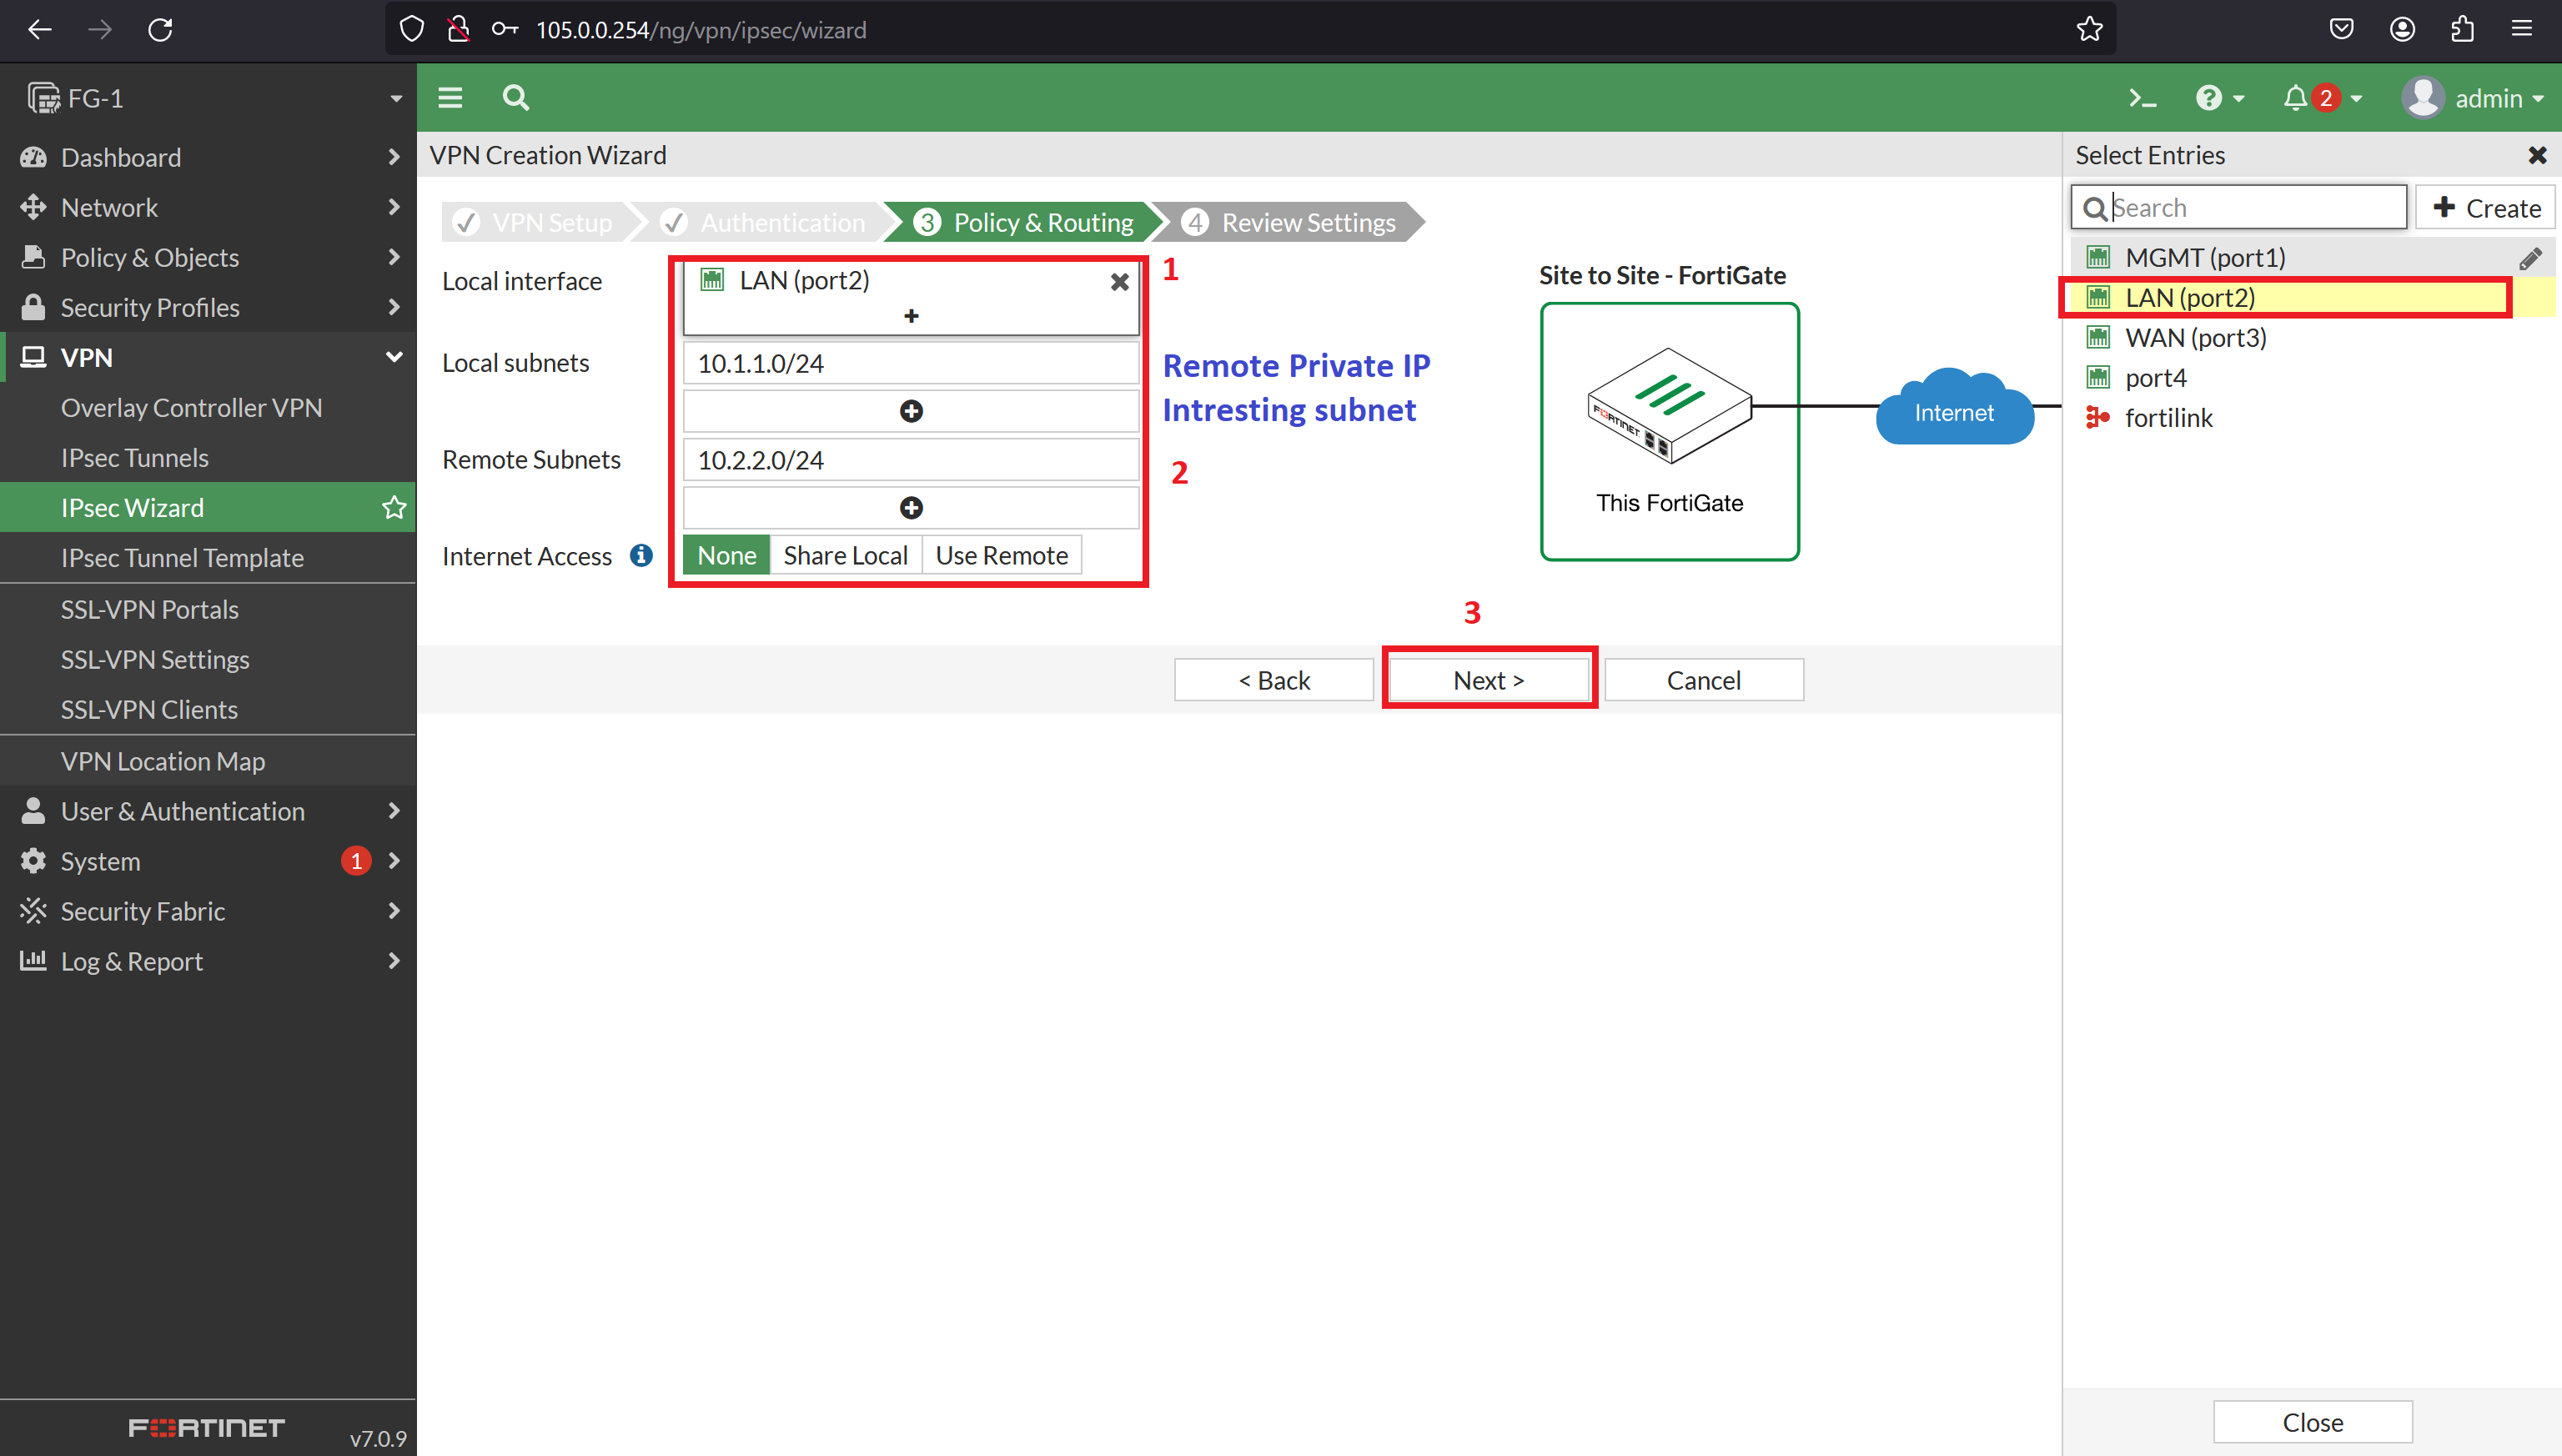
Configure the Tunnel both the sides:(once both side tunnel configured and both the phase negotiation complete tunnel come up or you need to manually bring up the tunnel)
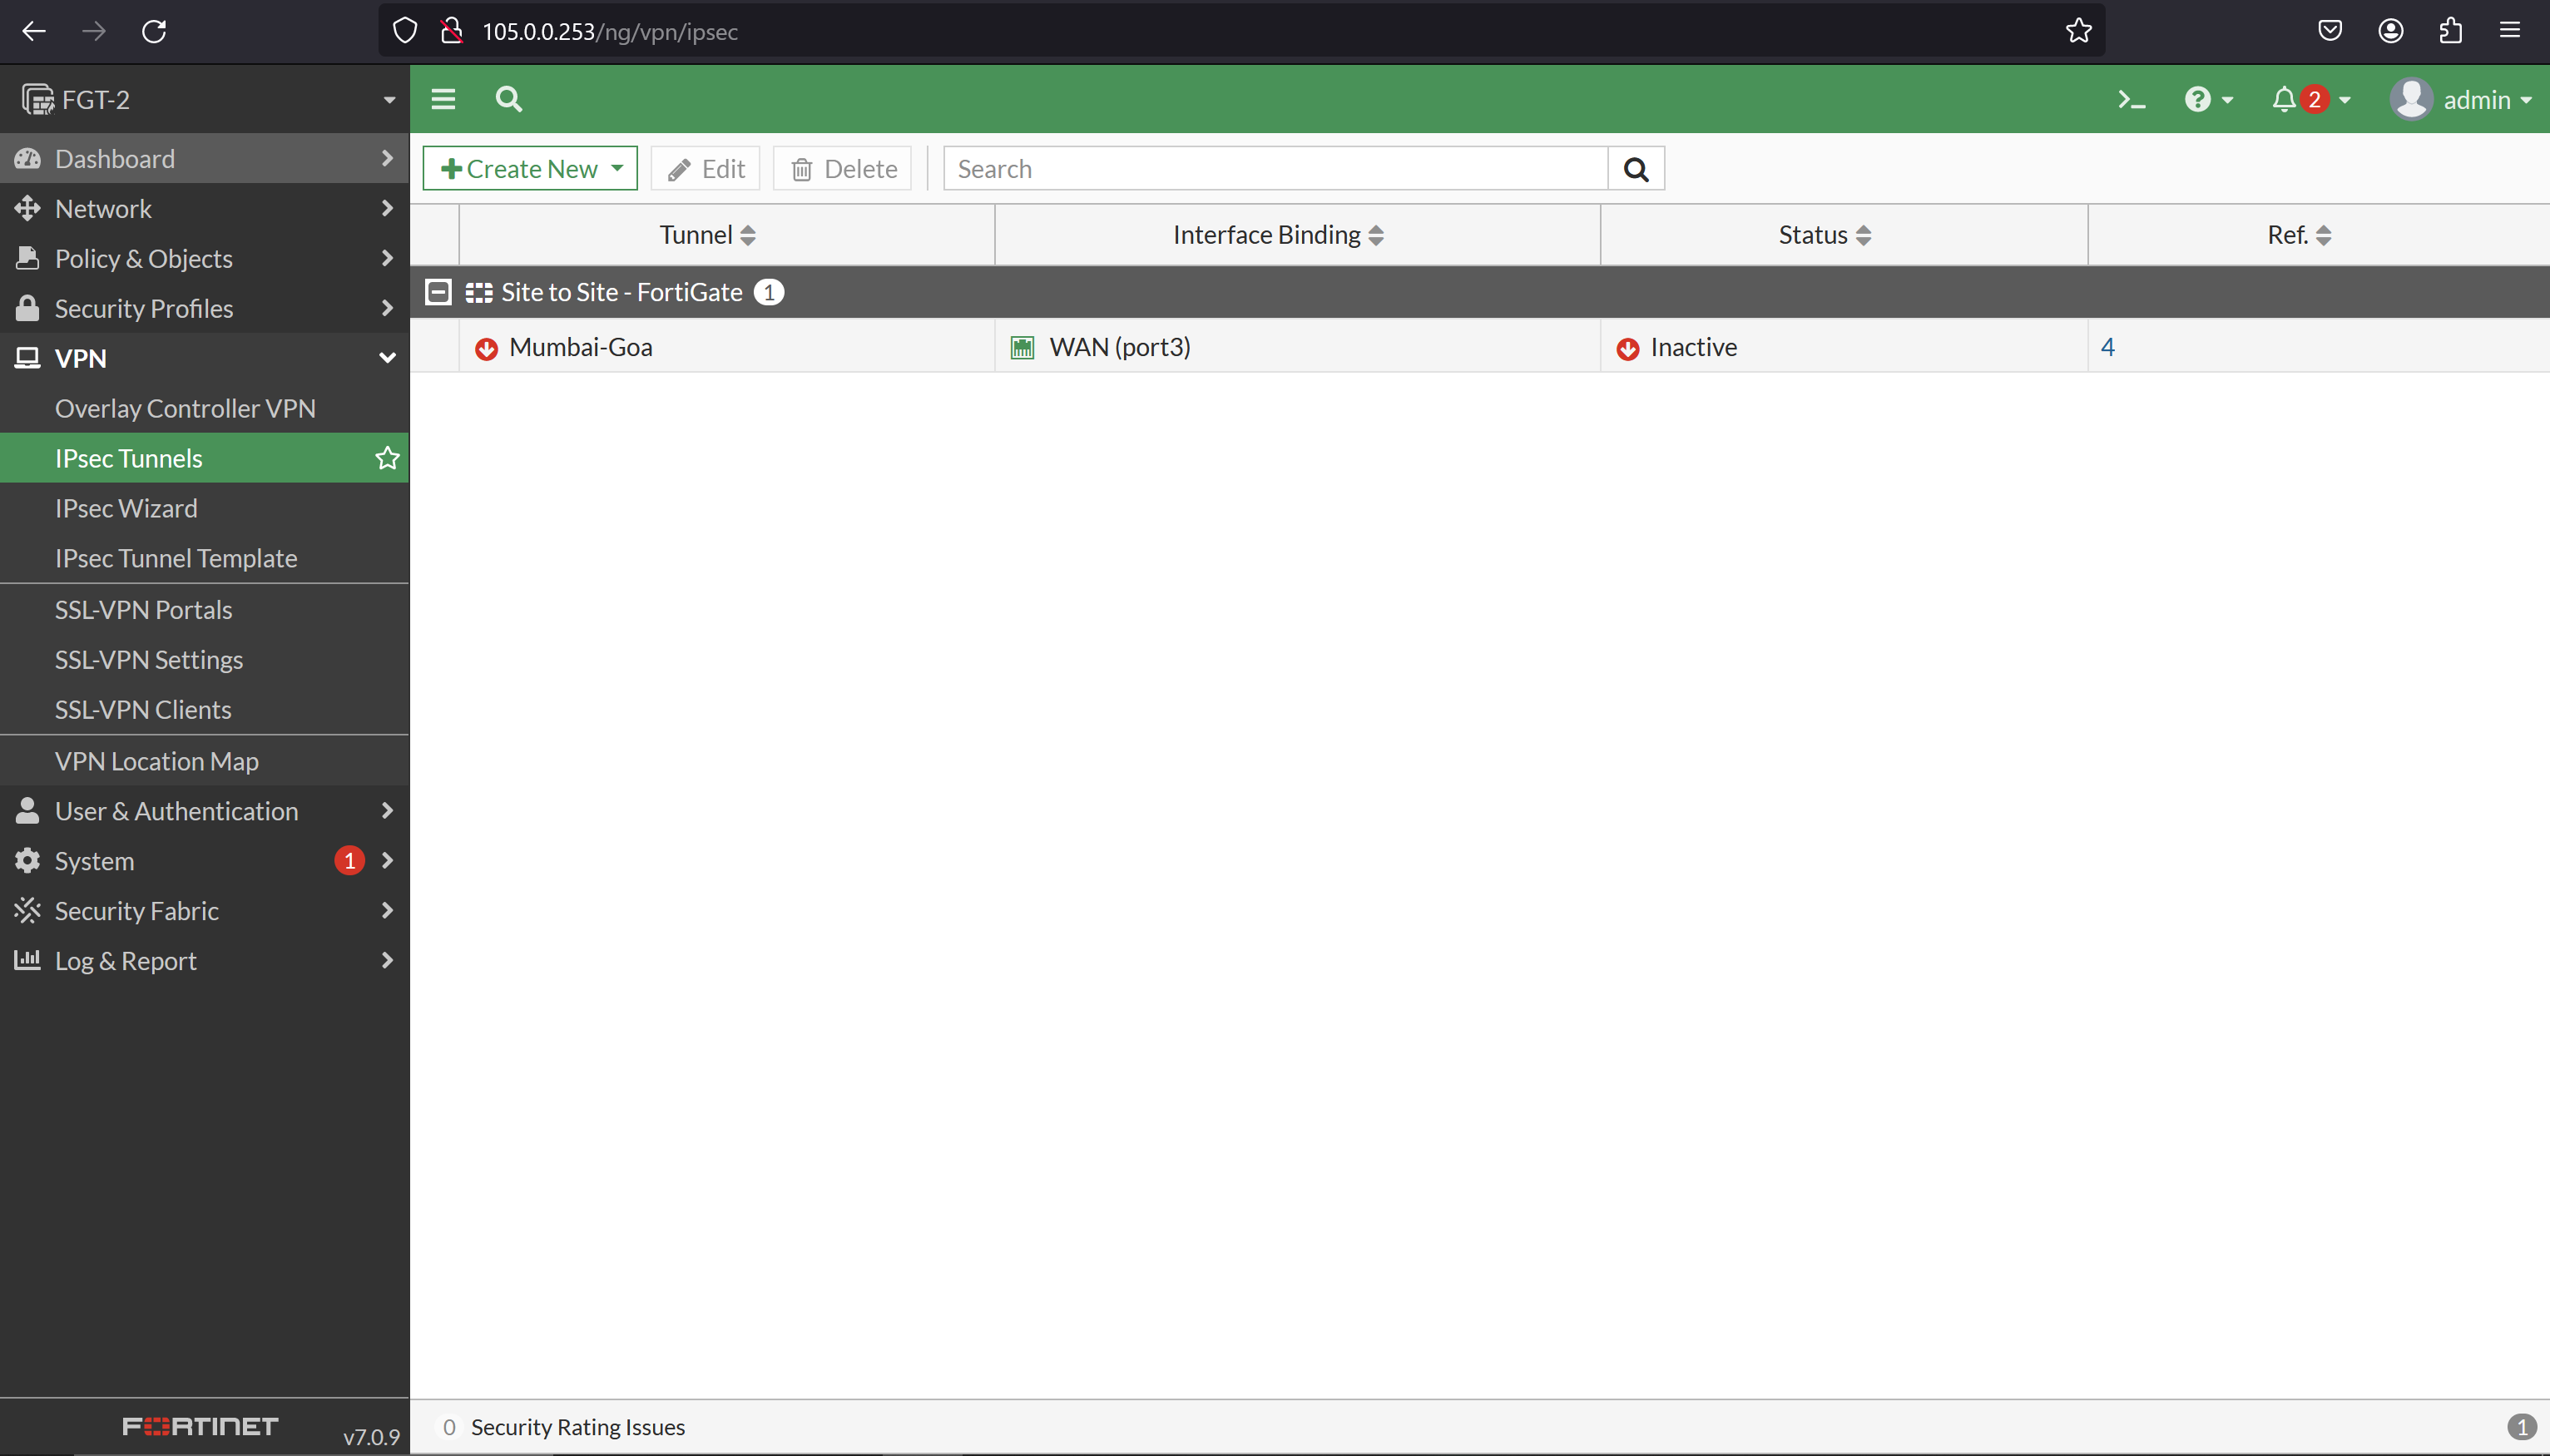
once you passed the traffic between two peers the tunnel comes up:
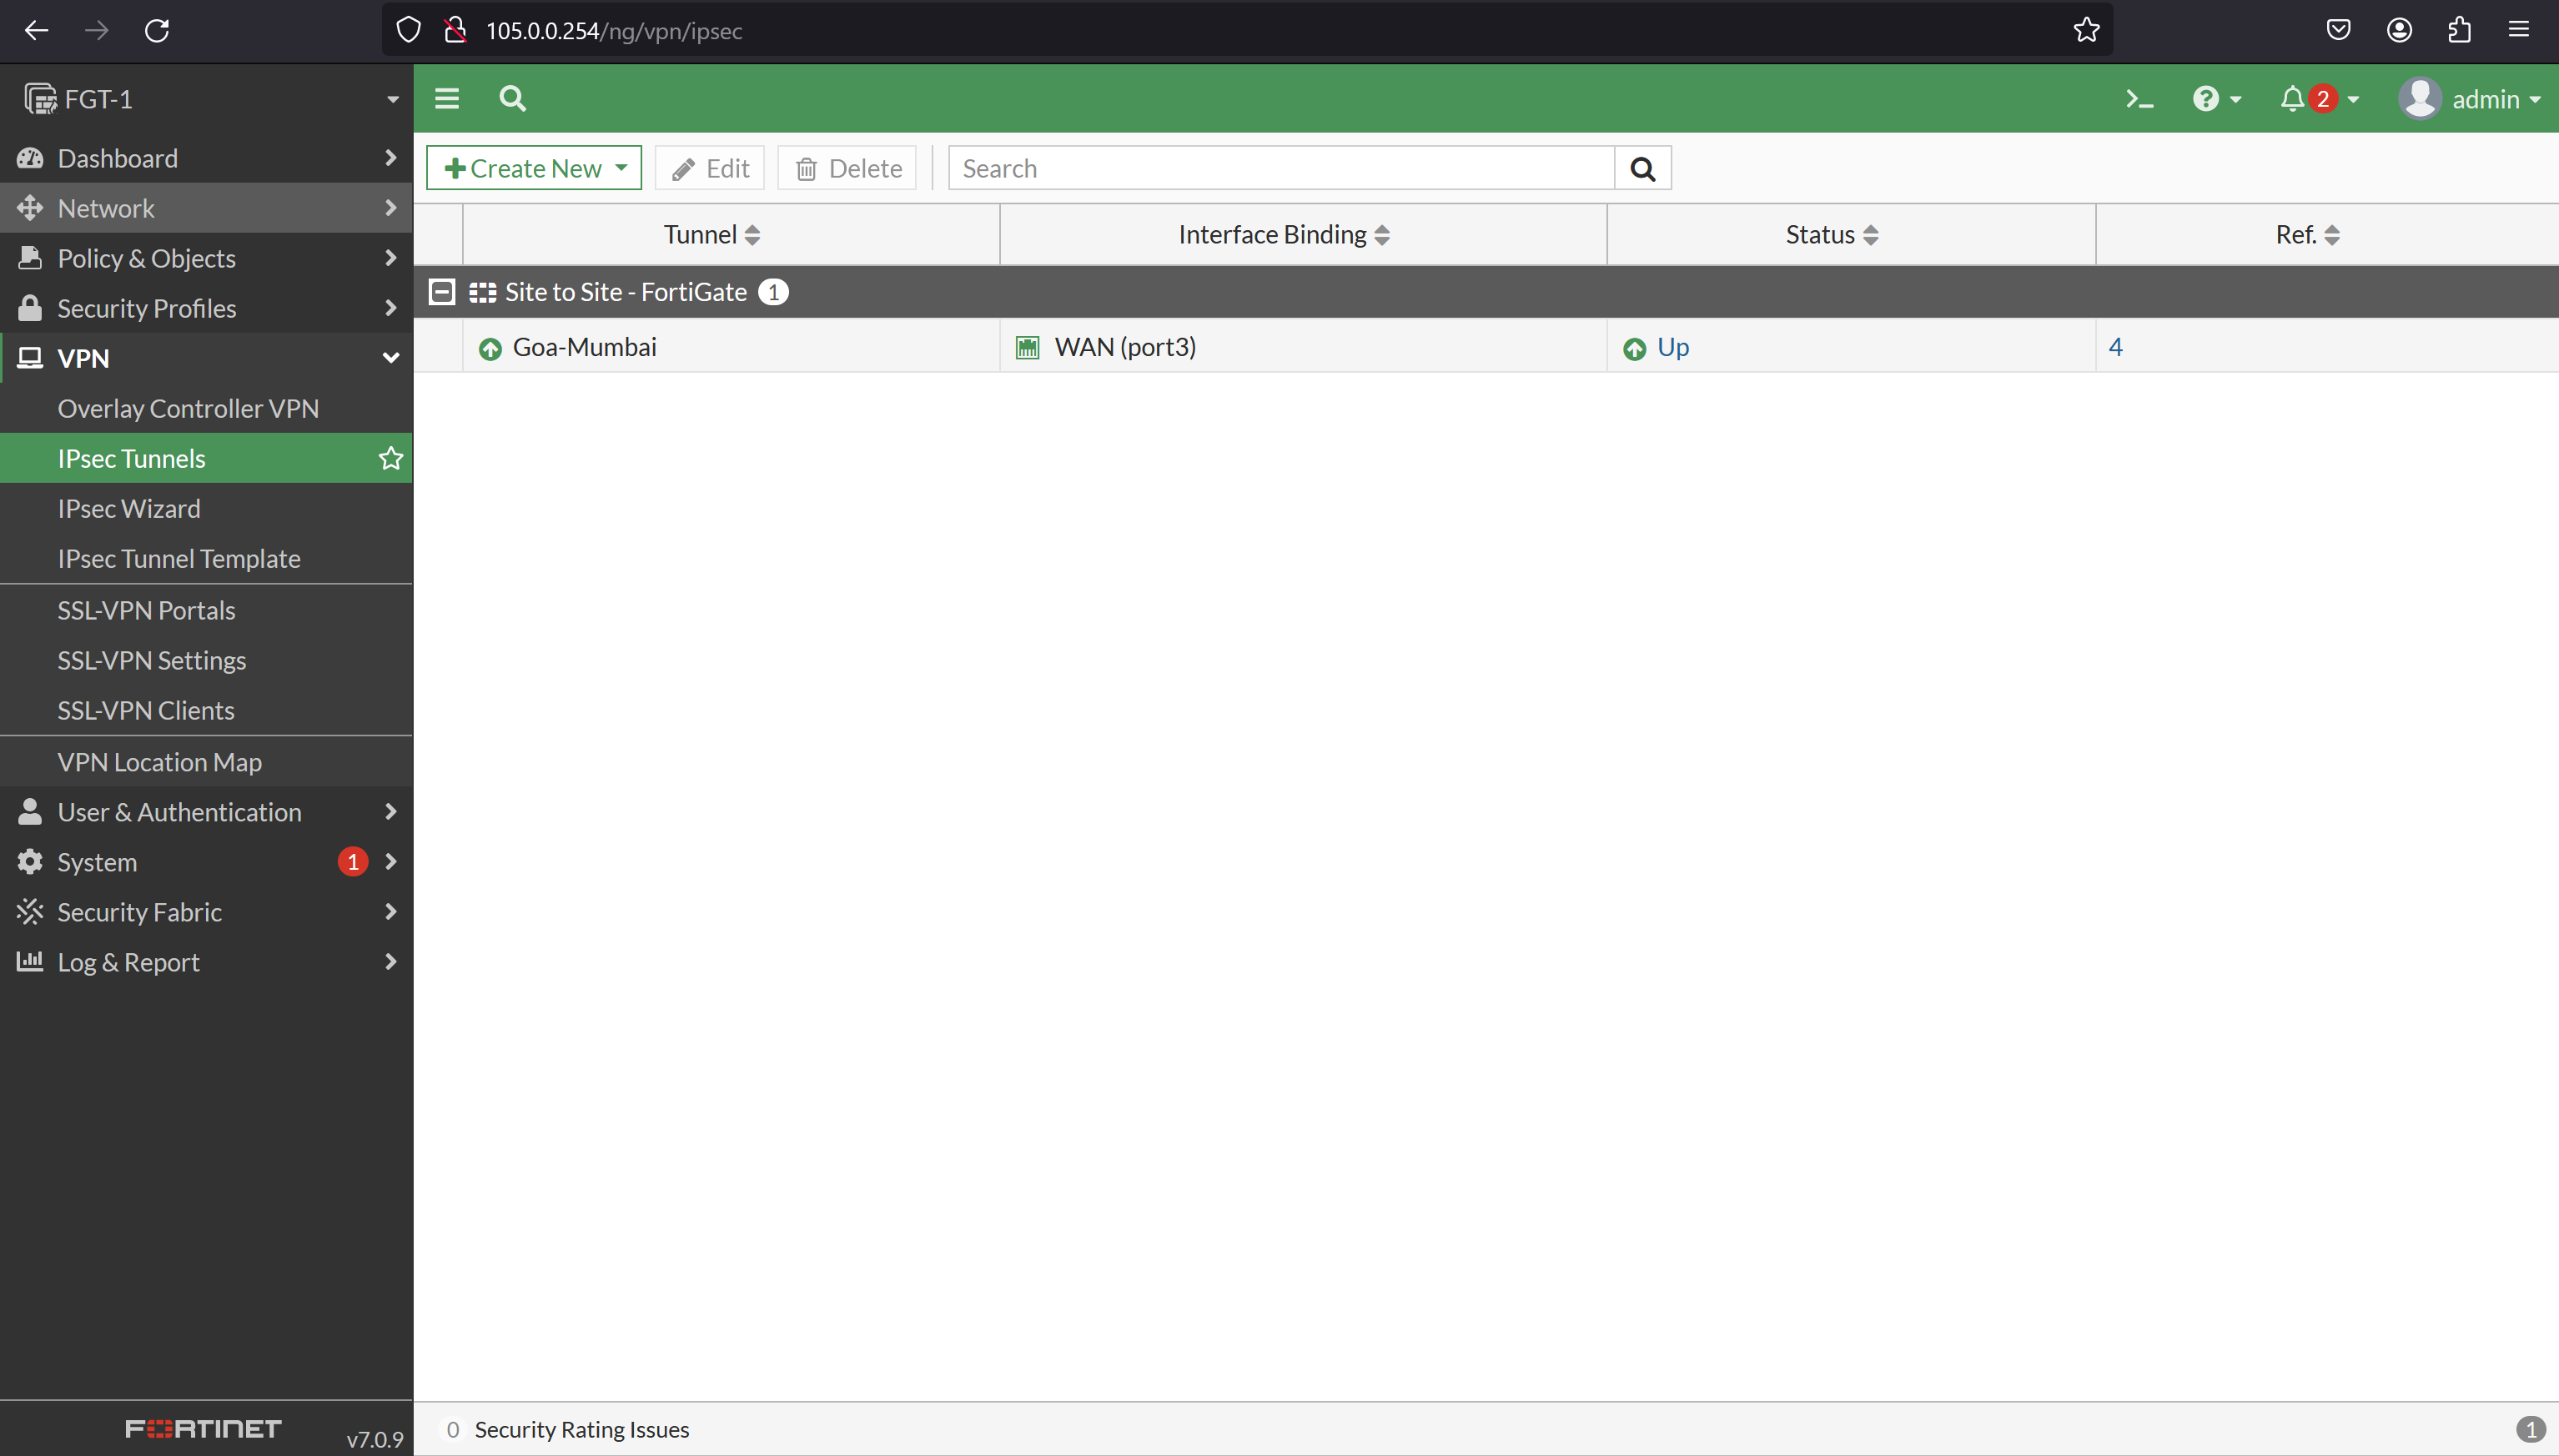
Automatically Policy added: to allowing traffic from two different sites.
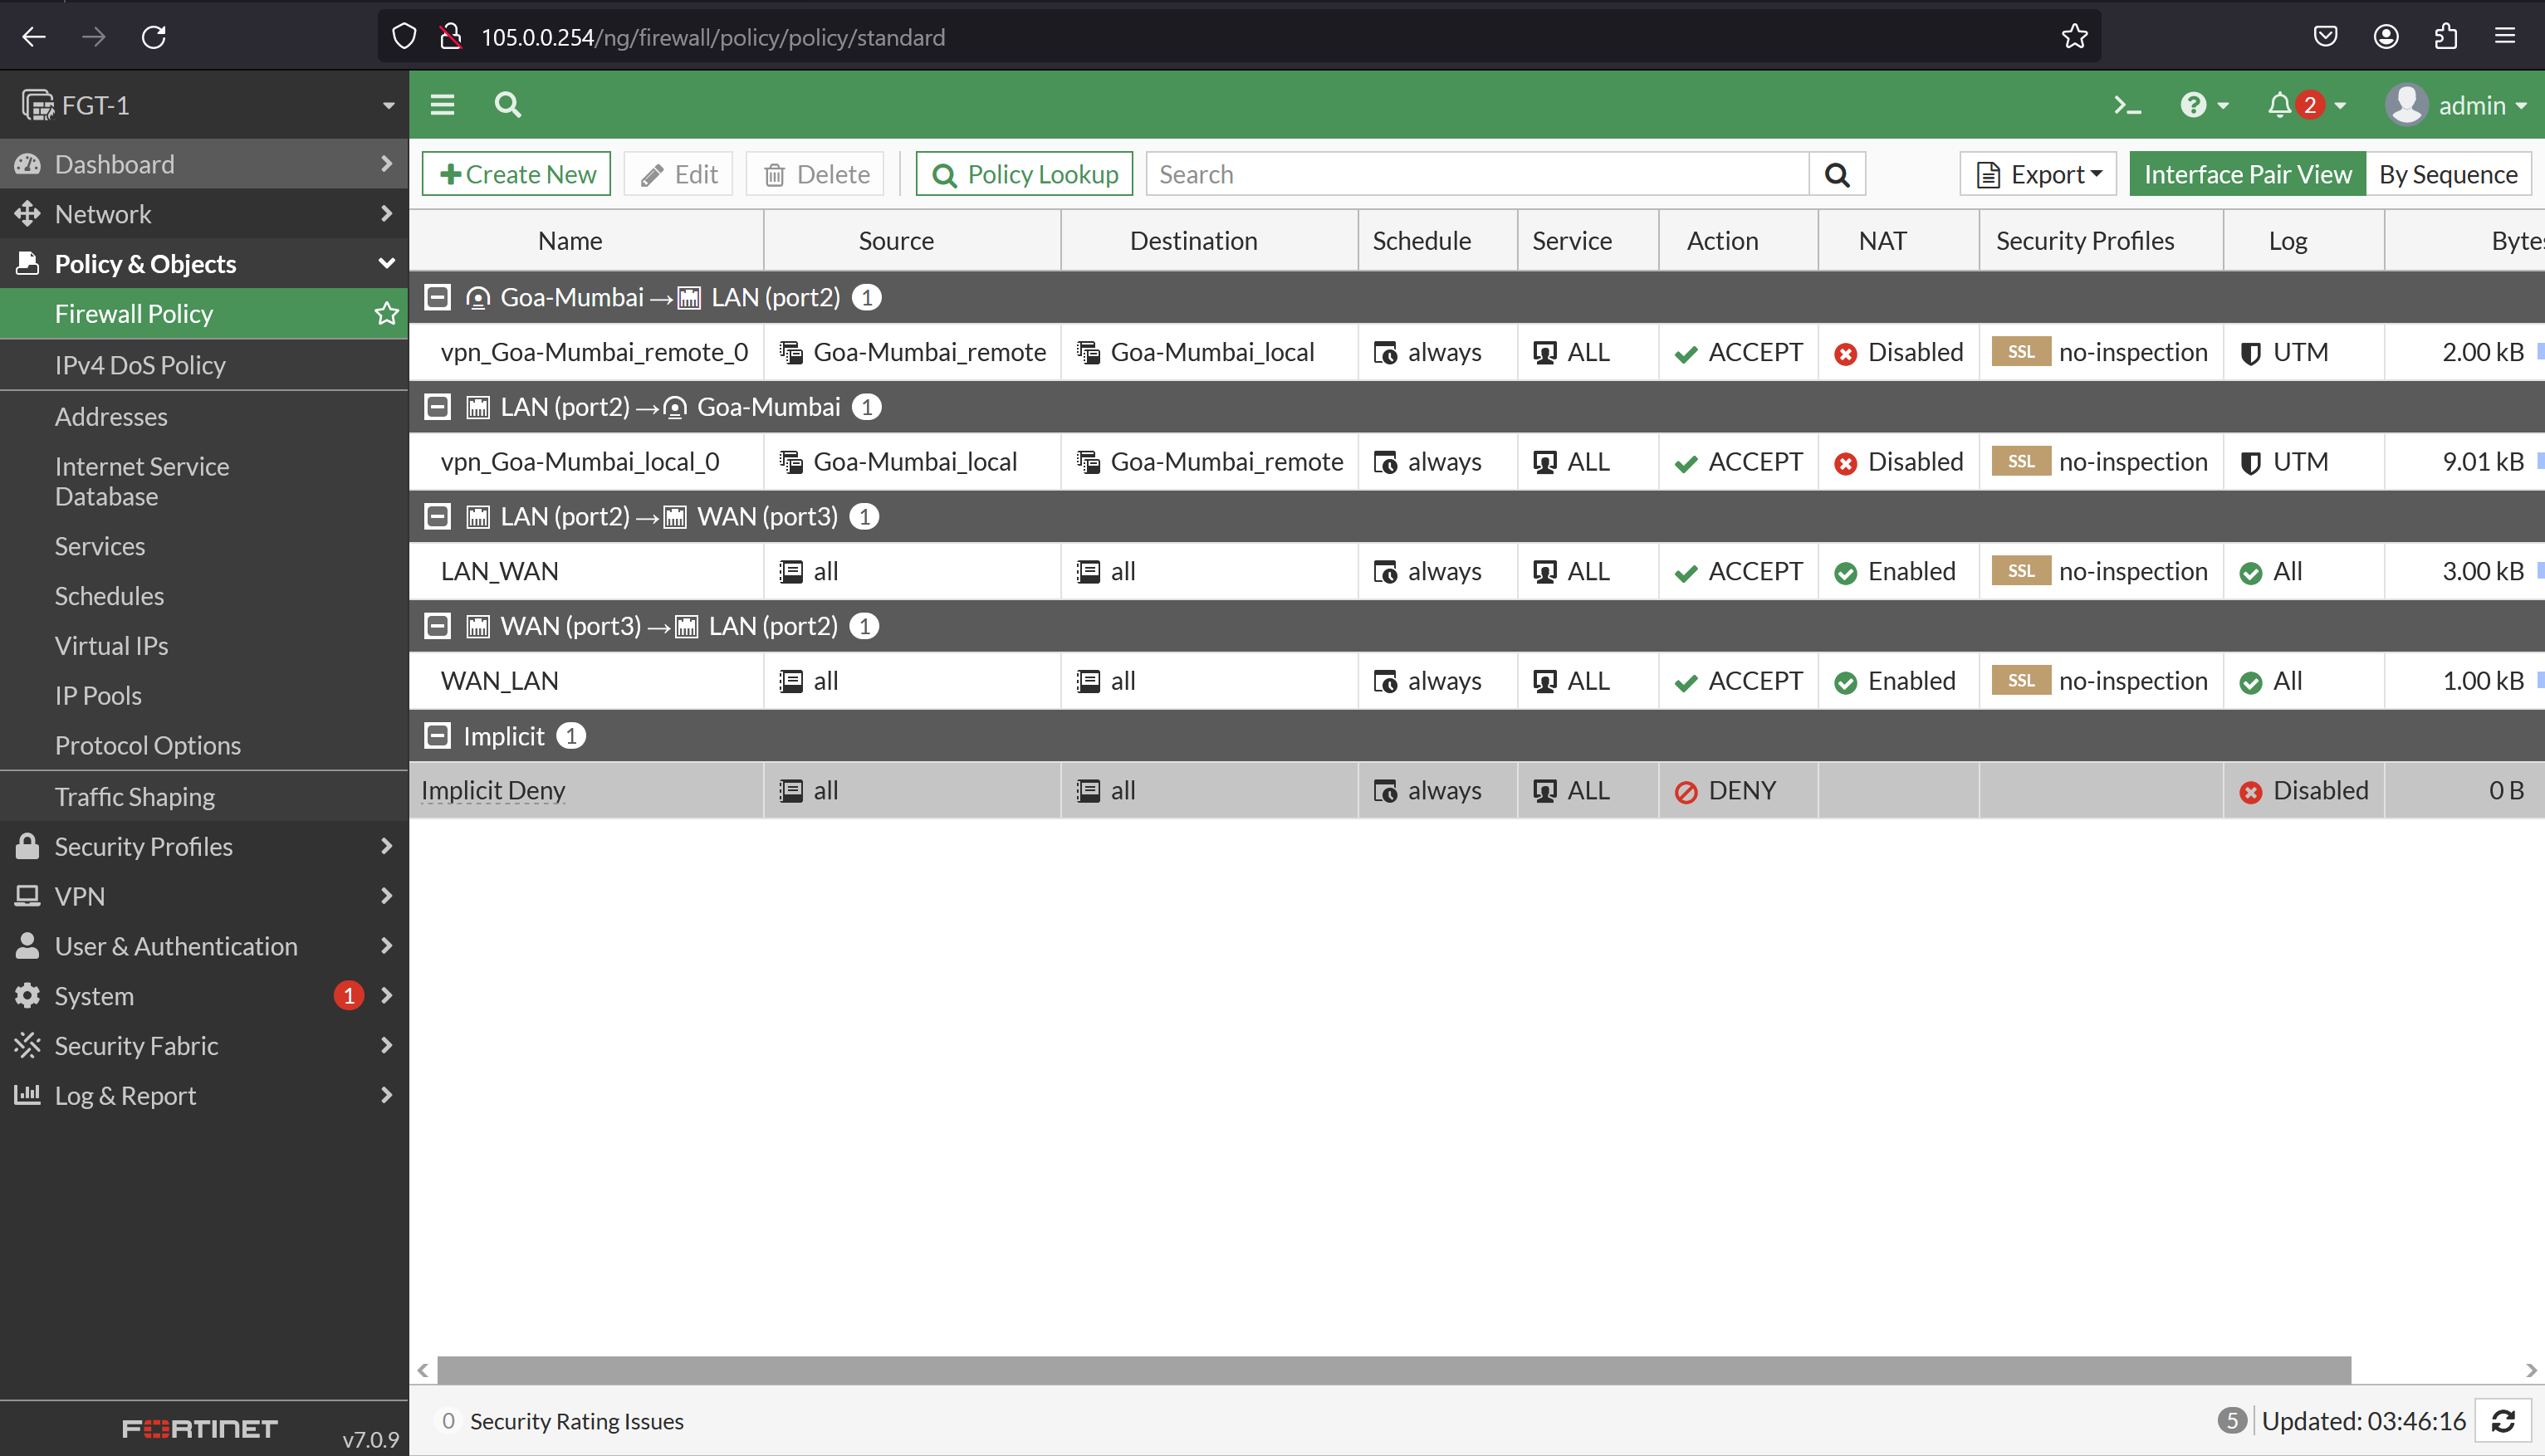
Static Routes between two Tunnel:
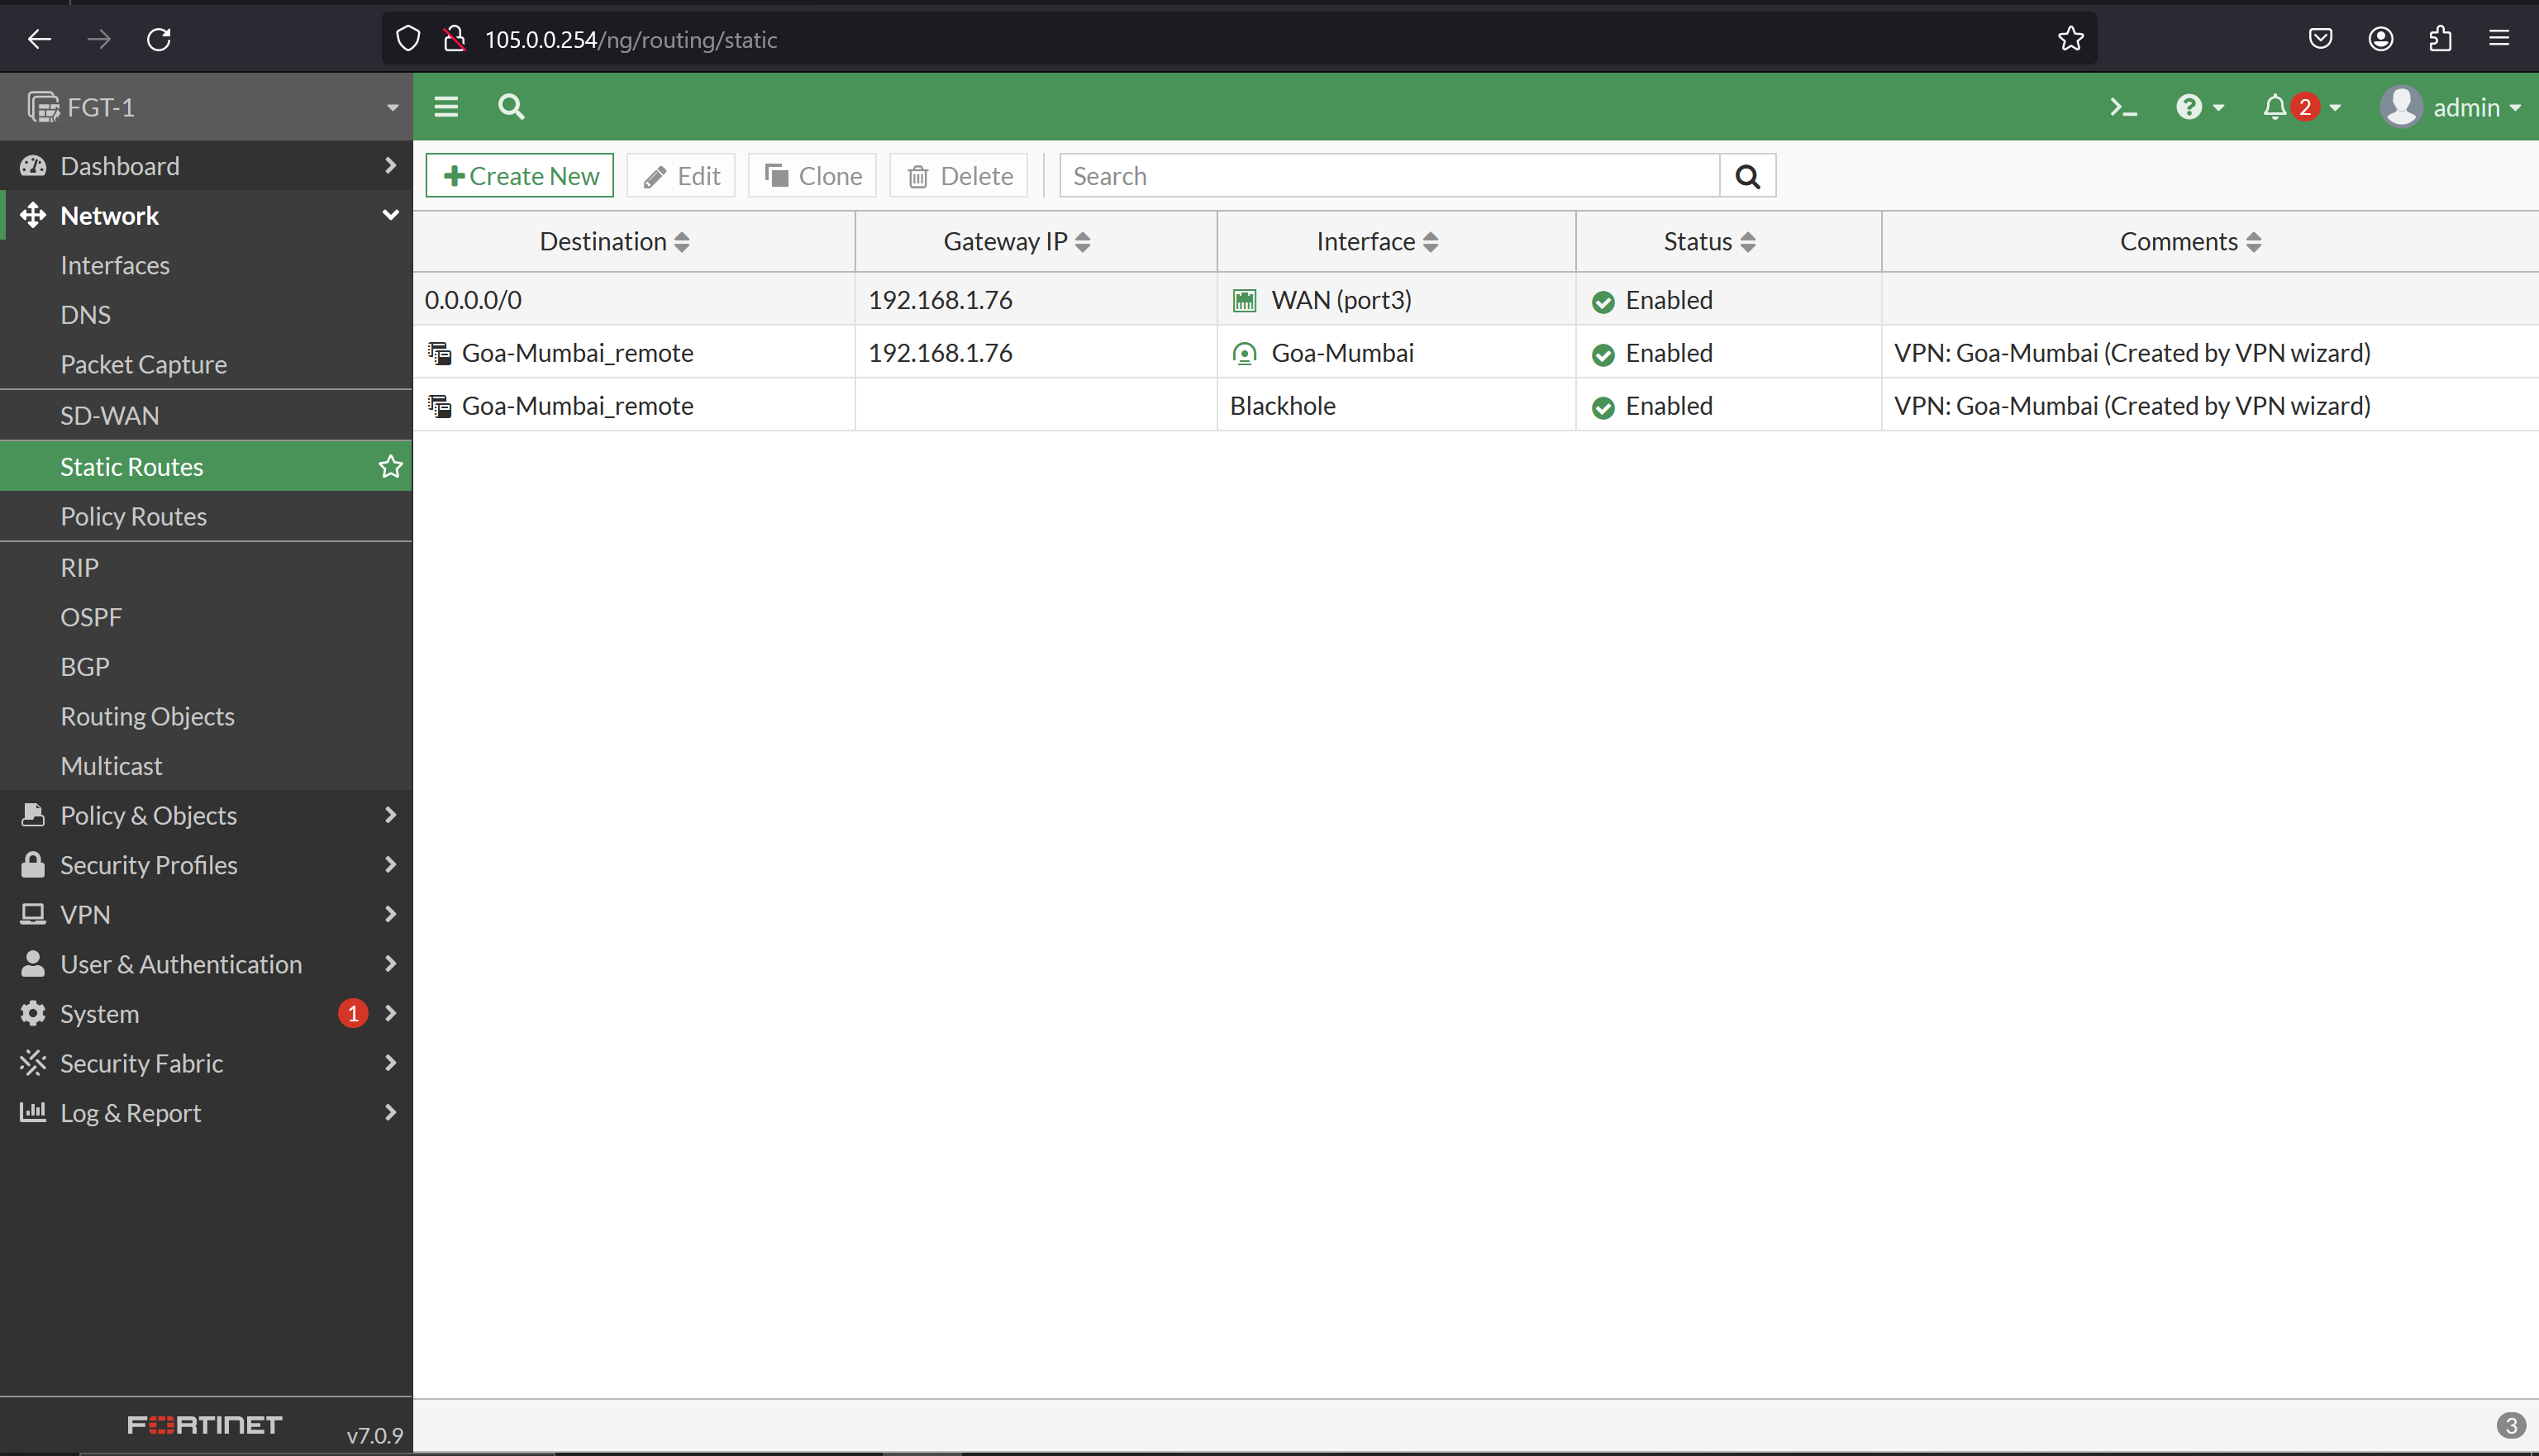
To Monitoring the VPN Tunnel traffic and User actions:
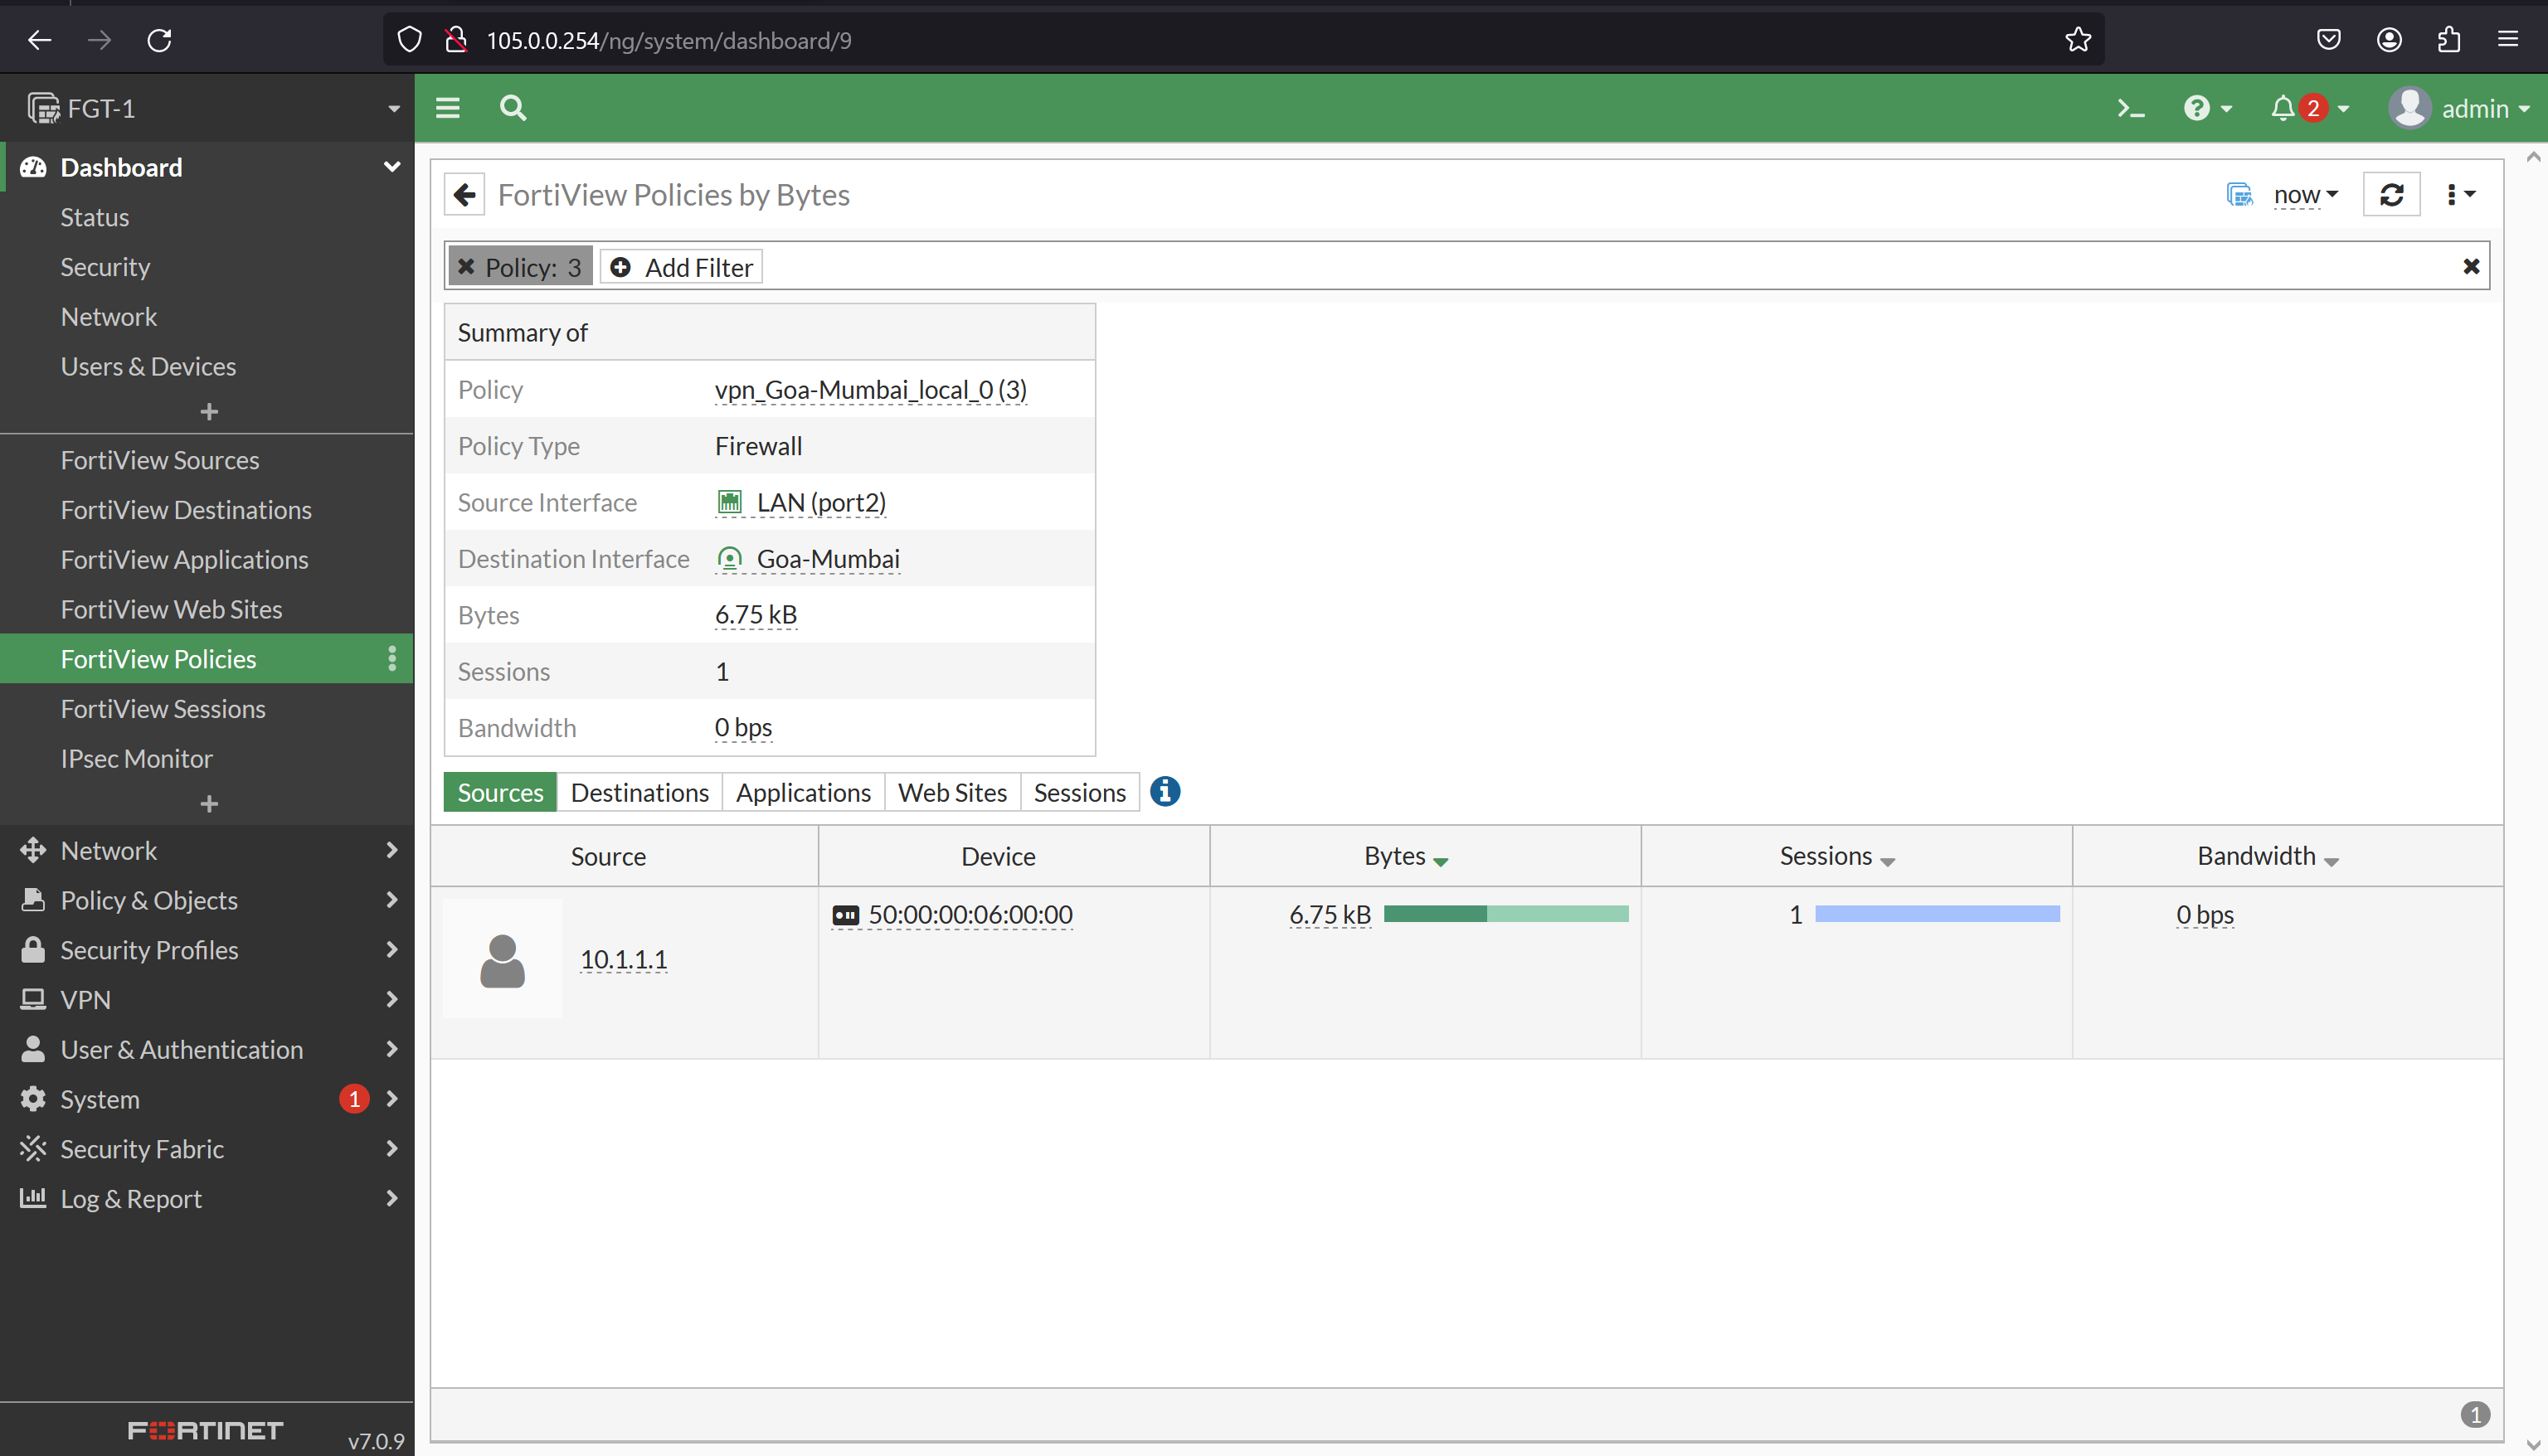
Summary:
- Covers the architecture of IPsec, detailing its components and protocols for securing internet communications.
- Explains IKE Phase 1 & 2, which are crucial for establishing and managing secure VPN connections between peers.
- Provides a step-by-step guide on configuring IPsec VPN between FortiGate firewalls, ensuring secure communication channels between networks or devices.
This module equips administrators with essential knowledge and practical skills for setting up IPsec VPNs using FortiGate firewalls, enhancing network security, and enabling secure communication over the internet.
Congratulations 🎁🎁✨ Now You Guys Have the Knowledge of:
- Module 1: Introduction to FortiGate Firewall: Provided an overview of FortiGate firewall features, platform design, CLI access, management GUI access, and administration profiles.
- Module 2: Interface Configurations & Firewall Policies: Covered basic interface configurations, routing configurations, DHCP setup, firewall policies, and Network Address Translation (NAT).
- Module 3: High Availability: Explored high availability concepts including active-standby and active-active failover setups.
- Module 4: Firewall Authentication: Discussed user and policy creation, authentication policies, and user monitoring, including captive portal setups.
- Module 5: Security Profiles: Detailed security profiles such as application control, web filtering, antivirus, intrusion prevention, and SSL/SSH inspection to enforce security policies.
- Module 6: Logging and Monitoring: Covered log severity levels, log types, log structures, configuring log settings, and redirecting logs to external systems like Syslog and SNMP.
- Module 7: Basic IPSEC VPN: Provided an understanding of IPsec architecture, IKE Phase 1 & 2, and practical guidance on configuring IPsec VPNs between FortiGate firewalls.
By completing these modules, you’ve gained a comprehensive understanding of FortiGate firewall functionalities, security features, high availability configurations, authentication mechanisms, logging and monitoring practices, and VPN setups. You’re now well-equipped to manage and secure network environments effectively using FortiGate firewall solutions. Great job!
Creator 🔝
(https://github.com/hegdepavankumar). Created by:-
 @hegdepavankumar |
Show some ❤️ by starring some of the repositories!
If you like what I do, maybe consider buying me a coffee 🥺👉👈

